介绍一个关于小米Zigbee的开源项目
AqaraHub
说明:这个是一个开源项目,有兴趣的可以看一下。
项目名称: Frans-Willem/AqaraHub:
github连接:https://github.com/Frans-Willem/AqaraHub.git
项目介绍:
这是一个为小米Aqara zigbee设备开源的Zigbee网关。它的目标是取代不需要与外部服务器通信的小米网关,并使用更理智的通信选项(例如MQTT)。虽然这个项目是专门为小米Aqara设备,其他Zigbee设备也很可能工作。
一)移植须知
- GGC5及以上版本的编译器,Clang 3.4及以上版本
- 该项目大量使用了Boost c++库、Adobe Software Technology Lab并发库(以下简称“STLab-libraries”)、Takatoshi Kondo's excellent mqtt_cpp库以及The Art of C++ / JSON 库。
二) 编译过程
2.1 编译Boost库
下载连接https://www.boost.org/,下载一个最新的boost库。然后编译。
编译过程可以参考网址:http://www.mamicode.com/info-detail-2301177.html
解压:
tar -zxvf boost_1_69_0.tar.gz
配置:
./bootstrap.sh --with-libraries=all --with-toolset=gcc
编译:
sudo ./b2 install --build-type=complete threading=multi
如果一切顺利,你就编译和安装boost成功了。
2.2 编译AqaraHub
下载AqaraHub源码:
git clone https://github.com/Frans-Willem/AqaraHub.git
下载除boost以外的其他用到的库:
git submodule update --init --recursive
cmake 3步走:
mkdir build && cd build
cmake ..
make
说明:只要make没有报错,那么就一直等就行了,编译main.o的时候会很慢。我看了20分钟都没有反应,放在没管。第二天看的时候,编译成功了。
2.3 在Pc 的Linux上装一个mqtt服务。
1. 引入mosquitto仓库并更新
sudo apt-add-repository ppa:mosquitto-dev/mosquitto-ppa sudo apt-get update
sudo apt-get update
2. 执行以下命令安装mosquitto包
sudo apt-get install mosquitto
3. 安装mosquitto开发包
sudo apt-get install mosquitto-dev
4. 安装mosquitto客户端
sudo apt-get install mosquitto-clients
5.查询mosquitto是否正确运行
sudo service mosquitto status
6. 本机测试
打开一个终端,执行以下命令订阅主题"mqtt"
mosquitto_sub -h localhost -t "mqtt" -v
打开另外一个终端,发布消息到主题 “mqtt”
mosquitto_pub -h localhost -t "mqtt" -m "Hello MQTT"
现在你会看到消息被显示在前一个终端上了。
7. 网络测试(test.mosquitto.org)
通过以下命令,可以定于到官放所有测试的mqtt信息,当然你发布的信息别人也能订阅到
mosquitto_sub -h test.mosquitto.org -t "#" -v
也可以在官方mqtt服务下发布自己专属的信息 mosquitto_sub -h test.mosquitto.org -t "myxyz123" -v
订阅自己的信息 mosquitto_pub -h test.mosquitto.org -t "myxyz123" -m "hello mqtt"
注意:如果你安装时报错
$ sudo apt-get install mosquitto

The following packages have unmet dependencies:
 mosquitto : Depends: libwebsockets8 (>= 1.6.0) but it is not installable
E: Unable to correct problems, you have held broken packages.
那么你需要更新你的websockets8。更新步骤如下:
参考网站:https://launchpad.net/ubuntu/+source/libwebsockets/
这个是ubuntu上关于websockets的包
libwebsockets package in Ubuntu
libwebsockets-dev: lightweight C websockets library - development files
libwebsockets-test-server: lightweight C websockets library - test servers
libwebsockets-test-server-common: lightweight C websockets library - test servers data
libwebsockets-test-server-dbgsym: debug symbols for libwebsockets-test-server
libwebsockets8: lightweight C websockets library
libwebsockets8-dbgsym: debug symbols for libwebsockets8
This package has 1 new bug and 0 open questions.


这个是ubuntu的更新源
sudo vi /etc/apt/source.list
deb http://cn.archive.ubuntu.com/ubuntu bionic main restricted universe multiverse
deb http://cn.archive.ubuntu.com/ubuntu bionic-security main restricted universe multiverse
deb [arch=amd64] https://download.docker.com/linux/ubuntu bionic stable
deb-src [arch=amd64] https://download.docker.com/linux/ubuntu bionic stable
deb http://cn.archive.ubuntu.com/ubuntu bionic-updates main restricted universe multiverse
更新一下
sudo apt-get install libwebsockets-dev
sudo apt-get install libwebsockets-test-server
sudo apt-get install libwebsockets-test-server-common
sudo apt-get install libwebsockets8
到这个里mosquitt应该装完了。如果还不行,自己百度解决吧。
到此,我们安装好了boost, AqaraHub 和mosquitt三个东西。
三) 调试运行
3.1 需要准备
一个串行的模块:
一个编程器:
一个mqtt服务器
一个或多个小米Aqara设备
四)烧写固件
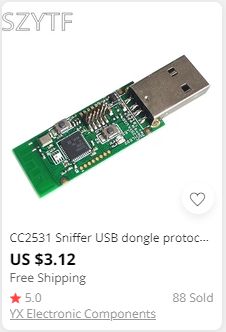
Zigbee板子需要运行Koenkk运行过的Z-Stack的固件。你可以使用CC-Tool工具来烧写你的板子。你可以按照以下步骤来下载工具和烧录。
git clone https://github.com/dashesy/cc-tool.git

cd cc-tool

./configure

make

wget https://github.com/Koenkk/Z-Stack-firmware/raw/master/coordinator/CC2531/bin/CC2531ZNP-Prod_20190223.zip
unzip CC2531ZNP-Prod_20190223.zip
sudo ./cc-tool -e -w CC2531ZNP-Prod.hex
当你烧录完成之后,从您的计算机上断开板子和编程器,断开调试电缆,将板子插回计算机。一旦绿灯熄灭,适配器应准备好供AqaraHub使用。
五)运行AqaraHub
运行AqaraHub相对简单。只需指示它到USB适配器使用的串行端口、要连接的MQTT服务器以及发布所有接收信息的主题:
./AqaraHub --port /dev/ttyACM0 --mqtt mqtt://ArchServer/ --topic AqaraHub六)与小米Aqara zigbee设置配对
首先启动CC2531不知道你的小米zigbee设备。您必须通过手动激活配对模式来对它们进行配对。通过MQTT发送一个数字,例如60,到AqaraHub/write/permitjoin主题:
mosquitto_pub -h ArchServer -t AqaraHub/write/permitjoin -m 60AqaraHub应该在AqaraHub/report/permitjoin主题上使用相同的数字进行响应,此时您有60秒的时间(取决于您发送的内容)来对设备进行配对。一旦60秒过去,您将收到另一条内容为“0”的消息到AqaraHub/report/permitjoin。
配对一个温度或门传感器应该通过把一个回形针插入小洞,并保持它的压力,直到LED开始闪烁蓝色。配对信息保存在CC2531中。
这些就是这个项目Github的README,我抄过来的。最好自己去看一下原文。

