Linux(64位)交叉编译 树莓派4(32位)驱动
1. 查看系统
查看系统信息: uname -a
查看系统位数:getconf WORD_BIT 或者 getconf LONG_BIT 或者 file /bin/ls
1.1 树莓派信息为: 32位
1.1.1 Linux raspberrypi 4.19.97-v7l+ #1294 SMP Thu Jan 30 13:21:14 GMT 2020 armv7l GNU/Linux
1.1.2 ELF 32-bit LSB executable, ARM, EABI5 version 1 (SYSV)
1.2 Linux系统信息为:64位
1.2.1 Linux dta14-04 4.4.0-146-generic #172~14.04.1-Ubuntu SMP Fri Apr 5 16:51:29 UTC 2019 x86_64 x86_64 x86_64 GNU/Linux
2. 下载树莓派内核代码
2.1 笔者所用树莓派版本为4.19.97,所以就按如下方式下载,以为4.19.**版本通用。
git clone -b rpi-4.19.y https://github.com/raspberrypi/linux.git RpiLinux2.2 之后编译内核驱动hello.ko,使用insmod hello.ko的时候报错,信息如下:
insmod: ERROR: could not insert module hello.ko: Invalid module format
2.3 这个错误的主要原因可能就是内核版本不对,内核版本最好与树莓派完全一致。
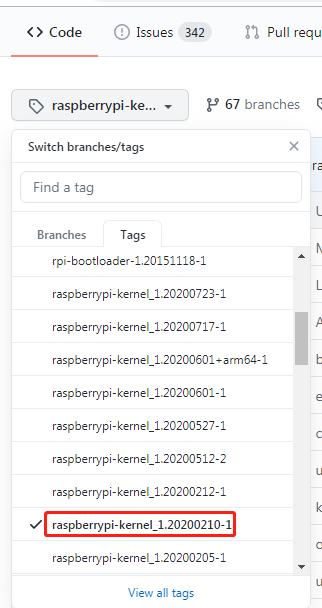
实际上从Makefile文件上面能看出版本信息,github上另外一个标签tags里的红框部分与笔者所用的树莓派一致(raspberrypi-kernel_1.20200210-1/raspberrypi-kernel_1.20200212-1)。下载其中的tar.gz包解压到RpiLinux目录中即可。

3. 下载交叉编译工具
git clone https://github.com/raspberrypi/tools.git RpiTools4. 文件路径
4.1 交叉编译工具路径:/home/dta14-04/code/raspi/RpiTools
4.2 内核代码路径:/home/dta14-04/code/raspi/RpiLinux
5. 设置默认编译器gcc路径
笔者在用户目录下的.bashrc文件中追加:
export PATH=$PATH:/home/dta14-04/code/raspi/RpiTools/arm-bcm2708/arm-rpi-4.9.3-linux-gnueabihf/bin
上面的目录路径,要根据自己内核代码和编译工具的实际路径来确定的。
更新:source ~/.bashrc
测试是否加入:arm-linux-gnueabihf-gcc -v
6. 编译内核代码
终端切换到RpiLinux目录中(切记,这里的内核代码要与树莓派内核代码版本一致),笔者使用的内核代码是tags下raspberrypi-kernel_1.20200212-1中
下载linux-raspberrypi-kernel_1.20200212-1.tar.gz解压到RpiLinux中的。
6.0 先清理一下
make distclean6.1 pi4 选择bcm2711这个cpu的默认配置
make ARCH=arm CROSS_COMPILE=arm-linux-gnueabihf- bcm2711_defconfig6.2 修改配置,不懂,就按默认走,保存退出即可。
make ARCH=arm CROSS_COMPILE=arm-linux-gnueabihf- menuconfig6.3 开始编译,时间比较久
make ARCH=arm CROSS_COMPILE=arm-linux-gnueabihf- Image modules dtbs -j6中间找不到某些模块就安装一下。
笔者就安装了
sudo apt-get install bison
sudo apt-get install flex
6.4 另外一种编译方式:
笔者没有采用此种方式,估计此种方式比步骤6.0-6.3更好,保证了.config与树莓派的一致性。
首先树莓派端通过sudo modprobe configs指令,会在/proc/目录下生成config.gz文件,将其复制到ubuntu端下载好的树莓派kernel目录下面,执行指令zcat config.gz > .config
依次执行KERNEL=kernel7
make ARCH=arm CROSS_COMPILE=arm-linux-gnueabihf- zImage modules dtbs 可以加入-jn加快编译速度,我这台**-j8**实验成功
7. 简单的驱动模块
7.1 在/home/dta14-04/code/raspi/中,创建了一个hello.c的文件。内容如下
#include
#include
#include

MODULE_LICENSE("Dual BSD/GPL");

static int hello_init(void)
{
    printk(KERN_ALERT"Hello, world\n");
    return 0;
}

static void hello_exit(void)
{
    printk(KERN_ALERT"Goodbye, cruel world\n");
}

module_init(hello_init);
module_exit(hello_exit);
7.2 在/home/dta14-04/code/raspi/中,创建一个Makefile文件。内容如下:
ifneq ($(KERNELRELEASE),)

obj-m := hello.o

else

KDIR := /home/dta14-04/code/raspi/RpiLinux/
all:
	make -C $(KDIR) M=$(PWD) modules ARCH=arm CROSS_COMPILE=/home/dta14-04/code/raspi/RpiTools/arm-bcm2708/arm-rpi-4.9.3-linux-gnueabihf/bin/arm-linux-gnueabihf-

clean:
	rm -f *.ko *.o *.mod.o *.mod.c *.symvers  modul*

endif
切记,上面的目录路径,要根据自己的实际情况配置。
7.3 执行: make
7.4 复制pc端编译好的hello.ko 到树莓派
7.5 树莓派端:进入刚才的ko文件目录,执行指令sudo insmod hello.ko
7.6 树莓派端:执行指令: dmesg,可以看到打印信息

8. 常用的启动命令
按装模块:sudo insmod hello.ko
移除模块:sudo rmmod hello.ko
查看模块列表:lsmod
查看模块信息:modinfo hello.ko
9. 树莓派内核版本和内核代码版本
笔者树莓派版本:4.19.97-v7l+
但是编译出来的hello.ko 版本:4.19.97-v7l

笔者在文中几次强调内核代码的版本和树莓派内核版本一致,但实际上编译出来还是有点差别。
笔者这里编译出来的驱动在树莓派中能用,对于其他类似情况是否一样,不清楚。
10. 参考
https://blog.csdn.net/lightsp/article/details/54708357
https://blog.csdn.net/xzpxzp42/article/details/106003001
https://blog.csdn.net/li84006800/article/details/103958869?utm_medium=distribute.pc_relevant.none-task-blog-baidujs-5&spm=1001.2101.3001.4242