基于NVIDIA TX2的串口(UART1_J17)通讯
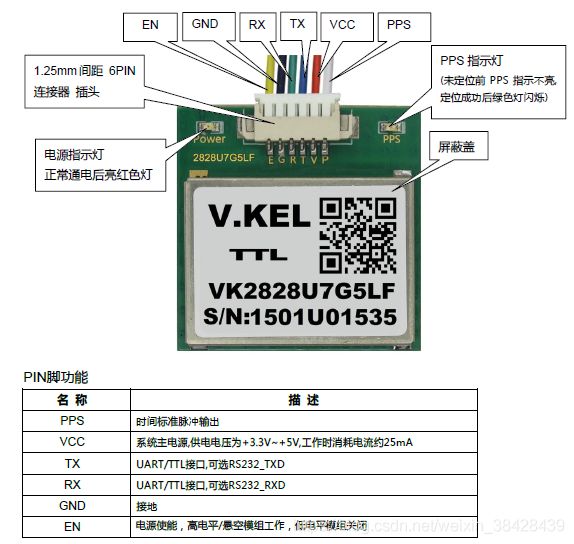
本文所讲述的是基于NVIDIA TX2的串口通讯,通讯的设备为NVIDIA TX2和GPS信号接收芯片模块。如下图所示是该芯片的示意图:
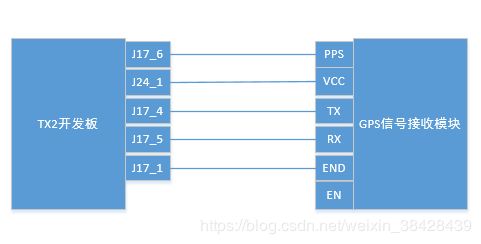
1、首先先画出该GPS信号接收芯片与TX2开发板的连接示意图,如下图所示:
切记,J17_1表示J17模块的1接口,表示接地;因此J17模块的引脚从上往下依次是6-1接口,千万不要接反了!!!
2、接下来就是串口通讯,直接上代码。
2.1采用Linux的可函数进行串口通讯
#include
#include
#include
#include
#include
#include
#include
#include
#include
#include
#include "fun.h"

#define      TRUE   1
#define      FALSE  0


int speed_arr[] = { B38400, B19200, B9600, B4800, B2400, B1200, B300,   //波特率设计
	    B38400, B19200, B9600, B4800, B2400, B1200, B300, };
int name_arr[] = {38400,  19200,  9600,  4800,  2400,  1200,  300,
	    38400,  19200,  9600, 4800, 2400, 1200,  300, };

char *freq[]={                              //改变GPS芯片的接受数据模式(可以不用在意)
 "B5 62 06 08 06 00 20 4E 01 00 01 00 84 00 B5 62 06 08 00 00 0E 30",
"B5 62 06 08 06 00 10 27 01 00 01 00 4D DD B5 62 06 08 00 00 0E 30",
"B5 62 06 08 06 00 88 13 01 00 01 00 B1 49 B5 62 06 08 00 00 0E 30",
"B5 62 06 08 06 00 B8 0B 01 00 01 00 D9 41 B5 62 06 08 00 00 0E 30",
"B5 62 06 08 06 00 E8 03 01 00 01 00 01 39",
"B5 62 06 08 06 00 C8 00 01 00 01 00 DE 6A B5 62 06 08 00 00 0E 30",
"B5 62 06 08 06 00 64 00 01 00 01 00 7A 12 B5 62 06 08 00 00 0E 30",
};
char *GPL[]={                            //改变GPS芯片的接受数据模式(可以不用在意)
"B5 62 06 09 0D 00 FF FF 00 00 00 00 00 00 FF FF 00 00 07 1F 9E",
"B5 62 06 3E 24 00 00 00 16 04 00 04 FF 00 00 00 00 00 01 01 03 00 00 00 00 00 05 00 03 00 00 00 00 00 06 08 FF 00 01 00 00 00 A0 D9 B5 62 06 3E 00 00 42 D2",

};

void set_speed(int fd, int speed)           //设定波特率的速度
{
  int   i;
  int   status;
  struct termios   Opt;
  tcgetattr(fd, &Opt);


  for ( i= 0;  i < sizeof(speed_arr) / sizeof(int);  i++)
   {
   	if  (speed == name_arr[i])
   	{
   	    tcflush(fd, TCIOFLUSH);                  //刷新缓存
    	cfsetispeed(&Opt, speed_arr[i]);         //设定输入波特率
    	cfsetospeed(&Opt, speed_arr[i]);         //设定输出波特率
    	status = tcsetattr(fd, TCSANOW, &Opt);
    	if  (status != 0)
            perror("tcsetattr fd1");
     	return;
     	}
   tcflush(fd,TCIOFLUSH);
   }
}

int set_Parity(int fd,int databits,int stopbits,int parity)  //数据个数和奇偶校验位设置
{
	struct termios options;
 if  ( tcgetattr( fd,&options)  !=  0)
  {
  	perror("SetupSerial 1");
  	return(FALSE);
  }
  options.c_cflag &= ~CSIZE;
  switch (databits)
  {
  	case 7:
  		options.c_cflag |= CS7;
  		break;
  	case 8:
		options.c_cflag |= CS8;
		break;
	default:
		fprintf(stderr,"Unsupported data size\n");
		return (FALSE);
	}
  switch (parity)
  	{
  	case 'n':
	case 'N':
		options.c_cflag &= ~PARENB;   /* Clear parity enable */
		options.c_iflag &= ~INPCK;     /* Enable parity checking */
		break;
	case 'o':
	case 'O':
		options.c_cflag |= (PARODD | PARENB);
		options.c_iflag |= INPCK;             /* Disnable parity checking */
		break;
	case 'e':
	case 'E':
		options.c_cflag |= PARENB;     /* Enable parity */
		options.c_cflag &= ~PARODD;
		options.c_iflag |= INPCK;       /* Disnable parity checking */
		break;
	case 'S':
	case 's':  /*as no parity*/
		options.c_cflag &= ~PARENB;
		options.c_cflag &= ~CSTOPB;
		break;
	default:
		fprintf(stderr,"Unsupported parity\n");
		return (FALSE);
		}

  	switch (stopbits)
  	{
  	case 1:
  		options.c_cflag &= ~CSTOPB;
		break;
	case 2:
		options.c_cflag |= CSTOPB;
		break;
	default:
		fprintf(stderr,"Unsupported stop bits\n");
		return (FALSE);
	}
  	/* Set input parity option */
  	if (parity != 'n')
  		options.c_iflag |= INPCK;
    	options.c_cc[VTIME] = 15; // 1.5 seconds
    	options.c_cc[VMIN] = 1;

  	tcflush(fd,TCIFLUSH); /* Update the options and do it NOW */
  	if (tcsetattr(fd,TCSANOW,&options) != 0)
  	{
  		perror("SetupSerial 3");
		return (FALSE);
	}
  	return (TRUE);
}

int OpenDev(char *Dev)
{
	int	fd = open( Dev, O_RDWR );         //| O_NOCTTY | O_NDELAY    打开UART1串口
	if (-1 == fd)
	{

		perror("Can't Open Serial Port");
		return -1;
	}
	else
		return fd;
}
/*
*@breif 	main()
*/
int main(int argc, char *argv[])
{
	int fd,res;
	FILE *fd1;
	int count=0,sum=0;
        long int length;
	int nread;
	long int nwrite;
	char buff[1024];
	char *dev ="/dev/ttyTHS2";                   //J17串口模块的设备描述符

        char *p=GPL[1];

	struct timespec	time_out;


	fd = OpenDev(dev);

	if (fd>0)
		 set_speed(fd,9600);
	else
	{
		perror("Can't Open Serial Port!");
		exit(0);
	}
  	if (set_Parity(fd,8,1,'N')== FALSE)
  	{
    		perror("Set Parity Error\n");
    		exit(1);
  	}
/*************************************************************************/
	if(argc>1)                                  //个人需求的一些设置,不用在意
	{
	int flag=atoi(argv[1]);
	switch(flag)
	{
	case 1:{
		length=strlen(p);
		if((nwrite = write(fd,p,length))==length)
		{
		printf("%s\n %ld\n %ld\n",p,nwrite,length);
		printf("write successfully***********\n");
		}
		else
		perror("write error!");
		}
		break;
	case 2:{
		p=freq[6];
		length=strlen(p);
		if((nwrite = write(fd,p,length))==length)
		{
		printf("%s\n %ld\n %ld\n",p,nwrite,length);
		printf("write successfully***********\n");
		}
		else
		perror("write error!");
		}
		break;
	default:printf("please choose 1 or 2\n");break;
	}
	}
	else
	printf("you should choose mode\n");
/*****************************************************************/
	fd1=fopen("/home/nvidia/gpsdata.txt","w");     //个人需求的一些设置,不用在意
	if(fd1 == NULL)
		perror("create file fail");

	if(res=setvbuf(fd1,NULL,_IONBF,0)!=0)
		printf("setvbuf failure\n");
/*******************************************************************/
	while(1)
  	{

   		while((nread = read(fd,buff,1024))>0)         //接收区字符大于1024时输出
   		{
			if((nread>30)&&(nread<90))               //对接收信息的长度进行判断
			{
			count++;
      			buff[nread+1]='\0';
      			clock_gettime(CLOCK_REALTIME, &time_out);

			fprintf(fd1,"%ld %ld\n %s\n",
				time_out.tv_sec,time_out.tv_nsec,buff);   //打印时间

      			printf("%ld %ld\n",
				time_out.tv_sec,time_out.tv_nsec);
  				analyse(buff);


			fflush(stdout);
			sum++;
			}
			else
				break;
   	 		}
	if(count==128)                                    //只接收128次数据就停止
	{
	printf("totally %d message got\n",sum);
	fprintf(fd1,"totally %d message got\n",sum);
	fflush(stdout);
	sum=0;
	count=0;
	break;
	}
  	}
    	close(fd);
	fclose(fd1);
	printf("just list these datas\n");
    	exit(0);
}
2.2 采用ros中的函数进行串口通讯,代码如下:
#include
#include
#include   //ROS已经内置了的串口包
#include
#include

serial::Serial ser; //声明串口对象

/*
void write_callback(const std_msgs::String::ConstPtr& msg)
{
    ROS_INFO_STREAM("Writing to serial port" <data);
    ser.write(msg->data);   //发送串口数据
}
*/

int main (int argc, char** argv)
{


    //初始化节点
    ros::init(argc, argv, "uart_ros");
    //声明节点句柄
    ros::NodeHandle nh;


    //订阅主题,并配置回调函数
//    ros::Subscriber write_sub = nh.subscribe("write", 1000, write_callback);
    //发布主题
    ros::Publisher read_pub = nh.advertise("read", 1000);


try
    {
    //设置串口属性,并打开串口
        ser.setPort("/dev/ttyTHS2");
        ser.setBaudrate(9600);
        serial::Timeout to = serial::Timeout::simpleTimeout(1000);
        ser.setTimeout(to);
        ser.open();
    }
catch (serial::IOException& e)
    {
        ROS_ERROR_STREAM("Unable to open port ");
        return -1;
    }

 if(ser.isOpen())
    {
        ROS_INFO_STREAM("Serial Port initialized");
    }
    else
    {
        return -1;
    }

 ros::Rate loop_rate(50);
    while(ros::ok())
    {

        if(ser.available()){

            ROS_INFO_STREAM("Reading from serial port");
            std_msgs::String result;
            result.data = ser.read(ser.available());
            ROS_INFO_STREAM("Read:\n " << result.data);
            read_pub.publish(result);
        }

        //处理ROS的信息,比如订阅消息,并调用回调函数
        ros::spinOnce();
        loop_rate.sleep();

    }
}
3.可以看到,ros中的串口通讯非常简单,因为ros的串口通讯已经封装成函数,直接调用就行了,但CMake需要添加相关的依赖库,不用像Linux中那么麻烦需要设置许多参数;本文主要是讲解TX2开发板的串口通讯的大概架构,具体函数的使用不在讲解之内。如果有问题欢迎提问!

