如何移植ugfx流程
ugfx简介
µGFX is a lightweight embedded library for displays and touchscreens providing everything required to build a fully featured embedded GUI.
The library is very small and fast because every unused feature is disabled and not linked into the finished binary.
- Lightweight
- Modular
- Portable
- Sources 100% open
- Actively Developed
中文大概就是:轻量级,功能全,模块化,开源
移植硬件环境
主控:M451RG6AE
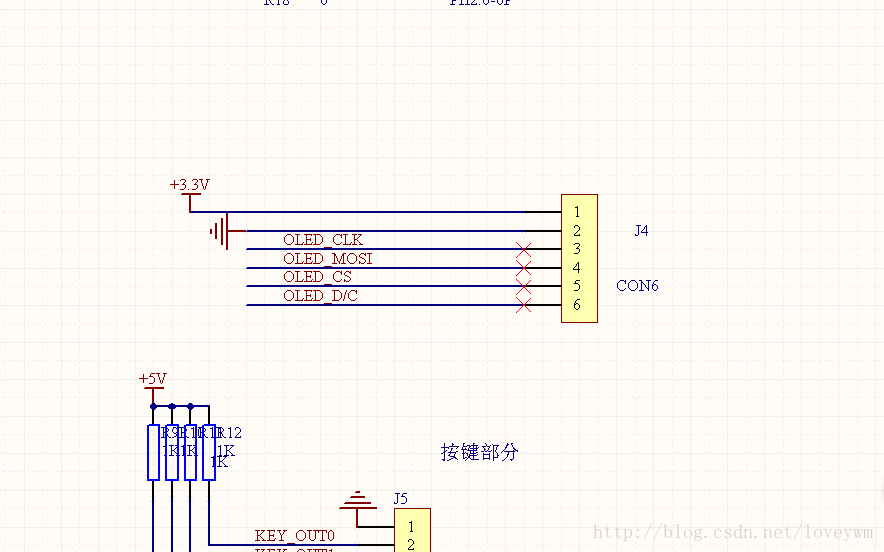
显示屏:OLED12864(SSD1306)SPI接口
*   OLED_CLK---PB4
*   OLED_MOSI---PB3
*   OLED_CS---PB2
*   OLED_D/C---PB1
系统开发环境
开发软件:CooCox CoIDE v2
编译器:GNU Tools ARM Embedded\4.7 2014q2
嵌入式RTOS:FreeRTOS8.2.1
移植步骤
第一步:完成SSD1306底层驱动
初始化函数:
void OLED_InitHard(void)写命令函数:
void OLED_WriteCmd(u8 cmd)写数据函数:
void OLED_WriteData(u8 dat)第二步:拷贝ugfx源码到工程文件。然后实现基层接口函数
ugfx也是分好几层的,基本层,绘制层,窗口层等。我们主要移植基本层和绘制层,这个两个做好之后,窗口层就是配置问题。
首先将我们要用到的源码里面ssd1306的驱动文件,拷贝出来放在我们的工程文件下,另外还有
gfx.h
gfxconfig.h
最好我们就关心ugfx底层接口函数与ssd1306驱动的对接函数实现。
void init_board(GDisplay *g);

void post_init_board(GDisplay *g) ;

void setpin_reset(GDisplay *g, bool_t state);

void acquire_bus(GDisplay *g) ;

void release_bus(GDisplay *g) ;

void write_cmd(GDisplay *g, uint8_t cmd);

void write_data(GDisplay *g, uint8_t* data, uint16_t length);
然后我们要实现上面的三个主要函数,其它的可选:
void  init_board(GDisplay *g)
{
    (void)g;
    OLED_InitHard();
}

void post_init_board(GDisplay *g)
{
    (void)g;
}

void setpin_reset(GDisplay *g, bool_t state)
{
    (void)g;
}

void acquire_bus(GDisplay *g)
{
    (void)g;
}

void release_bus(GDisplay *g)
{
    (void)g;
}

void write_cmd(GDisplay *g, uint8_t cmd)
{
    (void)g;
    OLED_WriteCmd(cmd);
}

void write_data(GDisplay *g, uint8_t* data, uint16_t length)
{
    (void)g;

    int count=0;
    for(count=0;countcount++)
    {
        OLED_WriteData(data[count]);
    }
}
第三步:添加用户要实现的函数
主要有四个函数要实现,在你对应得文件下实现,例如我是下“gdisp_lld_SSD1306.c”下实现的:
void gfxSleepMicroseconds(us)
{
    bsp_DelayUs(us);
}

void gfxSleepMilliseconds(ms)
{
    bsp_DelayMS(ms);
}


void *gfxAlloc(u32 size)
{
    void *xxx;
    xxx=malloc(size);
    return xxx;
}

void gfxFree(void *ptr)
{
    free(ptr);
}
第四步:编译,调错
完成上面的过程中,你肯定会遇到很多问题。我就是解决错误都用了一天呀。很多问题只能根据报错,然后自己的经验一点一点解决呀。
比如:
1:头文件包含不对,找不到相关定义申明
2:函数没有实现,链接找不到
3:各种宏定义开启关闭等
第五步:调用例子
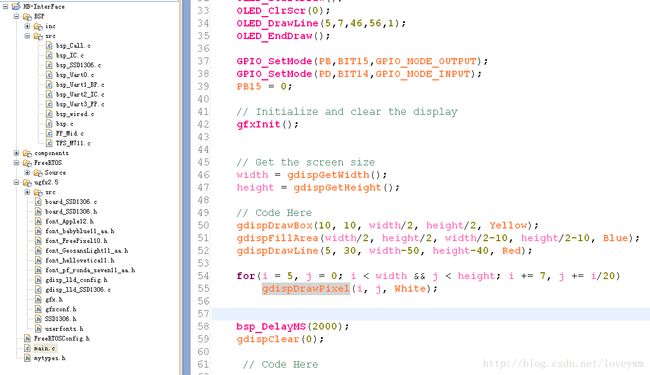
在源文件里有相关例子。参考里面的配置和主函数来实现最基本的画点,画圆操作。
// Initialize and clear the display
    gfxInit();


    // Get the screen size
    width = gdispGetWidth();
    height = gdispGetHeight();

    // Code Here
    gdispDrawBox(10, 10, width/2, height/2, Yellow);
    gdispFillArea(width/2, height/2, width/2-10, height/2-10, Blue);
    gdispDrawLine(5, 30, width-50, height-40, Red);

    for(i = 5, j = 0; i < width && j < height; i += 7, j += i/20)
        gdispDrawPixel(i, j, White);
终结
移植是个细致和经验活,做着很累,但做出来用着很好。日后我会出更多教程来了解内部源码吧。

