OpenWRT 编译固件(带usb摄像头相关驱动)与烧写固件,获取图像数据并用Qt显示,添加开机自启,添加自己写的驱动或者应用
我购买的是无涯的MT7688A开发板,所以以它来介绍,但是发现基本OpenWRT的编译固件套路是一样的,所以应该通用。
1.下载官网源码
2.编译源码
(1)./scripts/feeds update -a
(2)./scripts/feeds install -a
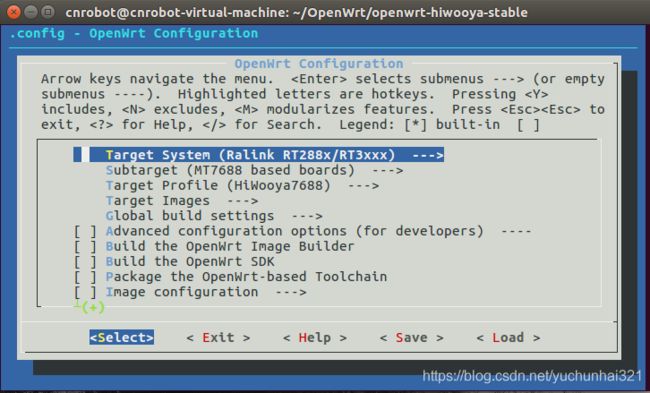
(3)make menuconfig 选择板子对应的信息
(4)usb摄像头驱动选择
Kernel modules —> USB Support —> <*> kmod-usb-core. ##默认已经选了
Kernel modules —> USB Support —> <*> kmod-usb-ohci. ## usb1.0
Kernel modules —> USB Support —> <*> kmod-usb-uhci. ## usb1.1
Kernel modules —> USB Support —> <*> kmod-usb-storage.
Kernel modules —> USB Support —> <*> kmod-usb-storage-extras.
Kernel modules —> USB Support —> <*> kmod-usb2. ##默认已经选了 usb2.0
Kernel modules -->video Support -->kmod-video-core
Multimedia --> mjpg-streamer
(5)编译固件
make V=99
(6)编译成功的固件为./bin/ramips/openwrt-ramips-mt7688-HiWooya7688-squashfs-sysupgrade.bin
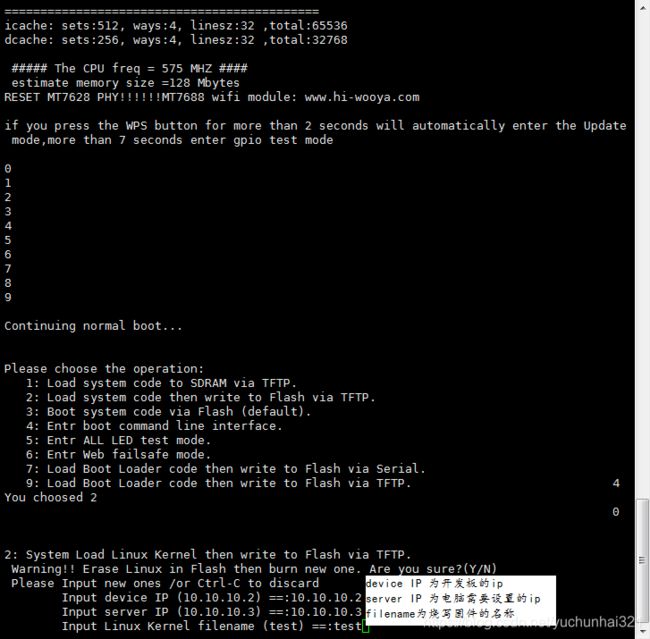
3.烧写固件,此时OpenWRT的WAN口连接机箱的网口,开发板的串口波特率为57600,8,N,1
设置完成后,系统会自动烧写固件,烧写成功后开发板会自动重启。
4.固件烧写启动成功后,输入指令
find / -name index.* #查找web网页所对应的地址/www/webcam
mjpg_streamer -i "input_uvc.so -f 15 -r 640*480 -d /dev/video0" -o "output_http.so -p 8080 -w /www/webcam" #保持运行
5.在网页上输入192.168.1.1:8080 即可查看到图像,ip地址为开发板eth0地址,此时OpenWRT的LAN口连接机箱的网口
6.QT获取数据并显示。电脑设置IP地址需与开发板在同一网段。测试程序如下:
//pro文件添加
QT       += network


//h文件
#ifndef WIDGET_H
#define WIDGET_H

#include
#include
#include
#include

QT_BEGIN_NAMESPACE
namespace Ui { class Widget; }
QT_END_NAMESPACE

class Widget : public QWidget
{
    Q_OBJECT

public:
    Widget(QWidget *parent = nullptr);
    ~Widget();

private slots:
    void mjpgStreamerUpdata(QNetworkReply *reply);

private:
    Ui::Widget *ui;

    QNetworkAccessManager *manager;
    QNetworkRequest *request;
};
#endif // WIDGET_H


//cpp文件
#include "widget.h"
#include "ui_widget.h"

Widget::Widget(QWidget *parent)
    : QWidget(parent)
    , ui(new Ui::Widget)
{
    ui->setupUi(this);
    this->setWindowTitle("Mjpg Streamer Client");

    //连接到mjpg-streamer 服务器
    QString url;
    manager = new QNetworkAccessManager();
    url.append("http://192.168.1.1:8080/?action=snapshot");
    qDebug()<label->setScaledContents(true);
    connect(manager, SIGNAL(finished(QNetworkReply *)), this, SLOT(mjpgStreamerUpdata(QNetworkReply *)));
    manager->get(*request);

    QEventLoop loop;
    connect(m_networkAccessManager, SIGNAL(finished(QNetworkReply *)), &loop, SLOT(quit()));
    loop.exec();
}

Widget::~Widget()
{
    delete ui;
}

void Widget::mjpgStreamerUpdata(QNetworkReply *reply)
{
    //读取全部数据
    QByteArray byteArray = reply->readAll();
    //构建pixmap
    QImage image;
    image.loadFromData(byteArray, "JPEG");
    //Label 显示图像
    ui->label->setPixmap(QPixmap::fromImage(image));
    ui->label->show();
    //继续清理URL
    manager->get(*request);
    reply->deleteLater();
}
注: 若不加reply->deleteLater();这句话会存在内存泄漏的问题
此时简单的OpenWRT调试完成。
7.添加开机自启功能
在/etc/init.d下添加文件test
#!/bin/sh /etc/rc.common
START=99

boot(){
mjpg_streamer -i "input_uvc.so -f 15 -r 640*480 -d /dev/video0" -o "output_http.so -p 8080 -w /www/webcam"  /dev/null 2>&1 &
}
要使脚本在系统启动后自动别调用的话还需要创建软链接到 ”/etc/rc.d”目录下,如以上文件需要创建如下链接:
ln -s /etc/init.d/test /etc/rc.d/S99test
或者使用系统方法:
/etc/init.d/test enable
将会自动创建对应的软链接。
同样的可以删除软链接或者使用disable取消脚本的自动启动
8.将开发板的固定ip改成自动获取插入网线的ip
vi /etc/config/network
将里面的静态ip地址的static改成dhcp,将固定的ip地址相关的东西删掉就可以了,这样插入网线,就可以获取到网线的ip了。
9.添加自己写的驱动或应用
驱动模块添加:
1:make menuconfig中的 kernel modules
其中的各个配置选项来自于下面目录中的.mk文件
![]()
这里以other.mk为对照,后续我们添加的驱动模块,添加到other分支当中
2:建立模块目录,路径是package/kernel/example。mkdir -p package/kernel/example
3:进行package/kernel/example目录,建立Makefile文件,内容如下
#Kernel module example
include $(TOPDIR)/rules.mk

include $(INCLUDE_DIR)/kernel.mk

PKG_NAME:=example
PKG_RELEASE:=1

include $(INCLUDE_DIR)/package.mk


EXTRA_CFLAGS:= \
    $(patsubst CONFIG_%, -DCONFIG_%=1, $(patsubst %=m,%,$(filter %=m,$(EXTRA_KCONFIG)))) \
    $(patsubst CONFIG_%, -DCONFIG_%=1, $(patsubst %=y,%,$(filter %=y,$(EXTRA_KCONFIG)))) \

MAKE_OPTS:=ARCH="$(LINUX_KARCH)" \
    CROSS_COMPILE="$(TARGET_CROSS)" \
    SUBDIRS="$(PKG_BUILD_DIR)" \
    EXTRA_CFLAGS="$(EXTRA_CFLAGS)"

define KernelPackage/example
  SUBMENU:=Other modules
  TITLE:=Support Module for example
  # DEPENDS:=@XXX   #如果有依赖,这个名字可去make menuconfig里面找到 Symbol:XXX
  FILES:=$(PKG_BUILD_DIR)/example.ko
  AUTOLOAD:=$(call AutoLoad,81,example) #系统启动时自动装载
endef

#PKG_BUILD_DIR:/build_dir/target-mipsel_24kec+dsp_uClibc-0.9.33.2/linux-ramips_mt7621/example
#建立 PKG_BUILD_DIR ,并将代码拷贝到此处
define Build/Prepare
    mkdir -p $(PKG_BUILD_DIR)/
    $(CP) -R ./src/* $(PKG_BUILD_DIR)/
endef
define Build/Compile
    $(MAKE) -C "$(LINUX_DIR)" $(MAKE_OPTS) CONFIG_EXAMPLE=m modules
endef
$(eval $(call KernelPackage,example))
4:在package/kernel/example目录下建立src目录,mkdir -p package/kernel/example/src
5:在package/kernel/example/src目录下建立源码文件example.c和对应的Makefile,Kconfig
example.c


#include
#include
#include

static int __init example_init(void)
{
    printk("hello example openwrt\n");
    return 0;
}

static void __exit example_exit(void)
{
    printk("hello example openwrt exit\n");
}

module_init(example_init);
module_exit(example_exit);

MODULE_AUTHOR("hello world");
MODULE_DESCRIPTION("example driver");
MODULE_LICENSE("GPL");
MODULE_ALIAS("platform:" DRV_NAME);


Makefile:

obj-${CONFIG_EXAMPLE}+= example.o


Kconfig:

config EXAMPLE
    tristate "Just a example"
    help
    This is a example, for debugging kernel model.
    If unsure, say N.
6:在trunk目录make menuconfig-->kernel module-->other module-->kmod-example选中。保存Config后,输入make ./package/kernel/example/compile V=s进行编译
![]()
![]()
![]()
应用程序编译
编译c文件:
1:在package应用目录。参考其他的应用文件。创建helloworld文件夹,并进入。创建Makefile:
##############################################
# OpenWrt Makefile for helloworld program
#
#
# Most of the variables used here are defined in
# the include directives below. We just need to
# specify a basic description of the package,
# where to build our program, where to find
# the source files, and where to install the
# compiled program on the router.
#
# Be very careful of spacing in this file.
# Indents should be tabs, not spaces, and
# there should be no trailing whitespace in
# lines that are not commented.
#
##############################################
include $(TOPDIR)/rules.mk

# Name and release number of this package
PKG_NAME:=helloworld
PKG_RELEASE:=1

# This specifies the directory where we're going to build the program.
# The root build directory, $(BUILD_DIR), is by default the build_mipsel
# directory in your OpenWrt SDK directory

PKG_BUILD_DIR := $(BUILD_DIR)/$(PKG_NAME)

include $(INCLUDE_DIR)/package.mk

# Specify package information for this program.
# The variables defined here should be self explanatory.
# If you are running Kamikaze, delete the DESCRIPTION
# variable below and uncomment the Kamikaze define
# directive for the description below
define Package/helloworld
    SECTION:=utils
    CATEGORY:=Utilities
    TITLE:=Helloworld -- prints a snarky message
endef
# Uncomment portion below for Kamikaze and delete DESCRIPTION variable above
define Package/helloworld/description
    If you can't figure out what this program does, you're probably
    brain-dead and need immediate medical attention.
endef
# Specify what needs to be done to prepare for building the package.
# In our case, we need to copy the source files to the build directory.
# This is NOT the default.  The default uses the PKG_SOURCE_URL and the
# PKG_SOURCE which is not defined here to download the source from the web.
# In order to just build a simple program that we have just written, it is
# much easier to do it this way.
define Build/Prepare
    mkdir -p $(PKG_BUILD_DIR)
    $(CP) ./src/* $(PKG_BUILD_DIR)/
endef
define Build/Configure
endef
define Build/Compile
    $(MAKE) -C $(PKG_BUILD_DIR) \
        CC="$(TARGET_CC)" \
        CFLAGS="$(TARGET_CFLAGS) -Wall" \
        LDFLAGS="$(TARGET_LDFLAGS)"
endef
# We do not need to define Build/Configure or Build/Compile directives
# The defaults are appropriate for compiling a simple program such as this one
# Specify where and how to install the program. Since we only have one file,
# the helloworld executable, install it by copying it to the /bin directory on
# the router. The $(1) variable represents the root directory on the router running
# OpenWrt. The $(INSTALL_DIR) variable contains a command to prepare the install
# directory if it does not already exist.  Likewise $(INSTALL_BIN) contains the
# command to copy the binary file from its current location (in our case the build
# directory) to the install directory.
define Package/helloworld/install
    $(INSTALL_DIR) $(1)/bin
    $(INSTALL_BIN) $(PKG_BUILD_DIR)/helloworld $(1)/bin/
endef
# This line executes the necessary commands to compile our program.
# The above define directives specify all the information needed, but this
# line calls BuildPackage which in turn actually uses this information to
# build a package.
$(eval $(call BuildPackage,helloworld))
2:在helloworld目录创建src文件夹,并进入。创建Makefile和helloworld.c:
# build helloworld executable when user executes "make"
helloworld: helloworld.o
    $(CC) $(LDFLAGS) helloworld.o -o helloworld
helloworld.o: helloworld.c
    $(CC) $(CFLAGS) -c helloworld.c
# remove object files and executable when user executes "make clean"
clean:
    rm *.o helloworld
helloworld.c
#include
#include
#include
int main(int argc, char**argv)
{
printf("Hell! O' world, why won't my code compile?\n\n");
return 0;
} 3:返回trunk目录,make menuconfig-->Utilities-->helloworld。然后make ./package/helloworld/compile V=s
![]()
![]()
编译c++文件:
1. 在package应用目录。参考其他的应用文件。创建helloworld文件夹,并进入。创建Makefile:
##############################################
# OpenWrt Makefile for helloworld program
#
#
# Most of the variables used here are defined in
# the include directives below. We just need to
# specify a basic description of the package,
# where to build our program, where to find
# the source files, and where to install the
# compiled program on the router.
#
# Be very careful of spacing in this file.
# Indents should be tabs, not spaces, and
# there should be no trailing whitespace in
# lines that are not commented.
#
##############################################
include $(TOPDIR)/rules.mk

# Name and release number of this package
PKG_NAME:=helloworld
PKG_RELEASE:=1

# This specifies the directory where we're going to build the program.
# The root build directory, $(BUILD_DIR), is by default the build_mipsel
# directory in your OpenWrt SDK directory

PKG_BUILD_DIR := $(BUILD_DIR)/$(PKG_NAME)

include $(INCLUDE_DIR)/package.mk

# Specify package information for this program.
# The variables defined here should be self explanatory.
# If you are running Kamikaze, delete the DESCRIPTION
# variable below and uncomment the Kamikaze define
# directive for the description below
define Package/multiFaceAcquisition
	SECTION:=utils
	CATEGORY:=Utilities
	TITLE:=helloworld -- prints a snarky message
endef
# Uncomment portion below for Kamikaze and delete DESCRIPTION variable above
define Package/multiFaceAcquisition/description
	If you can't figure out what this program does, you're probably
	brain-dead and need immediate medical attention.
endef
# Specify what needs to be done to prepare for building the package.
# In our case, we need to copy the source files to the build directory.
# This is NOT the default.  The default uses the PKG_SOURCE_URL and the
# PKG_SOURCE which is not defined here to download the source from the web.
# In order to just build a simple program that we have just written, it is
# much easier to do it this way.
define Build/Prepare
	mkdir -p $(PKG_BUILD_DIR)
	$(CP) ./src/* $(PKG_BUILD_DIR)/
endef
define Build/Configure
endef
define Build/Compile
	$(MAKE) -C $(PKG_BUILD_DIR) \
		CC="$(TARGET_CXX)" \
		CFLAGS="$(TARGET_CPPFLAGS) -Wall" \
		LDFLAGS="$(TARGET_LDFLAGS)"
endef
# We do not need to define Build/Configure or Build/Compile directives
# The defaults are appropriate for compiling a simple program such as this one
# Specify where and how to install the program. Since we only have one file,
# the helloworld executable, install it by copying it to the /bin directory on
# the router. The $(1) variable represents the root directory on the router running
# OpenWrt. The $(INSTALL_DIR) variable contains a command to prepare the install
# directory if it does not already exist.  Likewise $(INSTALL_BIN) contains the
# command to copy the binary file from its current location (in our case the build
# directory) to the install directory.
define Package/helloworld/install
	$(INSTALL_DIR) $(1)/bin
	$(INSTALL_BIN) $(PKG_BUILD_DIR)/helloworld $(1)/bin/
endef
# This line executes the necessary commands to compile our program.
# The above define directives specify all the information needed, but this
# line calls BuildPackage which in turn actually uses this information to
# build a package.
$(eval $(call BuildPackage,helloworld))
2:在helloworld目录创建src文件夹,并进入。创建Makefile和helloworld.cpp:
# build helloworld executable when user executes "make"
helloworld: helloworld.o
    $(CC) $(LDFLAGS) helloworld.o -o helloworld
helloworld.o: helloworld.cpp
    $(CC) $(CFLAGS) -c helloworld.cpp
# remove object files and executable when user executes "make clean"
clean:
    rm *.o helloworld
#include

using namespace std;

int main()
{
    cout<<"hello world"<
编译报错修改:
提示缺少libc.so.6和libstdc++.so.6文件,解决办法:
make menuconfig

选则如下配置:

OpenWrt Configuration > Base system >  <*>libc
                                       <*>libgcc
                                       <*>libpthread
                                       <*>librt
                                       <*>libstdcpp

vim staging_dir/target-mipsel_24kec+dsp_uClibc-0.9.33.2/pkginfo
添加如下内容:
libc.so.6
libstdc++.so.6
在写openwrt程序的Makefile时如果忘记加上依赖关系,编译时就会报这样的错:
| 1 2 |
|
解决方法是在定义程序包(Makefile)的时候加上依赖关系:
| 1 2 3 4 5 6 |
|

