【maven】多 module项目搭建
文章目录
- 1. 前言
- 2. 单一 module 项目
- 2.1. IDEA 创建项目
- 2.2. maven 命令创建
- 2.3. maven 项目结构
- 3. 多 module 项目
- 3.1. 创建顶层 module
- 3.2. 添加子 module
- 3.3. module 版本管理
- 4. bom 项目
- 4.1. bom 搭建
- 4.2. 打包
- 5. 相关链接
1. 前言
本着 “ 干货的定义,往往都是基于某种特定场景 ” 的原则,开篇之前,先来点前戏:
- 只讲 maven 工程实践,不谈 maven 原理
- 主要内容
- 多 module 项目搭建
- bom 模块搭建
- 环境介绍
- IDE: Intellij IDEA
- 语言: Java
- maven 已安装
2. 单一 module 项目
2.1. IDEA 创建项目
话不多说,上图:

创建 maven 或者 Spring Initializer 均可。我这里采用后者进行创建。
2.2. maven 命令创建
进入自己的工作目录,输入命令:
mvn archetype:generate \
 -DgroupId=club.chenlinghong.demo \
 -DartifactId=maven-demo \
 -Dversion=0.0.1-SNAPSHOT \
 -Dpackage=club.chenlinghong.demo.maven
参数说明:
- groupId: 组织ID,建议用 “域名反写” ,如: club.chenlinghong.demo [域名:chenlinghong.club, 项目域名:demo]
- artifactId: 建议采用项目名称
- version: 版本号
- package: 包名,包路径
2.3. maven 项目结构
创建项目后,大概是:
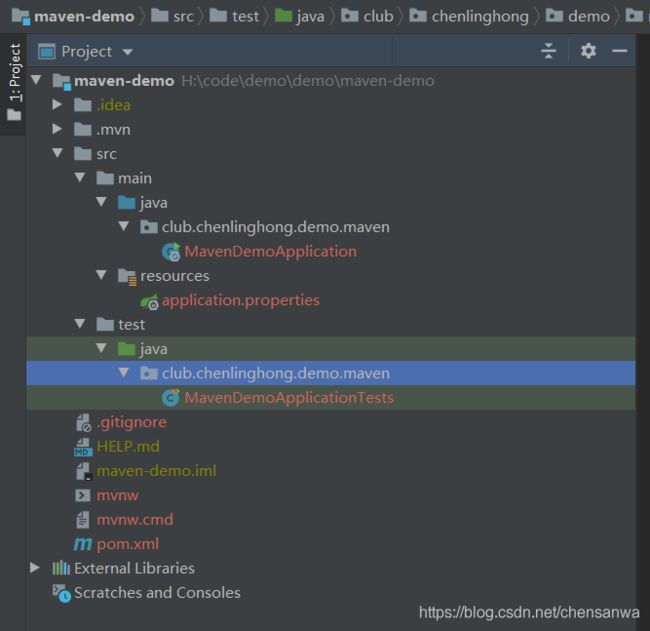
图片中,还包含了一些关于 IDE 特有的信息,我一般都会直接删除。
各文件介绍:
- src 【源码文件夹】
- main【主文件夹】
- java 【Java 源码】
- resources 【配置文件夹】
- test【测试文件夹】
- Java 【Java 测试代码】
- resources 【测试配置】
- main【主文件夹】
- .gitignore【项目采用了 git 管理,用于忽略一些本地文件】
- pom.xml 【maven 配置文件】
3. 多 module 项目
3.1. 创建顶层 module
可以延用前文 “单一 module 项目”,咱们把 src 删除。
在 顶层 module 中,咱们一般用于聚合多 module,较少放 src 代码。 当然,也是可以有 src 源码的哈
删除 src 后, 就只有一个 pom.xml
然后,修改 pom.xml 的 packaging 为 pom, 默认是 jar.
完整 pom.xml 文件:
<project xmlns="http://maven.apache.org/POM/4.0.0" xmlns:xsi="http://www.w3.org/2001/XMLSchema-instance"
         xsi:schemaLocation="http://maven.apache.org/POM/4.0.0 https://maven.apache.org/xsd/maven-4.0.0.xsd">
    <modelVersion>4.0.0modelVersion>
    <groupId>club.chenlinghong.demogroupId>
    <artifactId>maven-demoartifactId>
    <version>0.0.1-SNAPSHOTversion>
    <packaging>pompackaging>
project>
3.2. 添加子 module
这个步骤比较简单,直接基于 顶层 module 创建即可,类似于创建单一 module 项目.
此处演示,创建三个 module:
- maven-demo
- maven-demo-web
- maven-demo-service
- maven-demo-dao
经典的三层架构:
- maven-demo: 主项目
- maven-demo-web: web层
- maven-demo-service:业务逻辑层
- maven-demo-dao: 持久化层
聚合项目配置:
在父 module: maven-demo 中配置:
<modules>
    <module>maven-demo-webmodule>
    <module>maven-demo-servicemodule>
    <module>maven-demo-daomodule>
modules>
在各个子 module 中配置:
<parent>
    <groupId>club.chenlinghong.demogroupId>
    <artifactId>maven-demoartifactId>
    <version>0.0.1-SNAPSHOTversion>
    <relativePath>../pom.xmlrelativePath>
parent>
此时,maven 多 module 项目简版就算是搭建完成。
- 顶层 pom 聚合了三个无依赖关系的 maven 项目
3.3. module 版本管理
接着上边的项目,如果我想在 maven-demo-web module 中引用 maven-demo-service module,可以采用:
<dependency>
    <groupId>club.chenlinghong.demogroupId>
    <artifactId>maven-demo-serviceartifactId>
    <version>0.0.1-SNAPSHOTversion>
dependency>
咱们在同一个项目中,其他 module 修改了版本号,还需要在依赖 module 中修改,实在是不符合咱们程序员改变世界的初衷呀(万事从简嘛)
来,在顶层 pom 中配置下 dependenciesManagement :
<dependencyManagement>
    <dependencies>
        <dependency>
            <groupId>club.chenlinghong.demogroupId>
            <artifactId>maven-demo-serviceartifactId>
            <version>0.0.1-SNAPSHOTversion>
        dependency>
    dependencies>
dependencyManagement>
鉴于篇幅原因,配置一个来表示下。那咱们就可以在 maven-demo-web 模块中,简单引入:
<dependency>
    <groupId>club.chenlinghong.demogroupId>
    <artifactId>maven-demo-serviceartifactId>
dependency>
至此,咱们就把多 module 之间的依赖关系给配置了,并且进行了依赖管理。
怎么测试呢?直接在最底层的 module 中创建一个 Class ,然后在依赖的 module 中尝试 new 一下,就 ok。
4. bom 项目
4.1. bom 搭建
想必,接触过 Spring, SpringBoot 项目的同学,都看到过,在创建 Spring 项目后,就会有一个是 spring 提供的 pom 或者叫做 maven 坐标的 parent.。具体为:
<parent>
    <groupId>org.springframework.bootgroupId>
    <artifactId>spring-boot-starter-parentartifactId>
    <version>2.2.1.RELEASEversion>
    <relativePath/>
parent>
看到没?其实很熟悉是吧?
上文中在创建多 module 的时候,也有在子 module 中写过这个 parent 的标签。
其实,这两个的实现原理,是一样的。咱们也来搞一个试试:咱们这里偷个懒,就不单独创建项目了,直接在 maven-demo 项目下创建 maven-demo-bom 即可:
1、此项目,不需要 src,直接干掉。
2、配置 pom.xml,设置 packaging 为 pom, 这步,很关键、很关键,能否被其他项目采用 parent 方式引入,全靠这个配置。
此时,咱们的 bom 已经制作完成,只不过,啥都没有。 咱们来加一些 dependency, dependenciesManagement。
示例 bom :
<project xmlns="http://maven.apache.org/POM/4.0.0" xmlns:xsi="http://www.w3.org/2001/XMLSchema-instance"
         xsi:schemaLocation="http://maven.apache.org/POM/4.0.0 https://maven.apache.org/xsd/maven-4.0.0.xsd">
    <modelVersion>4.0.0modelVersion>
    <parent>
        <groupId>club.chenlinghong.demogroupId>
        <artifactId>maven-demoartifactId>
        <version>0.0.1-SNAPSHOTversion>
        <relativePath>../pom.xmlrelativePath>
    parent>

    <artifactId>maven-demo-bomartifactId>

    <packaging>pompackaging>

    <dependencies>
        <dependency>
            <groupId>junitgroupId>
            <artifactId>junitartifactId>
            <version>4.13version>
        dependency>
    dependencies>

    <dependencyManagement>
        <dependencies>
            <dependency>
                <groupId>mysqlgroupId>
                <artifactId>mysql-connector-javaartifactId>
                <version>8.0.18version>
            dependency>
        dependencies>
    dependencyManagement>

project>
4.2. 打包
现在 bom 已经制作好了,但是现在只能在 当前项目中 采用 parent 方式引入。
若期望其他项目,其他人也能够引入,那就需要把 bom 发布到 maven 仓库中(本地仓库、远程仓库均可,本地仓库则本地访问,远程仓库则其他人都可以访问)。
直接采用 mvn install 即可发布本地仓库,mvn deploy 发布远程仓库。如果想发布到 maven 官方中央仓库,那就需要去 maven 官网申请账号。
ok,完美收官!!!
5. 相关链接
- 完整代码:LamboChen/maven-demo
- 《Maven官方文档》目录指南:http://ifeve.com/maven-index-2