ActiveMQ
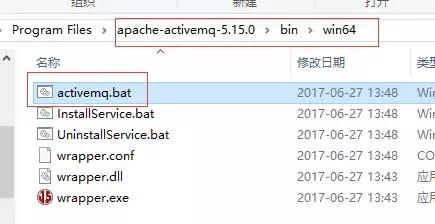
1. 下载windows办的activeMQ后,在以下目录可以启动:
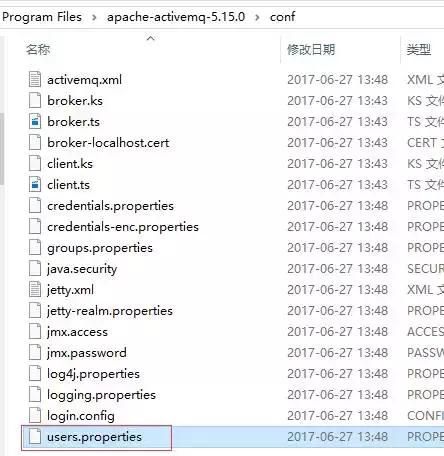
2 我们可以通过http://localhost:8161(http://127.0.0.1:8161/)访问管理页面,通过tcp://localhost:61616来连接消息服务器,用到的用户名和密码都在以下文件中(默认为admin=admin)所以用户名和密码都是admin
这是启动ActiveMq的步骤,下面是spring boot的对ActiveMQ简单使用
1 添加依賴:(备注:不知道是不是spring boot 2.04版本;activeMq-pool不要使用5.0.7版,建议使用5.14.4版或以上;错误:spring boot org.apache.activemq.pooledConnectionFactory.setConnectionFactory(connectionFactory);)
2 注入bean:
@Configuration
@EnableJms
public class ActiveMqConfig {
/**
* 点对点
* @return
* */
@Bean
public ActiveMQQueuequeue() {
return new ActiveMQQueue("promoteAct");
}
/**
* 发布/订阅
* @return
*/
@Bean
public Topictopic(){
return new ActiveMQTopic("zh-topic");
}
3 .写消息生产者(使用定时做测试;如果需要,可以使用spring mvc 的模式进行配置)
1)主题方式:
package com.example.demo.mq;
import org.springframework.beans.factory.annotation.Autowired;
import org.springframework.jms.annotation.JmsListener;
import org.springframework.jms.core.JmsMessagingTemplate;
import org.springframework.scheduling.annotation.Scheduled;
import org.springframework.stereotype.Component;
import javax.jms.Queue;
import javax.jms.Topic;
@Component
public class TopicProducer {
@Autowired
private JmsMessagingTemplatejmsMessagingTemplate;
@Autowired
private Queuequeue;
@Autowired
private Topictopic;
/***
* 服务端发送者 Topic
* */
@Scheduled(fixedDelay =2000)// 每2s执行1次
public void send() {
int num = (int) (Math.random()*100);
this.jmsMessagingTemplate.convertAndSend(this.topic, "hello word,activeMQ"+num);
}
@JmsListener(destination="out.topic")
public void consumerMessage(String text){
int num = (int) (Math.random()*100);
System.out.println("从out.topic 主题收到的回复为:"+text+" : " +num);
}
}
2)队列模式的生产者:
package com.example.demo.mq;
import org.springframework.beans.factory.annotation.Autowired;
import org.springframework.jms.annotation.JmsListener;
import org.springframework.jms.core.JmsMessagingTemplate;
import org.springframework.messaging.handler.annotation.SendTo;
import org.springframework.scheduling.annotation.EnableScheduling;
import org.springframework.scheduling.annotation.Scheduled;
import org.springframework.stereotype.Component;
import javax.jms.Queue;
@Component
@EnableScheduling
public class PromoteActProducer {
@Autowired
private JmsMessagingTemplatejmsMessagingTemplate;
@Autowired
private Queuequeue;
@Scheduled(fixedDelay =2000)// 每2s执行1次
public void send() {
int num = (int) (Math.random()*100);
this.jmsMessagingTemplate.convertAndSend(this.queue, "hello,activeMQ"+num);
}
@JmsListener(destination="out.queue")
public void consumerMessage(String text){
int num = (int) (Math.random()*100);
System.out.println("从out.queue队列收到的回复报文为:"+text +num);
}
}
4 :消息接受者
1)主题方式:
package com.example.demo.mq;
import org.springframework.jms.annotation.JmsListener;
import org.springframework.messaging.handler.annotation.SendTo;
import org.springframework.stereotype.Component;
@Component
public class TopicConsumer {
/**
* 客户端消费 Topic
* @param consumer
*/
@JmsListener(destination ="zh-topic")
@SendTo("out.topic")
public StringreceiveQueue(String consumer) {
int num = (int) (Math.random()*100);
System.out.println(consumer+":"+num+" topic主题 消息已经接收了");
return consumer+" " + num +" topic 主题发送消息了 " ;
}
}
2)队列方式:
package com.example.demo.mq;
import org.springframework.jms.annotation.JmsListener;
import org.springframework.messaging.handler.annotation.SendTo;
import org.springframework.stereotype.Component;
@Component
public class PromoteConsumer {
/**
* 客户端消费
* @param text
* JmsListener:监听器;destination:目的地
* SendTo 发送消息
*/
@JmsListener(destination ="promoteAct")
@SendTo("out.queue")
public StringreceiveQueue(String text) {
int num = (int) (Math.random()*100);
System.out.println("Consumer2收到的报文为:"+text);
return "return message:"+text+num;
}
}
5 结果:
后台输出:
activeMq 的显示结果:


