Linux中的防火墙技术(一)firewall
firewall火墙控制
-
firewall概述
动态防火墙后台程序firewalld提供了一个动态管理的防火墙,用以支持网络“zones”,以分配对一个网络及相关链接和界面一定程度的信任。它具有对IPv4和IPv6 防火墙设置的支持。它支持以太网桥,并有分离运行时间和永久性配置选择。它还具有一个通向服务或者应用程序以直接增强防火墙规则的接口。 -
系统提供了图像化的配置工具firewall-config、system-config-firewall,提供命令行客户端firewall-cmd,用于配置firewalld永久性或非永久性运行时间的改变:它依次用iptables工具与执行数据包筛选的内核中的Netfilter通信
-
防火墙:内核上的插件在linux中是iptables的意思
一个在系统内核上的数据包,在系统表格的汇总 -
默认有三张表五条链
filter访问本机服务的表------------> input output forward
net根本机服务没有关系的表 --------> input outputprerouting postouting mangle(net+filter)----------->input output prerouting (DNAT) postouting(SNAT) forward -
只要有一条选项不匹配就会被禁止
源地址转换 目的地地址转换 -
管理火墙就是管理iptables表格的内容
-
两种管理方式
一、 iptables更专业,参属更详细
二 、 firewalld 操作更简单
方法不同但功能相同
编写火墙策略的工具,将工具的服务关掉之后,表格不生效
1.selinux端口标签的修改(管理selinux端口标签)
1)添加端口
semanage port -a -t http_port_t -p tcp 6666
具体步骤:
<1>安装软件开启服务
[root@shenzhen ~]# yum install httpd

<2>编辑配置文件修改默认端口为6666,重启服务时出现报错
[root@shenzhen ~]# vim /etc/httpd/conf/httpd.conf
[root@shenzhen ~]# systemctl restart httpd
Job for httpd.service failed. See 'systemctl status httpd.service' and 'journalctl -xn' for details.
[root@shenzhen ~]# netstat -antlupe | grep http
![]()
<4>列出http相关的端口,发现没有6666这个端口
[root@shenzhen ~]# semanage port -l | grep http
http_cache_port_t              tcp      8080, 8118, 8123, 10001-10010
http_cache_port_t              udp      3130
http_port_t                    tcp      80, 81, 443, 488, 8008, 8009, 8443, 9000
pegasus_http_port_t            tcp      5988
pegasus_https_port_t           tcp      5989

<5>加入6666端口,再次查看,列表中有6666,但是没有被使用,这是因为服务没有起来
[root@shenzhen ~]# semanage port -a -t http_port_t -p tcp 6666
[root@shenzhen ~]# netstat -antlupe | grep http
[root@shenzhen ~]# semanage port -l | grep http
http_cache_port_t              tcp      8080, 8118, 8123, 10001-10010
http_cache_port_t              udp      3130
http_port_t                    tcp      6666, 80, 81, 443, 488, 8008, 8009, 8443, 9000
pegasus_http_port_t            tcp      5988
pegasus_https_port_t           tcp      5989
[root@shenzhen ~]# systemctl restart httpd
[root@shenzhen ~]# netstat -antlupe | grep http

2)端口的删除
semanage port -d -t http_port_t -p tcp 6666
如过要删除的端口正在使用,删除时会报错,但是在配置文件中修改之后,重启服务删除命令会自动执行
具体步骤:
<1>再次编辑配置文件,将使用的默认端口还原,重启服务
[root@shenzhen ~]# vim /etc/httpd/conf/httpd.conf
[root@shenzhen ~]# systemctl restart httpd
[root@shenzhen ~]# netstat -antlupe | grep http
[root@shenzhen ~]# semanage port -l | grep http
http_cache_port_t              tcp      8080, 8118, 8123, 10001-10010
http_cache_port_t              udp      3130
http_port_t                    tcp      6666, 80, 81, 443, 488, 8008, 8009, 8443, 9000
pegasus_http_port_t            tcp      5988
pegasus_https_port_t           tcp      5989

<4>将列表中的6666端口删除,再次查看列表中不再有6666端口
[root@shenzhen ~]# semanage port -d -t http_port_t -p tcp 6666
[root@shenzhen ~]# semanage port -l | grep http
http_cache_port_t              tcp      8080, 8118, 8123, 10001-10010
http_cache_port_t              udp      3130
http_port_t                    tcp      80, 81, 443, 488, 8008, 8009, 8443, 9000
pegasus_http_port_t            tcp      5988
pegasus_https_port_t           tcp      5989

准备工作:
*将一台主机设置成双网卡
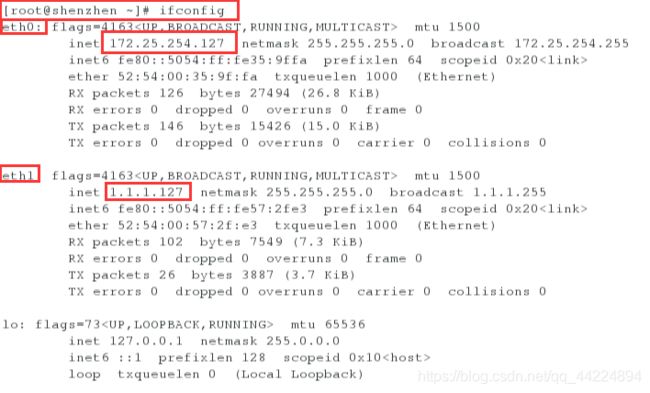
两块网卡的ip分别是 172.25.254.127和 1.1.1.127
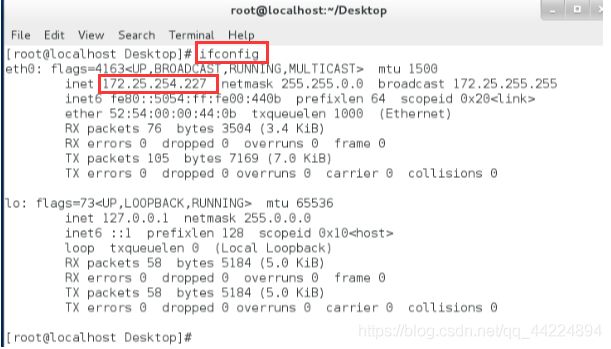
另一台主机是单网卡 ip是 1.1.1.227
步骤:
(1)给一台虚拟机添加网卡

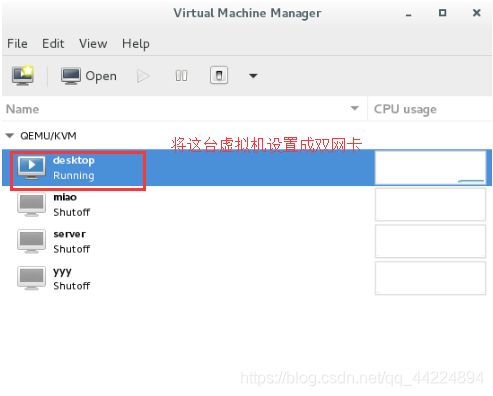
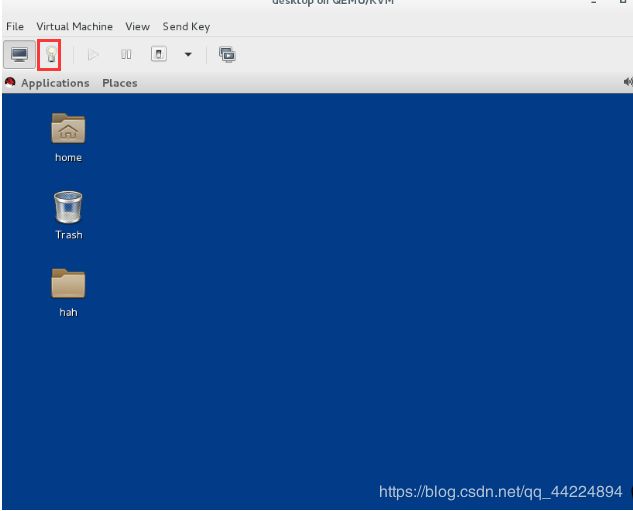
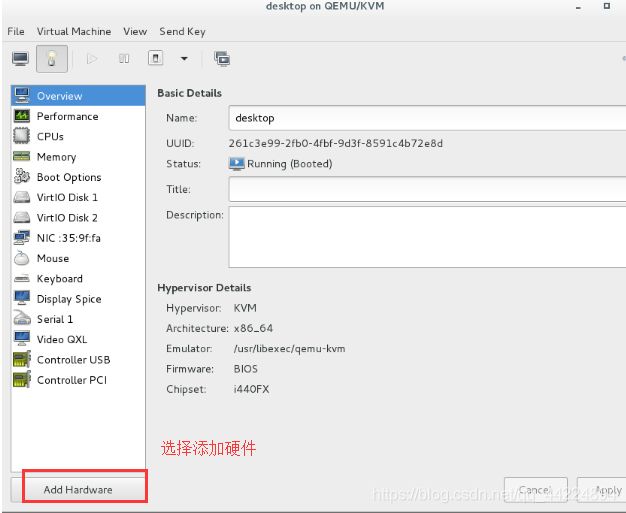
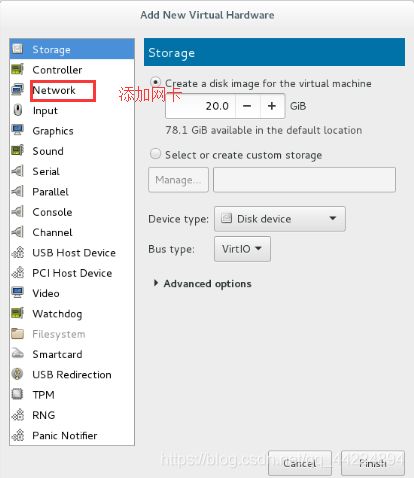

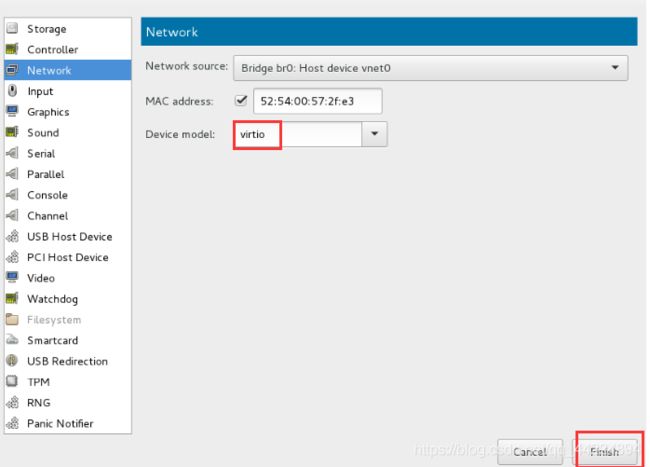
(2)配置网络
![]()
双网卡主机:
单网卡主机:
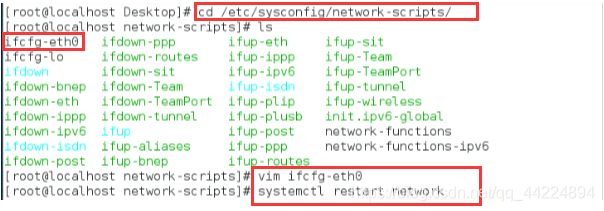


2.火墙的管理
火墙有两种管理方法
1)iptables
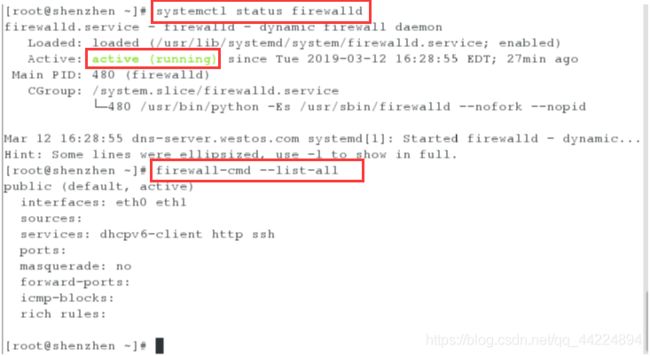
<1>firewalld查看火墙状态,列出允许的服务
[root@shenzhen ~]# systemctl status firewalld
[root@shenzhen ~]# firewall-cmd --list-all
[root@shenzhen ~]# yum iptables-services.x86_64
![]()
<3>关闭firewalld的服务
[root@shenzhen ~]# systemctl stop firewalld
[root@shenzhen ~]# systemctl mask firewalld
ln -s '/dev/null' '/etc/systemd/system/firewalld.service'
[root@shenzhen ~]# systemctl start iptables.service
[root@shenzhen ~]# systemctl enable iptables.service
ln -s '/usr/lib/systemd/system/iptables.service' '/etc/systemd/system/basic.target.wants/iptables.service'
[root@shenzhen ~]# iptables -nL
Chain INPUT (policy ACCEPT)
target     prot opt source               destination
ACCEPT     all  --  0.0.0.0/0            0.0.0.0/0            state RELATED,ESTABLISHED
ACCEPT     icmp --  0.0.0.0/0            0.0.0.0/0
ACCEPT     all  --  0.0.0.0/0            0.0.0.0/0
ACCEPT     tcp  --  0.0.0.0/0            0.0.0.0/0            state NEW tcp dpt:22
REJECT     all  --  0.0.0.0/0            0.0.0.0/0            reject-with icmp-host-prohibited

Chain FORWARD (policy ACCEPT)
target     prot opt source               destination
REJECT     all  --  0.0.0.0/0            0.0.0.0/0            reject-with icmp-host-prohibited

Chain OUTPUT (policy ACCEPT)
target     prot opt source               destination
<1>停止iptables的服务
[root@shenzhen ~]# systemctl stop iptables.service
[root@shenzhen ~]# systemctl disable iptables.service
rm '/etc/systemd/system/basic.target.wants/iptables.service'
[root@shenzhen ~]# systemctl mask iptables.service
ln -s '/dev/null' '/etc/systemd/system/iptables.service'
[root@shenzhen ~]# systemctl unmask firewalld
rm '/etc/systemd/system/firewalld.service'
[root@shenzhen ~]# systemctl start firewalld
[root@shenzhen ~]# systemctl enable firewalld
ln -s '/usr/lib/systemd/system/firewalld.service' '/etc/systemd/system/dbus-org.fedoraproject.FirewallD1.service'
ln -s '/usr/lib/systemd/system/firewalld.service' '/etc/systemd/system/basic.target.wants/firewalld.service'
[root@shenzhen ~]# firewall-cmd --list-all
<1>查看默认域
[root@shenzhen ~]# firewall-cmd --get-default-zone
public
[root@shenzhen ~]# firewall-cmd --list-all
public (default, active)

<2>将默认域设置为trusted信任
[root@shenzhen ~]# firewall-cmd --set-default-zone=trusted
success
真实主机连接虚拟机,离开连接成功

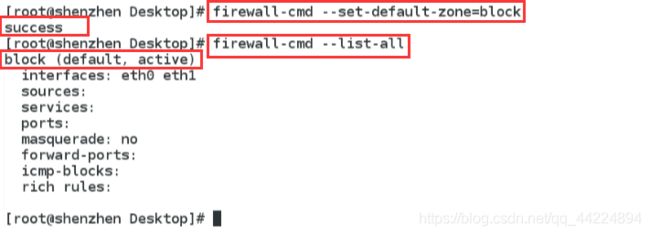
<3>将默认域设置为block,拒绝任何服务
[root@shenzhen ~]# firewall-cmd --set-default-zone=block
success
[root@shenzhen ~]# firewall-cmd --get-active-zones
block
  interfaces: eth0 eth1
[root@shenzhen ~]# firewall-cmd --get-zones
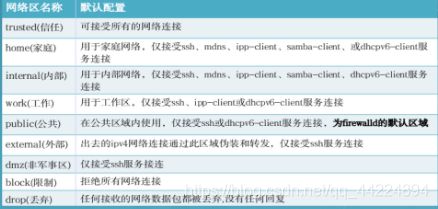
block dmz drop external home internal public trusted work
[root@shenzhen ~]# firewall-cmd --zone=public --list-all
[root@shenzhen ~]# firewall-cmd  --list-all
block (default, active)
  interfaces: eth0 eth1
  sources:
  services:
  ports:
  masquerade: no
  forward-ports:
  icmp-blocks:
  rich rules:
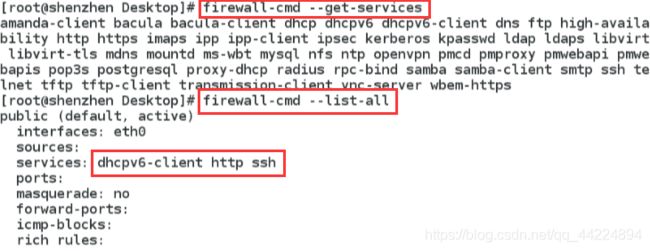
[root@shenzhen ~]# firewall-cmd  --get-services
amanda-client bacula bacula-client dhcp dhcpv6 dhcpv6-client dns ftp high-availability http https
imaps ipp ipp-client ipsec kerberos kpasswd ldap ldaps libvirt libvirt-tls mdns mountd ms-wbt
mysql nfs ntp open pmcd pmproxy pmwebapi pmwebapis pop3s postgresql proxy-dhcp
radius rpc-bind samba samba-client smtp ssh telnet tftp tftp-client transmission-client vnc-
server wbem-https
[root@shenzhen ~]# firewall-cmd --set-default-zone=public
success
[root@shenzhen ~]# firewall-cmd  --list-all
public (default, active)
  interfaces: eth0 eth1

2 指定主机可以访问
<1>信任来自ip为指定ip的主机访问
[root@shenzhen ~]# firewall-cmd --zone=trusted --add-source=172.25.254.68
success ##信任来自ip为 172.25.254.68的主机访问
[root@shenzhen ~]# firewall-cmd --get-active-zones ##查看所有的正在使用的域
public
  interfaces: eth0 eth1
trusted
  sources: 172.25.254.68


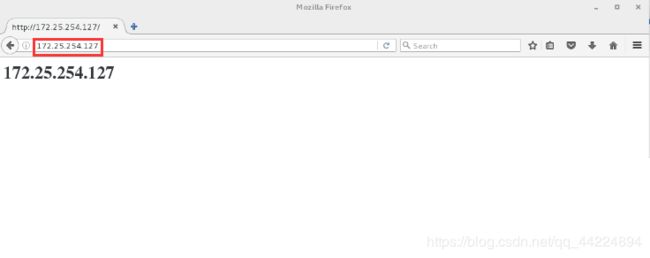
68主机浏览器中可以访问127主机
<2>将指定ip的主机从信任的域中移除
[root@shenzhen ~]# firewall-cmd --zone=trusted --remove-source=172.25.254.68 ##将 172.25.254.27 从信任域中移除
success
[root@shenzhen ~]# firewall-cmd --get-active-zones ##查看所有的正在使用的域
public
  interfaces: eth0 eth1
3 实验3: 设置双网卡主机两块网卡使用不同的域
<3>列出正在使用public域的信息,两块网卡都在使用public域
[root@shenzhen ~]# firewall-cmd --list-all --zone=public ##列出正在使用public域的信息
public (default, active)
  interfaces: eth0 eth1
[root@shenzhen ~]# firewall-cmd  --zone=public --remove-interface=eth1
success  ##将eth1从public域中移除
[root@shenzhen ~]# firewall-cmd --list-all --zone=public ##列出正在使用public域的信息,只有eth0
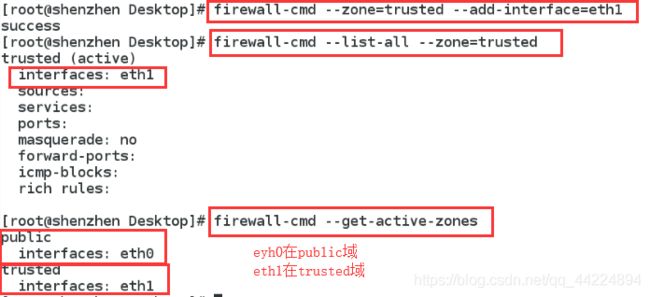
[root@shenzhen ~]# firewall-cmd --zone=trusted --add-interface=eth1
success ##将eth1添加到信任域
[root@shenzhen ~]# firewall-cmd --list-all --zone=trusted ####列出正在使用信任域的信息,有eth1
<1> 查看所有服务以及正在使用的服务
[root@shenzhen ~]# firewall-cmd --get-services ##查看所有的服务
[root@shenzhen ~]# firewall-cmd --list-all ##列出默认域的所有信息
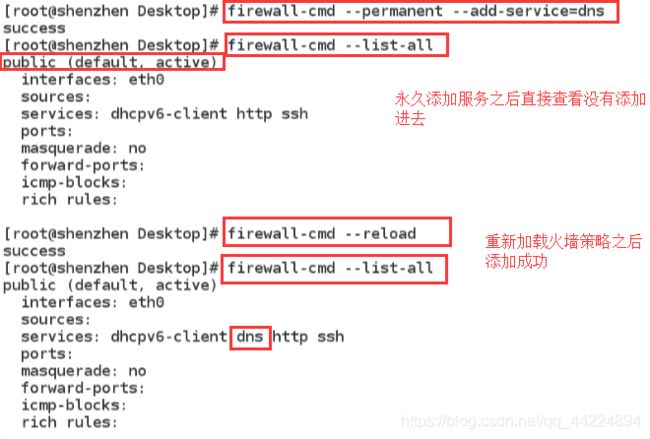
[root@shenzhen ~]# firewall-cmd --add-service=dns ##临时添加dns服务,永久要添加--permanent
success
[root@shenzhen ~]# firewall-cmd --list-all


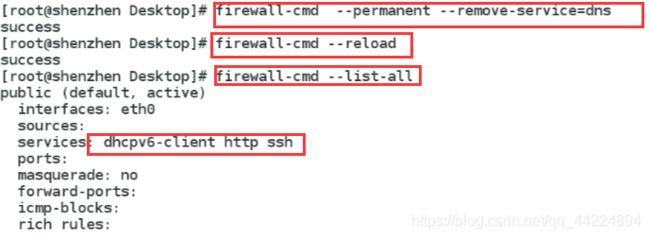
<3> 删除服务
reload和complete-reload的区别
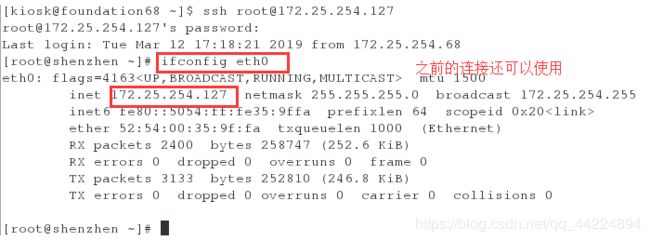
<1>真实主机先连接虚拟机

<2>reload
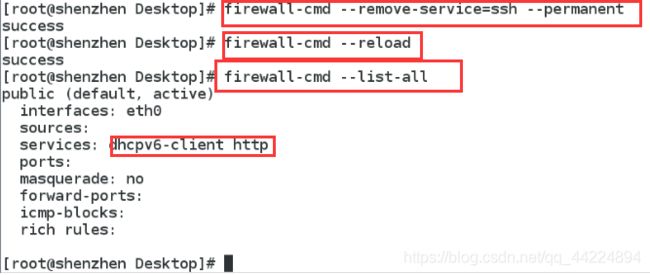
[root@shenzhen ~]# firewall-cmd --remove-service=ssh --permanent
success ##永久移除ssh服务,真实主机使用的ssh连接不会断开

[root@shenzhen ~]# firewall-cmd --reload ##刷新之后不会断开
success
[root@shenzhen ~]# firewall-cmd --list-all
[root@shenzhen ~]# firewall-cmd --complete-reload  ##完全刷新之后连接断开
success
5 管理防火墙规则(Direct Rules)
- 通过 firewall-cmd 工具,可以使用 --direct 选项在运行时间里增加或者移除链。如果不熟悉 iptables ,使用直接接口非常危险,因为你可能无意间导致防火墙被入侵。直接端口模式适用于服务或者程序,以便运行时间内增加特定的防火墙规则。直接端口模式添加的规则优先应用。
注:
-p 是tcp的端口
-d 端口
-s ip数据来源
-j 对数据做什么动作 ACCEPT允许 reject拒绝 drop丢弃
ipv4 的服务 filter表 的 INPUT链的 1 第一行
<1>将任务加入到filter表的INPUT链的第一行
firewall-cmd --direct --add-rule ipv4 filter INPUT 1 -p tcp --dport 22 -s 172.25.254.68 -j ACCEPT
##添加任务,指定只有68主机可以连接
firewall-cmd --direct --get-rules ##查看任务列表
firewall-cmd --direct --add-rule ipv4 filter INPUT 1 -p tcp --dport 22 ! -s 172.25.254.68 -j ACCEPT
##添加任务除了68都可以访问
firewall-cmd --direct --get-rules ##查看任务列表

测试端仍然可以访问,因为已经在第一行插入过任务,再次往第一行插入任务不会刷新之前的顺序,实际上是在第二行插入

<3>删除任务
firewall-cmd --direct --remove-rule ipv4 filter INPUT 1 -p tcp --dport 22 ! -s 172.25.254.68 -j ACCEPT
##将任务只有68可以访问移除
firewall-cmd --direct --get-rules  ##查看任务列表

测试端不可以访问
![]()
操作完后将剩余的任务也删除,避免对后面的实验造成影响

- *direct-rules 主要针对于filter表
- *rich-rules 主要针对于nat表
端口转发
外网的网段要进来,别人要访问我的时候将端口转发给里不过一个指定的ip
6 firewalld实现伪装和端口转发
例1:
- 火墙的伪装
具体步骤:
1 双网卡主机加入火墙伪装,刷新后列出信息
firewall-cmd --permanent --add-masquerade
firewall-cmd --reload
firewall-cmd --list-all

2 单网卡主机的网段是 1.1.1 将全局网关设置为双网卡主机的 1.1.1网段的ip
vim /etc/sysconfig/network
systemctl restart network

ping 172.25.254.127可以ping通

ping 172.25.254.68可以ping通

3 ssh 连接27主机连接成功
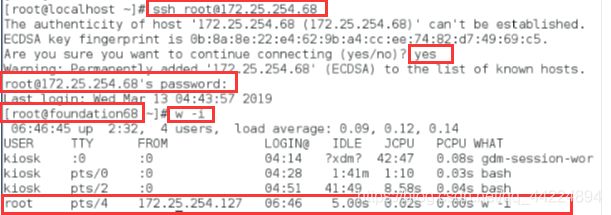
w -i查看那台主机连接过自己,发现连接27主机的是127主机,单真正连接68主机的是 1.1.1.227主机,172.25.254.127 主机只是充当了路由的角色
注意:若这个时候连接不上可能是双网卡值剧内核路由没有开启的原因
sysctl -a | grep forward
可以查看到内核路由有没有开
例2:
- 端口的转发
要实现让别的主机通过双网卡主机连接别人后查看到的是真实连接的主机需要用端口转发
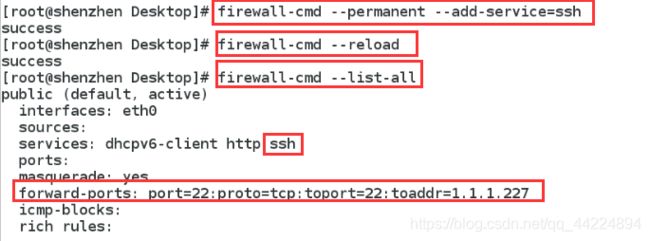
1 双网卡主机添加端口转发
firewall-cmd --permanent --zone=public --add-forward-port=potr=22:proto=tcp:toport=22:toaddr=1.1.1.227
![]()
表示任何主机通过22端口连接我的时候,都把22端口发送给 1.1.1.227这台主机
2 真实主机连接 172.25.254.127主机,连接成功,但是查看ip后发现连接的是 1.1.1.227 主机
出现以下报错可能是:
1.没有添加ssh服务(之前做实验将ssh服务永久删除了,需要重新添加)
2.没有删除filter表中的任务(上一个实验中filter表中的任务是拒绝所有来自68主机的连接)


