极客时间《TensorFlow快速入门与实践》笔记
文|Seraph
01 | 第一章 Tensorflow初印象
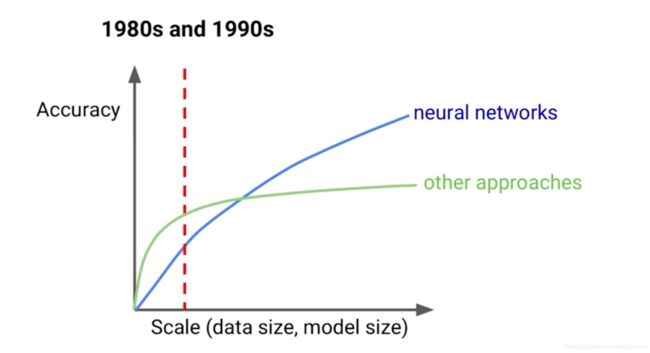
一、 TensorFlow产生的历史必然性
二、TensorFlow与JeffDean的那些事
-
Jeff Dean简介
Creator of TensorFlow
Creator of DistBelief
Designer of MapReduce
Designer of BigTable -
2012 Google DistBelief(内部使用) 到 2015 Google TensorFlow
文章:Large Scale Distributed Deep Networks.
三、TensorFlow的应用场景
- AlphaGo
- 找到适合人类居住的星球
- 无人银行
- OCR、人脸识别
四、TensorFlow的落地场景
- Google神经网络及其翻译(GNMT)
- 减少数据中心能源消耗
- 奶牛身体状况(保证高质量的牛奶输出)
- 疾病诊断
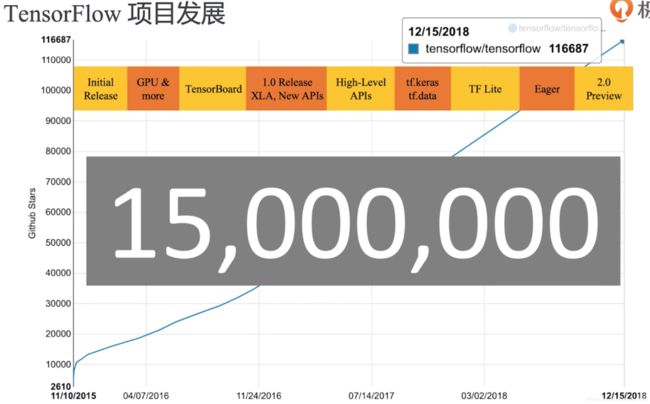
五、TensorFlow的发展现状
02 | 第二章 Tensorflow初接触
一、搭建TensorFlow开发环境
- 安装Python环境
brew update
brew install python  #使用brew安装python
curl https://bootstrap.pypa.io/get-pip.py -o get-pip.py   #curl命令作用是下载文件
python git-pip.py  #使用git-pip.py文件安装pip
sudo pip install -U virtualenv #安装virtualenv虚拟环境
virtualenv虚拟环境的好处:当我们需要多个版本tensorflow开发时,使用virtualenv可以隔离不同版本。
- 创建Python虚拟环境
virtualenv --system-site-packages -p python3.7 ./venv  #在当前venv目录下创建虚拟virualenv环境
source ./venv/bin/activate  #激活虚拟环境
- 安装适配的tensorflow软件包
pip install tensorflow   #安装tensorflow
pip list installed   #检查安装包
python     #进入Python
import tensorflow as tf   #导入tensorflow包
deactivate     #离开当前Python虚拟环境
二、“Hello TensorFlow”
import tensorflow as tf
hello = tf.constant("hello TensorFlow")  #定义常量操作,注意"不要输入成中文的,
sess = tf.Session() #创建一个会话
print(sess.run(hello)) #执行常量操作hello,并将结果打印到标准输出
执行sess = tf.Session()时可能会提示,CPU不支持AVX2指令集,但是没有关系,其中AVX2指令集是intel新发布的指令集,在AVX上扩展而来,有些老机器不支持。
三、在交互环境中使用TensorFlow
- 安装jupyter
pip install jupyter
python -m ipykernel install --user --name=venv  #将jupyter解析器绑定值venv虚拟环境,注意venv不要写错,因为写错了,也能执行成功,但是后面jupyter可能找不到venv
jupyter kernelspec list  #查看可用的kernel
jupyter notebook
四、在容器中使用TensorFlow
- 安装Docker,直接从官网上下载Docker stable并安装,手动安装步骤跟普通软件一样。
- 手动启动,我这里不知道为什么开始启动的时候老是失败,但是再次启动时,就OK了。我估计是第一次启动时,权限受制导致未初始化好。。。
- 使用docker
docker pull tensorflow/tensorflow:nightly-jupyter   #拉一个tensorflow镜像
docker run -it --rm -p 8888:8888 -v $PWD:/tf/notebooks tensorflow/tensorflow:nightly-jupyter
上面最后一条语句:映射关系是从实际:docker容器中,所以$PWD:/tf/notebooks表示将本地目录映射到容器中/tf/notebooks目录中。
现在我们就可以用浏览器登录jupyter了,不过我们输入localhost:8888时,会发现如下界面:

由于我们访问的不再是我们本机的jupyter,而是docker容器中的,这里提示我们需要密码。而我们肯定是不知道的,但可以从我们刚才docker镜像启动界面最下方拷贝那段token。
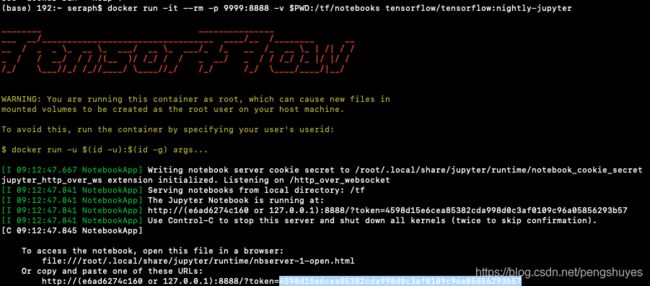
用localhost:8888/?token=598d15e6cea85382cda998d0c3af0109c96a05856293b57的直接访问,也可用这段token重置新密码。
03 | 第三章 Tensorflow基本概念解析
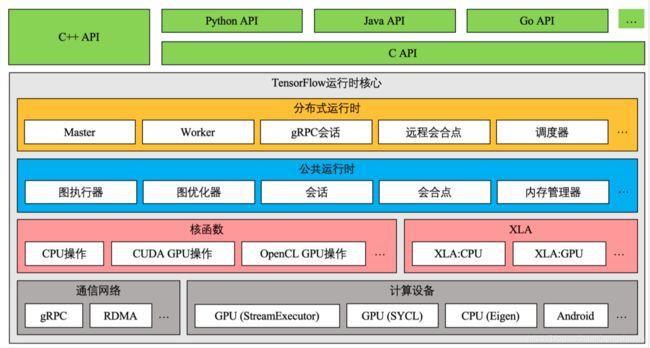
一、TensorFlow模块与架构介绍
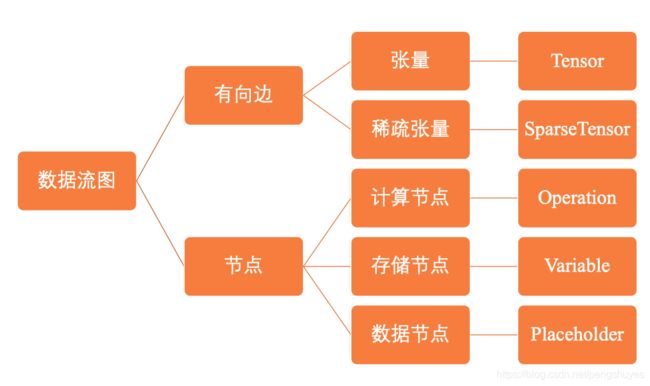
二、TensorFlow数据流图
- 并行计算快(图的拓扑结构,各个节点的依赖关系很明确,当节点入度为0时,就可运行)
- 分布式计算快(CPUs,GPUs, TPUs)
- 预编译优化(XLA)
- 可移植性(Language-independent representation)
三、张量Tensor
- 在数学里,张量是一种几何实体,广义上表示任意形式的“数据”。张量可以理解为0阶标量、1阶向量、2阶矩阵在高维空间上的推广,张量的阶描述它表示数据的最大维度。
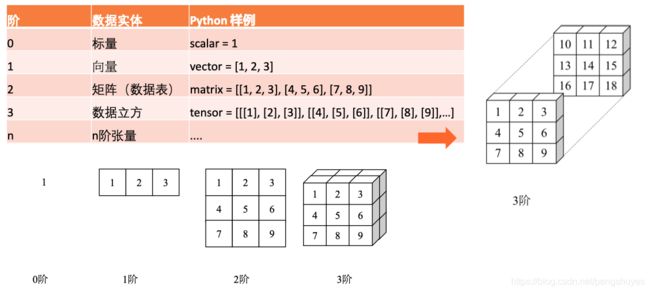
- 在TensorFlow中,张量Tensor表示某种
相同数据类型的多维数组。有两个属性:
- 数据类型(浮点型、整形、字符串等)
- 数组形状(各个维度的大小)。
- TensorFlow张量的特点
- 张量是执行操作时的输入或输出数据
- 用户通过执行操作来创建或计算张量
- 张量的形状不一定在编译时确定,可以在运行时通过形状推断计算得出。
- 几种比较特殊的张量:
- tf.constant //常量,类似于 y = a x + b y=ax+b y=ax+b中的 a a a、 b b b
- tf.placeholder //占位符,没有数据,也没有固定形状
- tf.Variable //变量
- Code示例:
import tensorflow as tf
# 0阶张量
mammal = tf.Variable("Elephant", tf.string)
ignition = tf.Variable(451, tf.int16)
floating = tf.Variable(3.14159265359, tf.float64)
its_complicated = tf.Variable(12.3 - 4.85j, tf.complex64)

# 1阶张量
mystr = tf.Variable(["Hello", "World"], tf.string)
cool_numbers  = tf.Variable([3.14159, 2.71828], tf.float32)
first_primes = tf.Variable([2, 3, 5, 7, 11], tf.int32)
its_very_complicated = tf.Variable([12.3 - 4.85j, 7.5 - 6.23j], tf.complex64)

# 2阶张量
mymat = tf.Variable([[7],[11]], tf.int16)
myxor = tf.Variable([[False, True],[True, False]], tf.bool)
linear_squares = tf.Variable([[4], [9], [16], [25]], tf.int32)
squarish_squares = tf.Variable([ [4, 9], [16, 25] ], tf.int32)
rank_of_squares = tf.rank(squarish_squares)
mymatC = tf.Variable([[7],[11]], tf.int32)

# 4阶张量
my_image = tf.zeros([10, 299, 299, 3])  # batch x height x width x color
四、变量Variable
- TensorFlow变量
Variable的主要作用是维护特定节点的状态,如深度学习或机器学习的模型参数。 tf.Variable方法是操作,返回值是变量(特殊变量)。- 通过
tf.Variable方法创建的变量,与张量一样,可以作为操作的输入和输出。但其不同之处在于:
- 张量的生命周期通常随着依赖的计算完成而结束,内存也随之释放。变量则是常驻内存,在每一步训练时不断更新其值,以实现模型参数的更新。
- Code示例一
import tensorflow as tf
#创建变量
w = tf.Variable(<initial-value>, name=<optional-name>)
#将变量作为操作的输入
y = tf.matmul(w, ...another vaiable or tensor ...)
z = tf.sigmoid(w + y)
# 使用asssign或assign_xxx方法重新给变量赋值
w.assgin(w + 1.0)
w.assgin_add(1.0)
import tensorflow as tf
# 创建变量
# tf.random_normal 方法返回形状为(1,4)的张量。它的4个元素符合均值为100、标准差为0.35的正态分布。
W = tf.Variable(initial_value=tf.random_normal(shape=(1, 4), mean=100, stddev=0.35), name="W")
b = tf.Variable(tf.zeros([4]), name="b")

# 初始化变量
# 创建会话(之后小节介绍)
sess = tf.Session()
# 使用 global_variables_initializer 方法初始化全局变量 W 和 b
sess.run(tf.global_variables_initializer())
# 执行操作,获取变量值
sess.run([W, b])

# 执行更新变量 b 的操作
sess.run(tf.assign_add(b, [1, 1, 1, 1]))

# 查看变量 b 是否更新成功
sess.run(b)
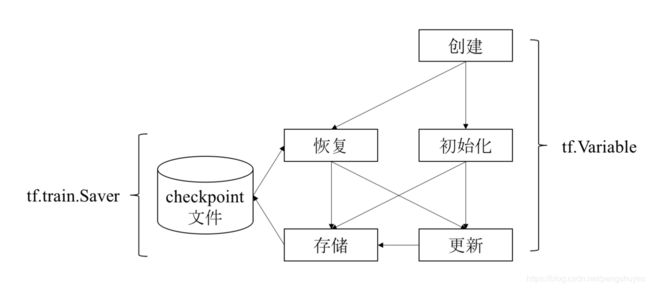
- Saver使用示例
v1 = tf.Variable(..., name='v1')
v2 = tf.Variable(..., name='v2')
# 指定需要保存和恢复的变量
saver = tf.train.Saver({'v1': v1, 'v2': v2}) #Key-Value的形式存储
saver = tf.train.Saver([v1, v2])# 默认以变量操作名为Key存储
saver = tf.train.Saver({v.op.name: v for v in [v1, v2]}) #等同于上一句
# 保存变量的方法
tf.train.saver.save(sess, 'my-model', global_step=0) # ==> filename: 'my-model-0'
以上代码最后一句的global_step参数在训练时很有用,一般我们要训练很多遍,这里步数可以让我们回溯每一步的保存值。
Code 示例三:
# 创建Saver
saver = tf.train.Saver({'W': W, 'b': b})
# 存储变量到文件 './summary/test.ckpt-0'
saver.save(sess, './summary/test.ckpt', global_step=0)

# 再次执行更新变量 b 的操作
sess.run(tf.assign_add(b, [1, 1, 1, 1]))
# 获取变量 b 的最新值
sess.run(b)

# 从文件中恢复变量 b 的值
saver.restore(sess, './summary/test.ckpt-0')
# 查看变量 b 是否恢复成功
sess.run(b)

# 从文件中恢复数据流图结构
# tf.train.import_meta_graph
第一步运行以后,我们可以在./summary文件夹下发现几个文件,其中.index后缀文件为索引文件,为了数据量很大时,快速查找;.meta存储着数据流图的结构;.data存在的数据。
五、操作Operation
- 节点分为三类:
- 存储节点:有状态的变量操作,通常用来存储模型参数。
- 计算节点:无状态的计算或控制操作,主要负责算法逻辑表达或流程控制。
- 数据节点:数据的占位符操作,用于描述图外输入数据的属性。
- 操作的输入和输出是张量或操作(函数式编程)
- 典型计算和控制操作
- Tensorflow使用占位符操作(tf.placeholder())表示图外的数据,如训练和测试数据。具体数据可以在会话中通过参数传递,也就是先占位,再在会话运行时通过具体数据格式传入参数相应的形状和值。
- Tensorflow数据流图描述了算法模型型的计算拓扑,在用户向数据流图填充数据前,图中并没有真正执行任何计算。
- Operation示例代码:
mport tensorflow as tf
a = tf.constant(2)
b = tf.constant(3)
with tf.Session() as sess:
print("a: %i:" % sess.run(a))
print("b: %i:" % sess.run(b))
print("Addition with constants : %i " % sess.run(a + b))
print("Multiplication with constants : %i " % sess.run ( a * b))
x = tf.placeholder( tf.int16 , shape= () , name = "x")
y = tf.placeholder( tf.int16 , shape= () , name = "y")
add = tf.add(x, y)
mul = tf.multiply(x, y)
with tf.Session() as sess:
print("Addition with constants : %i" % sess.run (add , feed_dict = { x : 10 , y : 3}) )
六、会话Session
- 会话提供 了估算张量和执行操作的运行环境,它是发放计算任务的客户端,所有计算任务都由它连接的执行引擎完成。
| 参数 | 功能说明 |
|---|---|
| target | 会话连接的执行引擎 |
| graph | 会话加载的数据流图 |
| config | 会话启动时的配置项 |
- 其它两种运行计算的示例代码(除了session.run()):
import tensorflow as tf
# 创建数据流图:y = W * x + b,其中W和b为存储节点,x为数据节点。
x = tf.placeholder(tf.float32)
W = tf.Variable(1.0)
b = tf.Variable(1.0)
y = W * x + b
with tf.Session() as sess:
    tf.global_variables_initializer().run() # Operation.run
    fetch = y.eval(feed_dict={x: 3.0})      # Tensor.eval
    print(fetch)                            # fetch = 1.0 * 3.0 + 1.0
以上两种方式,其实底层都是调用了Session.run方法。 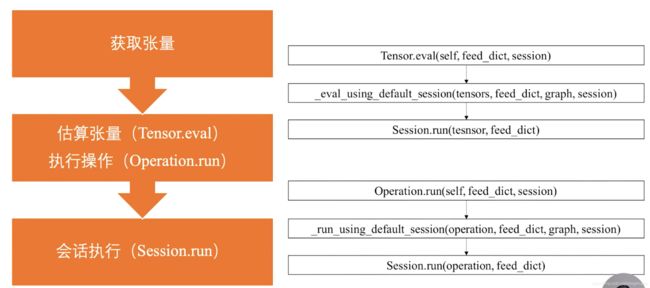
3. 会话执行原理
- 首先,程序内部提取操作依赖的素有前置操作。这些操作的节点共同组成一幅子图。
- 然后,程序会将子图中的计算节点、存储节点和数据节点按照各自执行设备分类,相同设备上的节点组成了一幅局部图。
- 最后,每个设备上的局部图在实际执行时,根据节点间的依赖关系将各个节点有序加载到设备上执行。(0入度节点便可进行执行)
七、优化器Optimizer
- 优化器算法
- 一阶导数:梯度下降法
- 二阶导数:牛顿法
- 前几轮迭代的信息:Adam
- tensorflow常用的优化器
04 | 第四章 实战Tensorflow房间预测
一、监督学习
- 监督学习典型算法
- 线性回归 Linear Regression
- 逻辑回归 Logistic Regression
- 决策树 Decision Tree
- 随机森林 Random Forest
- 最近邻算法 k-NN
- 朴素贝叶斯 Naive Bayes
- 支持向量机 SVM
- 感知器 Perceptron
- 深度神经网络 DNN
- 线性回归过程中,为了消除代价函数的系数,一般将代价函数乘以1/2,同时也不影响优化策略与梯度下降方向。
二、数据处理
- matplotlib:一个Python 2D绘图库。
- seaborn:基于matplotlib的Python数据可视化库。
- mplot3d:基础3D绘图工具集,一般会跟matplotlib一起安装。
- . 数据处理Numpy
人脸识别算法的三个流程:
1 人脸检测(Face detection)
2 人脸对齐(Face Alignment)
3 人脸特征表征(Features Representation)
发展的三个阶段:
1 早期算法:基于集合特征、子空间、
2
3
早期算法
线性降维:PCA降维、LDA降维
非线性降维:流行学习
第二阶段:
人工特征+分类器:逻辑回归、贝叶斯、支持向量机、神经网络等。
HOG\SIFT\Gabor\LBP
联合贝叶斯
LWF测试集
第三阶段:
基于深度学习的算法:DeepFace、FaceNet(Triplet Loss)
工具:
OpenCV(pip3 install opencv-python)
OpenCL
face_recognition
Triplet Loss
FaceNet-NN1
FaceNet-NN2
OpenFace
TFX
Kubeflow
ML GDE
