zuul网关集成swagger
swagger2是一个API文档生成工具,在微服务的架构中,一般会使用zuul作为api网关,适合用来集成swagger生成所有微服务的接口文档。(springboot版本1.5.9)
zuul服务添加依赖
springfox-swagger2是用于生成接口文档的,必须要依赖
springfox-swagger-ui负责提供ui查询界面,这里因为是在zuul集成,所以只需要zuul依赖就可以了,其他的应用只负责提供接口文档的数据,不需要ui界面查询,所以无需依赖
            io.springfox
            springfox-swagger2
            2.7.0


            io.springfox
            springfox-swagger-ui
            2.7.0
zuul添加swagger配置
import org.springframework.cloud.netflix.zuul.filters.Route;
import org.springframework.cloud.netflix.zuul.filters.RouteLocator;
import org.springframework.context.annotation.Configuration;
import org.springframework.context.annotation.Primary;
import springfox.documentation.swagger.web.SwaggerResource;
import springfox.documentation.swagger.web.SwaggerResourcesProvider;
import springfox.documentation.swagger2.annotations.EnableSwagger2;
import java.util.ArrayList;
import java.util.List;

//通过configuration注解自动注入配置文件
@Configuration
//开启swagger功能
@EnableSwagger2
//如果有多个配置文件,以这个为准
@Primary
//实现SwaggerResourcesProvider,配置swagger接口文档的数据源
public class SwaggerConfig  implements SwaggerResourcesProvider {

    //RouteLocator可以根据zuul配置的路由列表获取服务
    private final RouteLocator routeLocator;

    public SwaggerConfig(RouteLocator routeLocator) {
        this.routeLocator = routeLocator;
    }

    //这个方法用来添加swagger的数据源
    @Override
    public List get() {
        List resources = new ArrayList();
        List routes = routeLocator.getRoutes();
        //通过RouteLocator获取路由配置,遍历获取所配置服务的接口文档,这样不需要手动添加,实现动态获取
        for (Route route: routes) {
            resources.add(swaggerResource(route.getId(), route.getFullPath().replace("**", "v2/api-docs"),"2.0"));
        }
        return resources;
    }

    private SwaggerResource swaggerResource(String name, String location, String version) {
        SwaggerResource swaggerResource = new SwaggerResource();
        swaggerResource.setName(name);
        swaggerResource.setLocation(location);
        swaggerResource.setSwaggerVersion(version);
        return swaggerResource;
    }

}
一般来说zuul服务不会额外提供接口,所以zuul服务本身不需要创建swagger文档,到这里就完成了与swagger的集成,下面是其他服务的集成
================================================================================================
添加依赖
是需要依赖springfox-swagger2即可
            io.springfox
            springfox-swagger2
            2.7.0
添加配置文件
import io.swagger.annotations.Api;
import io.swagger.annotations.ApiOperation;
import org.springframework.context.annotation.Bean;
import org.springframework.context.annotation.Configuration;
import springfox.documentation.builders.ApiInfoBuilder;
import springfox.documentation.builders.PathSelectors;
import springfox.documentation.builders.RequestHandlerSelectors;
import springfox.documentation.service.*;
import springfox.documentation.spi.DocumentationType;
import springfox.documentation.spring.web.plugins.Docket;
import springfox.documentation.swagger2.annotations.EnableSwagger2;

@Configuration
@EnableSwagger2
public class SwaggerConfig {

    //创建接口文档
    @Bean
    public Docket createRestApi() {
        return new Docket(DocumentationType.SWAGGER_2)
                .apiInfo(apiInfo())
                .select()
                //扫描com.au.sa包下文件
                .apis(RequestHandlerSelectors.basePackage("com.au.sa"))
                //扫描@Api注解的类
                .apis(RequestHandlerSelectors.withClassAnnotation(Api.class))
                //扫描@ApiOperation注解的方法
                .apis(RequestHandlerSelectors.withMethodAnnotation(ApiOperation.class))
                .paths(PathSelectors.any())
                .build();
    }

    //接口文档的描述
    private ApiInfo apiInfo() {
        return new ApiInfoBuilder()
                .title("XXX模块")
                .description("XXX模块")
                .version("1.0")
                .build();
    }


}
创建接口类
接口类注意要在上面扫描的com.au.sa包下面,类要注入@Api,需要生成接口文档的接口需要加上@ApiOperation注解
@Api(tags = "customer服务接口")
@RestController
@RequestMapping("/customerService")
public class CustomerService extends MyCommonService {

    private static final Logger LOGGER = LoggerFactory.getLogger(CustomerService.class);
    @Autowired
    private ICustomer customerServer;

    @Override
    public IMybatisBaseCommon getBaseCommonServer() {
        return this.customerServer;
    }


    @ApiOperation("查询列表(不分页)")
    @ApiImplicitParam(name = "params", value = "查询参数",dataType = "String")
    @GetMapping("/findCustomerList")
    public String findCustomerList(@RequestParam(required = false) String params){
        return this.findList(params);
    }

    @ApiOperation("分页查询")
    @ApiImplicitParams(value = {
            @ApiImplicitParam(name = "params",value = "查询参数",dataType = "String", required = true),
            @ApiImplicitParam(name = "pageIndex",value = "当前页码", dataType = "int"),
            @ApiImplicitParam(name = "pageRows",value = "分页大小", dataType = "int")})
    @GetMapping("/findCustomerPagination")
    public String findCustomerPagination(@RequestParam(required = false) String params,
                                         @RequestParam(required = false,defaultValue = "1") Integer pageIndex,
                                         @RequestParam(required = false,defaultValue = "10") Integer pageRows){
        return super.findPagination(params,pageIndex,pageRows);
    }


    @ApiOperation("根据主键ID获取对象")
    @ApiImplicitParam(name = "params", value = "json字符串格式,必须包含参数id",dataType = "String", required = true)
    @PostMapping("/findById")
    public String findById(@RequestParam String params) {
        return super.findById(params);
    }


    @ApiOperation("保存")
    @ApiImplicitParam(name = "params",value = "需要保存的对象,json字符串格式", dataType = "String", required = true)
    @PostMapping("/save")
    public String saveOrUpdate(@RequestParam String params) {
        return super.saveOrUpdate(params);
    }

    @ApiOperation("删除")
    @ApiImplicitParam(name = "params", value = "json字符串格式,必须包含参数id,多个id用逗号隔开", dataType = "String", required = true)
    @PostMapping("/delete")
    public String delete(@RequestParam String params) {
        return super.delete(params);
    }
}
验证
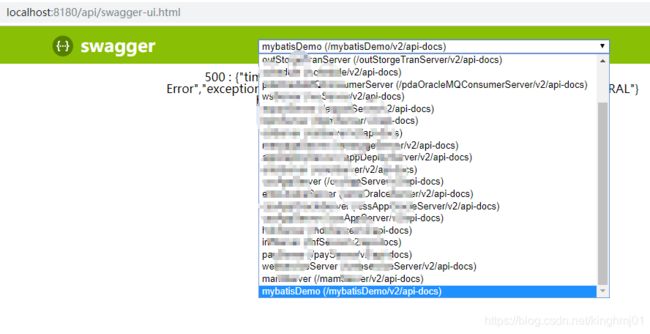
zuul服务起来之后就可以访问到swagger了,这里zuul因为是加了api前缀,所以访问的时候要加上/api,一般来说直接主机ip+端口号+/swagger-ui.html就可以访问了,下拉列表就是根据zuul的路由配置所拿到的服务。(这里还没有起其他服务,所以是500)
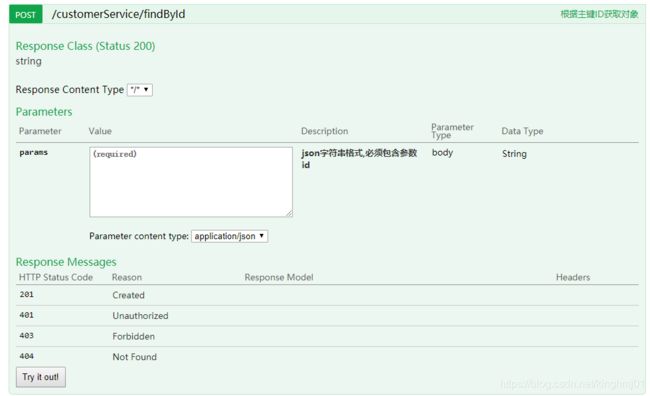
接下来把其他服务启动一下,然后在界面选择对应的服务,起来之后就可以看到扫描出来的接口
点击具体接口可以看到接口的详细说明,这些说明都是根据接口类中方法的注解生成的,具体注解属性对应的说明自行百度一下swagger的注解说明
这里记录一下遇到的几个坑:
1.swagger2的获取文档的接口以及页面等静态资源都是依赖包中提供的,如果项目中对请求有拦截的话需要将swagger的相关接口添加到例外,否则将无法访问,springboot的可以使用corsconfig的方式添加排除,主要将下面几个前缀的添加到例外
whiteList.add("swagger-resources");
whiteList.add("configuration");
whiteList.add("v2/");
whiteList.add("swagger-ui.html");
whiteList.add("webjars");
2.其他服务类在配置swagger的时候,createRestApi()生成接口文档扫描时不要贪图方便直接扫描@Api或者@ApiOperation,还是按照上面的扫描对应的包下面的,否则会将swagger自身的接口也会一起扫描出来或者是扫描不到方法


