Netty之Pipeline的原理和事件传播机制
Netty之Pipeline的原理和事件传播机制
文章目录
- Netty之Pipeline的原理和事件传播机制
- 一、包含知识点
- 二、 Channel和Pipeline之间关系
- 三、ChannelPipeline初始化流程
- 3.1 Channel初始化流程
- 3.2 Pipeline实例化
- 3.3 Pipeline实例化后图示
- 四、ChannelInitializer添加
- 4.1 init添加自定义handler、childHandler
- 4.2 handler转ChannelHandlerContext
- 4.3 init之后pipeline队列情况
- 五、自定义ChannelHandler添加入队列
- 5.1 自定义ChannelHandler添加流程
- 5.2 自定义ChannelHandler入队后情况
- 5.3 ChannelHandler默认命名规则
- 六、Pipeline事件传播机制
- 6.1 事件传播机制
- 6.2 事件传播分类
- 6.3 自定义事件传播方式
- 6.4 OutBound事件传播方式
- 6.5 inBound事件传播方式
- 6.6 事件传播总结
一、包含知识点
- ChannelPipeline初始化流程
- ChannelPipeline初始化流程
- ChannelInitializer添加
- 自定义ChannelHandler添加入队列
- Pipeline事件传播机制
二、 Channel和Pipeline之间关系
本篇文章主要讲解Netty中Pipeline相关的知识点 , 而pipeline和Channel有着紧密的联系, 数据的读取、写入都需要经过Channel,而Pipeline被绑定到了Channel, 那么从哪里可以知道Channel和Pipeline之间有关系呢 ?
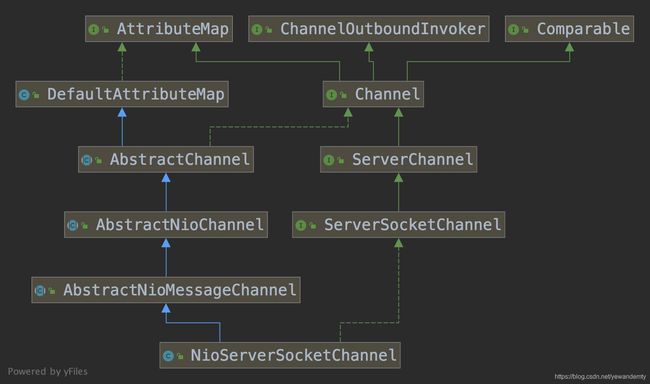
常见的Channel有NioServerSocketChannel、NioSocketChannel, 这里我们看下NioServerSocketChannel类继承关系, 从类继承关系 NioServerSocketChannel -> AbstractNioMessageChannel -> AbstractNioChannel -> AbstractChannel 进行查找, 在AbstractChannel抽象类中我们找到了pipeline变量, 这说明了Channel和Pipeline是有相互关系的
//AbstractChannel
private final DefaultChannelPipeline pipeline;
三、ChannelPipeline初始化流程
3.1 Channel初始化流程
在第二节中我们知道Channel和Pipeline之间存在联系, 那么Pipeline的初始化是否和Channel初始化有关系呢?带着这个疑问, 先查看抽象类AbstractChannel, 在构造方法中看到下面的代码, pipeline是在构造函数中创建的, 而构造函数在初始化的时候才会调用, 也就是Channel初始化的时候会同时创建pipeline对象。
//AbstractChannel
protected AbstractChannel(Channel parent) {
  this.parent = parent;
  id = newId();
  unsafe = newUnsafe();
  pipeline = newChannelPipeline();
}

protected AbstractChannel(Channel parent, ChannelId id) {
  this.parent = parent;
  this.id = id;
  unsafe = newUnsafe();
  pipeline = newChannelPipeline();
}
在上篇 Netty 核心原理之运行机制 文章中我们提到了Channel创建方式,服务启动(bind、connect)的时候会执行initAndRegister()方法, 该方法会执行channelFactory.newChannel()创建具体的Channel, 这里以NioServerSocketChannel为例说明
final ChannelFuture initAndRegister() {
  Channel channel = null;
  try {
    /**
     * Channel对象的创建, 来自下面语句
     * channel(NioServerSocketChannel.class)
     */
    channel = channelFactory.newChannel(); // 创建Channel对象, 这里是 NioServerSocketChannel
    init(channel); // 对Channel对象进行初始化
  } catch (Throwable t) {
    //... 省略部分其它代码
  }

  //... 省略部分其它代码

  return regFuture;
}
Channel构造方法初始化调用流程如下, 从构造函数初始化流程在AbstractChannel抽象类中找到了pipeline创建逻辑, 和本小节开始时分析是一致的。
//NioServerSocketChannel
public NioServerSocketChannel() {
  this(newSocket(DEFAULT_SELECTOR_PROVIDER));
}

public NioServerSocketChannel(ServerSocketChannel channel) {
  super(null, channel, SelectionKey.OP_ACCEPT);
  config = new NioServerSocketChannelConfig(this, javaChannel().socket());
}
// AbstractNioMessageChannel
protected AbstractNioMessageChannel(Channel parent, SelectableChannel ch, int readInterestOp) {
  super(parent, ch, readInterestOp);
}

// AbstractNioChannel
protected AbstractNioChannel(Channel parent, SelectableChannel ch, int readInterestOp) {
  super(parent);
  //...省略其它部分代码
}

//AbstractChannel
protected AbstractChannel(Channel parent) {
  this.parent = parent;
  id = newId();
  unsafe = newUnsafe();
  pipeline = newChannelPipeline();
}
3.2 Pipeline实例化
pipeline实例化是调用内部方法newChannelPipeline创建的
protected DefaultChannelPipeline newChannelPipeline() {
  return new DefaultChannelPipeline(this);
}
DefaultChannelPipeline创建的时候做了什么事情呢? 看下下面的代码
protected DefaultChannelPipeline(Channel channel) {
  this.channel = ObjectUtil.checkNotNull(channel, "channel");
  succeededFuture = new SucceededChannelFuture(channel, null);
  voidPromise =  new VoidChannelPromise(channel, true);

  tail = new TailContext(this);
  head = new HeadContext(this);

  head.next = tail;
  tail.prev = head;
}
可以看到, 入参channel赋值给了this.channel, 同时创建了两个字段tail、head,这两个字段维护了以AbstractChannelHandlerContext为节点的双向链表, 分别表示队尾、队头,这个双向链表是Netty实现Pipeline机制的关键, 下面分别看下HeadContext、TailContext类结构图

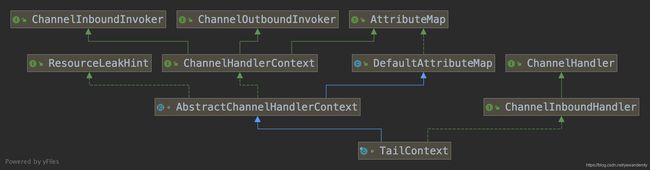
从类结构图可以看出, HeadContext、TailContext主要相似和区别是
- 差异
- HeadContext实现了ChannelOutboundHandler(虽然也实现了ChannelInboundHandler)
- TailContext实现了ChannelInboundHandler
- 相似
- 都实现了ChannelHandler、ChannelHandlerContext, 可以说head、tail既是一个ChannelHandler, 也是ChannelHandlerContext
从上面类继承关系我们知道HeadContext、TailContext的差异是ChannelOutboundHandler、ChannelInboundHandler, 那从哪里可以直观的这种区别呢 ? 我们看下HeadContext、TailContext构造方法
//HeadContext
HeadContext(DefaultChannelPipeline pipeline) {
  super(pipeline, null, HEAD_NAME, false, true);
  unsafe = pipeline.channel().unsafe();
  setAddComplete();
}

//TailContext
TailContext(DefaultChannelPipeline pipeline) {
  super(pipeline, null, TAIL_NAME, true, false);
  setAddComplete();
}
从构造方法中, 主要差别是super调用时入参的区别
- name的区别, 这点事显然的为了区别队列的头和尾
- inbound、outbound的区别
- head: inbound – false ,outbound – true
- tail: inbound – true ,outbound – false
3.3 Pipeline实例化后图示

四、ChannelInitializer添加
4.1 init添加自定义handler、childHandler
首先我们看下ChannelInitializer的使用代码示例
ServerBootstrap b = new ServerBootstrap();
b.group(bossGroup, workerGroup)
  .channel(NioServerSocketChannel.class)
  .handler(new new LengthFieldBasedFrameDecoder())
  .childHandler(new ChannelInitializer<SocketChannel>() {

    @Override
    protected void initChannel(SocketChannel ch) throws Exception {
      ChannelPipeline pipeline = ch.pipeline();

      //对象参数类型编码器
      pipeline.addLast("encoder",new ObjectEncoder());
      //对象参数类型解码器
      pipeline.addLast("decoder",new ObjectDecoder(Integer.MAX_VALUE,ClassResolvers.cacheDisabled(null)));
    }
  })
  .option(ChannelOption.SO_BACKLOG, 128)
  .childOption(ChannelOption.SO_KEEPALIVE, true);
在第三节中,DefaultChannelPipeline创建后, 并不能实现什么功能, 因为并没有给他添加自定义的ChannelHandler, 而自定义功能是在childHandler或handler里面, 通过自定义实现的ChannelInitializer#initChannel方法添加自定义handler, 那么ChannelInitializer是什么时候添加到ChannelPipeline的呢?在3.1节中,我们提到了initAndRegister()方法, 查看对应代码, 在创建Channel之后还有init()方法,查看该方法代码
//ServerBootstrap
void init(Channel channel) throws Exception {
  // ...省略部分其它代码
  ChannelPipeline p = channel.pipeline();
  // ...
  p.addLast(new ChannelInitializer<Channel>() {
    @Override
    public void initChannel(Channel ch) throws Exception {
      final ChannelPipeline pipeline = ch.pipeline();
      ChannelHandler handler = config.handler(); //初始化时 .handler() 对应逻辑
      if (handler != null) {
        pipeline.addLast(handler);
      }

      ch.eventLoop().execute(new Runnable() { //初始化时 .childHandler() 对应逻辑
                    @Override
                    public void run() {
                        pipeline.addLast(new ServerBootstrapAcceptor(
                                currentChildGroup, currentChildHandler, currentChildOptions, currentChildAttrs));
                    }
                });
      //... 省略部分其它代码
    }
  });
}
init方法初始化相关信息的时候, 通过ChannelInitializer将handler、chiledHandler中添加的自定义handler添加到pipeline队列中(这里是以Server端init方法举例),从源码中可以看出存在handler时才会进行添加,而childHandler会被封装成ServerBootstrapAcceptor再进行添加,如果是Client则直接对handler进行添加, 那么handler、childHandler有什么区别呢 ?
- handler:
- 在Server、Client端都存在对应实现
- 初始化的时候,如果handler不为空, 会执行相关handler
- 用于监听Channel各种动作以及状态的改变, 包括连接、绑定、接收消息等
- childHandler
- 只在Server端存在
- 在客户端成功连接后才执行, 源码中chidlHandler是在自定义线程中被封装成ServerBootstrapAcceptor再添加到pipeline
- 用于监听已连接客户端的Channel动作和状态
4.2 handler转ChannelHandlerContext
在上一节中,我们知道通过addLast方法添加的参数是ChannelHandler, 而队列维护的元素是AbstractChannelHandlerContext, 那么ChannelHandler是怎么转换为AbstractChannelHandlerContext的呢 ?查看addLast()核心方法
public final ChannelPipeline addLast(EventExecutorGroup group, String name, ChannelHandler handler) {
  final AbstractChannelHandlerContext newCtx;
  synchronized (this) {
    checkMultiplicity(handler); // 检查handler是否重复
    newCtx = newContext(group, filterName(name, handler), handler); // 创建DefaultChannelHandlerContext
    addLast0(newCtx); //将Context添加到队列尾部
  }
  // 省略部分其它代码

  return this;
}
该构造方法主要做了下面几个事情
- 为了避免并发问题, 用synchronized同步锁进行修饰
- checkMultiplicity()方法检测handler是否重复, 如果重复会抛ChannelPipelineException异常
- newContext()方法将handler封装成AbstractChannelHandlerContext
- addLast0()方法将新创建的newCtx添加到队列中
newContxt()方法具体干什么了呢 ? 查询代码
//DefaultChannelPipeline
private AbstractChannelHandlerContext newContext(EventExecutorGroup group, String name, ChannelHandler handler) {
  return new DefaultChannelHandlerContext(this, childExecutor(group), name, handler);
}

//DefaultChannelHandlerContext
DefaultChannelHandlerContext(
            DefaultChannelPipeline pipeline, EventExecutor executor, String name, ChannelHandler handler) {
  super(pipeline, executor, name, isInbound(handler), isOutbound(handler));
  if (handler == null) {
    throw new NullPointerException("handler");
  }
  this.handler = handler;
}
在构造方法DefaultChannelHandlerContext调用super操作时, 调用了isInbound、isOutnound方法,下面是两个方法的实现逻辑
private static boolean isInbound(ChannelHandler handler) {
  return handler instanceof ChannelInboundHandler;
}

private static boolean isOutbound(ChannelHandler handler) {
  return handler instanceof ChannelOutboundHandler;
}
从实现逻辑可以看出, isInbound、isOutbound分别是以ChannelInboundHandler、ChannelOutboundHandler来确定的, 如果handler继承了ChannelInboundHandler则为inbound、如果继承了ChannelOutboundHandler则为outBound
- ChannelInboundHandler
- ZlibDecoder
- LineBasedFrameDecoder
- ObjectDecoder
- ChannelOutboundHandler
- Bzip2Encoder
- ObjectEncoder
- LengthFieldPrepender
通过newCtx方法创建完Context后, 执行addLast0方法进行入队操作, 下面是相关逻辑代码,在保持HeadContext、TailContext队头、队尾不变的情况下, 将新添加的节点newCtx作为队列的尾部。
private void addLast0(AbstractChannelHandlerContext newCtx) {
  AbstractChannelHandlerContext prev = tail.prev;
  newCtx.prev = prev;
  newCtx.next = tail;
  prev.next = newCtx;
  tail.prev = newCtx;
}
4.3 init之后pipeline队列情况

五、自定义ChannelHandler添加入队列
5.1 自定义ChannelHandler添加流程
第四节中我们分析了child、childHandler中ChannelInitiallzer添加入队列的流程, ChannelInitiallzer中定义的自定义ChannelHandler又是怎么添加到队列中的呢 ?本小节对这个做分析,首先我们再次看下initAndRegister方法
final ChannelFuture initAndRegister() {
  Channel channel = null;
  try {
    channel = channelFactory.newChannel(); //创建channel
    init(channel); // 初始化channel
  } catch (Throwable t) {
    // 省略部分代码
  }

  ChannelFuture regFuture = config().group().register(channel); // 将channel进行注册到selector
  //省略部分代码

  return regFuture;
}
前面我们已经分析过newChannel()、init()相关方法对应逻辑,只有handler、childHandler对应ChannelInitializer添加涉及到pipeline逻辑,没有涉及到自定义ChannelHandler添加入队列逻辑, 继续查看initAndRegister方法, 其中有下面部分代码
ChannelFuture regFuture = config().group().register(channel);
这部分代码在 Netty 核心原理之运行机制 已经分析过, 这里不再分析,直接跟踪代码到如下register0代码,代码块中,只保留了需要分析的部分逻辑代码
//AbstractChannel
private void register0(ChannelPromise promise) {
  try {
    // 省略部分代码
    pipeline.fireChannelRegistered();
    // 省略部分代码
  } catch (Throwable t) {
    // 省略部分代码
  }
}

//DefaultChannelPipeline
public final ChannelPipeline fireChannelRegistered() {
  AbstractChannelHandlerContext.invokeChannelRegistered(head);
  return this;
}

//AbstractChannelHandlerContext
static void invokeChannelRegistered(final AbstractChannelHandlerContext next) {
  EventExecutor executor = next.executor();
  if (executor.inEventLoop()) {
    next.invokeChannelRegistered();
  } else {
    executor.execute(new Runnable() {
      @Override
      public void run() {
        next.invokeChannelRegistered();
      }
    });
  }
}

//AbstractChannelHandlerContext
private void invokeChannelRegistered() {
  if (invokeHandler()) {
    try {
      ((ChannelInboundHandler) handler()).channelRegistered(this);
    } catch (Throwable t) {
      notifyHandlerException(t);
    }
  } else {
    fireChannelRegistered();
  }
}

// AbstractChannelHandlerContext
private AbstractChannelHandlerContext findContextInbound() {
  AbstractChannelHandlerContext ctx = this;
  do {
    ctx = ctx.next;
  } while (!ctx.inbound);
  return ctx;
}
从代码中可以看到, 调用静态方法invokeChannelRegistered时直接将head作为了入参, 显然会从head开始遍历Pipeline双向链表, 找到属性为inbound的ChannelHandler, 然后处理对应逻辑, 下面是逻辑调用流程, 其中红色部分是循环处理逻辑,持续寻找属性为inBound的ChannelHandler
AbstractChannel#register0(promise) -> DefaultChannelPipeline#fireChannelRegistered() -> AbstractChannelHandlerContext#invokeChannelRegistered(head) -> **AbstractChannelHandlerContext#invokeChannelRegistered() -> AbstractChannelHandlerContext#fireChannelRegistered() -> AbstractChannelHandlerContext#findContextInbound() **
如果当前inBound是ADD_COMPLETE操作 或 ADD_PENDING且order=false,会调用channelRegistered操作, 初始化之后由4.3 图示, ChannelHandler就是ChannelInitializer, 实际调用的是ChannelInitializer的channelRegistered方法
//ChannelInitializer
public final void channelRegistered(ChannelHandlerContext ctx) throws Exception {
  if (initChannel(ctx)) {
    ctx.pipeline().fireChannelRegistered();
  } else {
    ctx.fireChannelRegistered();
  }
}

private boolean initChannel(ChannelHandlerContext ctx) throws Exception {
  if (initMap.putIfAbsent(ctx, Boolean.TRUE) == null) { // Guard against re-entrance.
    try {
      initChannel((C) ctx.channel());
    } catch (Throwable cause) {
      // Explicitly call exceptionCaught(...) as we removed the handler before calling initChannel(...).
      // We do so to prevent multiple calls to initChannel(...).
      exceptionCaught(ctx, cause);
    } finally {
      remove(ctx);
    }
    return true;
  }
  return false;
}
在执行channelRegistered方法时,会执行方法initChannel()进行自定义ChannelHandler添加操作, 执行initChannel方法时,会调用Bootstrap、ServerBootstrap初始化时ChannelInitializer重写的initChannel(Channel)方法, 即下面逻辑代码
childHandler(new ChannelInitializer<SocketChannel>() {
  @Override
  protected void initChannel(SocketChannel ch) throws Exception {
    ChannelPipeline pipeline = ch.pipeline();
    pipeline.addLast(new LengthFieldBasedFrameDecoder(Integer.MAX_VALUE, 0, 4, 0, 4));
    //自定义协议编码器
    pipeline.addLast(new LengthFieldPrepender(4));
    //对象参数类型编码器
    pipeline.addLast("encoder",new ObjectEncoder());
  }
})
添加之后会执行finally逻辑代码块, 该逻辑主要是将init时添加的ChannelHandler, 即ChannelInitializer进行删除
//ChannelInitializer
private void remove(ChannelHandlerContext ctx) {
  try {
    ChannelPipeline pipeline = ctx.pipeline();
    if (pipeline.context(this) != null) {
      pipeline.remove(this);
    }
  } finally {
    initMap.remove(ctx);
  }
}
5.2 自定义ChannelHandler入队后情况

5.3 ChannelHandler默认命名规则
在执行addLast()进行ChannelHandler添加时, 如果没有指定handler名称,会执行filterName()方法创建名称, 下面是具体的代码, 从代码的执行逻辑可以看见, ChannelHandler名字规则是SimpleName + “”#0", 比如: ObjectEncoder -> ObjectEncoder#0
//DefaultChannelPipeline
private String filterName(String name, ChannelHandler handler) {
  if (name == null) {
    return generateName(handler);
  }
  checkDuplicateName(name);
  return name;
}

private String generateName(ChannelHandler handler) {
  Map<Class<?>, String> cache = nameCaches.get();
  Class<?> handlerType = handler.getClass();
  String name = cache.get(handlerType);
  if (name == null) {
    name = generateName0(handlerType);
    cache.put(handlerType, name);
  }

  // It's not very likely for a user to put more than one handler of the same type, but make sure to avoid
  // any name conflicts.  Note that we don't cache the names generated here.
  if (context0(name) != null) {
    String baseName = name.substring(0, name.length() - 1); // Strip the trailing '0'.
    for (int i = 1;; i ++) {
      String newName = baseName + i;
      if (context0(newName) == null) {
        name = newName;
        break;
      }
    }
  }
  return name;
}

private static String generateName0(Class<?> handlerType) {
  return StringUtil.simpleClassName(handlerType) + "#0";
}
六、Pipeline事件传播机制
6.1 事件传播机制
在类ChannelPipeline中有下面对事件传播介绍, 在AbstractChannelHandlerContext中有inbound、outbound两个boolean变量, 用于标识handler类型
- inbound=true, 表示其对应的ChannelHandler是ChannelInboundHandler子类
- outbound=true,表示其对应的ChannelHandler是ChannelOutboundHandler子类

从事件传播流程可以看出, inbound、outbound事件流向是不同的
- inbound
- 事件流向是自低向上
- 通过 ChannelHandlerContext.fireIN_EVT() 方法进行传递
- outbound
- 事件流向是自顶向下
- 通过 ChannelHandlerContext.OUT_EVT() 方法进行传递
6.2 事件传播分类
事件传播分为inbound、outbound,它们分别对应ChannelInboundHandler、ChannelOutboundHandler, 查阅接口, 包含的事件传播方法包含
- inbound, 事件回调, 响应请求事件
public interface ChannelInboundHandler extends ChannelHandler {
    void channelRegistered(ChannelHandlerContext ctx) throws Exception;
    void channelUnregistered(ChannelHandlerContext ctx) throws Exception;
    void channelActive(ChannelHandlerContext ctx) throws Exception;
    void channelInactive(ChannelHandlerContext ctx) throws Exception;
    void channelRead(ChannelHandlerContext ctx, Object msg) throws Exception;
    void channelReadComplete(ChannelHandlerContext ctx) throws Exception;
    void userEventTriggered(ChannelHandlerContext ctx, Object evt) throws Exception;
    void channelWritabilityChanged(ChannelHandlerContext ctx) throws Exception;
    void exceptionCaught(ChannelHandlerContext ctx, Throwable cause) throws Exception;
}
- outbound, 主动触发, 发起请求事件
public interface ChannelOutboundHandler extends ChannelHandler {
    void bind(ChannelHandlerContext ctx, SocketAddress localAddress, ChannelPromise promise) throws Exception;
    void connect(
            ChannelHandlerContext ctx, SocketAddress remoteAddress,
            SocketAddress localAddress, ChannelPromise promise) throws Exception;
    void disconnect(ChannelHandlerContext ctx, ChannelPromise promise) throws Exception;
    void close(ChannelHandlerContext ctx, ChannelPromise promise) throws Exception;
    void deregister(ChannelHandlerContext ctx, ChannelPromise promise) throws Exception;
    void read(ChannelHandlerContext ctx) throws Exception;
    void write(ChannelHandlerContext ctx, Object msg, ChannelPromise promise) throws Exception;
    void flush(ChannelHandlerContext ctx) throws Exception;
}
6.3 自定义事件传播方式
那么对于捕获的事件, 如果需要将这个事件传递下去, 需要调用 fireChannelActive() 方法
//自己定义的 MyInBoundHandler
public class MyInBoundHandler extends ChannelInboundhandlerAdapter{
  public void channelActive(ChannelHandlerContext ctx) {
    //业务逻辑处理
    ctx.fireChannelActive();
  }
}
//AbstractChannelHandlerContext
public ChannelHandlerContext fireChannelActive() {
  final AbstractChannelHandlerContext next = findContextInbound();
  invokeChannelActive(next);
  return this;
}
MyInBoundHandler处理完逻辑后, 会调用fireChannelActive将逻辑传递下去, findContextInbound会进行遍历找到下一个InboundHandler继续进行逻辑处理
6.4 OutBound事件传播方式
在6.2节中,我们提到OutBound属于主动触发, 发起请求事件, 这里以Bootstrap的connect为例进行说明, 跟踪connect代码, 核心处理逻辑如下代码
//AbstractChannel
public ChannelFuture connect(SocketAddress remoteAddress, SocketAddress localAddress, ChannelPromise promise) {
  return pipeline.connect(remoteAddress, localAddress, promise);
}

//DefaultChannelPipeline
public final ChannelFuture connect(
  SocketAddress remoteAddress, SocketAddress localAddress, ChannelPromise promise) {
  return tail.connect(remoteAddress, localAddress, promise);
}

//AbstractChannelHandlerContext
public ChannelFuture connect(
            final SocketAddress remoteAddress, final SocketAddress localAddress, final ChannelPromise promise) {

  if (remoteAddress == null) {
    throw new NullPointerException("remoteAddress");
  }
  if (!validatePromise(promise, false)) {
    // cancelled
    return promise;
  }

  final AbstractChannelHandlerContext next = findContextOutbound();
  EventExecutor executor = next.executor();
  if (executor.inEventLoop()) {
    next.invokeConnect(remoteAddress, localAddress, promise);
  } else {
    safeExecute(executor, new Runnable() {
      @Override
      public void run() {
        next.invokeConnect(remoteAddress, localAddress, promise);
      }
    }, promise, null);
  }
  return promise;
}

//AbstractChannelHandlerContext
private AbstractChannelHandlerContext findContextOutbound() {
  AbstractChannelHandlerContext ctx = this;
  do {
    ctx = ctx.prev;
  } while (!ctx.outbound);
  return ctx;
}
从代码可以看出, outBound事件传播是从队列尾部开始的, 在AbstractChannelHandlerContext#connect中, 核心方法 findContextOutbound()循环查找队列中outbound=true的ChannelHandler, 找到后通过invokeConnect进行连接操作, 继续看invokeConnect()代码
//AbstractChannelHandlerContext
private void invokeConnect(SocketAddress remoteAddress, SocketAddress localAddress, ChannelPromise promise) {
  if (invokeHandler()) {
    try {
      ((ChannelOutboundHandler) handler()).connect(this, remoteAddress, localAddress, promise);
    } catch (Throwable t) {
      notifyOutboundHandlerException(t, promise);
    }
  } else {
    connect(remoteAddress, localAddress, promise);
  }
}

//ChannelOutboundHandlerAdatper
public void connect(ChannelHandlerContext ctx, SocketAddress remoteAddress,
                    SocketAddress localAddress, ChannelPromise promise) throws Exception {
  ctx.connect(remoteAddress, localAddress, promise);
}
如果业务逻辑代码没有重写connect方法, 会调用ChannelOutboundHandlerAdatper的connect()进行连接操作, 而这个方法仅仅调用了ctx.connect(),之后这个调用将会 进入下面调用循环, 注意这里ChannelHandlerContext 是AbstractChannelHandlerContext
ChannelHandlerContext.connect() -> ChannelHandlerContext.findContextOutbound() -> ChannelHandlerContext.invokeConnect() -> ChannelOutboundHandlerAdatper.connect() -> ChannelHandlerContext.connect()
直到connect事件传递到DefaultChannelPipeline双向队列的头节点, handler为HeadContext, 会直接返回当前对象this, 最终connect链接事件将会在head中被处理, 下面是相关逻辑代码, 到达head后整个全球事件也就结束了
//HeadContext
public ChannelHandler handler() {
  return this;
}

//HeadContext
public void connect(
  ChannelHandlerContext ctx,
  SocketAddress remoteAddress, SocketAddress localAddress,
  ChannelPromise promise) throws Exception {
  unsafe.connect(remoteAddress, localAddress, promise);
}
6.5 inBound事件传播方式
从6.1事件传播流程,大致可以看出inBound和outBound处理事件过程相似, 只是传播方向不一样, 在6.2节中提到inbound是事件回调, 响应请求事件
这里我们接着6.4节继续分析,connect进行连接之后,肯定需要进行回调操作,而Client连接Server是在AbstractNioChannel中,查看下面代码
//AbstractNioChannel
public final void connect(
  //省略部分其它代码
  try {
    boolean wasActive = isActive();
    if (doConnect(remoteAddress, localAddress)) { // 执行链接操作
      fulfillConnectPromise(promise, wasActive); // 链接成功,执行事件回调操作
    } else {
      //省略部分其它代码
    }
  } catch (Throwable t) {
    promise.tryFailure(annotateConnectException(t, remoteAddress));
    closeIfClosed();
  }
}

//AbstractNioChannel
private void fulfillConnectPromise(ChannelPromise promise, boolean wasActive) {
  // 省略部分其它代码
  if (!wasActive && active) {
    pipeline().fireChannelActive();
  }
	if (!promiseSet) {
    close(voidPromise());
  }
}
在fulfillConnectPromise()方法中,执行DefaultChannelPipeline的fireChannelActive()方法进行回调操作, 这个应该比较熟悉, 这个方法在前面已经分析过, 以head作为起始遍历节点, 这里我们只关注下面的逻辑
//AbstractChannelHandlerContext
private void invokeChannelActive() {
  if (invokeHandler()) {
    try {
      ((ChannelInboundHandler) handler()).channelActive(this);
    } catch (Throwable t) {
      notifyHandlerException(t);
    }
  } else {
    fireChannelActive();
  }
}

//ChannelInboundHandlerAdapter
public void channelActive(ChannelHandlerContext ctx) throws Exception {
  ctx.fireChannelActive();
}
可以看出之后这里和outBound调用循环很相似, inbound会进入下面的循环, 注意这里ChannelHandlerContext 是AbstractChannelHandlerContext
ChannelHandlerContext.fireChannelActive() -> ChannelHandlerContext.findContextInbound -> ChannelHandlerContext.invokeChannelActive() -> ChannelInboundHandlerAdapter.channelActive() -> ChannelHandlerContext.fireChannelActive()
当消息传递到TailContext后, 会执行TailContext的channelActive()方法,但是该方法空实现, 默认是不处理。
public void channelActive(ChannelHandlerContext ctx) throws Exception { }
6.6 事件传播总结
-
Inbound
- Inbound事件是通知型事件, 当某件事件就绪后会自底向上进行通知
- Inbound事件的发起者是unsafe
- inbound事件的处理者是Channel,如果用户没有实现自定义处理方法, inbound事件默认的处理者是TailContext(实际是空实现)
- Inbound事件在双向链表中的传播方向是head -> tail
- ChannelHandler在处理事件时, 如果这个handler不是最后一个handler,会调用ChannelHandlerContext.fireIN_EVT()方法, 将事件传播下去, 比如上面提到的fireChannelActive(),如果不这么做事件传播会终止
-
outBound
- outbound事件是请求型事件
- outbound事件的处理者是unsafe
- outbound事件的发起者是Channel
- outBound事件在双向链表中的传播方向是 tail -> head
- ChannelHandler在处理事件时, 如果这个handler 不是最后一个handler, 会调用ChannelHandlerContext.OUT_EVT()方法, 将事件传播下去, 比如上面提到的ctx.connect(), 如果不这么做事件传播会终止