用自己的图片训练和预测LeNet模型
学习过mnist手写数字识别的例程之后,想用自己的字符图片进行训练和预测。整个过程分为:1、收集图像数据;2、转换数据格式;3、训练网络;4、生成均值文件;5、修改网络模型;6、预测图片的类别。
1、收集图像数据
由于主要是使用lenet模型训练自己的图片数据,我的图像数据共有10个类别,分别是0~9。
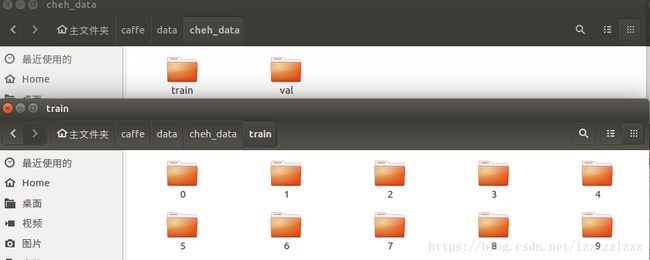
- 在路径/home/liu/caffe/data/下新建文件夹,命名为cheh_data,用于保存图像数据。
- 在路径/home/liu/caffe/data/cheh_data/下新建文件夹,命名为train,用于保存训练数据,里边有10个文件夹,命名为0~9,分别存放字符‘0’~‘9’的字符样本;
- 在路径/home/liu/caffe/data/cheh_data/下新建文件夹,命名为val,用于保存验证数据,里边有10个文件夹,命名为0~9,分别存放字符‘0’~‘9’的字符样本;
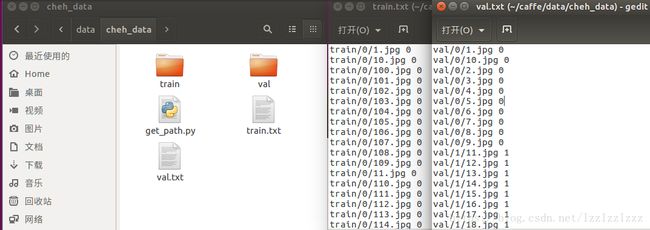
- 对所有样本进行缩放处理并生成txt格式的类别标签文件:在路径/home/liu/caffe/data/cheh_data/下创建python文件,命名为get_path.py,并写入以下内容:
# coding:utf-8
import cv2
import os
def IsSubString(SubStrList, Str):
flag = True
for substr in SubStrList:
if not (substr in Str):
flag = False
return flag
def GetFileList(FindPath, FlagStr=[]):
FileList = []
FileNames = os.listdir(FindPath)
if len(FileNames) > 0:
for fn in FileNames:
if len(FlagStr) > 0:
if IsSubString(FlagStr, fn):
fullfilename = os.path.join(FindPath, fn)
FileList.append(fullfilename)
else:
fullfilename = os.path.join(FindPath, fn)
FileList.append(fullfilename)
if len(FileList) > 0:
FileList.sort()
return FileList
train_txt = open('train.txt', 'w')
classList = ['0', '1', '2', '3', '4', '5', '6', '7', '8', '9']
for idx in range(len(classList)):
imgfile = GetFileList('train/' + classList[idx])
for img in imgfile:
srcImg = cv2.imread(img)
resizedImg = cv2.resize(srcImg, (28, 28))
cv2.imwrite(img, resizedImg)
strTemp = img + ' ' + classList[idx] + '\n'
train_txt.writelines(strTemp)
train_txt.close()
test_txt = open('val.txt', 'w')
for idx in range(len(classList)):
imgfile = GetFileList('val/' + classList[idx])
for img in imgfile:
srcImg = cv2.imread(img)
resizedImg = cv2.resize(srcImg, (28, 28))
cv2.imwrite(img, resizedImg)
strTemp = img + ' ' + classList[idx] + '\n'
test_txt.writelines(strTemp)
test_txt.close()
print("success!")
注意:在语句 strTemp = img + ' ' + classList[idx] + '\n' 中用空格代替'\t'
在终端中将路径切换到py文件所在路径并执行命令python get_path.py以运行该文件,可将所有图片缩放至28*28大小并得到train.txt和val.txt
2、转换数据格式
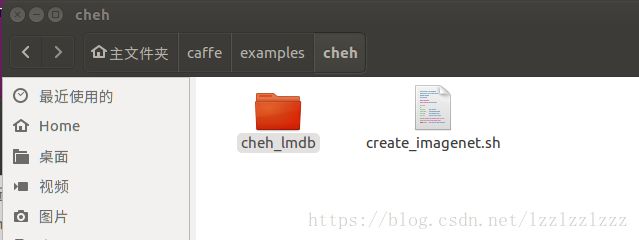
首先,在路径/home/liu/caffe/examples/下新建文件夹并命名为cheh,并在路径/home/liu/caffe/examples/cheh/下新建一个文件夹命名为cheh_lmdb,用于存放生成的lmdb文件。
其次,将caffe路径下 examples/imagenet/create_imagenet.sh 复制一份到路径/home/liu/caffe/examples/cheh/下,并修改如下:
#!/usr/bin/env sh
# Create the imagenet lmdb inputs
# N.B. set the path to the imagenet train + val data dirs
set -e
EXAMPLE=/home/liu/caffe/examples/cheh/cheh_lmdb
DATA=/home/liu/caffe/data/cheh_data
TOOLS=/home/liu/caffe/build/tools
TRAIN_DATA_ROOT=/home/liu/caffe/data/cheh_data/
VAL_DATA_ROOT=/home/liu/caffe/data/cheh_data/
# Set RESIZE=true to resize the images to 256x256. Leave as false if images have
# already been resized using another tool.
RESIZE=false
if $RESIZE; then
RESIZE_HEIGHT=28
RESIZE_WIDTH=28
else
RESIZE_HEIGHT=0
RESIZE_WIDTH=0
fi
if [ ! -d "$TRAIN_DATA_ROOT" ]; then
echo "Error: TRAIN_DATA_ROOT is not a path to a directory: $TRAIN_DATA_ROOT"
echo "Set the TRAIN_DATA_ROOT variable in create_imagenet.sh to the path" \
"where the ImageNet training data is stored."
exit 1
fi
if [ ! -d "$VAL_DATA_ROOT" ]; then
echo "Error: VAL_DATA_ROOT is not a path to a directory: $VAL_DATA_ROOT"
echo "Set the VAL_DATA_ROOT variable in create_imagenet.sh to the path" \
"where the ImageNet validation data is stored."
exit 1
fi
echo "Creating train lmdb..."
GLOG_logtostderr=1 $TOOLS/convert_imageset \
--resize_height=$RESIZE_HEIGHT \
--resize_width=$RESIZE_WIDTH \
--shuffle \
--gray \
$TRAIN_DATA_ROOT \
$DATA/train.txt \
$EXAMPLE/cheh_train_lmdb
echo "Creating val lmdb..."
GLOG_logtostderr=1 $TOOLS/convert_imageset \
--resize_height=$RESIZE_HEIGHT \
--resize_width=$RESIZE_WIDTH \
--shuffle \
--gray \
$VAL_DATA_ROOT \
$DATA/val.txt \
$EXAMPLE/cheh_val_lmdb
echo "Done."
注意:需要将所有的路径都对应正确,需要设置样本的尺寸,如果不是拷贝caffe下的create_imagenet.sh 文件进行修改,可能会发生错误,注意python代码的缩进,要么使用4个空格要么使用\t,要保持一致。此外为防止发生错误,可以将所有路径补全,不再使用相对路径。
再次,在路径/home/liu/caffe/examples/cheh/下创建文件夹cheh_lmdb
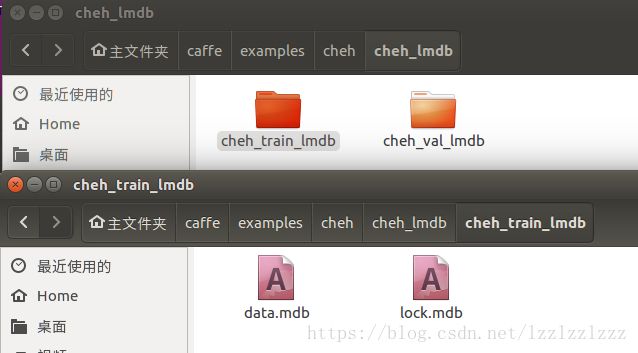
最后,执行指令sh examples/cheh/create_imagenet.sh后,在路径/home/liu/caffe/examples/cheh/cheh_lmdb/下生成cheh_train_lmdb和cheh_val_lmdb两个子文件夹,在每个文件夹里都有data.mdb和lock.mdb两个文件
3、训练网络
将caffe/examples/mnist下的 train_lenet.sh 、lenet_solver.prototxt 、lenet_train_test.prototxt 这三个文件复制到路径/home/liu/caffe/examples/cheh/下,
首先,修改train_lenet.sh :
#!/usr/bin/env sh
set -e
./build/tools/caffe train --solver=examples/cheh/lenet_solver.prototxt $@
然后,再更改lenet_solver.prototxt :
# The train/test net protocol buffer definition
net: "examples/cheh/lenet_train_test.prototxt"
# test_iter specifies how many forward passes the test should carry out.
# In the case of MNIST, we have test batch size 100 and 100 test iterations,
# covering the full 10,000 testing images.
test_iter: 100
# Carry out testing every 500 training iterations.
test_interval: 500
# The base learning rate, momentum and the weight decay of the network.
base_lr: 0.01
momentum: 0.9
weight_decay: 0.0005
# The learning rate policy
lr_policy: "inv"
gamma: 0.0001
power: 0.75
# Display every 100 iterations
display: 100
# The maximum number of iterations
max_iter: 10000
# snapshot intermediate results
snapshot: 5000
snapshot_prefix: "examples/cheh/"
# solver mode: CPU or GPU
solver_mode: CPU
再然后,修改lenet_train_test.prototxt
name: "LeNet"
layer {
name: "mnist"
type: "Data"
top: "data"
top: "label"
include {
phase: TRAIN
}
transform_param {
scale: 0.00390625
}
data_param {
source: "examples/cheh/cheh_lmdb/cheh_train_lmdb"
batch_size: 64
backend: LMDB
}
}
layer {
name: "mnist"
type: "Data"
top: "data"
top: "label"
include {
phase: TEST
}
transform_param {
scale: 0.00390625
}
data_param {
source: "examples/cheh/cheh_lmdb/cheh_val_lmdb"
batch_size: 100
backend: LMDB
}
}
layer {
name: "conv1"
type: "Convolution"
bottom: "data"
top: "conv1"
param {
lr_mult: 1
}
param {
lr_mult: 2
}
convolution_param {
num_output: 20
kernel_size: 5
stride: 1
weight_filler {
type: "xavier"
}
bias_filler {
type: "constant"
}
}
}
layer {
name: "pool1"
type: "Pooling"
bottom: "conv1"
top: "pool1"
pooling_param {
pool: MAX
kernel_size: 2
stride: 2
}
}
layer {
name: "conv2"
type: "Convolution"
bottom: "pool1"
top: "conv2"
param {
lr_mult: 1
}
param {
lr_mult: 2
}
convolution_param {
num_output: 50
kernel_size: 5
stride: 1
weight_filler {
type: "xavier"
}
bias_filler {
type: "constant"
}
}
}
layer {
name: "pool2"
type: "Pooling"
bottom: "conv2"
top: "pool2"
pooling_param {
pool: MAX
kernel_size: 2
stride: 2
}
}
layer {
name: "ip1"
type: "InnerProduct"
bottom: "pool2"
top: "ip1"
param {
lr_mult: 1
}
param {
lr_mult: 2
}
inner_product_param {
num_output: 500
weight_filler {
type: "xavier"
}
bias_filler {
type: "constant"
}
}
}
layer {
name: "relu1"
type: "ReLU"
bottom: "ip1"
top: "ip1"
}
layer {
name: "ip2"
type: "InnerProduct"
bottom: "ip1"
top: "ip2"
param {
lr_mult: 1
}
param {
lr_mult: 2
}
inner_product_param {
num_output: 10
weight_filler {
type: "xavier"
}
bias_filler {
type: "constant"
}
}
}
layer {
name: "accuracy"
type: "Accuracy"
bottom: "ip2"
bottom: "label"
top: "accuracy"
include {
phase: TEST
}
}
layer {
name: "loss"
type: "SoftmaxWithLoss"
bottom: "ip2"
bottom: "label"
top: "loss"
}
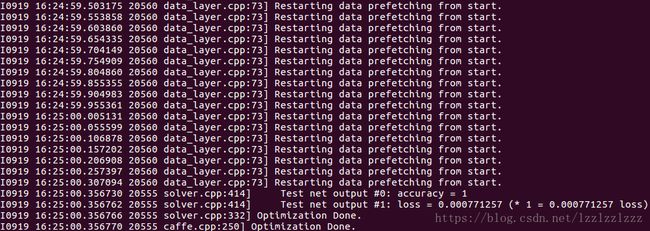
执行命令sh examples/cheh/train_lenet.sh得到最后的训练结果,在/home/liu/caffe/examples/cheh/下生成训练的caffemodel和solverstate。
注意:如果遇到以下问题请提升权限:sudo sh examples/cheh/train_lenet.sh
F0919 15:49:21.687918 16837 io.cpp:69] Check failed: proto.SerializeToOstream(&output)
*** Check failure stack trace: ***
    @     0x7f12912575cd  google::LogMessage::Fail()
    @     0x7f1291259433  google::LogMessage::SendToLog()
    @     0x7f129125715b  google::LogMessage::Flush()
    @     0x7f1291259e1e  google::LogMessageFatal::~LogMessageFatal()
    @     0x7f1291795835  caffe::WriteProtoToBinaryFile()
    @     0x7f129171fa06  caffe::Solver<>::SnapshotToBinaryProto()
    @     0x7f129171fb0a  caffe::Solver<>::Snapshot()
    @     0x7f129172352e  caffe::Solver<>::Step()
    @     0x7f1291723f7a  caffe::Solver<>::Solve()
    @           0x40a064  train()
    @           0x406fa0  main
    @     0x7f12901c7830  __libc_start_main
    @           0x4077c9  _start
    @              (nil)  (unknown)
Aborted (core dumped)
训练完成后:
 4、生成均值文件
均值文件主要用于图像预测的时候,由caffe/build/tools/compute_image_mean生成,在caffe/下执行命令
build/tools/compute_image_mean \/home/liu/caffe/examples/cheh/cheh_lmdb/cheh_train_lmdb /home/liu/caffe/examples/cheh/mean.binaryproto
可在/home/liu/caffe/examples/cheh/下生成均值文件mean.binaryproto
5、修改网络模型
deploy.prototxt是在lenet_train_test.prototxt的基础上删除了开头的Train和Test部分以及结尾的Accuracy、SoftmaxWithLoss层,并在开始时增加了一个data层描述,结尾增加softmax层,可以参照博文http://blog.csdn.net/lanxuecc/article/details/52474476 使用python生成,也可以直接由train_val.prototxt上做修改,将 lenet_train_test.prototxt复制到/home/liu/caffe/examples/cheh/下,并重命名为deploy.prototxt ,修改里面的内容如下:
name: "LeNet"
layer {
name: "data"
type: "Input"
top: "data"
input_param { shape: { dim: 1 dim: 1 dim: 28 dim: 28 } }
}
layer {
name: "conv1"
type: "Convolution"
bottom: "data"
top: "conv1"
param {
lr_mult: 1
}
param {
lr_mult: 2
}
convolution_param {
num_output: 20
kernel_size: 5
stride: 1
weight_filler {
type: "xavier"
}
bias_filler {
type: "constant"
}
}
}
layer {
name: "pool1"
type: "Pooling"
bottom: "conv1"
top: "pool1"
pooling_param {
pool: MAX
kernel_size: 2
stride: 2
}
}
layer {
name: "conv2"
type: "Convolution"
bottom: "pool1"
top: "conv2"
param {
lr_mult: 1
}
param {
lr_mult: 2
}
convolution_param {
num_output: 50
kernel_size: 5
stride: 1
weight_filler {
type: "xavier"
}
bias_filler {
type: "constant"
}
}
}
layer {
name: "pool2"
type: "Pooling"
bottom: "conv2"
top: "pool2"
pooling_param {
pool: MAX
kernel_size: 2
stride: 2
}
}
layer {
name: "ip1"
type: "InnerProduct"
bottom: "pool2"
top: "ip1"
param {
lr_mult: 1
}
param {
lr_mult: 2
}
inner_product_param {
num_output: 500
weight_filler {
type: "xavier"
}
bias_filler {
type: "constant"
}
}
}
layer {
name: "relu1"
type: "ReLU"
bottom: "ip1"
top: "ip1"
}
layer {
name: "ip2"
type: "InnerProduct"
bottom: "ip1"
top: "ip2"
param {
lr_mult: 1
}
param {
lr_mult: 2
}
inner_product_param {
num_output: 10
weight_filler {
type: "xavier"
}
bias_filler {
type: "constant"
}
}
}
layer {
name: "prob"
type: "Softmax"
bottom: "ip2"
top: "prob"
}
6、预测图片
首先,在路径/home/liu/caffe/data/cheh_data/下创建一文件夹并命名为test,用于存放测试的图片;
然后,在/home/liu/caffe/examples/cheh/下新建synset_words.txt文件,之后在里面输入:
0
1
2
3
4
5
6
7
8
9
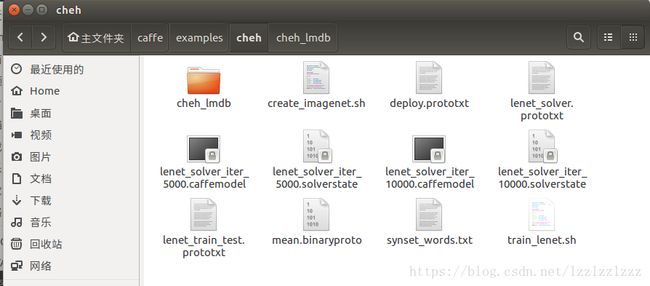
此时,cheh文件夹的状态:
最后,运行以下命令对图片作预测
./build/examples/cpp_classification/classification.bin \
/home/liu/caffe/examples/cheh/deploy.prototxt \
/home/liu/caffe/examples/cheh/lenet_solver_iter_10000.caffemodel \
/home/liu/caffe/examples/cheh/mean.binaryproto \
/home/liu/caffe/examples/cheh/synset_words.txt \
/home/liu/caffe/data/cheh_data/1.jpg
结果如下:
入门小白所做,高手可自行忽略。
本文参考了https://blog.csdn.net/ap1005834/article/details/74783452
https://blog.csdn.net/u011244794/article/details/51565786
