Spring boot集成axis2开发webservice 服务
Spring boot集成axis2开发webservice 服务
1、新建Spring boot 项目
此处省略。。。
2、添加Axis2依赖
<!--axis2版本信息-->
<properties>
    <axis2.version>1.7.8</axis2.version>
</properties>

<!--=============================-->

<!--axis2 begin-->
<dependency>
    <groupId>org.apache.axis2</groupId>
    <artifactId>axis2-spring</artifactId>
    <version>${axis2.version}</version>
</dependency>
<dependency>
    <groupId>org.apache.axis2</groupId>
    <artifactId>axis2-transport-http</artifactId>
    <version>${axis2.version}</version>
</dependency>
<dependency>
    <groupId>org.apache.axis2</groupId>
    <artifactId>axis2-transport-local</artifactId>
    <version>${axis2.version}</version>
</dependency>
<dependency>
    <groupId>org.apache.axis2</groupId>
    <artifactId>axis2-xmlbeans</artifactId>
    <version>${axis2.version}</version>
</dependency>
3、创建AxisServlet配置类用于配置发布webservice服务,并对请求的url进行拦截
@Configuration
public class AxisWebserviceConfig {

    private final static Logger log = LoggerFactory.getLogger(AxisWebserviceConfig.class);

    @Bean
    public ServletRegistrationBean<AxisServlet> axisServlet(){
        ServletRegistrationBean<AxisServlet> registrationBean = new ServletRegistrationBean<>();
        registrationBean.setServlet(new AxisServlet());
        registrationBean.addUrlMappings("/services/*");
        //
        String path = this.getClass().getResource("/ServicePath").getPath().toString();
        if(path.toLowerCase().startsWith("file:")){
                path = path.substring(5);
        }
        if(path.indexOf("!") != -1){
            try{
                FileCopyUtils.copy("ServicePath/services/myService/META-INF/services.xml");
            }catch (Exception e){
                e.printStackTrace();
            }
            path = path.substring(0, path.lastIndexOf("/", path.indexOf("!"))) + "/ServicePath";
        }
        log.info("xml配置文件path={}","{"+path+"}");
        registrationBean.addInitParameter("axis2.repository.path", path);
        registrationBean.setLoadOnStartup(1);
        return registrationBean;
    }

    @Bean
    public ApplicationContextHolder getApplicationContextHolder(){
        return new  ApplicationContextHolder();
    }
}
FileCopyUtils类的实现如下,主要功能是将文件拷贝到项目所在目录
package com.zxs.demo.common.util;

import org.apache.commons.io.IOUtils;
import org.springframework.core.io.support.PathMatchingResourcePatternResolver;

import java.io.ByteArrayInputStream;
import java.io.File;
import java.io.IOException;
import java.io.InputStream;
import java.net.URL;
import java.nio.file.Files;
import java.nio.file.Path;
import java.nio.file.Paths;

/**
 *@ClassName FileCopyUtils
 *@Description 将jar内的文件复制到jar包外的同级目录下
 *@Author Administrator
 *@Date 2020/6/3 11:29
 *@Version 1.0
 */
public class FileCopyUtils {


        private static InputStream getResource(String location) throws IOException {
            PathMatchingResourcePatternResolver resolver = new PathMatchingResourcePatternResolver();
            InputStream in = resolver.getResource(location).getInputStream();
            byte[] byteArray = IOUtils.toByteArray(in);
            in.close();
            return new ByteArrayInputStream(byteArray);
        }

        /**
         * 获取项目所在文件夹的绝对路径
         * @return
         */
        private static String getCurrentDirPath() {
            URL url = FileCopyUtils.class.getProtectionDomain().getCodeSource().getLocation();
            String path = url.getPath();
            if(path.startsWith("file:")) {
                path = path.replace("file:", "");
            }
            if(path.contains(".jar!/")) {
                path = path.substring(0, path.indexOf(".jar!/")+4);
            }

            File file = new File(path);
            path = file.getParentFile().getAbsolutePath();
            return path;
        }

        private static Path getDistFile(String path) throws IOException {
            String currentRealPath = getCurrentDirPath();
            Path dist = Paths.get(currentRealPath + File.separator + path);
            Path parent = dist.getParent();
            if(parent != null) {
                Files.createDirectories(parent);
            }
            Files.deleteIfExists(dist);
            return dist;
        }

        /**
         * 复制classpath下的文件到jar包的同级目录下
         * @param location 相对路径文件,例如kafka/kafka_client_jaas.conf
         * @return
         * @throws IOException
         */
        public static String copy(String location) throws IOException {
            InputStream in = getResource("classpath:"+location);
            Path dist = getDistFile(location);
            Files.copy(in, dist);
            in.close();
            return dist.toAbsolutePath().toString();
        }
}
4、创建实体,实体必须实现Serializable 接口
package com.zxs.demo.entity;

import com.zxs.demo.config.DataAdapter;

import javax.xml.bind.annotation.XmlAccessType;
import javax.xml.bind.annotation.XmlAccessorType;
import javax.xml.bind.annotation.XmlElement;
import javax.xml.bind.annotation.adapters.XmlJavaTypeAdapter;
import java.io.Serializable;

/**
 *@ClassName User
 *@Description TODO
 *@Author sxc
 *@Date 2020/5/29 10:41
 *@Version 1.0
 */
public class User implements Serializable {

    private String name;

    private String age;

    private String birthday;

    public String getName() {
        return name;
    }

    public void setName(String name) {
        this.name = name;
    }

    public String getAge() {
        return age;
    }

    public void setAge(String age) {
        this.age = age;
    }

    public String getBirthday() {
        return birthday;
    }

    public void setBirthday(String birthday) {
        this.birthday = birthday;
    }
}
package com.zxs.demo.common.util;

import com.zxs.demo.entity.User;

import javax.xml.bind.annotation.*;
import java.io.Serializable;
import java.util.List;

/**
 *@ClassName Response
 *@Description 同一的返回类
 *@Author Administrator
 *@Date 2020/5/29 10:53
 *@Version 1.0
 */
public class Response implements Serializable {

    private  String resultCode;

    private String  resultDesc;

    private List<User> result;


    public static Response SUCCESS(List<User> list){
        return new Response("0","success",list);
    }
    public static Response SUCCESS(String msg,List<User> list){
        return new Response("0",msg,list);
    }

    public static Response ERROR(){
        return new Response("-1","操作失败",null);
    }

    public static Response ERROR(String code,String msg){
        return new Response(code,msg,null);
    }

    public static Response ERROR(String msg){
        return new Response("-1",msg,null);
    }
    public String getResultCode() {
        return resultCode;
    }

    public void setResultCode(String resultCode) {
        this.resultCode = resultCode;
    }

    public String getResultDesc() {
        return resultDesc;
    }

    public void setResultDesc(String resultDesc) {
        this.resultDesc = resultDesc;
    }

    public List<User> getResult() {
        return result;
    }

    public void setResult(List<User> result) {
        this.result = result;
    }

    public Response() {
    }

    public Response(List<User> result) {
        this.result = result;
    }

    public Response(String resultDesc) {
        this.resultDesc = resultDesc;
    }

    public Response(String resultCode, String resultDesc, List<User> result) {
        this.resultCode = resultCode;
        this.resultDesc = resultDesc;
        this.result = result;
    }
}
5、创建服务接口
package com.zxs.demo.service;

import com.zxs.demo.common.util.Response;

import javax.jws.WebMethod;
import javax.jws.WebService;
import javax.jws.soap.SOAPBinding;

/**
 * @ClassName DemoService
 * @Description 服务接口类
 * @Author sxc
 * @Date 2020/5/29 10:37
 * @Version 1.0
 */
public interface DemoService {

    public Response listUser(String id);
}
创建接口实现类
package com.zxs.demo.service.impl;
import com.google.common.collect.Lists;
import com.zxs.demo.common.util.Response;
import com.zxs.demo.entity.User;
import com.zxs.demo.service.DemoService;
import org.springframework.stereotype.Service;


import javax.jws.WebService;

/**
 *@ClassName DemoServiceImplement
 *@Description TODO
 *@Author Administrator
 *@Date 2020/5/29 11:24
 *@Version 1.0
 */
@Service("demoService")
public class DemoServiceImpl implements DemoService {

    @Override
    public Response listUser(String id) {
        User user1 = new User();
        user1.setName("张三");
        user1.setAge("20");
        return Response.SUCCESS(Lists.newArrayList(user1,user1));
    }
}
6、创建services.xml文件
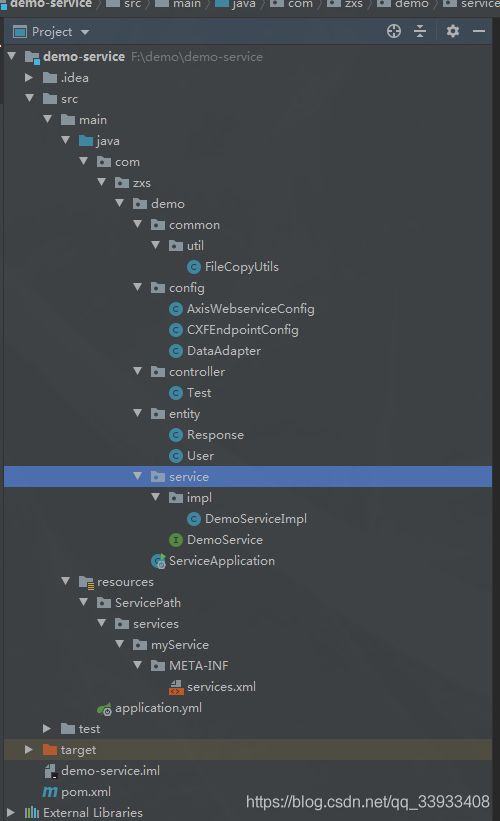
在resource文件夹中创建目录ServicePath/services/myService/META-INF/ 目录要一层一层的建,否则会找不到文件,ServicePath目录名称 和myService 目录名称可以自定义,services文件夹名称 必须和 AxisWebserviceConfig 配置类中registrationBean.addUrlMappings("/services/*"); 输入的名称一致。META-INF文件名称不可变
services.xml文件名称不可变
<?xml version="1.0" encoding="UTF-8"?>
<serviceGroup>
    <service name="demoService" scope="application"><!--接口名称-->
        <description>
            axis2 实现的webservice样例<!--接口描述-->
        </description>

        <messageReceivers>
            <messageReceiver mep="http://www.w3.org/ns/wsdl/in-only" class="org.apache.axis2.rpc.receivers.RPCInOnlyMessageReceiver"/>
            <messageReceiver mep="http://www.w3.org/ns/wsdl/in-out" class="org.apache.axis2.rpc.receivers.RPCMessageReceiver"/>
        </messageReceivers>
        <parameter name="ServiceClass">com.zxs.demo.service.impl.DemoServiceImpl</parameter><!--接口实现类-->
           <!--接口实现类-->
<!--    <parameter name="SpringBeanName">demoService</parameter>
    <parameter name="ServiceObjectSupplier">org.apache.axis2.extensions.spring.receivers.SpringServletContextObjectSupplier</parameter>-->
    </service>
</serviceGroup>
建议以ServiceClass类路径的形式配置服务类,
不建议使用
<parameter name="SpringBeanName">demoService</parameter>
<parameter name="ServiceObjectSupplier">org.apache.axis2.extensions.spring.receivers.SpringServletContextObjectSupplier</parameter>
7、在spring boot 启动类上添加@ServletComponentScan 注解,允许Servlet可以直接通过@WebServlet注解自动注册
package com.zxs.demo;

import org.springframework.boot.SpringApplication;
import org.springframework.boot.autoconfigure.SpringBootApplication;
import org.springframework.boot.builder.SpringApplicationBuilder;
import org.springframework.boot.web.servlet.ServletComponentScan;
import org.springframework.boot.web.servlet.support.SpringBootServletInitializer;
/**
 *@ClassName ServiceApplication
 *@Description 启动类
 *@Author sxc
 *@Date 2020/5/29 10:31
 *@Version 1.0
 */
@SpringBootApplication
@ServletComponentScan
public class ServiceApplication extends SpringBootServletInitializer {

    public static void main(String[] args) {
        SpringApplication.run(ServiceApplication.class);
    }

    @Override
    protected SpringApplicationBuilder configure(SpringApplicationBuilder builder) {
        return builder.sources(ServiceApplication.class);
    }
}
8、启动服务,输入服务地址:
localhost:8080/services/demoService?wsdl
地址中services 为 AxisWebserviceConfig 配置类中的 registrationBean.addUrlMappings("/services/*"); 配置的url值,demoService为service.xml中
的name的值即服务名称

