Elasticsearch搜索引擎第二篇-ES单机安装、结合Kibana使用
文章目录
- Linux下安装
- Windows下安装
- ES软件目录说明
- 安装常见错误
- 内存不够
- 设置的最大文件描述符太小,需要增加
- ES配置说明
- 配置文件分离
- 数据和日志目录
- JVM参数格式说明
- ES重要的配置参数
- 安装Kibana
官网下载地址:
https://www.elastic.co/downloads/elasticsearch
前提:
JDK版本:1.8
Elasticsearch版本:6.4.3
Linux下安装
下载好的安装包上传到目录/usr/local/src,或者直接在Linux机器上使用curl下载:
cd /usr/local/src
curl -L -O https://artifacts.elastic.co/downloads/elasticsearch/elasticsearch-6.4.3.tar.gz
tar -zxvf elasticsearch-6.4.3.tar.gz
mv elasticsearch-6.4.3 /usr/local/elk/elasticsearch  #重命名
mkdir /usr/local/elk/elasticsearch/data  #创建数据存放路径
mkdir /usr/local/elk/elasticsearch/logs  #创建日志存放路径(已存在不用创建)
建立用户并授权(es不能用root运行)
useradd es  #添加用户
chown -R es:es /usr/local/elk/elasticsearch  #赋予文件夹权限
#修改配置文件
vim /usr/local/elk/elasticsearch/elasticsearch-6.4.3/config/elasticsearch.yml
如下内容:
#集群的名称
cluster.name: my-es-6.4
#节点名称
node.name: node-1
#索引数据的存储路径
path.data: /usr/local/elk/elasticsearch/data
#日志文件的存储路径
path.logs: /usr/local/elk/elasticsearch/logs
#设置为true来锁住内存。因为内存交换到磁盘对服务器性能来说是致命的,当jvm开始swapping时es的效率会降低,所以要保证它不swap
bootstrap.memory_lock: true
#绑定的ip地址
network.host: 0.0.0.0
#设置对外服务的http端口,默认为9200
http.port: 9200
检查配置是否正确:
grep '^[a-z]' /usr/local/elk/elasticsearch/elasticsearch-6.4.3/config/elasticsearch.yml
调整jvm内存:
vim /usr/local/elk/elasticsearch/elasticsearch-6.4.3/config/jvm.options

#默认是1g官方建议对jvm进行一些修改,不然很容易出现OOM内存溢出,参考官网改参数配置最好不要超过内存的50%
-Xms1g
-Xmx1g
启动Elasticsearch,使用es用户启动
su es
/usr/local/elk/elasticsearch/elasticsearch-6.4.3/bin/elasticsearch -d
ps -ef|grep elasticsearch
ES端口说明:
9200 默认对外服务的http端口
9300 默认节点间通信的tcp端口
Windows下安装
解压elasticsearch-6.4.3.zip包到指定目录,这里不设置参数,直接启动
运行:bin/elasticsearch.bat
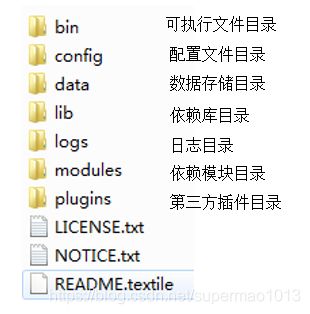
ES软件目录说明
安装常见错误
内存不够
官方默认是1G内存,如果机器内存不够则需要调整jvm内存:
vim /usr/local/elk/elasticsearch/config/jvm.options

#默认是1g官方建议对jvm进行一些修改,不然很容易出现OOM内存溢出,参考官网改参数配置最好不要超过内存的50%
-Xms512m
-Xmx512m
设置的最大文件描述符太小,需要增加
[2018-09-16T19:53:20,595][ERROR][o.e.b.Bootstrap ] [node-1] node validation exception
[1]: max file descriptors [4096] for elasticsearch process is too low, increase to at least [65536]
[2]: max number of threads [1024] for user [es] likely too low, increase to at least [2048]
[3]: max virtual memory areas vm.max_map_count [65530] is too low, increase to at least [262144]
[4]: memory locking requested for elasticsearch process but memory is not locked
问题一:max file descriptors [4096] for elasticsearch process is too low, increase to at least [65536]
解决:切换到root用户修改配置limits.conf 添加下面两行
su -root
vim /etc/security/limits.conf

es soft nofile 65536
es hard nofile 65536
问题二:max number of threads [1024] for user [es] likely too low, increase to at least [2048]
解决:切换到root用户,进入limits.d目录下修改配置文件。
修改如下内容:
su -root
vim /etc/security/limits.d/90-nproc.conf

* soft nproc 1024
#修改为
* soft nproc 2048
问题三:max virtual memory areas vm.max_map_count [65530] is too low, increase to at least [262144]
解决:切换到root用户修改配置sysctl.conf
然后切换到es用户,重启elasticsearch
su -root
vim /etc/sysctl.conf
vm.max_map_count=655360

sysctl -p  #生效配置
问题四:memory locking requested for elasticsearch process but memory is not locked
解决:切换到root用户修改配置limits.conf 添加下面两行
su -root
vim /etc/security/limits.conf

es soft memlock unlimited
es hard memlock unlimited
ES配置说明
配置文件分离
配置文件目录默认为:$ES_HOME/config,如果需要配置文件与软件分离(方便升级),可以通过 ES_PATH_CONF 环境变量来指定。如你可以在命令行指定声明,也可以在环境变量中export:
ES_PATH_CONF=/path/to/my/config /usr/local/elk/elasticsearch/bin/elasticsearch -d
数据和日志目录
一般需要把数据目录和日志目录单独存放,不和软件目录放在一起,可以设置config/elastcisearch.yml文件:
#索引数据的存储路径
path.data: /usr/local/elk/elasticsearch/data
#日志文件的存储路径
path.logs: /usr/local/elk/elasticsearch/logs
JVM参数格式说明
在config/jvm.options文件中设置了很多JVM参数,格式说明如下:
- -Xmx2g:无JVM版本限制的参数
- 8:-Xmx2g:应用到指定版本JVM的参数
- 8-:Xmx2g:应用到指定版本及以上版本JVM的参数
- 8-9:-Xmx2g:应用到指定版本到版本JVM的参数
ES重要的配置参数
- 所属集群名,默认为elasticsearch,可自定义
cluster.name: elasticsearch - 节点名,默认为UUID前7个字符,可自定义
node.name: prod-data-1 node.name: ${HOSTNAME} #以主机名作为节点名 - IP绑定,默认地址是127.0.0.1,允许本机访问该es,集群下要服务间通信,需绑定集群所有地址
network.host: 192.168.0.1 - 对外服务的http 端口, 默认 9200-9300 。可以为它指定一个值或一个区间,当为区间时会取用区间第一个可用的端口。
http.port: 9200-9300 - 节点间交互的端口, 默认 9300-9400 。可以为它指定一个值或一个区间,当为区间时会取用区间第一个可用的端口。
transport.tcp.port: 9300-9400 - 设置一个集群中主节点的数量,当多于三个节点时,该值可在2-4之间
discovery.zen.minimum_master_nodes: 1 - 设置新节点被启动时能够发现的主节点列表(主要用于不同网段机器连接):
discovery.zen.ping.unicast.hosts: ["host1", "host2:port", "host3[portX-portY]"] - 是否压缩tcp传输的数据,默认false
transport.tcp.compress: false - 是否使用http协议对外提供服务,默认true
http.cors.enabled: true - http传输内容的最大容量,默认100mb
http.max_content_length: 100mb - 指定该节点是否可以作为master节点,默认是true。ES集群默认是以第一个节点为master,如果该节点出故障就会重新选举master
node.master: true - 该节点是否存索引数据,默认true
node.data: true - 设置集群中自动发现其他节点时ping连接超时时长,默认为3秒。在网络环境较差的情况下,增加这个值,会增加节点等待响应的时间,从一定程度上会减少误判
discover.zen.ping.timeout: 3s - 是否启用多播来发现节点
discovery.zen.ping.multicast.enabled: false - JVM heap dump path设置,生产环境中指定当发生OOM异常时,heap的dump path,好分析问题。在jvm.options中配置
-XX:HeapDumpPath=/var/lib/elasticsearch
除此之外,还有很多参数,请参考官网:https://www.elastic.co/guide/en/elasticsearch/reference/current/system-config.html
安装Kibana
ES需要可视化界面进行操作的话,直接安装Kibana即可。
下载地址:https://www.elastic.co/downloads/kibana
Windows和Linux版本的安装都是一样的,开箱即用,不过需要注意的是,下载的Kibana版本必须和Elasticsearch一致!


