TMS320F28379D创建工程
TI公司的Delfino tms320F28377D是双核32位浮点微控制器单元(MCU),支持新的双核C28x架构,大大地提升了系统性能.每核提供200MHz的信号处理性能,集成了512KB或1MB闪存,172KB或204KB RAM
一个典型的F2837xD应用工程包含两个独立的CCS工程:一个用于CPU1,一个用于CPU2.折两个工程师完全独立的工程,没有真正的连接。
CPU1 子系统的创建
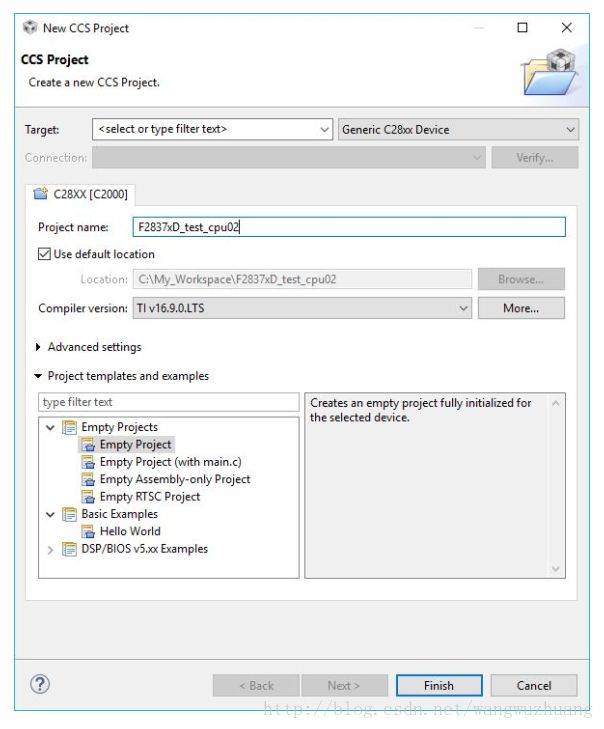
1、从CCS主界面窗口,选择 File -> New -> CCS Project.选择你的目标器件”Generic
C28xx Device”命名你的工程并且选择工程目录,点击完成,你的工程就创建好了

2、在你可以成功编译工程之前,你需要设置一些参数。点击你的project 选择properies。找到 Processor Options ,保证和下图一样

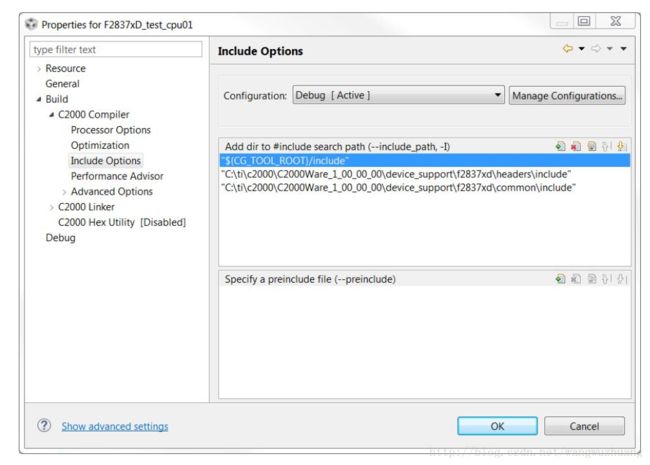
3、In the C2000 Compiler entry look for and select the Include Options. Click on the add directory icon to add a directory to the search path. Click the File System button to browse to the commonninclude folder of your C2000Ware installation (typically C:ntinc2000nC2000Ware_X_XX_XX_XXndevice_supportnf2837xdncommonninclude). Replace the ’X’s with your current C2000Ware version installation. Click ok to add this path, and repeat this same process to add the headersninclude directory.
4. Expand the Advanced Options and look for the Predefined Symbol entry. Add a Pre-define NAME called “CPU1”. This ensures that the header files build correct for this CPU. If using a Launchpad, also add a pre-define NAME called “_LAUNCHXL_F28379D”. This is required to setup the proper device clocking


7. In the project explorer, check that no linker command file got added during project setup. If so,remove the linker command file that got added.
- Next we need to link in a few files which are used by the header files. To do this right click on your project in the workspace and select Add Files… Navigate to the headersnsource directory, and select F2837xD_GlobalVariableDefs.c. After you select the file you’ll have the
option to copy the file into the project or link it. We recommend you link files like this to the project as you will probably not modify these files. Link in the following files as well:
commonnsourcenF2837xD_CodeStartBranch.asm
commonnsourcenF2837xD_usDelay.asm
commonnsourcenF2837xD_SysCtrl.c
commonnsourcenF2837xD_Gpio.c
commonnsourcenF2837xD_Ipc.c
At this point your project workspace should look like the following:

- Create a new file by right clicking on the project and selecting New -> File. Name this file
#include "F28x_Project.h"
void main(void)
{
uint32_t delay;
InitSysCtrl();
// Set pin direction
EALLOW;
GpioCtrlRegs.GPADIR.bit.GPIO10 = 1;
EDIS;
GPIO_SetupPinOptions(14, GPIO_OUTPUT, GPIO_PUSHPULL);
GPIO_SetupPinMux(14, GPIO_MUX_CPU2, 0);
// turn off LED
GpioDataRegs.GPADAT.bit.GPIO10 = 1;
while(1)
{
// Turn on LED
GpioDataRegs.GPADAT.bit.GPIO10 = 0;
// Delay for a bit.
for(delay = 0; delay < 2000000; delay++)
{ }
// Turn off LED
GpioDataRegs.GPADAT.bit.GPIO10 = 1;
// Delay for a bit.
for(delay = 0; delay < 2000000; delay++)
{ }
}
}- Save main.c and then attempt to build the project by right click on it and selecting Build Project. Assuming the project builds try debugging this project on a F2837xD device. When the code runs you should see GPIO 10 toggle.
CPU2子系统创建
- From the main CCS window select File -> New -> CCS Project. Select your Target as “GenericC28xx Device”. Name your project and choose a location for it to reside. Click Finish and your project will be created.
- Before we can successfully build a project we need to setup some build specific settings. Right
click on your project and select Properties. Look at the Processor Options and ensure they
match the below image:

- In the C2000 Compiler entry look for and select the Include Options. Click on the add directory icon to add a directory to the search path. Click the File System button to browse to the commonninclude folder of your C2000Ware installation(typicallyC:ntinc2000nC2000Ware_X_XX_XX_XXndevice_supportnf2837xdncommonninclude). Replace the ’X’s with your current C2000Ware version installation. Click ok to add this path,and repeat this same process to add the headersninclude directory.

- Expand the Advanced Options and look for the Predefined Symbol entry. Add a Pre-define NAME called “CPU2”. This ensures that the header files build correct for this CPU. If using a Launchpad, also add a pre-define NAME called “_LAUNCHXL_F28379D”. This is required to setup the proper device clocking

- Click on the Linker File Search Path. Add these directories to the search path: commonncmd and headersncmd. Then you’ll also want to add the following files: rts2800_fpu.lib,2837xD_RAM_lnk_cpu2.cmd, and F2837x_Headers_nonBIOS_cpu2.cmd. Finally,delete libc.a, we will use rts2800_fpu.lib as our run time support library instead.

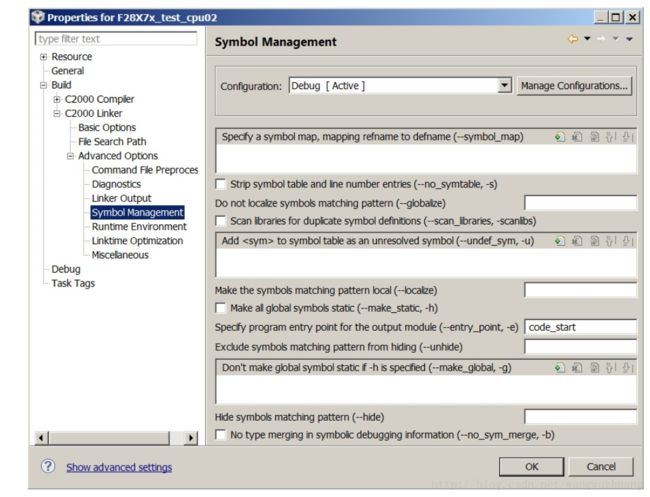
- While you have this window open select the Symbol Management options under C2000 Linker Advanced Options. Specify the program entry point to be code_start. Select ok to close out of the Build Properties.
In the project explorer, check that no linker command file got added during project setup. If so,remove the linker command file that got added.
Next we need to link in a few files which are used by the header files. To do this right click on your project in the workspace and select Add Files… Navigate to the headersnsource directory, and select F2837xD_GlobalVariableDefs.c. After you select the file you’ll have the
option to copy the file into the project or link it. We recommend you link files like this to the project as you will probably not modify these files. Link in the following files as well:
commonnsourcenF2837xD_CodeStartBranch.asm
commonnsourcenF2837xD_usDelay.asm
commonnsourcenF2837xD_SysCtrl.c
commonnsourcenF2837xD_Gpio.c
commonnsourcenF2837xD_Ipc.c
At this point your project workspace should look like the following:

- Create a new file by right clicking on the project and selecting New -> File. Name this file
main.c and copy the following code into it:
#include "F28x_Project.h"
void main(void)
{
uint32_t delay;
// turn off LED
GpioDataRegs.GPADAT.bit.GPIO14 = 1;
while(1)
{
// Turn on LED
GpioDataRegs.GPADAT.bit.GPIO14 = 0;
// Delay for a bit.
for(delay = 0; delay < 2000000; delay++)
{ }
// Turn off LED
GpioDataRegs.GPADAT.bit.GPIO14 = 1;
// Delay for a bit.
for(delay = 0; delay < 2000000; delay++)
{ }
}
}- Save main.c and then attempt to build the project by right click on it and selecting Build Project. Assuming the project builds try debugging both these projects simultaneously on a F2837xD device, otherwise carefully examine the error and the above steps to determine what could have gone wrong.
快捷键
- 加粗
Ctrl + B - 斜体
Ctrl + I - 引用
Ctrl + Q - 插入链接
Ctrl + L - 插入代码
Ctrl + K - 插入图片
Ctrl + G - 提升标题
Ctrl + H - 有序列表
Ctrl + O - 无序列表
Ctrl + U - 横线
Ctrl + R - 撤销
Ctrl + Z - 重做
Ctrl + Y
Markdown及扩展
Markdown 是一种轻量级标记语言,它允许人们使用易读易写的纯文本格式编写文档,然后转换成格式丰富的HTML页面。 —— [ 维基百科 ]
使用简单的符号标识不同的标题,将某些文字标记为粗体或者斜体,创建一个链接等,详细语法参考帮助?。
本编辑器支持 Markdown Extra , 扩展了很多好用的功能。具体请参考Github.
表格
Markdown Extra 表格语法:
| 项目 | 价格 |
|---|---|
| Computer | $1600 |
| Phone | $12 |
| Pipe | $1 |
可以使用冒号来定义对齐方式:
| 项目 | 价格 | 数量 |
|---|---|---|
| Computer | 1600 元 | 5 |
| Phone | 12 元 | 12 |
| Pipe | 1 元 | 234 |
定义列表
- Markdown Extra 定义列表语法:
- 项目1
- 项目2
- 定义 A
- 定义 B
- 项目3
- 定义 C
-
定义 D
定义D内容
代码块
代码块语法遵循标准markdown代码,例如:
@requires_authorization
def somefunc(param1='', param2=0):
    '''A docstring'''
    if param1 > param2: # interesting
        print 'Greater'
    return (param2 - param1 + 1) or None
class SomeClass:
    pass
>>> message = '''interpreter
... prompt'''
脚注
生成一个脚注1.
目录
用 [TOC]来生成目录:
- TI公司的Delfino tms320F28377D是双核32位浮点微控制器单元MCU支持新的双核C28x架构大大地提升了系统性能每核提供200MHz的信号处理性能集成了512KB或1MB闪存172KB或204KB RAM
- CPU1 子系统的创建
- CPU2子系统创建
- 快捷键
- Markdown及扩展
- 表格
- 定义列表
- 代码块
- 脚注
- 目录
- 数学公式
- UML 图
- 离线写博客
- 浏览器兼容
数学公式
使用MathJax渲染LaTex 数学公式,详见math.stackexchange.com.
- 行内公式,数学公式为: Γ(n)=(n−1)!∀n∈N 。
- 块级公式:
更多LaTex语法请参考 这儿.
UML 图:
可以渲染序列图:
或者流程图:
- 关于 序列图 语法,参考 这儿,
- 关于 流程图 语法,参考 这儿.
离线写博客
即使用户在没有网络的情况下,也可以通过本编辑器离线写博客(直接在曾经使用过的浏览器中输入write.blog.csdn.net/mdeditor即可。Markdown编辑器使用浏览器离线存储将内容保存在本地。
用户写博客的过程中,内容实时保存在浏览器缓存中,在用户关闭浏览器或者其它异常情况下,内容不会丢失。用户再次打开浏览器时,会显示上次用户正在编辑的没有发表的内容。
博客发表后,本地缓存将被删除。
用户可以选择 把正在写的博客保存到服务器草稿箱,即使换浏览器或者清除缓存,内容也不会丢失。
注意:虽然浏览器存储大部分时候都比较可靠,但为了您的数据安全,在联网后,请务必及时发表或者保存到服务器草稿箱。
浏览器兼容
- 目前,本编辑器对Chrome浏览器支持最为完整。建议大家使用较新版本的Chrome。
- IE9以下不支持
- IE9,10,11存在以下问题
- 不支持离线功能
- IE9不支持文件导入导出
- IE10不支持拖拽文件导入
- 这里是 脚注 的 内容. ↩