通过lnmp搭建zabbix4.4监控详细教程
目录
1 环境准备
2 关闭selinux和firewalld防火墙
3 jdk安装
4 安装相关依赖包
5 数据库安装配置
6 安装zabbix
7 安装php
8 安装nginx
9 浏览器配置
10 解决中文乱码问题
11 监控其他linux服务器
1 环境准备
| 软件 | 版本 |
| 操作系统 | CentOS 7.6_64 (mini) |
| jdk | 1.8.181 |
| zabbix | 4.4.10 |
| php | 5.6.36 |
| nginx | 1.18.0 |
| 角色 | IP |
| zabbix server | 172.20.10.171 |
| zabbix agent | 172.20.10.172 |
2 关闭selinux和firewalld防火墙
[root@zabbixServer-171 ~]# sed -i "s/SELINUX=enforcing/SELINUX=disabled/g" /etc/selinux/config     //永久关闭,需重启服务器
[root@zabbixServer-171 ~]# setenforce 0    //临时生效,使用上一种
[root@zabbixServer-171 ~]# getenforce      //查看selinux状态
Disabled

[root@zabbixServer-171 ~]# systemctl stop firewalld
[root@zabbixServer-171 ~]# systemctl disable firewalld
3 jdk安装
/root/soft 此目录存放需要的软件包
[root@zabbixServer-171 ~]# tar zxf soft/jdk-8u181-linux-x64.tar.gz -C /usr/local/
[root@zabbixServer-171 ~]# mv /usr/local/jdk1.8.0_181 /usr/local/jdk
[root@zabbixServer-171 ~]# vim /etc/profile
...追加以下配置...
#jdk
export JAVA_HOME=/usr/local/jdk
export CLASSPATH=$CLASSPATH:$JAVA_HOME/lib/
export PATH=$PATH:$JAVA_HOME/bin

[root@zabbixServer-171 ~]# source /etc/profile
[root@zabbixServer-171 ~]# java -version
java version "1.8.0_181"
Java(TM) SE Runtime Environment (build 1.8.0_181-b13)
Java HotSpot(TM) 64-Bit Server VM (build 25.181-b13, mixed mode)
4 安装相关依赖包
yum install -y gcc gcc-c++ libcurl libcurl-devel net-snmp net-snmp-devel perl-DBI libevent libevent-devel bzip2 5 数据库安装配置
[root@zabbixServer-171 ~]# yum install mariadb*
[root@zabbixServer-171 ~]# systemctl start mariadb
[root@zabbixServer-171 ~]# systemctl enable mariadb
Created symlink from /etc/systemd/system/multi-user.target.wants/mariadb.service to /usr/lib/systemd/system/mariadb.service.
[root@zabbixServer-171 ~]# mysql_secure_installation   #初始化配置 设置密码等..显示略

[root@zabbixServer-171 ~]# mysql -u root -p  //登录数据库,创建zabbix数据库、账号及授权

MariaDB [(none)]> create database zabbix character set utf8 collate utf8_bin;
MariaDB [(none)]> grant all on zabbix.* to zabbix@localhost identified by 'zabbix123';
MariaDB [(none)]> grant all on zabbix.* to zabbix@"%" identified by 'zabbix123';
MariaDB [(none)]> flush privileges;
MariaDB [(none)]> exit

//导入zabbix数据
[root@zabbixServer-171 ~]# cd soft/ && tar zxf zabbix-4.4.10.tar.gz
[root@zabbixServer-171 soft]# cd zabbix-4.4.10/database/mysql/
[root@zabbixServer-171 mysql]# ls -l *.sql
-rw-r--r-- 1 1000 1000 7054747 Jun 29 18:30 data.sql
-rw-r--r-- 1 1000 1000 1978341 May 11 01:36 images.sql
-rw-r--r-- 1 1000 1000  144622 Jun 29 18:30 schema.sql
[root@zabbixServer-171 mysql]# mysql -uzabbix -pzabbix123 zabbix < schema.sql
[root@zabbixServer-171 mysql]# mysql -uzabbix -pzabbix123 zabbix < images.sql
[root@zabbixServer-171 mysql]# mysql -uzabbix -pzabbix123 zabbix < data.sql

[root@zabbixServer-171 ~]# mysql -u zabbix -pzabbix123 //登录数据库查看是否有数据

MariaDB [(none)]> show databases;
+--------------------+
| Database           |
+--------------------+
| information_schema |
| test               |
| zabbix             |
+--------------------+
MariaDB [(none)]> use zabbix;
MariaDB [zabbix]> show tables;
+----------------------------+
| Tables_in_zabbix           |
+----------------------------+
| acknowledges               |
| actions                    |
...略...
6 安装zabbix
6.1 编译安装zabbix
[root@zabbixServer-171 ~]# cd soft/zabbix-4.4.10
[root@zabbixServer-171 zabbix-4.4.10]# ./configure --prefix=/usr/local/zabbix --enable-server --enable-agent --with-mysql  --with-net-snmp--with-libcurl --enable-java
[root@zabbixServer-171 zabbix-4.4.10]# make && make install
6.2 配置zabbix server和agent启动文件
[root@zabbixServer-171 ~]# ls -l soft/zabbix-4.4.10/misc/init.d/tru64/
total 8
-rw-r--r-- 1 1000 1000 1519 May 11 01:36 zabbix_agentd
-rw-r--r-- 1 1000 1000 1521 May 11 01:36 zabbix_server
[root@zabbixServer-171 ~]# cp soft/zabbix-4.4.10/misc/init.d/tru64/zabbix_* /etc/init.d/
[root@zabbixServer-171 ~]# ls -l /etc/init.d/zabbix_*
-rw-r--r-- 1 root root 1519 Jul 20 13:37 /etc/init.d/zabbix_agentd
-rw-r--r-- 1 root root 1521 Jul 20 13:37 /etc/init.d/zabbix_server

[root@zabbixServer-171 ~]# chmod +x /etc/init.d/zabbix_*  //查看到脚本没权限,授予执行权限
[root@zabbixServer-171 ~]# ls -l /etc/init.d/zabbix_*
-rwxr-xr-x 1 root root 1519 Jul 20 13:37 /etc/init.d/zabbix_agentd
-rwxr-xr-x 1 root root 1521 Jul 20 13:37 /etc/init.d/zabbix_server

[root@zabbixServer-171 ~]# vim /etc/init.d/zabbix_server   //配置zabbix_server启动脚本,agent同理

...///上面忽略
SERVICE="Zabbix server"
#DAEMON=/usr/local/sbin/zabbix_server       //此行注释
DAEMON=/usr/local/zabbix/sbin/zabbix_server //添加此行,路径为安装路径
PIDFILE=/tmp/zabbix_server.pid
...///下面忽略
6.3 配置zabbix server 配置文件
[root@zabbixServer-171 ~]# vim /usr/local/zabbix/etc/zabbix_server.conf ///注意备份此文件
///主要修改这几个地方 ,其他忽略
ListenPort=10051
LogFile=/tmp/zabbix_server.log
PidFile=/tmp/zabbix_server.pid
DBHost=localhost   ///数据库地址
DBName=zabbix      ///数据库 名字
DBUser=zabbix      ///数据库用户
DBPassword=zabbix123  ///密码
DBPort=3306           ///端口,默认为3306
AllowRoot=1           ///默认为0,设置1,允许其他用户启动
User=root             ///设置root启动,默认为zabbix用户
Include=/usr/local/zabbix/etc/zabbix_server.conf.d/*.conf
6.4 启动zabbix
[root@zabbixServer-171 ~]# /etc/init.d/zabbix_server start
Zabbix server started.
[root@zabbixServer-171 ~]# ps -ef | grep zabbix
root      20445      1  0 13:49 ?        00:00:00 /usr/local/zabbix/sbin/zabbix_server
[root@zabbixServer-171 ~]# netstat -anultp | grep 10051    ## 10051端口是zabbixServer监听端口
tcp        0      0 0.0.0.0:10051           0.0.0.0:*               LISTEN      20445/zabbix_server
7 安装php
7.1 php编译安装及相关配置
[root@zabbixServer-171 ~]# cd soft && tar xf php-5.6.36.tar.bz2
[root@zabbixServer-171 php-5.6.36]# yum install -y libjpeg  libpng*  libxslt-devel* libjpeg-devel freetype*
[root@zabbixServer-171 php-5.6.36]# ./configure --prefix=/usr/local/php --with-config-file-path=/usr/local/php/etc --with-curl --with-gd --with-gettext --with-iconv-dir --with-kerberos --with-libdir=lib64 --with-libxml-dir --with-mysql --with-mysqli --with-openssl --with-pcre-regex --with-pdo-mysql --with-pdo-sqlite --with-pear --with-png-dir --with-freetype-dir --with-jpeg-dir --with-xmlrpc --with-xsl --with-zlib --enable-fpm --enable-bcmath --enable-libxml --enable-inline-optimization --enable-gd-native-ttf --enable-mbregex --enable-mbstring --enable-opcache --enable-pcntl --enable-shmop --enable-soap --enable-sockets --enable-sysvsem --enable-xml
[root@zabbixServer-171 php-5.6.36]# make && make install

[root@zabbixServer-171 etc]# cp php-fpm.conf.default php-fpm.conf
[root@zabbixServer-171 etc]# cp ~/soft/php-5.6.36/php.ini-development ./php.ini
[root@zabbixServer-171 etc]# cp ~/soft/php-5.6.36/sapi/fpm/init.d.php-fpm /etc/init.d/php-fpm
[root@zabbixServer-171 etc]# chmod +x /etc/init.d/php-fpm
[root@zabbixServer-171 etc]# /etc/init.d/php-fpm  start
[root@zabbixServer-171 etc]# ps -ef | grep php-fpm
root      15374      1  0 14:16 ?        00:00:00 php-fpm: master process (/usr/local/php/etc/php-fpm.conf)
nobody    15375  15374  0 14:16 ?        00:00:00 php-fpm: pool www
nobody    15376  15374  0 14:16 ?        00:00:00 php-fpm: pool www
7.2 针对php安装ldap ///不做此步骤 ,后面会有警告
[root@zabbixServer-171 ~]# yum install -y openldap*  autoconf
///  autoconf 必须安装,此不安装会,后面不会生产configure文件

[root@zabbixServer-171 ~]# cd soft/php-5.6.36/ext/ldap/
[root@zabbixServer-171 ldap]# ls
config.m4  config.w32  CREDITS  ldap.c  ldap.dsp  ldap.mak  LDAP_Win32_HOWTO.txt  php_ldap.h  tests

[root@zabbixServer-171 ldap]# /usr/local/php/bin/phpize
Configuring for:
PHP Api Version:         20131106
Zend Module Api No:      20131226
Zend Extension Api No:   220131226
[root@zabbixServer-171 ldap]# ls
acinclude.m4    build         config.m4   configure.in  install-sh  ldap.mak              Makefile.global  php_ldap.h
aclocal.m4      config.guess  config.sub  config.w32    ldap.c      LDAP_Win32_HOWTO.txt  missing          run-tests.php
autom4te.cache  config.h.in   configure   CREDITS       ldap.dsp    ltmain.sh             mkinstalldirs    tests

///编译安装
[root@zabbixServer-171 ldap]# cp /usr/lib64/libldap* /usr/lib/
[root@zabbixServer-171 ldap]# ./configure --with-php-config=/usr/local/php/bin/php-config --with-ldap
[root@zabbixServer-171 ldap]# make && make install

///php.ini文件设置
[root@zabbixServer-171 ~]# vim /usr/local/php/etc/php.ini
extension=ldap.so  添加此行,重启php
[root@zabbixServer-171 ~]# /etc/init.d/php-fpm restart
8 安装nginx
8.1 编译安装
#使用yum安装也可以,个人喜欢源码编译安装
[root@zabbixServer-171 ~]# groupadd nginx
[root@zabbixServer-171 ngin]# useradd nginx -g nginx -M -s /sbin/nologin
[root@zabbixServer-171 ~]# cd soft && tar zxf nginx-1.18.0.tar.gz
[root@zabbixServer-171 soft]# cd nginx-1.18.0

[root@zabbixServer-171 nginx-1.18.0]# yum install -y GeoIP*
[root@zabbixServer-171 nginx-1.18.0]# ./configure --prefix=/usr/local/nginx --user=nginx --group=nginx --with-compat --with-file-aio --with-threads --with-http_addition_module --with-http_auth_request_module --with-http_dav_module --with-http_flv_module --with-http_gunzip_module --with-http_gzip_static_module --with-http_mp4_module --with-http_random_index_module --with-http_realip_module --with-http_secure_link_module --with-http_slice_module --with-http_ssl_module --with-http_stub_status_module --with-http_sub_module --with-http_v2_module --with-mail --with-mail_ssl_module --with-stream --with-stream_realip_module --with-stream_ssl_module --with-stream_ssl_preread_module --with-pcre --with-pcre-jit --with-stream_geoip_module
[root@zabbixServer-171 nginx-1.18.0]# make && make install

[root@zabbixServer-171 ~]# /usr/local/nginx/sbin/nginx -c /usr/local/nginx/conf/nginx.conf -t  //检测nginx
nginx: the configuration file /usr/local/nginx/conf/nginx.conf syntax is ok
nginx: configuration file /usr/local/nginx/conf/nginx.conf test is successful

[root@zabbixServer-171 ~]# /usr/local/nginx/sbin/nginx -c /usr/local/nginx/conf/nginx.conf  #启动nginx
8.2 修改配置文件,支持php,这里不再演示测试,启动
[root@zabbixServer-171 ~]# cat /usr/local/ngin/conf/nginx.conf
#user  nobody;
worker_processes  auto;

error_log  logs/error.log;
error_log  logs/error.log  notice;
error_log  logs/error.log  info;

pid        logs/nginx.pid;


events {
    worker_connections  1024;
}


http {
    include       mime.types;
    default_type  application/octet-stream;

    log_format  main  '$remote_addr - $remote_user [$time_local] "$request" '
                      '$status $body_bytes_sent "$http_referer" '
                      '"$http_user_agent" "$http_x_forwarded_for"';

    access_log  logs/access.log  main;

    sendfile        on;

    server_tokens off;

    keepalive_timeout  65;

    gzip  on;

    server {
        listen       80;
        server_name  localhost;

        access_log  logs/host.access.log  main;

        location / {
            root   html;
            index  index.php;
        }

       location /nginx_status {
           stub_status on;
           access_log   off;
       }

        error_page  404              /404.html;

        error_page   500 502 503 504  /50x.html;
        location = /50x.html {
            root   html;
        }

        location ~ \.php$ {
            root           html;
            fastcgi_split_path_info ^(.+.php)(.*)$;
            include fastcgi.conf;
            fastcgi_pass   127.0.0.1:9000;
            fastcgi_index  index.php;
            fastcgi_param  PATH_INFO  $fastcgi_path_info;
        }

    }
}
8.3 拷贝zabbix前端文件
[root@zabbixServer-171 ~]# cd soft/zabbix-4.4.10/frontends/php/
[root@zabbixServer-171 php]# cp -R * /usr/local/ngin/html/
9 浏览器配置
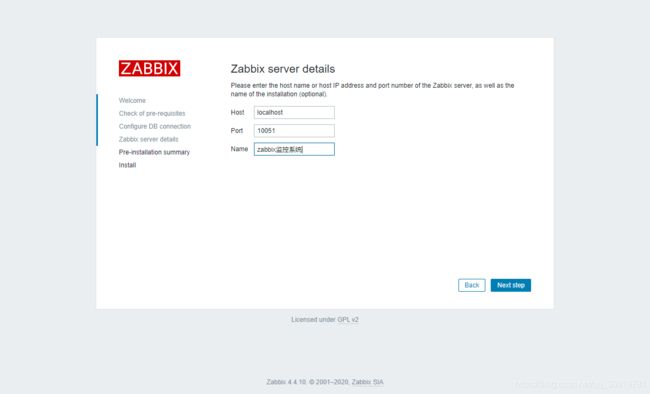
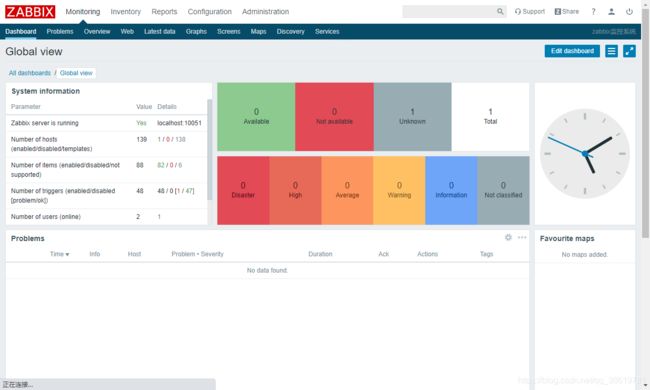
浏览器输入IP地址:http://172.20.10.171
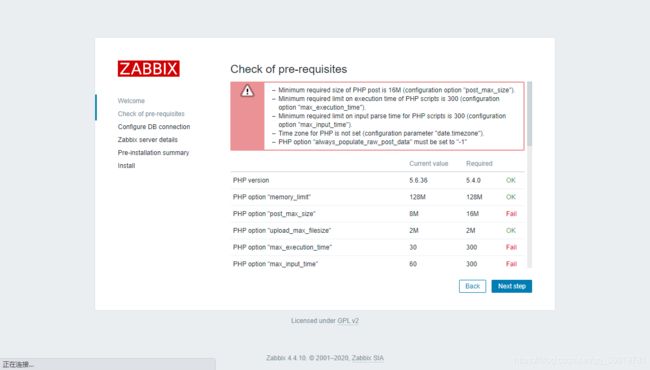
请自行根据内容修改 /usr/local/php/etc/php.ini 文件,然后重启php,刷新页面!


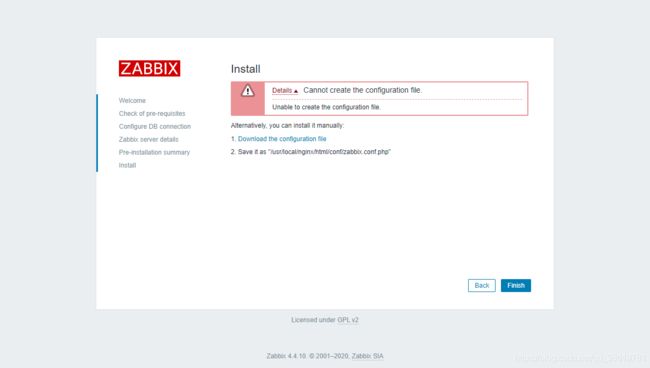
此地方自行下载文件,并放在指定位置!

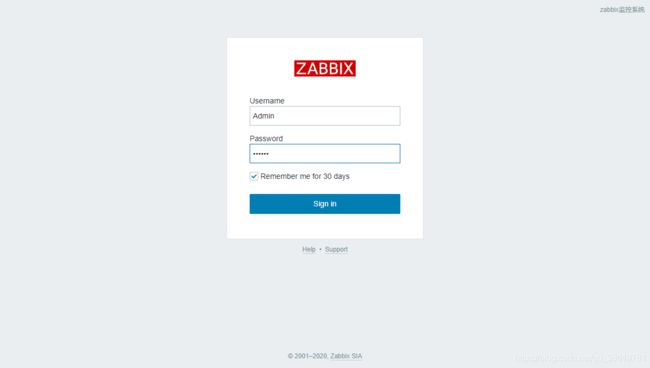
登陆账号密码默认为:Admin zabbix
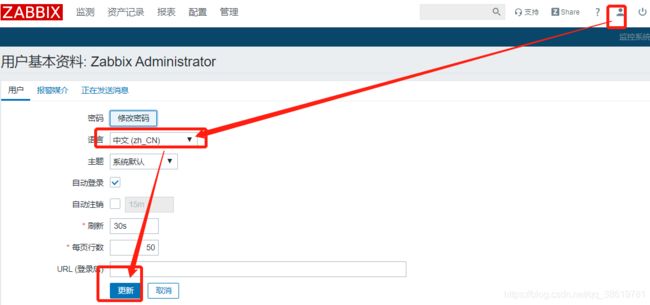
设置语言为中文:
监控自身:启动agint
[root@zabbixServer-171 ~]# grep "^[^#"] /usr/local/zabbix/etc/zabbix_agentd.conf
PidFile=/tmp/zabbix_agentd.pid
LogFile=/tmp/zabbix_agentd.log
Server=127.0.0.1                #一般写server端IP 这里默认
ListenPort=10050                #agent 端口
ServerActive=127.0.0.1          # 一般写server端IP  这里默认即可
Hostname=Zabbix server          #在server端显示的名称
AllowRoot=1                     #允许其他用户启动,默认不允许
User=root                       #使用root启动agent 默认zabbix用户
Include=/usr/local/zabbix/etc/zabbix_agentd.conf.d/*.conf

[root@zabbixServer-171 ~]# /etc/init.d/zabbix_agentd start
这样都已正常!
10 解决中文乱码问题

查看图形时,显示乱码解决方法:
从Window服务器找一款自己喜欢的字体,复制到zabbix Server服务器上: C:\Windows\Fonts
[root@zabbixServer-171 ~]# cd /usr/local/nginx/html/assets/fonts
[root@zabbixServer-171 fonts]# ll
total 740
-rw-r--r-- 1 root root 756072 Jul 20 16:59 DejaVuSans.ttf

[root@zabbixServer-171 fonts]# rz   进行上传

[root@zabbixServer-171 fonts]# ll
total 12252
-rw-r--r-- 1 root root   756072 Jul 20 16:59 DejaVuSans.ttf
-rw-r--r-- 1 root root 11787328 Aug  9  2018 SIMKAI.TTF

[root@zabbixServer-171 fonts]# mv DejaVuSans.ttf DejaVuSans.ttf_bak

[root@zabbixServer-171 fonts]# mv SIMKAI.TTF DejaVuSans.ttf
再次查看,正常!
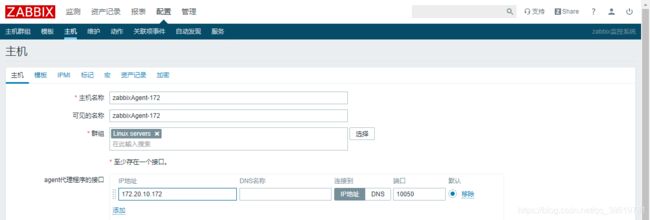
11 监控其他linux服务器
登录服务器172.20.10.172,这里以rpm包方式安装agent端。
[root@zabbixAgent-172 ~]# wget http://repo.zabbix.com/zabbix/4.4/rhel/7/x86_64/zabbix-agent-4.4.10-1.el7.x86_64.rpm

[root@zabbixAgent-172 ~]# yum install zabbix-agent-4.4.10-1.el7.x86_64.rpm

[root@zabbixAgent-172 ~]# grep "^[^#]" /etc/zabbix/zabbix_agentd.conf
PidFile=/var/run/zabbix/zabbix_agentd.pid
LogFile=/var/log/zabbix/zabbix_agentd.log
LogFileSize=0
Server=172.20.10.171                      #server 端地址
ServerActive=172.20.10.171                #server端地址
Hostname=zabbixAgent-172                  #agent主机名
AllowRoot=1                               #允许其他用户启动,默认不允许,我是以root了
User=root
Include=/etc/zabbix/zabbix_agentd.d/*.conf

[root@zabbixAgent-172 ~]# vim /usr/lib/systemd/system/zabbix-agent.service
。。。
User=root   默认为zabbix  我改为了root
Group=root
。。。

[root@zabbixAgent-172 ~]# systemctl start zabbix-agent
[root@zabbixAgent-172 ~]# systemctl enable zabbix-agent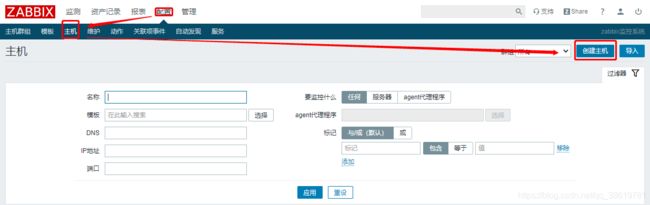
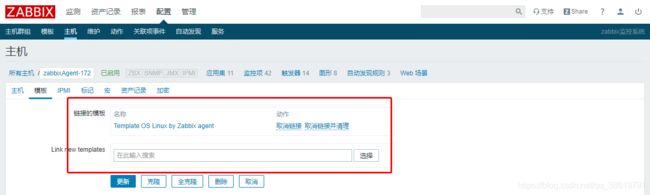

表示监控成功,这样是手动添加agent主机,可以设置自动发现agent,并自动监控。