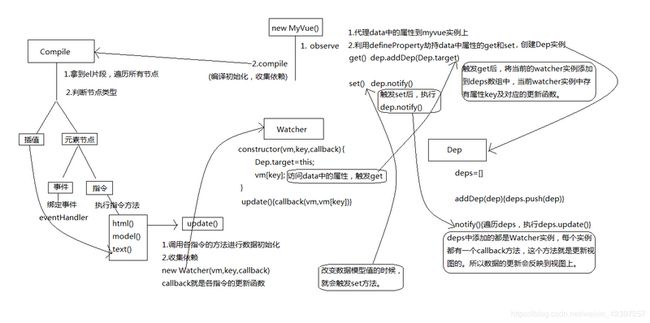
根据对vue源码的理解,对vue的数据响应式做一个简单的实现。
定义myvue,使用方式仿造vue,简单实现插值表达式、数据双向绑定、事件及指令。
直接上代码
创建index.html,代码如下:
{{title}}
创建myvue.js,主要作用是数据的响应化,代码如下:
class MyVue {
    constructor(options) {
        this.$options = options;
        this.$data = options.data;

        this.observe(this.$data);

        // 在compile.js中实现
        new Compile(options.el, this);
    }

    observe(data) {
        if (!data || typeof data !== 'object')
            return;

        Object.keys(data).forEach(key => {
            this.defineReactive(data, key, data[key]);
            this.proxyData(key);
        })
    }

    // 数据响应化
    defineReactive(data, key, value) {
        this.observe(value);

        var dep = new Dep();
        Object.defineProperty(data, key, {
            get() {
                Dep.target && dep.addDep(Dep.target);
                return value;
            },
            set(newValue) {
                if (value === newValue) return;
                value = newValue;
                dep.notify();
            }
        })
    }

    // 代理data中的属性到vue实例上
    proxyData(key) {
        Object.defineProperty(this, key, {
            get() {
                return this.$data[key];
            },
            set(newValue) {
                this.$data[key] = newValue;
            }
        })
    }

}

// 依赖收集器,管理Watcher
class Dep {
    constructor() {
        // 用来存放watcher
        this.deps = [];
    }

    addDep(dep) {
        this.deps.push(dep);
    }

    notify() {
        this.deps.forEach(dep => dep.update())
    }
}

// Watcher 订阅者
class Watcher {
    constructor(vm, key, callback) {
        this.vm = vm;
        this.key = key;
        this.callback = callback;

        // 将当前实例指向Dep类的静态属性target
        Dep.target = this;
        this.vm[this.key];
        Dep.target = null;
    }

    update() {
        this.callback.call(this.vm, this.vm[this.key]);
    }
}
创建compile.js,主要作用是编译,代码如下:
class Compile {
    constructor(el, vm) {
        this.$el = document.querySelector(el);
        this.$vm = vm;

        if (this.$el) {
            this.$fragment = this.node2Fragment(this.$el);
            // 核心——编译(处理html模板,解析指令事件等,以及收集相关依赖)
            this.compile(this.$fragment);
            this.$el.appendChild(this.$fragment);
        }
    }

    // 将dom结构转换为fragment片段进行操作,提升性能
    node2Fragment(el) {
        const frag = document.createDocumentFragment();

        let child;
        while (child = el.firstChild) {
            frag.appendChild(child);
        }
        return frag;
    }

    compile(el) {
        const childNodes = el.childNodes;
        // 遍历所有节点
        Array.from(childNodes).forEach(node => {
            // 元素节点
            if (this.isElement(node)) {
                const nodeAttrs = node.attributes;
                // 遍历所有属性
                Array.from(nodeAttrs).forEach(attr => {
                    const attrName = attr.name;
                    const attrVal = attr.value;
                    // 指令
                    if (this.isDirective(attrName)) {
                        const dirName = attrName.substring(3);
                        this[dirName] && this[dirName](node, this.$vm, attrVal);
                    } else if (this.isEvent(attrName)) { // 事件
                        const eventName = attrName.substring(1);
                        this.eventHandler(node, this.$vm, attrVal, eventName);
                    }
                })
            } else if (this.isText(node)) { // 文本节点
                this.compileText(node);
            }

            if (node.childNodes && node.childNodes.length > 0) {
                this.compile(node);
            }
        })
    }

    // 调用指令方式初始化,并收集依赖
    update(node, vm, val, dir) {
        const updateFn = this[dir + 'Updater'];
        updateFn && updateFn(node, vm[val]);

        new Watcher(vm, val, function (value) {
            updateFn && updateFn(node, value);
        });
    }

    // 处理插值表达式
    compileText(node) {
        this.update(node, this.$vm, RegExp.$1, "text");
    }

    // text指令方法
    text(node, vm, attrVal) {
        this.update(node, vm, attrVal, "text");
    }

    // text指令更新函数
    textUpdater(node, value) {
        console.log('set:' + value)
        node.textContent = value;
    }

    // model指令方法
    model(node, vm, attrVal) {
        // 指定input的value属性,模型对视图的响应
        this.update(node, vm, attrVal, "model");

        // 视图对模型响应
        node.addEventListener('input', function (e) {
            vm[attrVal] = e.target.value;
        })
    }

    // 双向绑定更新函数
    modelUpdater(node, value) {
        node.value = value;
    }

    // html指令方法
    html(node, vm, attrVal) {
        this.update(node, vm, attrVal, "html");
    }

    // html更新函数
    htmlUpdater(node, value) {
        node.innerHTML = value;
    }

    // 事件处理函数
    eventHandler(node, vm, val, event) {
        // 在vue实例的methods中找到对应的方法
        let fn = vm.$options.methods && vm.$options.methods[val];
        if (event && fn)
            node.addEventListener(event, fn.bind(vm))
    }

    // 判断属性是否为指令
    isDirective(attr) {
        return attr.indexOf('my-') === 0;
    }

    // 判断属性是否为自定义事件
    isEvent(attr) {
        return attr.indexOf('@') === 0;
    }

    // 判断节点为元素节点
    isElement(node) {
        return node.nodeType === 1;
    }

    // 判断节点是文本节点并且为插值表达式
    isText(node) {
        return node.nodeType === 3 && /\{\{(.*)\}\}/.test(node.textContent)
    }
}代码到这就结束了,代码都有简单的注释,就不再用文字说明了,看一张图就好。(本来想着用文字描述的,但是文字不太容易理解,索性就画了个图,觉得比文字容易理解)
