SSM整合--新人快速搭建项目环境
SSM整合
准备:eclipse、JDK1.7、spring、mybaits、springmvc
一、开发步骤:
0、创建数据库、导入jar包
1、配置mybatis配置文件sqlMapConfig.xml
2、配置spring容器applicationConfig.xml
为了直观,将spring配置文件分成3份
2.1、applicationConfig-dao.xml与mybatis整合及扫描dao层
2.2、applicationConfig-service.xml扫描service层
2.3、applicationConfig-tran.xml增强service层功能
3、配置springmvc配置文件springmvc.xml
4、编写POJO(对应数据库),Mapper(持久层),Service(业务逻辑层),Controller(处理前端页面)类
5、部署web.xml文件
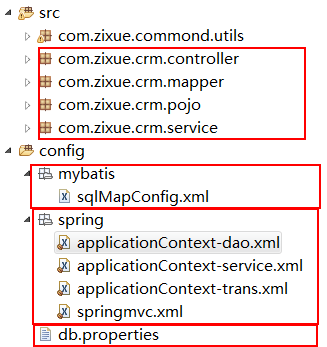
二、作用范围:

最终文件目录

三、编写配置文件
0、数据库创建略过,jar包最后打包上传
1、sqlMapConfig.xml编写
引入mybatis-config.dtd约束
<configuration>


configuration>
2、applicationConfig-dao.xml编写
引入约束:xsi(必须),beans(必须),context(加载数据库配置文件),tx\aop(需要配置事务可引入约束)等等….看需求引入约束
    <context:property-placeholder location="classpath:db.properties" />

    <bean id="dataSource" class="com.alibaba.druid.pool.DruidDataSource">
        <property name="driverClassName" value="${jdbc.driver}" />
        <property name="url" value="${jdbc.url}" />
        <property name="username" value="${jdbc.username}" />
        <property name="password" value="${jdbc.password}" />
    bean>


    <bean class="org.mybatis.spring.SqlSessionFactoryBean">

        <property name="configLocation" value="classpath:mybatis/sqlMapConfig.xml" />

        <property name="dataSource" ref="dataSource" />
    bean>


    <bean class="org.mybatis.spring.mapper.MapperScannerConfigurer">

        <property name="basePackage" value="com.zixue.crm.mapper" />
    bean>
其中db.properties的代码
##driver:驱动
##url:“jdbc:muysql://localhost:3306”固定格式,“ssm”数据库名称,“characterEncoding=utf-8”字符编码
##username:连接数据库的用户名
##password:连接数据库的密码
##加上jdbc前缀是为了防止有多个数据库重名,spring会获取连接异常
jdbc.driver=com.mysql.jdbc.Driver
jdbc.url=jdbc:mysql://localhost:3306/ssm?characterEncoding=utf-8
jdbc.username=root
jdbc.password=123456
3、applicationConfig-service.xml
引入约束与applicationConfig-dao.xml相同
<context:component-scan base-package="com.zixue.crm.service"/>4、applicationConfig-tran.xml编写
由于搭建环境初期不需要编写事务,故此处不编写
5、springmvc.xml编写
引入约束:xsi(必须),beans(必须),context(扫描controller类及需要的properties),mvc(配置注解驱动(映射器、适配器))
6、web.xml编写
<web-app xmlns:xsi="http://www.w3.org/2001/XMLSchema-instance" xmlns="http://java.sun.com/xml/ns/javaee" xsi:schemaLocation="http://java.sun.com/xml/ns/javaee http://java.sun.com/xml/ns/javaee/web-app_2_5.xsd" id="WebApp_ID" version="2.5">
  <display-name>WEB-ssmdisplay-name>
  <welcome-file-list>
    <welcome-file>index.htmlwelcome-file>
    <welcome-file>index.htmwelcome-file>
    <welcome-file>index.jspwelcome-file>
    <welcome-file>default.htmlwelcome-file>
    <welcome-file>default.htmwelcome-file>
    <welcome-file>default.jspwelcome-file>
  welcome-file-list>


    <context-param>
        <param-name>contextConfigLocationparam-name>
        <param-value>classpath:spring/applicationContext-*.xmlparam-value>
    context-param>

    <listener>
        <listener-class>org.springframework.web.context.ContextLoaderListenerlistener-class>
    listener>


    <filter>
        <filter-name>encodingfilter-name>
        <filter-class>org.springframework.web.filter.CharacterEncodingFilterfilter-class>
        <init-param>
            <param-name>encodingparam-name>
            <param-value>UTF-8param-value>
        init-param>
    filter>
    <filter-mapping>
        <filter-name>encodingfilter-name>
        <url-pattern>/*url-pattern>
    filter-mapping>


    <servlet>
        <servlet-name>boot-crmservlet-name>
        <servlet-class>org.springframework.web.servlet.DispatcherServletservlet-class>
        <init-param>
            <param-name>contextConfigLocationparam-name>
            <param-value>classpath:spring/springmvc.xmlparam-value>
        init-param>


        <load-on-startup>1load-on-startup>
    servlet>
    <servlet-mapping>
        <servlet-name>boot-crmservlet-name>

        <url-pattern>*.actionurl-pattern>
    servlet-mapping>
web-app>
7、编写Mapper层,POJO类,以及简单jsp表单页面
Mapper、POJO类可以用逆向工程自动生成代码:逆向工程下面打包上传

先编写图中的1
<generatorConfiguration>
    <context id="testTables" targetRuntime="MyBatis3">
        <commentGenerator>

            <property name="suppressAllComments" value="true" />
        commentGenerator>

        <jdbcConnection driverClass="com.mysql.jdbc.Driver"
            connectionURL="jdbc:mysql://localhost:3306/ssm" userId="root"
            password="123456">
        jdbcConnection>


        <javaTypeResolver>
            <property name="forceBigDecimals" value="false" />
        javaTypeResolver>


        <javaModelGenerator targetPackage="com.zixue.crm.pojo"     //输出pojo类至逆向工程根目录
            targetProject=".\src">

            <property name="enableSubPackages" value="false" />

            <property name="trimStrings" value="true" />
        javaModelGenerator>

        <sqlMapGenerator targetPackage="cn.zixue.crm.mapper"      //输出mapper.xml至逆向工程根目录
            targetProject=".\src">

            <property name="enableSubPackages" value="false" />
        sqlMapGenerator>

        <javaClientGenerator type="XMLMAPPER"
            targetPackage="cn.zixue.crm.mapper"                //输出mapper接口至逆向工程根目录
            targetProject=".\src">

            <property name="enableSubPackages" value="false" />
        javaClientGenerator>

        <table schema="" tableName="user">table>
        -=-=-=-=-=-=.......数据库中有多少表就添加多少table标签-=-=-=-=-=-=-=-=-=-=-=-=-=-=-=-=-=-=-=
    context>
generatorConfiguration>
编写好1后,运行2

运行图中画圈的main方法,即可发现逆向工程根目录生成了com.zixue.crm.pojo和com.zixue.crm.mapper文件,copy至自己项目中即可。
注意:由于spring容器扫描了controller、service类,需要在这两类的类头加上@controller、@service,才能正确扫描,除此之外,service层需要调用mapper,controller层需要调用service,故可在service中@Autowired注入mapper,controller中注入service
简单的整合就大功告成,简单的入门程序CRUD,会在后续发布
ssm的打包jar包,逆向工程
链接:http://pan.baidu.com/s/1jIMNdQI 密码:bl50