day05-电商环境搭建&首页制作&分类制作&vant使用
搭建项目环境
初始化wepy环境
使用命令npm i wepy-cli -g 安装脚手架
wepy init standard hmyg
输入项目名称
输入appID
进入到项目根目录 输入 npm install 来下载相应的依赖包
进入到项目根目录 输入 wepy build --watch 来实时编译小程序代码
搭建项目结构
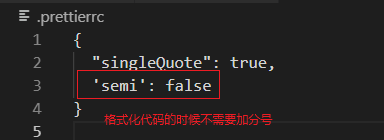
在配置项去除格式化自动不全 分号
配置小程序底部的tab栏
在page 目录中 创建5个tab页面
给5个 wpy 文件分别定义三个标签 、、
在标签中对外创建class类,继承 wepy.page
import wepy from 'wepy'
export default class Cart extends wepy.page {

}
配置 tab栏 效果
- 在
app.wpy文件的config节点中,配置tabBar,配置每一个页面的路径,图片,文字等
tabBar: {
      list: [{
        // 页面路径
        pagePath: 'pages/tabs/home',
        // 显示的文本
        text: '首页',
        // 默认图标路径
        iconPath: '/assets/icon/home.png',
        // 选中后图标路径
        selectedIconPath: '/assets/icon/home-active.png'
      },
      {
        pagePath: 'pages/tabs/cates',
        text: '分类',
        iconPath: '/assets/icon/cates.png',
        selectedIconPath: '/assets/icon/cates-active.png'
      },
      {
        pagePath: 'pages/tabs/search',
        text: '搜索',
        iconPath: '/assets/icon/search.png',
        selectedIconPath: '/assets/icon/search-active.png'
      },
      {
        pagePath: 'pages/tabs/cart',
        text: '购物车',
        iconPath: '/assets/icon/cart.png',
        selectedIconPath: '/assets/icon/cart-active.png'
      },
      {
        pagePath: 'pages/tabs/me',
        text: '我的',
        iconPath: '/assets/icon/my.png',
        selectedIconPath: '/assets/icon/my-active.png'
      }]
    }
配置导航栏头部的样式
在 app.wpy 文件的 config节点中,找到window
window: {
      // 三个小圆点样式
      backgroundTextStyle: 'dark',
      // 导航栏头部的背景颜色
      navigationBarBackgroundColor: '#d81e06',
      // 导航栏头部文字
      navigationBarTitleText: '黑马优购',
      // 导航栏头部文字颜色
      navigationBarTextStyle: 'white'
}
开启异步支持
在 app.wpy 文件的 config节点中,找到 constructor
constructor () {
    super()
    this.use('requestfix')
    // 通过这一行代码,就可以开启异步api,开启 promise功能,这样异步API调用结果,返回的就是Promise对象
    this.use('promisify')
}
配置全局的变量
由于每次我们去请求接口,前面的路径都是相同的,所以我们可以把访问跟路径做成全局的变量,配置方式如下
-
在
app.wpy里面的config找到globalData,配置全局变量globalData = { httpUrl: 'https://www.zhengzhicheng.cn/api/public/v1' } -
在我们page中的
wpy里面就可以通过this.$parent.globalData来获取this.$parent.globalData.httpUrl;
首页功能制作
轮播图功能
- 在
home.wpy中,定义 data 数据,onLoad函数,自定义请求轮播图的函数 - 在
onLoad函数中,调用 自定义请求轮播图的函数 - 在自定义请求轮播图函数中 利用
wepy.request()来请求服务,请求的地址已经请求方式参考接口文档 - 得到服务器返回的数据,然后对数据进行校验,如果返回状态码是200,代表成功
- 把得到的数据赋值给 data数据中,然后刷新页面
export default class Home extends wepy.page {
          data = {
               // 轮播图数据
               swiperList: []
          }
          onLoad() {
               //当页面加载完毕调用方法请求首页的轮播图数据
               this.getSwiperData()
          }
          async getSwiperData() {
               // this.$parent.globalData 获取的是全局的变量,因为每次我们请求接口,前面的路径都是相同的,所以我们可以做成全局的变量
               const {
                    data: res
               } = await wepy.request({
                    url: this.$parent.globalData.httpUrl + '/home/swiperdata',
                    method: 'GET'
               })
               console.log(res)
               if (res.meta.status == 200) {
                    // 把数据赋值给 data里面的swiperList
                    this.swiperList = res.message
                    // 强制刷新页面
                    this.$apply()
                    // 弹出提示框
                    wepy.showToast({
                         title: '请求成功',
                         icon: 'none',
                         duration: 500
                    })
               }
          }
     }
得到数据了之后,就可以通过小程序帮我们预先设定好的轮播图组件(swiper)来进行渲染 ,修改一下相应的样式
 <view>
      <swiper indicator-dots autoplay circular>
          <block wx:for="{{swiperList}}" wx:key="index">
              <swiper-item>
                  <image mode="aspectFill" src="{{item.image_src}}" />
              swiper-item>
          block>
      swiper>
 view>

<style lang="less">
  swiper{
       height: 350rpx;
       navigator,
       image{
          width: 750rpx;
          height: 100%;
       }
  }
style>
点击轮播图图片跳转到详情页,在template里面使用了 navigator 来进行跳转,我们需要创建相应的文件即可
分类列表
- 在
home.wpy中,创建自定义请求分类列表的函数,onLoad函数中,调用这个函数 - 在自定义请求分类函数中 利用
wepy.request()来请求服务,请求的地址已经请求方式参考接口文档 - 得到服务器返回的数据,然后对数据进行校验,如果返回状态码是200,代表成功
- 把得到的数据赋值给 data数据中,然后刷新页面
javascrip代码
 async getCateItems() {
     const {
          data: res
     } = await wepy.request({
          url: this.$parent.globalData.httpUrl + '/home/catitems', //开发者服务器接口地址",
          method: 'GET',
          dataType: 'json', //如果设为json,会尝试对返回的数据做一次 JSON.parse
     });
     if (res.meta.status === 200) {
          this.cateItems = res.message
          this.$apply();
     } else {
          toastUtil.showErrorToast()
     }
}
拓展
-
这里我针对Toast进行了一层封装,这个属于是工具,所以我们创建相应的文件目录
src -> util -> toastUtil.js -
在
js文件中定义两个弹框,一个是成功的弹框一个是失败的弹框// 导入 wepy 模块 import wepy from 'wepy' // 向外暴露函数 module.exports = { showSuccessToast: function(msg) { wepy.showToast({ title: 'msg', //提示的内容, icon: 'none', //图标, duration: 500, //延迟时间, mask: true, //显示透明蒙层,防止触摸穿透, }) }, showErrorToast: function() { wepy.showToast({ title: '请求失败', //提示的内容, icon: 'none', //图标, duration: 500, //延迟时间, mask: true, //显示透明蒙层,防止触摸穿透, }); } } -
在我们的
home.wpy文件中就可以引入这个工具js// @ 代表就是src这一层根目录 import toastUtil from '@/util/ToastUtil.js' -
在这里就能使用工具
js里面的函数了
抽取js
-
由于在一个页面
js代码会比较多,所以我们可以把js的逻辑代码抽取到mixins文件夹下,目录:src -> mixins -> tab -> home.js -
在这个
js里面,我们就可以把逻辑代码copy过来 -
注意,这里我们不是挂载在页面了,所以我们继承的要是
wepy,mixinimport wepy from 'wepy' export default class extends wepy.mixin { ... } -
在
home.wpy文件中,引入这个js文件,在继承的wepy.page里面挂载mixins文件import wepy from 'wepy' import home from '@/mixins/tabs/home.js' export default class Home extends wepy.page { //如果有多个 mixins 文件,可以放多个 mixins = [home] }
楼层区功能
-
在
home.wpy里面编写模板代码<view class="floor-container"> <view class="floor-item" wx:for="{{floorData}}" wx:key="index"> <image class="floor-item-title" src="{{item.floor_title.image_src}}"/> <view class="floor-img-box"> <image class="floor-item-pic" wx:for="{{item.product_list}}" wx:key="index" src="{{item.image_src}}" style="width: {{item.image_width}}rpx;" @tap="goGoodsList({{item.navigator_url}})"/> view> view> view> -
在home.js 中定义自定义函数,在里面根据接口请求服务器,获取数据
-
把服务器返回的数据设置给
floorData,然后强制刷新页面 -
根据效果调整样式属性
async getFloorData() {
    const { data: res } = await wepy.get('/home/floordata')

    if (res.meta.status !== 200) {
      return wepy.baseToast()
    }

    this.floorData = res.message
    this.$apply()
}
分类功能制作
- 设置一下自定义编译模式
- 根据结构文档,获取分类的所有数据,数据里面包含了一级分类,二级分类和三级分类数据,参照数据格式我们可以通过 children来获取
- 利用
vant小程序UI组件来实现页面效果
import wepy from 'wepy'
export default class extends wepy.mixin {
  data = {
    // 所有分类的数据列表
    cateList: [],
    // 默认被激活的索引项
    active: 0,
    // 当前窗口可用的高度
    wh: 0,
    // 所有的二级分类数据
    secondCate: []
  }
  onLoad() {
    this.getCateList()
  }
  async getCateList() {
    const { data: res } = await wepy.get('/categories')
    if (res.meta.status !== 200) {
      return wepy.baseToast()
    }
    this.cateList = res.message
    this.secondCate = res.message[0].children
    this.$apply()
  }
}
- 定义全局组件,在
app.wpy中
 usingComponents:{
   "van-badge": "./assets/vant/badge/index",
   "van-badge-group": "./assets/vant/badge-group/index"
 }
- 在 template 标签中引入组件标签,设置相应的值
 <view>
      <van-badge-group active="{{ active }}" bind:change="onChange">
           <van-badge title="{{item.cat_name}}" wx:for="{{cateList}}" wx:key="index"/>
      van-badge-group>
 view>
- 左侧的内容比较多,我们滚动左侧的时候,右侧内容也就会跟着滚动,所以我们只需要利用 scroll-view包裹即可,需要注意,我们设置scroll-view的滚动方向,以及相应的高度和宽度
<scroll-view class="left" scroll-y>
       <van-badge-group active="{{ active }}" bind:change="onChange">
            <van-badge title="{{item.cat_name}}" wx:for="{{categories}}" wx:key="index" />
       van-badge-group>
scroll-view>
<style lang="less">
.left{
     width: 85px;
}
style>
-
对于scroll-view的高度,我们需要动态进行获取,通过
wx.getSystemInfo来进行获取,或者直接在样式中 给scroll-view设置 100vh-
S3引入的”vw”和”vh”基于宽度/高度相对于窗口大小
-
'vw'='view width' 'vh'='view height' -
我们称为视窗单位允许我们更接近浏览器窗口来定义大小。
.demo {
  width: 100vw;
  font-size: 10vw; /* 宽度为窗口100%, 字体大小为窗口的10% */
}
.demo1 {
  width: 80vw;
  font-size: 8vw; /* 宽度为窗口80%, 字体大小为窗口的8% */
}
-
// 动态获取屏幕可用的高度
async getWindowHeight() {
  const res = await wepy.getSystemInfo()
  if (res.errMsg === 'getSystemInfo:ok') {
    this.wh = res.windowHeight
    this.$apply()
  }
}
- 给左侧的一级分类绑定事件,当切换的时候获取到相应的索引,然后更新data里面的数据
  methods = {
    onChange(e) {
      // e.detail 是点击项的索引
      this.secondCate = this.cateList[e.detail].children
    }
  }
- 右侧的二级分类和三级分类我们可以使用 Layout 组件来进行渲染,这里需要分清楚结构,二级分类,占据一行,一行里面只有一个元素,三级分类,占据一行,一行里面有3个元素,利用
wx:for来进行循环渲染
  <block wx:for="{{secondCate}}" wx:key="index">
    <van-row>
      <van-col span="24" style="text-align:center;">

        <text class="cate_title" space="ensp">/  {{item.cat_name}}  /text>
      van-col>
    van-row>

    <van-row>
      <block wx:for="{{item.children}}" wx:key="index">
        <van-col span="8" class="cell" @tap="goGoodsList({{item.cat_id}})">
          <image src="{{item.cat_icon}}" class="thumbImg" />
          <view class="thumbTitle">{{item.cat_name}}view>
        van-col>
      block>
    van-row>
  block>
scroll-view>
- 设置相应的属性
.right {
  .cate_title {
    font-size: 26rpx;
    font-weight: bold;
    display: inline-block;
    margin: 30rpx 0;
  }
  .cell {
    text-align: center;
    .thumbImg {
      width: 120rpx;
      height: 120rpx;
    }
    .thumbTitle {
      font-size: 24rpx;
    }
  }
- 给右侧的三级列表注册点击事件,传递参数是商品的id
  methods = {
    ...
    // 点击跳转到商品列表页面,同时把商品分类的 cid 传递过去
    goGoodsList(cid) {
      wepy.navigateTo({
        url: '/pages/goods_list?cid=' + cid
      })
    }
  }
vant入门使用
vant 是 有赞封装的组件库,里面封装好了很多的组件,助力开发者快速搭建小程序应用
下载vant相关资源文件
通过 npm 安装 (推荐)
# npm
npm i vant-weapp -S --production

# yarn
yarn add vant-weapp --production
下载代码
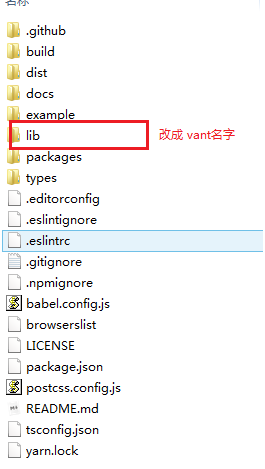
直接通过 git 下载 Vant Weapp 源代码,并将dist目录拷贝到自己的项目中
git clone https://github.com/youzan/vant-weapp.git
引入相关组件库
找到相应资源文件,引入到项目中
查看文档,在app.wpy 中注册全局组件
"usingComponents": {
  "van-badge": "资源引入的路径/badge/index",
  "van-badge-group": "资源引入的路径/badge-group/index"
}
在 wpy 文件的 template标签中引入组件即可
<van-badge-group active="{{ active }}" bind:change="onChange">
     <van-badge title="{{item.cat_name}}" wx:for="{{categories}}" wx:key="index"/>
van-badge-group>


