Angular 路由get传参 & 内部跳转
本节知识点:
- 静态路由 get 传参;
- 动态路由 get 传参;
- js 实现内部路由跳转;
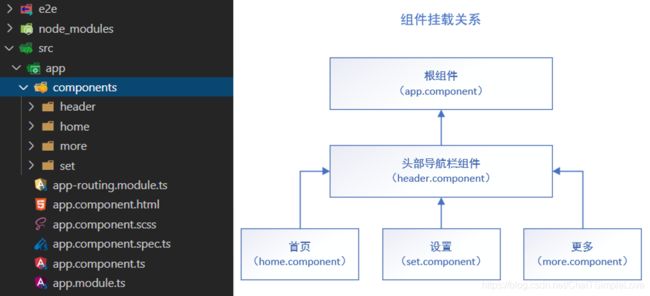
为了演示路由跳转和传值,继续上次的【路由基本配置】继续分解,创建的组件分别是【header】,【home】,【set】和【more】,目录结构和依赖关系如下:
1.基础准备:
【app-routing.module.ts】路由配置:
import { NgModule } from '@angular/core';
import { Routes, RouterModule } from '@angular/router';

/* 引入组件 */
import { HomeComponent } from './components/home/home.component';
import { MoreComponent } from './components/more/more.component';
import { SetComponent } from './components/set/set.component';


/* 配置路由 */
const routes: Routes = [
  {path:'', pathMatch:'full', redirectTo:'home'},
  {path:'home',component: HomeComponent},
  {path:'set',component: SetComponent},
  {path:'more/:aid',component: MoreComponent} /* 动态路由配置 */
];

@NgModule({
  imports: [RouterModule.forRoot(routes)],
  exports: [RouterModule]
})
export class AppRoutingModule { }
【app.component.html】挂载头部组件和路由:
【styles.scss】全局样式中编写点简单的样式:
/* You can add global styles to this file, and also import other style files */
body{
    margin: 0px;
    padding: 0px;
    background-color:#eff3f5;
}

.figure{
    background-color: orange;
    margin: 80px 0px 0px 0px;
    padding: 0px;
    height: auto;
}
2. 在头部组件中准备菜单导航栏:
1.【header.component.html】导航栏布局:
2.【header.component.scss】编写样式:
.header{
    /* 设置宽度高度背景颜色 */
    height: auto; /*高度改为自动高度*/
    width:100%;
    position: fixed; /*固定在顶部*/
    top: 0;/*离顶部的距离为0*/
    margin: 0px;
    background-color: rgba(117, 30, 95, 0.69);

    & li{
        list-style:none;
        float: left;
        text-align: center;
        float:left; /* 使li内容横向浮动,即横向排列  */
        margin-right:50px;  /* 两个li之间的距离*/
    }

    & li a{
        /* 设置链接内容显示的格式*/
        display: block; /* 把链接显示为块元素可使整个链接区域可点击 */
        color:white;
        text-align: center;
        padding: 14px 16px;
        text-decoration: none; /* 去除下划线 */
    }

    & li a:hover{
        /* 鼠标选中时背景变为黑色 */
        background-color: #111;
    }
}
3.在首页组件中准备演示代码:
1.【home.component.ts】ts中代码:
import { Component, OnInit } from '@angular/core';

/* 1.引入Router,NavigationExtras */
import { Router, NavigationExtras } from '@angular/router';

@Component({
  selector: 'app-home',
  templateUrl: './home.component.html',
  styleUrls: ['./home.component.scss']
})
export class HomeComponent implements OnInit {

  public techStack:string[] = [];
  constructor(private outer:Router) { }

  ngOnInit(): void {
    this.techStack = ['.NET Core','C#','Angular','TypeScript','DataBase'];
  }

  /* 跳转到more组件 */
  goMore(): void{
    //2.js路由跳转,适合普通路由和动态路由, 只需引入 Router
    this.outer.navigate(['/more','404']);
  }

  /* 跳转到set组件 */
  goSet(): void{
    //3.get跳转路由并传值,需引入 Router,NavigationExtras
    let navExtr:NavigationExtras = {
      queryParams:{'id':'666','title':'xxx'},
      fragment:'anchor'
    };
    this.outer.navigate(['/set'],navExtr);
  }

}
2.【home.component.html】 页面准备代码:
home works!
- 1.静态路由get传参
-
{{item}} -------------- {{i}}
- 2.动态路由get传参
-
{{item2}} -------------- {{key}}
- 3.js跳转路由
-
-
运行如下所示:【ng serve --open】
4.目标组件【set,more】接收传过来的参数值:
注:为了区分演示路由传值,set组件接收静态路由传值,more组件接受动态路由传值;
1.1【set.component.ts】实现代码:
import { Component, OnInit } from '@angular/core';
import { ActivatedRoute } from '@angular/router'; /* 1.1引入ActivatedRoute */

@Component({
  selector: 'app-set',
  templateUrl: './set.component.html',
  styleUrls: ['./set.component.scss']
})
export class SetComponent implements OnInit {

  /* DI注册ActivatedRoute */
  constructor(private route:ActivatedRoute) { }

  ngOnInit(): void {
    //1.2接收静态路由get传值
    console.log(this.route.queryParams);
    //route.queryParams 对象也是基于【Observable】
    this.route.queryParams.subscribe((data:any)=>{
      console.log(data);
    });
  }

}
1.2【set.component.html】实现代码:
set works!
- 我是【set】组件
2.1【more.component.ts】实现代码:
import { Component, OnInit } from '@angular/core';
import { ActivatedRoute } from '@angular/router'; /* 2.1引入ActivatedRoute */

@Component({
  selector: 'app-more',
  templateUrl: './more.component.html',
  styleUrls: ['./more.component.scss']
})
export class MoreComponent implements OnInit {

  /* DI注册ActivatedRoute */
  constructor(private route:ActivatedRoute) { }

  ngOnInit(): void {
    //2.2接收动态路由get传值
    console.log(this.route.params);
    //route.params 对象也是基于【Observable】
    this.route.params.subscribe((data: any) => {
      console.log(data);
    });
  }

}
2.2【more.component.html】实现代码:
more works!
- 我是【more】组件
以上就完成本节知识点演示,实现【静态路由】和【动态路由】的get传参以及内部 js 路由跳转。
5.总结
- 静态路由 get 传参;
//1.【app-routing.module.ts】文件

//1.1 引入组件:
import { SetComponent } from './components/set/set.component';

//1.2【Routes】路由配置:
/* 配置路由 */
{path:'set',component: SetComponent} //静态路由配置

/*-------------------------------------------------------------------*/

//2.目标组件【set】接收参数传值
//2.1引入ActivatedRoute
import { ActivatedRoute } from '@angular/router'; /* 引入ActivatedRoute */

//2.2构造函数DI注册ActivatedRoute
constructor(private route:ActivatedRoute) { }

//2.3接收静态路由get传值
ngOnInit(): void {
    //接收静态路由get传值
    console.log(this.route.queryParams);
    //route.queryParams 对象也是基于【Observable】
    this.route.queryParams.subscribe((data:any)=>{
      console.log(data);
    });
}
- 动态路由 get 传参;
//1.【app-routing.module.ts】文件

//1.1 引入组件:
import { MoreComponent } from './components/more/more.component';

//1.2【Routes】路由配置:
/* 配置路由 */
{path:'more/:aid',component: MoreComponent} //配置动态路由

/*-------------------------------------------------------------------*/

//2.目标组件【more】接收参数传值
//2.1引入ActivatedRoute
import { ActivatedRoute } from '@angular/router'; /* 引入ActivatedRoute */

//2.2构造函数DI注册ActivatedRoute
constructor(private route:ActivatedRoute) { }

//2.3接收动态路由get传值
ngOnInit(): void {
    //接收动态路由get传值
    console.log(this.route.params);
    //route.params 对象也是基于【Observable】
    this.route.params.subscribe((data: any) => {
      console.log(data);
    });
}- js 实现内部路由跳转;
//1.【app-routing.module.ts】文件,同上需要配置基本路由规则;

/*---------------------------------------------------------*/

//2.由于演示js路由跳转是在home组件演示,所以在home组件实现以下步骤;
//2.1 引入所需路由模块【Router,NavigationExtras】
import { Router, NavigationExtras } from '@angular/router';

//2.2 事件方法/函数实现跳转:
/* 跳转到more组件 */
goMore(): void{
    //2.js路由跳转,适合普通路由和动态路由, 只需引入 Router
    this.outer.navigate(['/more','404']);
}

/* 跳转到set组件 */
goSet(): void{
    //3.get跳转路由并传值,需引入 Router,NavigationExtras
    let navExtr:NavigationExtras = {
      queryParams:{'id':'666','title':'xxx'},
      fragment:'anchor'
    };
    this.outer.navigate(['/set'],navExtr);
}

