安卓进阶(6)之OkHttp整体架构/基本使用/OkHttpClient原理解析
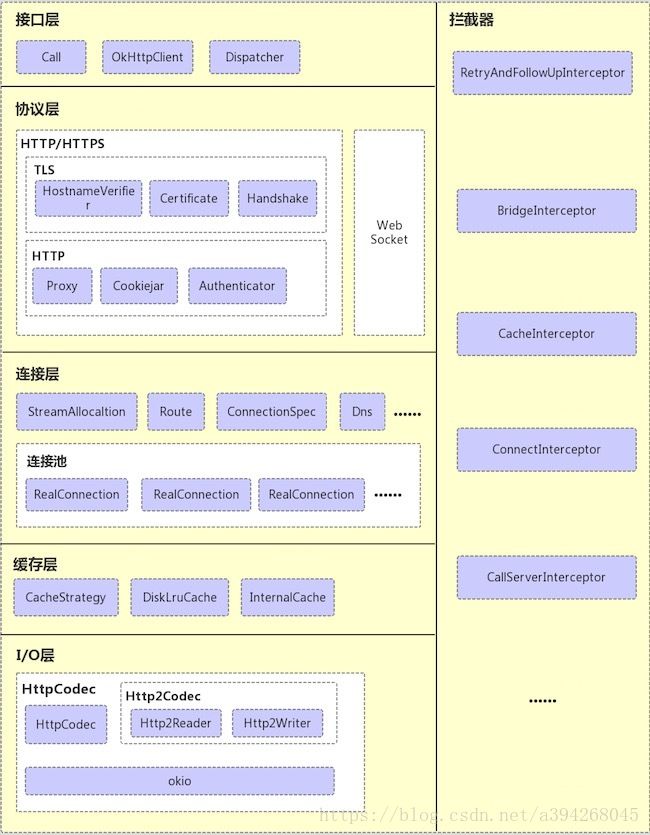
整体架构图
Okhttp可以分为上层应用接口层,协议层,连接层,缓存层,I/O层,拦截器层。接口层就是我们上层开发人员调用的一些接口和API。连接层是核心,连接池以及网络请求优化都在这里面了。拦截器和缓存层是重点,比如我们要加log日志,这时候加一个拦截器。OkHttp的整体架构图如图所示:

基本使用
GET请求
//创建OkHttpClient对象
OkHttpClient client = new OkHttpClient.Builder()
        .connectTimeout(10, TimeUnit.SECONDS)
        .writeTimeout(10, TimeUnit.SECONDS)
        .readTimeout(10, TimeUnit.SECONDS)
        .build();

/**
 * GET方式请求
 */
private void getRequest(){
    //创建request对象
    Request request = new Request.Builder()
            .url("http://192.168.32.77:8089/api/commodity/getCommodityList")
            .get()
            .build();
    //创建call对象
    Call call = client.newCall(request);
    //加入队列,异步操作
    call.enqueue(new Callback() {
        @Override
        public void onFailure(Call call, IOException e) {
            System.out.println("连接失败。。。");
        }
        @Override
        public void onResponse(Call call, Response response) throws IOException {
            if(response.code() == 200){
                System.out.println(response.body().string());
            }
        }
    });
}
首先创建了OkHttpClient对象,然后创建了Request对象,最后创建Call对象,如果有参数,就直接拼接到url后面。创建OkHttpClient和Request对象时,都用了builder模式,方便开发人员设置它们的方法和属性。
表单格式的POST请求
/**
 * POST表单请求
 */
private void postFormRequest() {

    //创建FormBody对象
    FormBody formBody = new FormBody.Builder()
            .add("commodityType", "01")
            .build();

    //创建request对象
    Request request = new Request.Builder()
            .url("http://192.168.32.77:8089/api/commodity/getCommodityList")
            .post(formBody)
            .build();

    //创建Call对象
    Call call = client.newCall(request);
    //加入队列,异步操作
    call.enqueue(new Callback() {
        @Override
        public void onFailure(Call call, IOException e) {
            Log.d("onFailure", "连接失败。。。");
        }

        @Override
        public void onResponse(Call call, Response response) throws IOException {

            Log.d("response", response.body().string());
        }
    });
}
post表单请求的步骤,是在get请求的步骤上,新增了一步:创建了FormBody对象,而FormBody也用了Builder模式!由此可见,builder设计模式在OkHttp中的普遍程度了!
json格式的POST请求
 /**
 * json格式的post请求
 */
private void postJsonRequest(){

    //使用Gson将map数据json化,当然了,也可以是对象数据json化,都可以的
    HashMap map = new HashMap();
    map.put("commodityType", "01");
    //这里使用的Gson,还有fastjson,jackson,都可以将对象json化哦
    Gson gson = new Gson();
    String json = gson.toJson(map);

    Log.d("json", "---->" + json);

    //创建request对象
    Request request = new Request.Builder()
            .url("http://192.168.32.77:8089/api/commodity/getCommodityList")
            .post(RequestBody.create(MediaType.parse("application/json"), json))
            .build();

    //创建Call对象
    Call call = client.newCall(request);
    //加入队列,异步操作
    call.enqueue(new Callback() {
        @Override
        public void onFailure(Call call, IOException e) {
            Log.d("onFailure", "连接失败。。。");
        }

        @Override
        public void onResponse(Call call, Response response) throws IOException {

            Log.d("response", response.body().string());
        }
    });
}
json数据提交方式将数据统一放到一个字符串中,比表单提交方式更方便快捷,也是我们现在前后端分离后最常用的数据请求交互的方式了。
OkHttpClient原理解析
关于OkHttpClient的原理,我主要从构造方法中初始化的几个参数来讲解。了解了Builder构造方法中的几个参数的来龙去脉,OkHttpClient的原理也就差不多了,至于更深层次的原理,后续再出文章说明。我们首先来看OkHttpClient.Builder中的构造方法:
public Builder() {
    //任务调度器
    dispatcher = new Dispatcher();
    //支持的http协议版本
    protocols = DEFAULT_PROTOCOLS;
    //连接规格
    connectionSpecs = DEFAULT_CONNECTION_SPECS;
    eventListenerFactory = EventListener.factory(EventListener.NONE);
    proxySelector = ProxySelector.getDefault();
    //默认不缓存cookie
    cookieJar = CookieJar.NO_COOKIES;
    //socket工厂,构造方法中支持通过服务器的IP,端口,客户端的IP,端口组装各种构造函数
    socketFactory = SocketFactory.getDefault();
    //主机校验,默认会去校验IP和主机名
    hostnameVerifier = OkHostnameVerifier.INSTANCE;
    //使用CertificatePinner来约束哪些认证机构被信任,默认是没有
    certificatePinner = CertificatePinner.DEFAULT;
    //放在请求头中验证的,以user:pass的形式以base64形式加密,由于不安全,默认不用。如果用了,但校验失败,服务器会返回401
    proxyAuthenticator = Authenticator.NONE;
    authenticator = Authenticator.NONE;
    //连接池,连接的复用可以说是okhttp的核心所在了,后面会另写一篇博客讲解。
    connectionPool = new ConnectionPool();
    //域名系统
    dns = Dns.SYSTEM;
    followSslRedirects = true;
    followRedirects = true;
    retryOnConnectionFailure = true;
    connectTimeout = 10_000;
    readTimeout = 10_000;
    writeTimeout = 10_000;
    pingInterval = 0;
}
任务调度器Dispatcher原理
Dispatcher在OkHttpClient和OkHttpClient.Builder构造方法中实现了初始化,当我们使用Call.enqueue()去提交任务时,会在Call的子类RealCall中的enqueue()方法去调用Dispatcher.enqueue():
final class RealCall implements Call {
	......

	@Override public void enqueue(Callback responseCallback) {
    synchronized (this) {
      if (executed) throw new IllegalStateException("Already Executed");
      executed = true;
    }
    captureCallStackTrace();
    eventListener.callStart(this);
    client.dispatcher().enqueue(new AsyncCall(responseCallback));
  }

	......
}
了解了调度器的使用入口,接下来看看Dispatcher类的原理:
public final class Dispatcher {
  private int maxRequests = 64;
  private int maxRequestsPerHost = 5;
  private @Nullable Runnable idleCallback;

  /** Executes calls. Created lazily. */
  private @Nullable ExecutorService executorService;

  /** Ready async calls in the order they'll be run. */
  private final Deque<AsyncCall> readyAsyncCalls = new ArrayDeque<>();

  /** Running asynchronous calls. Includes canceled calls that haven't finished yet. */
  private final Deque<AsyncCall> runningAsyncCalls = new ArrayDeque<>();

  /** Running synchronous calls. Includes canceled calls that haven't finished yet. */
  private final Deque<RealCall> runningSyncCalls = new ArrayDeque<>();

  public Dispatcher(ExecutorService executorService) {
    this.executorService = executorService;
  }

  public Dispatcher() {
  }

  public synchronized ExecutorService executorService() {
    if (executorService == null) {
      executorService = new ThreadPoolExecutor(0, Integer.MAX_VALUE, 60, TimeUnit.SECONDS,
          new SynchronousQueue<Runnable>(), Util.threadFactory("OkHttp Dispatcher", false));
    }
    return executorService;
  }

  public synchronized void setMaxRequests(int maxRequests) {
    if (maxRequests < 1) {
      throw new IllegalArgumentException("max < 1: " + maxRequests);
    }
    this.maxRequests = maxRequests;
    promoteCalls();
  }

  public synchronized int getMaxRequests() {
    return maxRequests;
  }

  public synchronized void setMaxRequestsPerHost(int maxRequestsPerHost) {
    if (maxRequestsPerHost < 1) {
      throw new IllegalArgumentException("max < 1: " + maxRequestsPerHost);
    }
    this.maxRequestsPerHost = maxRequestsPerHost;
    promoteCalls();
  }

  public synchronized int getMaxRequestsPerHost() {
    return maxRequestsPerHost;
  }

  synchronized void enqueue(AsyncCall call) {
  //当运行的任务小于最大请求数,且请求某个主机的数量小于最大请求主机的数量时,添加任务到运行任务中和线程池中,否则将任务添加到待运行任务队列中。
    if (runningAsyncCalls.size() < maxRequests && runningCallsForHost(call) < maxRequestsPerHost) {
      runningAsyncCalls.add(call);
      executorService().execute(call);
    } else {
      readyAsyncCalls.add(call);
    }
  }

  /** Used by {@code Call#execute} to signal it is in-flight. */
  synchronized void executed(RealCall call) {
    runningSyncCalls.add(call);
  }
}
上面是我缩减了Dispatcher类的代码,它是final类,不能被继承。调度器用的线程池类似于缓存线程池,关于线程池的分为和原理解析,可以去看下我的上一篇文章《安卓进阶(4)之线程池以及多线程并发原理》。唯一的区别,只是在new一个Thread的时候,添加了OkHttp这个log。大家知道,四大线程池之一的缓存线程池,是可以无限创建线程无限提交任务的,而OkHttp控制线程并发数量,是用的maxRequests和maxRequestsPerHost这两个参数。默认的最大并发请求数是64个,单个主机最大并发请求数量是5个。正在执行的任务队列,和待执行的任务队列ArrayQueue,底层是基于链表+数组的双端队列。
当然了,如果需要更改最大请求并发数的,更改方法如下:
Dispatcher dispatcher = new Dispatcher();
dispatcher.setMaxRequests(6);
dispatcher.setMaxRequestsPerHost(40);

//创建OkHttpClient对象
OkHttpClient client = new OkHttpClient.Builder()
        .dispatcher(dispatcher)
        .connectTimeout(10, TimeUnit.SECONDS)
        .writeTimeout(10, TimeUnit.SECONDS)
        .readTimeout(10, TimeUnit.SECONDS)
        .build();
http协议版本
在OkHttpClient.Builder构造方法中的第二个参数,我们看到设置的属性是:
static final List<Protocol> DEFAULT_PROTOCOLS = Util.immutableList(
      Protocol.HTTP_2, Protocol.HTTP_1_1);

public Builder() {
   ...
   protocols = DEFAULT_PROTOCOLS;
   ...
}
OkHttp的http协议版本要求
默认支持http/2和http/1.1两种版本的http协议,而且,当我们想自定义http协议版本时,必须支持http/1.1,而且不可以支持http/1.0,否则会报错:
public Builder protocols(List<Protocol> protocols) {
   // Create a private copy of the list.
   protocols = new ArrayList<>(protocols);

   // Validate that the list has everything we require and nothing we forbid.
   if (!protocols.contains(Protocol.HTTP_1_1)) {
     throw new IllegalArgumentException("protocols doesn't contain http/1.1: " + protocols);
   }
   if (protocols.contains(Protocol.HTTP_1_0)) {
     throw new IllegalArgumentException("protocols must not contain http/1.0: " + protocols);
   }
   if (protocols.contains(null)) {
     throw new IllegalArgumentException("protocols must not contain null");
   }

   // Remove protocols that we no longer support.
   protocols.remove(Protocol.SPDY_3);

   // Assign as an unmodifiable list. This is effectively immutable.
   this.protocols = Collections.unmodifiableList(protocols);
   return this;
}
http各协议版本的区别
http1.1在http1.0的基础上,实现了默认支持keep-alive,实现了持久化连接;
http2.0在http1.1的基础上,最大特点是实现了多路复用功能,就是多个连接共用一个socket;
由于http2.0兼容性不太好,部署成本也比较大,所以现在普遍使用的还是http1.1。
连接规格
第三个参数表示连接规格:
public Builder() {
	...
	connectionSpecs = DEFAULT_CONNECTION_SPECS;
	...
}
OkHttp内置了三套规格:
ConnectionSepc.MODEN_TLS : 现代的TLS配置;
ConnectionSpec.COMPATIABLE_TLS: 兼容性但安全的TLS配置;
ConnectionSpec.CLEARTEXT: 不安全的TLS配置;
TLS是什么呢?https的原理就是在http和TCP之间加的一层套接字TLS。TLS通过非对称加密建立了安全的加密通道,然后通过对称加码对数据进行加密。okhttp默认支持第一种和第三种,也就是默认支持http和https
关于OkHttpClient的原理解析,我主要讲解了构造函数的几个参数,以及它们初始化时,做了什么事情。关于连接池部分会另写一个帖子重点讲解。
参考文章
OkHttp 3.7源码分析—整体架构
HTTP2.0
浅析 OkHttp 的 TLS 连接过程
HTTPS 证书锁定CertificatePinner
HTTP AUTH 那些事