Unity打iOS包之xcodeapi的使用
xcodeapi
我们在用Unity打包iOS的时候,经常需要自动化设置导出工程的各项配置,比如证书名、TeamId、mobileprovision文件等等。
在Unity 4.x时代,常用的工具是XUPorter(原作者已不再维护,如果坚持要用,可以从github上下载:https://github.com/onevcat/XUPorter)
在Unity 5.x之后,Unity官方提供了另外一套工具,叫做xcodeapi,因为是官方维护的,所以在使用上可以更放心,所以推荐使用。
xcodeapi的工程链接在Unity的开源bitbucket上:https://bitbucket.org/Unity-Technologies/xcodeapi

原理
其实,这个工具的工作原理并不复杂,利用的是Unity工作的一个固定流程:Unity在导出工程之后,会去继续搜索并执行被标记为[PostProcessBuildAttribute]的方法,而对于Unity导出的iOS工程,所有的配置信息都会被记录在一个固定名称的文件里面,其中一个是导出工程目录下的 Unity-iPhone.xcodeproj/project.pbxproj,是一个json格式的文本文件,所有的Build Setting项都在这个文件里面;另外一个叫Info.plist,是个xml格式的文件。所以,这个工具就是提供了json和xml文件操作的能力,和几个特定的接口,用于更改指定配置项的内容。
使用
明确这一点之后,使用起来应该就可以更有数了。使用方法很简单,只要把工程文件下载下来,把里面的xcode目录放到你工程的某个Editor目录下,然后在里面添加一个标记为PostProcessBuildAttribute的方法,在这个方法里面修改你的xcode工程配置就可以了,例如下面的类,也放在Editor目录下,类名随便取:
using UnityEditor;
using UnityEditor.Callbacks;
using UnityEditor.iOS.Xcode.Custom;

public class ProjectPostProcess
{
    [PostProcessBuildAttribute(1)]
    public static void OnPostProcessBuild(BuildTarget buildTarget, string pathToBuiltProject)
    {
        // 只处理IOS工程, pathToBuildProject会传入导出的ios工程的根目录
        if (buildTarget != BuildTarget.iOS)
            return;

        // 创建工程设置对象
        var projectPath = pathToBuiltProject + "/Unity-iPhone.xcodeproj/project.pbxproj";
        PBXProject project = new PBXProject();
        project.ReadFromFile(projectPath);
        string targetGuid = project.TargetGuidByName("Unity-iPhone");

        // 修改BITCODE设置的例子
        project.SetBuildProperty(targetGuid, "ENABLE_BITCODE", "NO");

        // 你可能会设置的--------------------------------------------------
        //project.SetBuildProperty(targetGuid, "CODE_SIGN_IDENTITY", "p12证书的code_sign");
        // 把证书设置设置为手动,即不使用Automatically manage signing
        //project.SetTargetAttributes("ProvisioningStyle","Manual");

        //project.SetBuildProperty(targetGuid, "PROVISIONING_PROFILE", "mobileprovison文件的UUID");
        //project.SetBuildProperty(targetGuid, "PROVISIONING_PROFILE_SPECIFIER", "mobileprovison文件的Name");

        //project.SetTeamId(targetGuid,"证书的TeamId");
        //project.SetBuildProperty(targetGuid, "IPHONEOS_DEPLOYMENT_TARGET", "8.0");

        // 添加framework
        //project.AddFrameworkToProject(targetGuid, "StoreKit.framework", true);
        //----------------------------------------------------------------

        // 修改后的内容写回到配置文件
        File.WriteAllText(projectPath, project.WriteToString());

        // 修改Info.plist的示例
        var plistPath = Path.Combine(pathToBuiltProject, "Info.plist");
        var plist = new PlistDocument();
        plist.ReadFromFile(plistPath);

        // 增加字符串类型的设置
        plist.root.SetString("fieldname", "value");

        // 修改后的内容写回到文件Info.plist
        plist.WriteToFile(plistPath);
    }
}
关于这个方法的属性,网上的有些例子上写的是PostProcessBuild,其实只是PostProcessBuildAttribute的简写,意义是一样的,不需要纠结。
常用的的Property:
| Property | 值 | 备注 |
| CODE_SIGN_IDENTITY | p12证书的code_sign | 在钥匙串那里看 双击钥匙串里已安装的证书 最上面显示的标题就是code_sign 也叫“常用名称” |
| DEVELOPMENT_TEAM | 证书的TeamId | 在钥匙串那里看, 查看方法同上,“组织单位”的值就是TeamId 使用project.SetTeamId接口进行设置 |
| ENABEL_BITCODE | YES / NO | 关于Bitcode:https://www.cnblogs.com/QianChia/p/6223047.html |
| IPHONEOS_DEPLOYMENT_TARGET | 8.0/8.1/8.2/..../12.1 | Unity打出来的默认是6.0 目前最低必须设置为8.0以上 |
| PRODUCT_BUNDLE_IDENTIFIER | 项目的bundleId | com.xxx.xxxx |
| PRODUCT_NAME | 项目的名称 | |
| PROVISIONING_PROFILE | .mobileprovision的UUID | 用vim打开.mobileprovision文件 然后查找UUID: 在vim中输入/UUID,然后按回车键 |
| PROVISIONING_PROFILE_SPECIFIER | mobileprovision的Name | 用vim打开.mobileprovision文件 然后查找Name: 在vim中输入/UUID,然后按回车键 |
一步到位
如果想要一步到位,导出xcode后自动执行Archive和生产ipa,可以写好shell脚本自动运行
Archive脚本
xcodebuild -project "工程目录/Unity-iPhone.xcodeproj" -scheme Unity-iPhone archive -archivePath "Archive的目录"生成ipa脚本
xcodebuild -project "工程目录/Unity-iPhone.xcodeproj" -exportArchive -exportFormat ipa -archivePath "Archive的目录" -exportPath "ipa的目录" -exportProvisioningProfile "mobileprovision文件的Name"Xcode7之后取消了原来的-exportFormat,而是使用exportOptionsPlist 来取代
改用下面的命令
xcodebuild -exportArchive -exportOptionsPlist xxx/Info.plist -archivePath xxx.xcarchive -exportPath ~/Desktop/ 例
xcodebuild -exportArchive -exportOptionsPlist ../ExportOptions.plist -archivePath ../testPacking.xcarchive -exportPath ./autoPackage -allowProvisioningUpdates我们需要自己创建一个plist作为Export Options
写个工具类方便生成
using UnityEngine;
using UnityEditor;
using System.Collections.Generic;
class XcodeExportPlist
{
///
/// 对应ios_build_config.json的exportArchiveMethod
///
public static readonly string[] kMethods =
{
"app-store",
"enterprise",
"ad-hoc",
"development",
};
public static void GenFile(string filPath, string teamID, string method, string bundleID, string profileName)
{
string text = GenText(teamID, method, bundleID, profileName);
System.IO.File.WriteAllText(filPath, text);
GameLogger.LogGreen("GenFile: " + filPath);
}
static string GenText(string teamID, string method, string bundleID, string profileName)
{
var sb = new System.Text.StringBuilder();
sb.Append("\n");
sb.Append("\n");
sb.Append("\n");
sb.Append("\n");
AppendTeamID(sb, teamID);
AppendMethod(sb, method);
AppendUploadSymbols(sb, false);
AppendProfiles(sb, bundleID, profileName);
sb.Append(" \n");
sb.Append(" \n");
return sb.ToString();
}
static void AppendTeamID(System.Text.StringBuilder sb, string teamID, string ind = "\t")
{
sb.Append(ind).Append("teamID \n");
AppendPStr(sb, teamID, ind);
}
static void AppendMethod(System.Text.StringBuilder sb, string method, string ind = "\t")
{
sb.Append(ind).Append("method \n");
AppendPStr(sb, method, ind);
}
static void AppendUploadSymbols(System.Text.StringBuilder sb, bool isUploadSymbols, string ind = "\t")
{
sb.Append(ind).Append("uploadSymbols \n");
AppendPBool(sb, isUploadSymbols, ind);
}
static void AppendProfiles(System.Text.StringBuilder sb, string bundleID, string profilesName, string ind = "\t")
{
Dictionary dic = new Dictionary();
if (!string.IsNullOrEmpty(bundleID))
{
dic.Add(bundleID, profilesName);
}
if (dic.Count > 0)
{
sb.Append(ind).Append("provisioningProfiles \n");
AppendPDict(sb, dic, ind);
}
}
static void AppendPStr(System.Text.StringBuilder sb, string s, string ind)
{
sb.Append(ind);
sb.Append("");
sb.Append(s);
sb.Append(" \n");
}
static void AppendPBool(System.Text.StringBuilder sb, bool b, string ind)
{
sb.Append(ind).Append(b ? " key_value, string ind)
{
sb.Append(ind);
sb.Append("");
foreach (var item in key_value)
{
sb.Append("\n").Append(ind);
sb.Append("");
sb.Append(item.Key);
sb.Append(" ");
sb.Append("\n").Append(ind);
sb.Append("");
sb.Append(item.Value);
sb.Append(" ");
}
sb.Append("\n").Append(ind);
sb.Append(" \n");
}
}// end class XcodeExportPlist
用上面的XcodeExportPlist工具类生成exportOption.plist
public static string GenArchiveOptPlist()
{
    var path = Application.dataPath.Replace("Assets", "Bin/exportOption.plist";
    var teamId = "BQCHO456";
    // "app-store","enterprise","ad-hoc","development"
    var archiveMethod = "enterprise";
    var bundleId = "com.linxinfa.test";
    var provisionName = "linxinfaEnt2019614";

    XcodeExportPlist.GenFile(path, teamId, archiveMethod, bundleId, provisionName);
    return path;
}
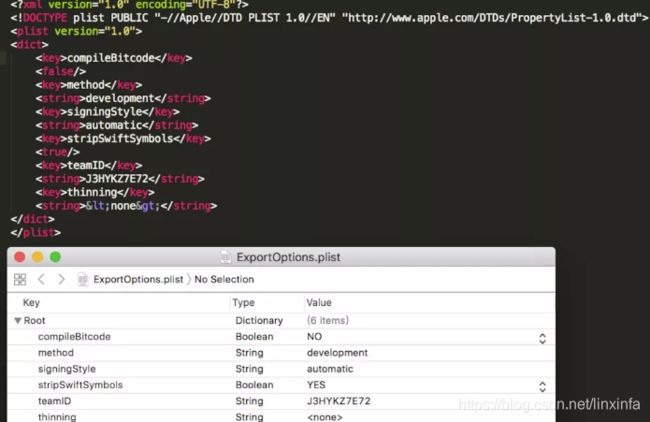
ExportOptionsPlist文件
结合《Unity中C#如何执行cmd命令(System.Diagnostics.Process的使用)》
https://blog.csdn.net/linxinfa/article/details/52982384
可以通过C#执行shell命令
//var version = "1.0.0";
//var binPath = Application.dataPath + "/../Bin";
//var xcodeProjPath = binPath + "/XcodeProj";
//var xcodeArchPath = binPath + "/Archives/Unity-iPhone-archive.xcarchive";
//var outputPath = string.Format("{0}/{1}/", binPath, version);
//var appName = string.Format("mygame_v{0}_{1}.ipa", version, DateTime.Now.ToString("yyyyMMdd"));


private static void XCodeArchive(string xcodeProjPath, string xcodeArchPath)
{
    Debug.Log("XCodeArchive Begin");
    string args = string.Format("-project \"{0}/Unity-iPhone.xcodeproj\" -scheme Unity-iPhone archive -archivePath \"{1}\" ", xcodeProjPath, xcodeArchPath);
    var r = EdtUtil.RunCmd("xcodebuild", args);

    if (string.IsNullOrEmpty(r[0]) || r[0].LastIndexOf("ARCHIVE SUCCEEDED") < 0)
    {
        Debug.LogError("Build IPA : XCodeBuildArchive FAILED\n" + r[0]);
        throw new Exception("Build IPA : XCodeBuildArchive FAILED");
    }
    Debug.LogGreen("Build IPA : XCodeBuildArchive OK");
}


private static void XCodeExportIPA(string xcodeProjPath, string xcodeArchPath, string outputPath, string ipaName)
{
    // 生成plist
    var expOptPath = GenArchiveOptPlist();

    Debug.Log("XCodeExportIPA Begin\n xcodeProjPath: " + xcodeProjPath + "\nxcodeArchPath: " + xcodeArchPath + "\noutputPath: " + outputPath);
    string args = string.Format("-project \"{0}/Unity-iPhone.xcodeproj\" -exportArchive -archivePath \"{1}\" -exportPath \"{2}\" -exportOptionsPlist \"{3}\" ",
                                    xcodeProjPath, xcodeArchPath, outputPath, expOptPath);
    var r = EdtUtil.RunCmd("xcodebuild", args);

    if (string.IsNullOrEmpty(r[0]) || r[0].LastIndexOf("EXPORT SUCCEEDED") < 0)
    {
        Debug.LogError("Build IPA : XCodeBuildIPA FAILED\n" + r[0]);
        throw new Exception("Build IPA : XCodeBuildIPA FAILED");
    }
    Debug.LogGreen("Build IPA : XCodeBuild IPA OK");

    // 重命名
    File.Move(outputPath + "Unity-iPhone.ipa", outputPath + ipaName);
}
如果不放心,也可以到XCode进行手动ipa打包
Archive:
先检查Product->Scheme->Edit Scheme...中的设置是否正确,比如现在是要打的是面向外部玩家的版本,则要Run里面要选择Relaese,Archive里也要选择Release,记得勾选Archive的Options的Reveal Archive in Organizer,检查工程的General中的证书设置是否正确,检查工程的Images.xcassets中的AppIcon的图标设置是否正常
检查无误之后,就可以执行Archive了: Product->Archive
导出ipa:
Archive完之后,会自动弹出Organizer窗口,如果没有弹出来,则手动打开:Window->Organizer
然后点击Distribute App按钮,接下来一步一步Next,注意中间会让你选择一些选项,根据需求进行选择即可
补充:
如果要对不同的配置做修改,比如,单独修改Debug版本或者Release版本的配置项,那么就需要用BuildConfigByName先获取到指定的配置项,然后使用SetBuildPropertyForConfig设置对应的配置项,例如,单独修改debug版本的ENABLE_BITCODE设置:
string configGuid = project.BuildConfigByName("targetGuid", "Debug");
project.SetBuildPropertyForConfig(configGuid, "ENABLE_BITCODE", "NO");
另外,对于XUPorter的导出插件和native代码的功能,Unity 5之后可以直接把需要的文件放在Assets/Plugins/iOS目录下面,文件就会被自动导出到目标工程中,请参考Unity文档:https://docs.unity3d.com/Manual/PluginsForIOS.html
参考:https://blog.csdn.net/yubo112002/article/details/83449694