Logstash——Logstash将数据推送至Elasticsearch
elasticsearch介绍
在使用云日志管理的时候,logstash的数据最终需要elasticsearch来进行存储和分析。所以logstash提供大量参数来支持和满足相关业务场景。
可配置参数
| 字段 | 参数类型 | 说明 |
|---|---|---|
| action | string | 要执行的Elasticsearch动作 |
| api_key | password | 使用Elasticsearch API密钥进行身份验证,需要启动SSL |
| bulk_path | string | 执行_bulk请求的HTTP路径 |
| cacert | a valid filesystem path | 验证服务器的证书的.cer或.pem文件 |
| cloud_auth | password | 云认证字符串,需要Elastic Cloud |
| cloud_id | string | Cloud ID,需要使用Elastic Cloud |
| custom_headers | hash | 自定义的标题头 |
| doc_as_upsert | boolean | 启用doc_as_upsert更新模式。如果document_idElasticsearch中不存在带有源的新文档 |
| document_id | string | 需要插入的文档ID |
| document_type | string | 在7.X以上版本不建议使用,8.X版本已经移除 |
| failure_type_logging_whitelist | array | 错误白名单,将忽略列表中的异常 |
| healthcheck_path | string | 后端标记为HEAD时发送HEAD请求的HTTP路径 |
| hosts | uri | 设置远程实例的主机 |
| http_compression | boolean | 对请求启用gzip压缩 |
| ilm_enabled | string, one of [“true”, “false”, “auto”] | auto如果Elasticsearch为7.0.0以上版本,且启用了ILM功能则默认设置为会自动启用索引生命周期管理功能,否则将其禁用。 |
| ilm_pattern | string | 模式中指定的值将附加到写别名,并在ILM创建新索 |
| ilm_policy | string | 修改此设置以使用自定义的索引生命周期管理策略,而不是默认策略。 |
| ilm_rollover_alias | string | 过渡别名 |
| index | string | 事件最终要写入的目标索引 |
| keystore | a valid filesystem path | 证书密钥库,可以是.jks或.p12 |
| keystore_password | password | 密钥库密码 |
| manage_template | boolean | 此模板的内容是默认模板 |
| parameters | hash | 传递一组键值对作为URL查询字符串 |
| parent | string | 对于子级文档,为关联父级的ID。可以使用%{foo}动态语法 |
| password | password | Elasticsearch密码 |
| path | string | Elasticsearch服务器所在的HTTP路径。在host参数配置的情况下,无需配置此参数 |
| pipeline | string | 希望为事件执行的摄取管道 |
| pool_max | number | 设置了输出将创建的最大打开连接数,设置得太低可能意味着经常关闭/打开连接 |
| pool_max_per_route | number | 设置输出将创建的每个端点的最大打开连接数。将此值设置得太低可能意味着经常关闭/打开连接 |
| proxy | uri | 设置转发HTTP代理的地址 |
| resurrect_delay | number | 两次resurrection等待的频率(以秒为单位),resurrection用来检测标记为down的后端端点是否恢复 |
| retry_initial_interval | number | 设置两次重试之间的初始间隔 |
| retry_max_interval | number | 设置两次重试之间的最大间隔 |
| retry_on_conflict | number | Elasticsearch内部重试更新/提交的文档的次数 |
| routing | string | 路由已处理的事件 |
| script | string | 设置脚本 |
| script_lang | string | 设置脚本语言 |
| script_type | string, one of [“inline”, “indexed”, “file”] | 定义“script”变量内联引用的脚本类型 |
| script_var_name | string | 设置传递给脚本的变量名 |
| scripted_upsert | boolean | 如果启用,则脚本负责创建不存在的文档 |
| sniffing | boolean | 此设置要求Elasticsearch提供所有集群节点的列表,并将它们添加到主机列表。 |
| sniffing_delay | number | 在两次嗅探尝试之间等待多长时间(以秒为单位) |
| sniffing_path | string | 用于嗅探请求的HTTP路径默认值 |
| ssl | boolean | 启用与Elasticsearch集群的SSL / TLS安全通信 |
| ssl_certificate_verification | boolean | 用于验证服务器证书的选项 |
| template | a valid filesystem path | 可以在此处将路径设置为自己的模板 |
| template_name | string | 定义如何在Elasticsearch中命名模板 |
| template_overwrite | boolean | 选项总是会用Elasticsearch中指定的模板或包含的模板覆盖指定的模板 |
| timeout | number | 发送到Elasticsearch的请求的超时限制 |
| truststore | a valid filesystem path | 用于验证服务器证书的信任库 |
| truststore_password | password | 设置信任库密码 |
| upsert | string | 将upsert内容设置为更新模式 |
| user | string | Elasticsearch集群的用户名 |
| validate_after_inactivity | number | 在使用keepalive执行连接上的请求之前,在检查连接是否过时之前需要等待多长时间。 |
| version | string | 用于索引的版本 |
| version_type | string, one of [“internal”, “external”, “external_gt”, “external_gte”, “force”] | 用于索引的版本类型 |
hosts
hosts支持一个或者多个url路径。当配置多个路径的时候会在指定的主机之间负载均衡请求。
此参数支持的格式:
"127.0.0.1"["127.0.0.1:9200","127.0.0.2:9200"]["http://127.0.0.1"]["https://127.0.0.1:9200"]
需要注意,为了避免向主节点推送批量操作的请求,url只需要配置data node 和 client node。关于数据节点可以查看这篇文章
Elasticsearch集群
数据插入的逻辑
当数据被插入elasticsearch的时候,根据logstash不同的参数配置有有不同的结果,logstash对其配置主要使用下面几个参数:
- action
- doc_as_upsert
- upsert
action
action提供了四个参数来定义数据操作的逻辑,其中index是默认的参数配置
index
此配置会在elasticsearch不存在索引的时候创建索引。在这种配置下插入数据会下面的可能:
- 当没有设置文档id(document_id )的时候,数据会被插入到对应索引,并且由elasticsearch生成该文档的id。
- 当文档id存在且elasticsearch也存在相同ID的文档,则会执行更新操作。
- 当文档id存在且elasticsearch不存在相同ID的文档,则会执行插入操作。
elasticsearch {
     hosts => "http://localhost:9200"
	 index => "index-test"
	 document_id => "%{id}"
	 user => user
	 password => password
}
因为index是默认参数,所以无需再次设置。而此时index参数指向的索引并不存在。
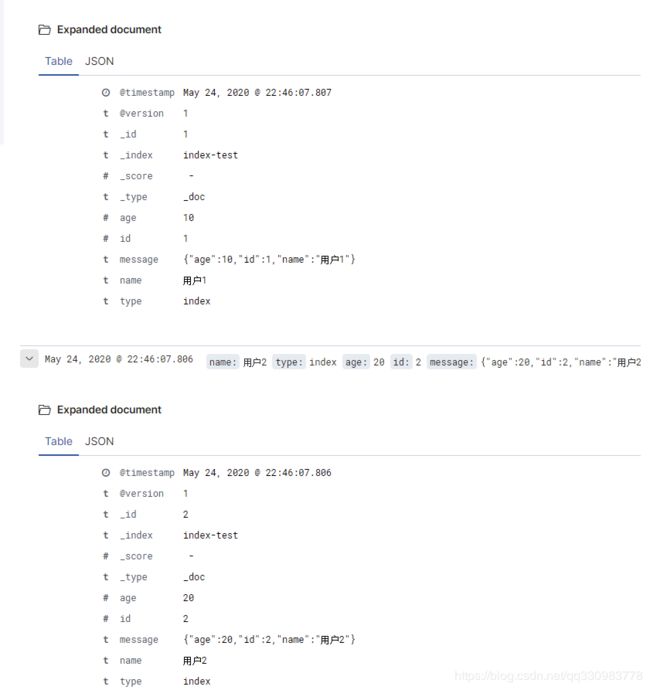
为了测试效果,此时发送三条数据,其中两条ID相同其他不同。可以看到elasticsearch中的内容
{"age":10,"id":1,"name":"用户1"}
{"age":20,"id":2,"name":"用户2"}
{"age":30,"id":1,"name":"用户3"}
最后ES中的内容只存在了两条
ps.这里需要注意,因为插入速度过快,在logstash从队列取出值的时候3已经是上面的了,最终取数据的ID顺序是3、2、1,所以1覆盖了3
delete
按ID删除文档。这个使用的应该不是很多。
create
此配置会在elasticsearch不存在索引的时候创建索引。在这种配置下插入数据会下面的可能:
- 当没有设置文档id(document_id )的时候,直接返回失败,此方式,必须设置文档ID
- 当文档id存在且elasticsearch也存在相同ID的文档,会返回失败
- 当文档id存在且elasticsearch不存在相同ID的文档,则会执行插入操作。
   elasticsearch {
	  hosts => "http://localhost:9200"
	 index => "create-test"
	 action => "create"
 	 document_id => "%{id}"
	 user => user
	 password => password
   }
此时action被设置为create。而此时index参数指向的索引并不存在。
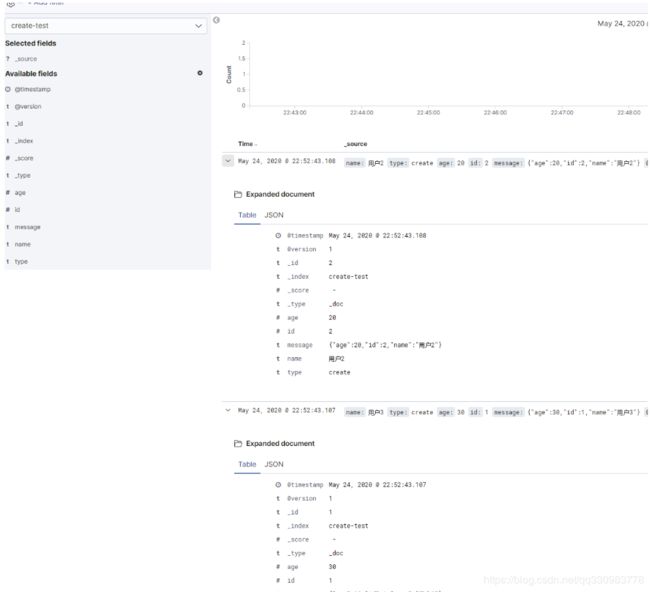
为了测试效果,此时发送三条数据,其中两条ID相同其他不同。可以看到elasticsearch中的内容
{"age":10,"id":1,"name":"用户1"}
{"age":20,"id":2,"name":"用户2"}
{"age":30,"id":1,"name":"用户3"}
此时控制台抛出异常,提示document already exists
[2020-05-24T22:52:43,653][WARN ][logstash.outputs.elasticsearch] Failed action. {:status=>409, :action=>["create", {:_id=>"1", :_index=>"create-test", :_type=>"_doc", :routing=>nil}, #], :response=>{"create"=>{"_index"=>"create-test", "_type"=>"_doc", "_id"=>"1", "status"=>409, "error"=>{"type"=>"version_conflict_engine_exception", "reason"=>"[1]: version conflict, document already exists (current version [1])", "index_uuid"=>"oQJbUsKKRP-XrKklyvLo4A", "shard"=>"0", "index"=>"create-test"}}}}
而此时只插入了前两条数据
ps.这里需要注意,因为插入速度过快,在logstash从队列取出值的时候3已经是上面的了,最终取数据的ID顺序是3、2、1
update
此配置会在elasticsearch不存在索引的时候创建索引。在这种配置下插入数据会下面的可能:
- 当没有设置文档id(document_id )的时候,直接返回失败,此方式,必须设置文档ID
- 当文档id存在且elasticsearch也存在相同ID的文档,则会执行更新操作。
- 当文档id存在且elasticsearch不存在相同ID的文档,则会执行插入操作。
但是update模式存在两个补充参数(doc_as_upsert 和 upsert),使得其的更新操作有不同结果。
   elasticsearch {
	 hosts => "http://localhost:9200"
	 index => "update-test"
	 action => "update"
	 upsert => "123456"
 	 document_id => "%{id}"
	 user => user
	 password => password
   }
此时action被设置为update,且upsert被设置为123456。而此时index参数指向的索引并不存在。
为了测试效果,此时发送三条数据,其中两条ID相同其他不同。可以看到elasticsearch中的内容
此时控制台抛出异常,提示Could not index event to Elasticsearch
[2020-05-24T22:52:51,049][WARN ][logstash.outputs.elasticsearch] Could not index event to Elasticsearch. {:status=>404, :action=>["update", {:_id=>"1", :_index=>"update-test", :_type=>"_doc", :routing=>nil, :retry_on_conflict=>1}, #], :response=>{"update"=>{"_index"=>"update-test", "_type"=>"_doc", "_id"=>"1", "status"=>404, "error"=>{"type"=>"document_missing_exception", "reason"=>"[_doc][1]: document missing", "index_uuid"=>"h1RRhkP1RKKpW2NRB60szA", "shard"=>"0", "index"=>"update-test"}}}}
doc_as_upsert
是更新模式下(action=update)的补充参数。
当设置为true的时候,如果在Elasticsearch中不存在相同ID的文档,则使用source创建一个新文档
upsert
是更新模式下(action=update)的补充参数。
当设置为true的时候,如果在Elasticsearch中不存在相同ID的文档,使用此参数作为json字符串创建一个新文档
连接的优化
官方文档中关于数据输出有一个介绍
Each Elasticsearch output is a new client connected to the cluster:
每一个Elasticsearch output都会建立一个新的客户端连接。假如创建了多个数据输出端口最直接的结果就是导致,重新启动时间变的很长。这个时候根据官方建议,最大程度的减少Elasticsearch打开的客户端连接数量,并且减少小批量请求的数量。
这个时候产生了一个问题,在上面的配置一个output指向了一个index。如果我们需要向多个index推送数据,就需要实现一个output把数据推送至多个index。这就需要index的目标可以接受动态参数。同时也涉及到logstash对Elasticsearch索引的管理
单一Elasticsearch客户端数据推送至不同索引
使用数据中的内容作为索引
因为输出参数也支持%{}的动态语法,所以我们可以使用下面配置,将数据中的某一个字段,设置成目标索引的值,将数据插入其中。索引不能包含大写字符。
elasticsearch {
     hosts => "http://localhost:9200"
     index => "%{userType}"
     document_id => "%{id}"
	 user => user
	 password => password
}
为了测试效果,此时发送两条userType不相同的数据。可以看到elasticsearch中的内容。
{"age":10,"id":1,"name":"admin","userType":"admin"}
{"age":20,"id":2,"name":"user","userType":"user"}
此时通过kibana可以看到出现了两个新的只有一条数据的索引
使用时间作为索引
很多时候我们使用logstash用来管理云日志的功能,而日志随着时间的积累会越来越多,一般来说在生成日志文件的时候我们会根据时间进行切分,将不同时间的日志文件作为不同的日志文件,所以我们同样可以通过时间按天划分索引。logstash提供了直接使用时间戳数据的方法logstash-%{+yyyy.MM.dd},当然也可以自己格式化数据中的日期来设置索引模板。
filter {
	json {
		source => "message"
	}
	date {
		match => [ "createDate", "yyyy-MM-dd HH:mm:ss" ]
	}
}
output {
   elasticsearch {
     hosts => "http://localhost:9200"
	 index => "%{userType}-%{+yyyy-MM-dd}"
	 document_id => "%{id}"
	 user => user
	 password => password
   }
}
为了测试效果,此时发送两条携带时间戳日期的数据。可以看到elasticsearch中的内容
{"age":10,"createDate":"2020-05-24 11:13:05","id":1,"name":"admin","userType":"admin"}
{"age":20,"createDate":"2020-05-24 11:13:05","id":2,"name":"user","userType":"user"}
此时通过kibana可以看到出现了两个使用时间作为后缀的索引
只剩下模板这个明天继续
使用预设模板
在我们知道向哪些索引插入数据的时候,我们可以提前把索引在Elasticsearch中创建出来,但是在一些场景下(比如上面根据时间插入不同的索引)我们不可能提前创建出所有可能的索引。当然我们可以依赖logstash自动创建索引,但是很多时候为了方便查询和统计我们需要索引有一些特殊的处理,所以这个时候自动创建的索引可能并不符合我们需求,而logstash提供了template参数来让我们设置自己的模板。
此时需要设置template_overwrite => true
output {
   # 将数据保存到elasticsearch
   elasticsearch {
     # elasticsearch服务端口
     hosts => "http://localhost:9200"
     # 数据推送的索引
     index => "%{type}-%{+YYYY.MM.dd}"
     # 假如设置了elasticsearch密码账号登录则需要配置此内容
     # 账号
	 user => user
     # 密码
     password => exception
	 template => "/usr/local/logstash-7.2.0/config/output/admin.json"
	 template_overwrite => true
   }
}
模板admin-*
此模板匹配所有admin开头的索引
{
    "template": "admin-*",
    "settings": {
        "index.number_of_shards": 3,
        "number_of_replicas": 0
    },
    "mappings": {
		"properties": {
			"@timestamp": {
				"type": "date",
				"format": "strict_date_optional_time||epoch_millis",
				"doc_values": true
			},
			"name": {
				"type": "keyword"
			},
			"age": {
				"type": "integer"
			},
			"weight": {
				"type": "float"
			},
			"desc": {
				"type": "text"
			},
			"role": {
				"type": "text"
			},
			"telephone": {
				"type": "long"
			}
		}
    }
}
为了测试效果,发送下面的数据插入一条数据
{"age":10,"createDate":"2020-05-24 11:13:05","id":1,"name":"admin","userType":"admin"}
此时可以在kibana中看到新的索引的mapping和预设的一样
同时查询索引模板会出现一个名字为 logstash的索引模板
如果想使用自定义个索引模板名称可以设置 template-name参数。
个人水平有限,上面的内容可能存在没有描述清楚或者错误的地方,假如开发同学发现了,请及时告知,我会第一时间修改相关内容。假如我的这篇内容对你有任何帮助的话,麻烦给我点一个赞。你的点赞就是我前进的动力。


