学成在线一:前端页面管理CMS
1.SpringBootApplication注解规范
@SpringBootApplication
@EntityScan("com.xuecheng.framework.domain.cms")//扫描实体类
@ComponentScan(basePackages = {"com.xuecheng.api"})//扫描接口
@ComponentScan(basePackages = {"com.xuecheng.manage_cms"})//扫描本项目下所有的类,默认,可不写
public class ManageCmsApplication {

    public static void main(String[] args) {
        SpringApplication.run(ManageCmsApplication.class,args);}
}
2.mongodb的使用
(1)MongoRepositoryspring定义的接口类,T指定模型类和模型的主键类,模型类中指定表,即可以对对应的表进行增删改查操作
import com.xuecheng.framework.domain.cms.CmsPage;
import org.springframework.data.mongodb.repository.MongoRepository;

//MongoRepositoryspring定义的接口类,T指定模型类和模型的主键类,模型类中指定表
public interface CmsPageRepository extends MongoRepository {
}
(2)模型类
@Data
@ToString
@Document(collection = "cms_page")
public class CmsPage {
    /**
     * 页面名称、别名、访问地址、类型(静态/动态)、页面模版、状态
     */
    //站点ID
    private String siteId;
    //页面ID
    @Id
    private String pageId;
    //页面名称
    private String pageName;
    //别名
    private String pageAliase;
    //访问地址
    private String pageWebPath;
    //参数
    private String pageParameter;
    //物理路径
    private String pagePhysicalPath;
    //类型(静态/动态)
    private String pageType;
    //页面模版
    private String pageTemplate;
    //页面静态化内容
    private String pageHtml;
    //状态
    private String pageStatus;
    //创建时间
    private Date pageCreateTime;
    //模版id
    private String templateId;
    //参数列表
    private List pageParams;
    //模版文件Id
//    private String templateFileId;
    //静态文件Id
    private String htmlFileId;
    //数据Url
    private String dataUrl;

}
(3)分页查
@SpringBootTest
@RunWith(SpringRunner.class)
public class CmsPageRepositoryTest {


    @Autowired
    CmsPageRepository cmsPageRepository;

    @Test
    public void testFindPage(){

        Pageable pageable = PageRequest.of(1,10);//从第一页开始,每页10条
        Page all = cmsPageRepository.findAll(pageable);
        System.out.println(all);
    }
}
3.swagger
Swagger接口生成工作原理:
1、系统启动,扫描到api工程中的Swagger2Configuration类
2、在此类中指定了包路径com.xuecheng,找到在此包下及子包下标记有@RestController注解的controller类
3、根据controller类中的Swagger注解生成接口文档
(1)Swagger2Configuration.java
@Configuration
@EnableSwagger2
public class Swagger2Configuration {
    @Bean
    public Docket createRestApi() {
        return new Docket(DocumentationType.SWAGGER_2)
                .apiInfo(apiInfo())
                .select()
                .apis(RequestHandlerSelectors.basePackage("com.xuecheng"))
                .paths(PathSelectors.any())
                .build();
    }

    private ApiInfo apiInfo() {
        return new ApiInfoBuilder()
                .title("学成网api文档")
                .description("学成网api文档")
//                .termsOfServiceUrl("/")
                .version("1.0")
                .build();
    }

}
(2)在Java类中添加Swagger的注解即可生成Swagger接口,常用Swagger注解如下:
@Api:修饰整个类,描述Controller的作用
@ApiOperation:描述一个类的一个方法,或者说一个接口
@ApiParam:单个参数描述
@ApiModel:用对象来接收参数 @ApiModelProperty:用对象接收参数时,描述对
象的一个字段
@ApiResponse:HTTP响应其中1个描述 @ApiResponses:HTTP响应整体描述
@ApiIgnore:使用该注解忽略这个API
@ApiError :发生错误返回的信息
@ApiImplicitParam:一个请求参数
@ApiImplicitParams:多个请求参数
@Api(value = "cms页面管理借口",description = "cms页面管理借口,提供页面的增删改查")
public interface CmsPageControllerApi {

    //页面查询
    @ApiOperation("分页查询页面列表")
    @ApiImplicitParams({@ApiImplicitParam(name="page",value = "页码",required=true,paramType="path",dataType="int"),
                        @ApiImplicitParam(name="size",value = "每页记录数",required=true,paramType="path",dataType="int")
                    })
    public QueryResponseResult findList(int page, int size, QueryPageRequest queryPageRequest);
}
@Data
public class QueryPageRequest {
//接收页面查询的查询条件
//站点id
@ApiModelProperty("站点id")
private String siteId;
//页面ID
@ApiModelProperty("页面ID")
private String pageId;
//页面名称
@ApiModelProperty("页面名称")
private String pageName;
//别名
@ApiModelProperty("页面别名")
private String pageAliase;
//模版id
@ApiModelProperty("模版id")
private String templateId;
//....
}(3)通过http://localhost:31001/swagger-ui.html访问
4.vue.js的使用
(1)入门
①引入vue.min.js
②编写view层
③编写MMVM中的VM(ViewModel)部分及model部分
④刷新页面运行程序, vue.js(VM)部分实现将model中的数据在view中展示
vue.js测试程序
{{name}}
(2)v-model实现双向数据绑定
仅能在input,select,textarea.components中使用
①由模型数据绑定到Dom对象,模型数据的值改变, Dom对象的值自动改变
②由Dom对象绑定到模型数据, Dom对象的值改变,模型数据就改变
③vue_02.html
vue.js测试程序
{{name}}
+
=
{{Number.parseInt(num1)+Number.parseInt(num2)}}
(3)v-text解决闪烁
v-text可以将一个变量的值渲染到指定的元素中,它可以解决插值表达式闪烁,即不会出现源码表达式
①用法
②整体程序
vue.js测试程序
+
=
(4)v-on监听用户事件
①用法
methods:{
	change:function () {
		this.result = Number.parseInt(this.num1)+Number.parseInt(this.num2)//调用自己VM里面的对象要用this.
	}
}
②整体程序
vue.js测试程序
+
=
(5)v-bind: 可简写为:
v-bind可以将数据对象绑定在dom的任意属性中。
v-bind可以给dom对象绑定一个或多个特性,例如动态绑定style和class。
vue.js测试程序
(6)v-for , v-if ,v-else
v-for可以循环遍历数组、v-if进行判断
①vue_03.html
vue.js测试程序
- {{index}}-->{{item}}
- {{key}}-->{{value}}
-
{{index}}-->{{item.user.uname}}-->{{item.user.age}}
{{index}}-->{{item.user.uname}}-->{{item.user.age}}
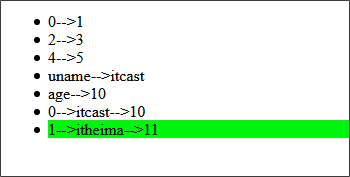
②效果
5.webpack使用
(1)model01.js,定义方法
若要被使用需要先导出
function add(x, y) {
    return x + y + 1
};

function add2(x, y) {
    return x + y + 2
};

//若要被使用需要先导出
// module.exports = {add,add2}
module.exports.add = add;
module.exports.add2 = add2;
(2)定义入口main.js
//导入需要使用的model01.js和vue.min.js
var {add} = require("./model01.js");
var Vue = require("./vue.min.js")

//编写MMVM中的VM(ViewModel)部分及model部分
//整体处理数据的是VM
var VM = new Vue({
    el: "#app", //表示vm接管了app区域
    data:{      //model,数据
        name: '黑马',
        num1: 0,
        num2: 0,
        result: 0,
        url: 'www.baidu.com',
        size: 11

    },
    methods:{
        change:function () {
            this.result = add(Number.parseInt(this.num1),Number.parseInt(this.num2))//调用自己VM里面的对象要用this.
        }
    }
});
(3)进入程序目录,执行webpack main.js build.js ,这段指令表示将main.js打包输出为 build.js文件
(4)在html中引用build.js
build.js里面包含了model01.js和vue.min.js
vue_02.html
vue.js测试程序
6.webpack-dev-server,实现热加载,自动刷新浏览器
(1)安装webpack-dev-server
使用 webpack-dev-server需要安装webpack、 webpack-dev-server和 html-webpack-plugin三个包。
执行命令:
cnpm install [email protected] [email protected] [email protected] --save-dev安装完成,会发现程序目录出现一个package.json文件,此文件中记录了程序的依赖。
没有联网的同学拷贝老师提供的node_modules.zip到webpacktest02目录下,解压到node_modules目录下。
(2)配置webpack-dev-server
在package.json中配置script
{
  "scripts": {
	"dev": "webpack-dev-server --inline --hot --open --port 5008"
	},
  "devDependencies": {
    "html-webpack-plugin": "^2.30.1",
    "webpack": "^3.6.0",
    "webpack-dev-server": "^2.9.1"
  }
}
--inline:自动刷新
--hot:热加载
--port:指定端口
--open:自动在默认浏览器打开
--host:可以指定服务器的 ip,不指定则为127.0.0.1,如果对外发布则填写公网ip地址
(3)配置webpack.config.js
//引用html-webpack-plugin插件,作用是根据html模板template: 'vue_02.html在内存生成html文件,他的工作原理是根据模板文件在内存生成一个index,html文件
var htmlwp = require('html-webpack-plugin');
module.exports={
    entry:'./src/main.js', //指定打包的入口文件
    output:{
        path : __dirname+'/dist', // 注意:__dirname表示webpack.config.js所在目录的绝对路径
        filename:'build.js' //输出文件
    },
    plugins:[
        new htmlwp({
            title: '首页', //生成的页面标题首页
            filename: 'index.html', //webpack-dev-server在内存中生成的文件名称,自动将build注入到这个页面底部,才能实现自动刷新功能
            template: 'vue_02.html' //根据index1.html这个模板来生成(这个文件请程序员自己生成)
        })
    ]
}
(4)启动
启动文件:
方法1、进入 webpacktest02目录,执行npm run dev
方法2、使用webstorm,右键package.json文件,选择“Show npm Scripts”
打开窗口:

双击 dev。
注意:dev就是在package.json中配置的webpack dev
发现启动成功自动打开浏览器。
修改src中的任意文件内容,自动加载并刷新浏览器。
(5)debug调试
使用了webpack之后就不能采用传统js的调试方法在chrome中打断点,
配置如下:
①在webpack.config.js中配置:
devtool: 'eval-source-map',②webpack.config.js部分内容如下:
//引用html-webpack-plugin插件,作用是根据html模板template: 'vue_02.html在内存生成html文件,他的工作原理是根据模板文件在内存生成一个index,html文件
var htmlwp = require('html-webpack-plugin');
module.exports={
    entry:'./src/main.js', //指定打包的入口文件
    output:{
        path : __dirname+'/dist', // 注意:__dirname表示webpack.config.js所在目录的绝对路径
        filename:'build.js' //输出文件
    },
    devtool: 'eval-source-map',
    plugins:[
        new htmlwp({
            title: '首页', //生成的页面标题首页
            filename: 'index.html', //webpack-dev-server在内存中生成的文件名称,自动将build注入到这个页面底部,才能实现自动刷新功能
            template: 'vue_02.html' //根据index1.html这个模板来生成(这个文件请程序员自己生成)
        })
    ]
}
③添加debugger
function add(x, y) {
    debugger
    return x + y
}
点击“计算” 即进入debugger代码位置,此时可以使用chrome,F12进行调试了。
7.vue.js,创建页面/table/分页查询/api调用/跨域问题解决
(1)页面结构
(2)前后的请求响应流程图
1、在浏览器输入前端url
2、前端框架vue.js根据url解析路由,根据路由找到page_list.vue页面
3、首先执行page_list.vue中的钩子方法
4、在钩子方法中调用query方法。
5、在query方法中调用cms.js中的page_list方法
6、cms.js中的page_list方法通过axios请求服务端接口
7、采用proxyTable解决跨域问题,node.js将请求转发到服务端(http://localhost:31001/cms/page/list)
8、服务端处理,将查询结果响应给前端
9、成功响应调用then方法,在then方法中处理响应结果,将查询结果赋值给数据模型中的total和list变量。
10、vue.js通过双向数据绑定将list数据渲染输出。
(3)程序编写
①页面结构(含表格,分页),/src/module/cms/page/page_list.vue
查询
//分页组件
②页面路由,/src/module/cms/router/index.js,负责转发
import Home from '@/module/home/page/home.vue';
import CMS from '@/module/cms/page/page_list.vue';
export default [{
    path: '/cms',
    component: Home,
    name: 'CMS内容管理',
    hidden: false,
    children:[
      {path: '/cms/page/list',name: '页面列表',component: CMS,hidden: false}
    ]
  }
]
③导入cms模块的路由,/src/base/router/index.js
import Vue from 'vue';
import Router from 'vue-router';
Vue.use(Router);
// 定义路由配置
let routes = []
let concat = (router) => {
  routes = routes.concat(router)
}
// // 导入路由规则
import HomeRouter from '@/module/home/router'
import CMSRouter from '@/module/cms/router'
// 合并路由规则
concat(HomeRouter)
concat(CMSRouter)
export default routes;
④Api方法定义,/src/module/cms/api/cms.js
//public是对axios的工具类封装,定义了http请求方法,有get,post等
import http from './../../../base/api/public.js'
let sysConfig = require('@/../config/sysConfig')
let apiUrl = sysConfig.xcApiUrlPre;

//页面查询
export const page_list = (page,size,params) =>{
  //请求服务端的页面接口查询接口
  //return http.requestQuickGet('http://localhost:31001/cms/page/list/'+page+'/'+size),出现跨域问题
  return http.requestGet(apiUrl+'/cms/page/list/'+page+'/'+size);
}
⑤跨域问题解决、
原因:浏览器的同源策略不允
解决:采用proxyTable解决,使用node.js。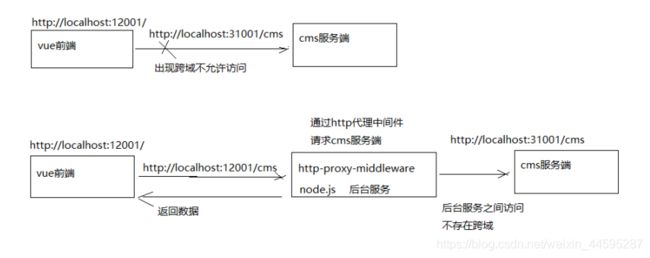
a.修改/src/module/cms/api/index.js方法中url的定义,请求前加/api前缀
由
return http.requestQuickGet('http://localhost:31001/cms/page/list/'+page+'/'+size)
改为
return http.requestGet(apiUrl+'/cms/page/list/'+page+'/'+size);
//let apiUrl = sysConfig.xcApiUrlPre;
xcApiUrlPre在config/sysConfig.js中定义,是字符串'/api'
config/sysConfig.js
var sysConfig = {
    xcApiUrlPre: '/api',
    xcApiUrl: 'http://api.xuecheng.com/',
    imgUrl:'http://img.xuecheng.com/',
    videoUrl:'http://video.xuecheng.com/',
    openAuthenticate:true,
    openAuthorize:true
}

module.exports = sysConfig
/src/module/cms/api/index.js
//public是对axios的工具类封装,定义了http请求方法,有get,post等
import http from './../../../base/api/public.js'
let sysConfig = require('@/../config/sysConfig')
let apiUrl = sysConfig.xcApiUrlPre;

//页面查询
export const page_list = (page,size,params) =>{
  //请求服务端的页面接口查询接口
  return http.requestGet(apiUrl+'/cms/page/list/'+page+'/'+size);
}
b.配置proxyTable, config/index.js
proxyTable: {

'/api/cms': { //api/cms开头的请求,代理请求转发http://localhost:31001
  target: 'http://localhost:31001',  //http://localhost:31001/api/cms
  pathRewrite: {
	'^/api': ''  //实际请求中将/api去掉http://localhost:31001/cms
  }
 }
}
8.条件查询
(1)后端
PageService.java@Service
public class PageService {
@Autowired
CmsPageRepository cmsPageRepository;
public QueryResponseResult findList(int page, int size, QueryPageRequest queryPageRequest){
if(queryPageRequest==null){
queryPageRequest = new QueryPageRequest();
}
//自定义条件查询
//1.条件值查询
CmsPage cmsPage = new CmsPage();
//设置某个站点id为查询条件
if(StringUtils.isNotEmpty(queryPageRequest.getSiteId())){
cmsPage.setSiteId(queryPageRequest.getSiteId());
}
//设置某个模板id为查询条件
if(StringUtils.isNotEmpty(queryPageRequest.getTemplateId())){
cmsPage.setTemplateId(queryPageRequest.getTemplateId());
}
//设置页面别名作为查询条件
if(StringUtils.isNotEmpty(queryPageRequest.getPageAliase())){
cmsPage.setPageAliase(queryPageRequest.getPageAliase());
}
//2.定义条件匹配器,迷糊查询方式等(包含,开头)
ExampleMatcher exampleMatcher = ExampleMatcher.matching()
.withMatcher("pageAliase", ExampleMatcher.GenericPropertyMatchers.contains());//对pageAliase属性,按包含模糊查询
Example example = Example.of(cmsPage, exampleMatcher);
//设置分页参数,页码从1开始
if(page <=0){
page = 1;
}
page = page - 1;
if(size<=0){
size = 10;
}
Pageable pageable = PageRequest.of(page,size);
//使用cmsPageRepository,查询
Page all = cmsPageRepository.findAll(example,pageable);
QueryResult queryResult = new QueryResult();
queryResult.setList(all.getContent());
queryResult.setTotal(all.getTotalElements());
QueryResponseResult queryResponseResult = new QueryResponseResult(CommonCode.SUCCESS,queryResult);
return queryResponseResult;
}
} (2)前端
①/src/module/cms/page/page_list.vue
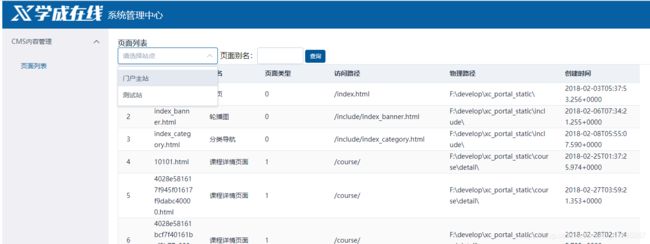
页面别名:查询
②/src/module/cms/api/cms.js
用querystring将json转成url后面的key/value对
//public是对axios的工具类封装,定义了http请求方法,有get,post等
import http from './../../../base/api/public.js'
import querystring from 'querystring'
let sysConfig = require('@/../config/sysConfig')
let apiUrl = sysConfig.xcApiUrlPre;

//页面查询
export const page_list = (page,size,params) =>{
  //将json转成url后面的key/value对
  //page=1&size=10&siteId=5a751fab6abb5044e0d19ea1&pageAliase=%E8%AF%BE%E7%A8%88
  let queryString =  querystring.stringify(params);
  //请求服务端的页面接口查询接口
  return http.requestGet(apiUrl+'/cms/page/list/'+page+'/'+size+'?'+queryString);
}
9.新增页面
(1)后端代码
①CmsPageControllerApi.java
public interface CmsPageControllerApi {
@ApiOperation("新增页面")
    public CmsPageResult add(CmsPage cmsPage);
}
②CmsPageController.java
@Override
@PostMapping("/add")
public CmsPageResult add(@RequestBody CmsPage cmsPage) {
	return pageService.add(cmsPage);
}
③CmsPageRepository.java
//MongoRepositoryspring定义的接口类,T指定模型类和模型的主键类,模型类中指定表
public interface CmsPageRepository extends MongoRepository {

    //根据页面名称、站点Id、页面webpath查询
    CmsPage findByPageNameAndSiteIdAndPageWebPath(String pageName,String siteId,String pageWebPath);

}
④PageService.java
    public CmsPageResult add(CmsPage cmsPage) {
        if(cmsPage == null){
            //抛出异常
        }
        //校验页面名称、站点Id、页面webpath的唯一性
        //根据页面名称、站点Id、页面webpath去cms_page集合,如果查到说明此页面已经存在,如果查询不到再继续添加
        CmsPage cmsPage1 = cmsPageRepository.findByPageNameAndSiteIdAndPageWebPath(cmsPage.getPageName(), cmsPage.getSiteId(), cmsPage.getPageWebPath());
        if(cmsPage1 != null){
            //页面已存在抛出异常

        }

        //调用dao新增页面
        cmsPage.setPageId(null);//防止主键重复,先置空,再由mongodb自动生成主键
        cmsPageRepository.save(cmsPage);
        return new CmsPageResult(CommonCode.SUCCESS,cmsPage);

    }
(2)前端代码
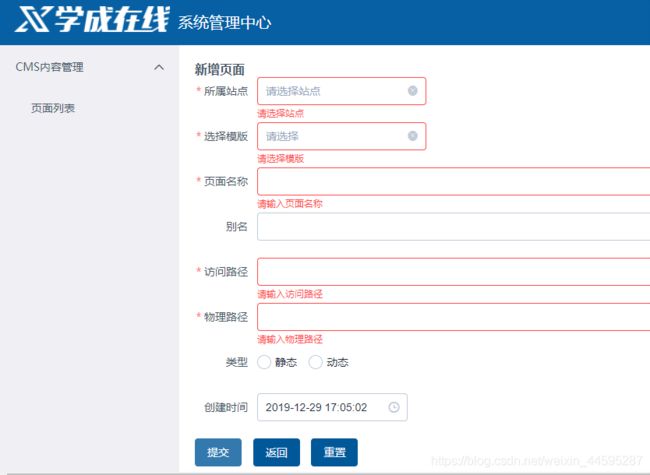
效果图
①添加“新增”按钮,按钮包含链接,并携带参数page和siteId
新增
创建page_add.vue页面
②在cms模块的路由文件中配置路由:
import page_add from '@/module/cms/page/page_add.vue';
。。。

{path: '/cms/page/add',name: '新增页面',component: page_add,hidden: true}
③“返回”按钮,并回到上一步的当前页
跳转时携带参数
新增
取出参数
  //返回
  go_back: function () {
	this.$router.push({   //取当前路由
	  path: '/cms/page/list',  //设置返回路径
		query:{
		  page: this.$route.query.page, //取出路由中传过来的参数
		  siteId: this.$route.query.siteId
	  }
	})
  },
在page_list调用钩子,回显条件
created(){
  //取出路由中的参数,赋值给数据对象
  this.params.page = Number.parseInt(this.$route.query.page || 1)   //若无page参数,设为1
  this.params.siteId = this.$route.query.siteId || ''               //若无siteId参数,设为不存在
},
④“重置”按钮
  reset: function () {
	this.$refs['pageForm'].resetFields(); //重置表单
  }
⑤表单校验
1)在form属性上配置rules(表单验证规则)
2)在数据模型中配置校验规则:
pageFormRules: {
  siteId:[
	{required: true, message: '请选择站点', trigger: 'blur'}
  ],
  templateId:[
	{required: true, message: '请选择模版', trigger: 'blur'}
  ],
  pageName: [
	{required: true, message: '请输入页面名称', trigger: 'blur'}
  ],
  pageWebPath: [
	{required: true, message: '请输入访问路径', trigger: 'blur'}
  ],
  pagePhysicalPath: [
	{required: true, message: '请输入物理路径', trigger: 'blur'}
  ]
}
⑥点击“提交”按钮触发校验
1)在form表单上添加 ref属性(ref="pageForm")在校验时引用此表单对象
2)执行校验
     addSubmit: function () {
        this.$refs['pageForm'].validate((valid)=>{  //表单校验
          if (valid) {      //表单校验成功
            //弹窗提示
            this.$confirm('你确认提交吗?', '提示', {}).then(() => {
              //调用page_add接口
              cmsApi.page_add(this.pageForm).then((res) => {
                //解析后端返回结果
                if (res.success) {
                  this.$message.success("新增成功");  //提示增加成功
                  this.$refs['pageForm'].resetFields(); //成功后清空表单
                } else if (res.message) {
                  this.$message.error(res.message)
                } else {
                  this.$message.error("提交失败")
                }
              });
            })
          }
        })
      }
⑦page_list.vue
页面别名:查询
新增
⑧page_add.vue
静态
动态
10.修改页面
(1)后端代码,先查询用于回显-->再修改
①CmsPageController.java
@Override
@GetMapping("/get/{id}")  //先查询用于回显
public CmsPage findById(@PathVariable("id") String id) {
	return pageService.getById(id);
}

@Override
@PutMapping("/edit/{id}")
public CmsPageResult edit(@PathVariable("id") String id, @RequestBody CmsPage cmsPage) {
	return pageService.update(id,cmsPage);
}
②PageService.java
page.row.pageId
(2)前端代码
①添加"编辑"按钮,跳转到编辑页面
page_edit.vue
page //该列表
page.row.pageId //该列表该行的pageId
	  编辑

	  删除
②带参数跳转页面
传参方法
a. page_edit.vue,发送
path: '/cms/page/edit/' + pageId,
  edit: function (pageId) {
	this.$router.push({
	  path: '/cms/page/edit/' + pageId,
	  query: {
		page: this.params.page,
		siteId: this.params.siteId
	  }
	})
  }
b.router/index.js接收
{path: '/cms/page/edit/:pageId',name: '修改页面',component: page_edit,hidden: true}
整体代码如下,router/index.js
import Home from '@/module/home/page/home.vue';
import CMS from '@/module/cms/page/page_list.vue';
import page_add from '@/module/cms/page/page_add.vue';
import page_edit from '@/module/cms/page/page_edit.vue';
export default [{
    path: '/cms',
    component: Home,
    name: 'CMS内容管理',
    hidden: false,
    children:[
      {path: '/cms/page/list',name: '页面列表',component: CMS,hidden: false},
      {path: '/cms/page/add',name: '新增页面',component: page_add,hidden: true},
      {path: '/cms/page/edit/:pageId',name: '修改页面',component: page_edit,hidden: true}
    ]
  }
]
③page_edit.vue,进入页面先使用钩子查询数据,用于回显
  editSubmit(){
	this.$refs.pageForm.validate((valid) => {//表单校验
	  if (valid) {//表单校验通过
		this.$confirm('确认提交吗?', '提示', {}).then(() => {
		  this.addLoading = true;
		  //修改提交请求服务端的接口
		  cmsApi.page_edit(this.pageId,this.pageForm).then((res) => {
			console.log(res);
			if(res.success){
			  this.addLoading = false;
			  this.$message({
				message: '提交成功',
				type: 'success'
			  });
			  //返回
			  this.go_back();

			}else{
			  this.addLoading = false;
			  this.$message.error('提交失败');
			}
		  });
		});
	  }
	});
  }
},

created: function () {
  this.pageId=this.$route.params.pageId;
  //根据主键查询页面信息
  cmsApi.page_get(this.pageId).then((res) => {
	console.log(res);
	if(res){
	  this.pageForm = res;
	}
  });
},
11.删除
(1)后端代码
①CmsPageController.java
@Override
@DeleteMapping("/del/{id}")
public ResponseResult delete(@PathVariable("id") String id) {
	return pageService.delete(id);
}
②PageService.java
public ResponseResult delete(String id) {
	Optional optional = cmsPageRepository.findById(id);
	if(optional.isPresent()){
		cmsPageRepository.deleteById(id);
		return new ResponseResult(CommonCode.SUCCESS);
	}

	//删除失败
	return new ResponseResult(CommonCode.FAIL);
}
③cms.js
//修改页面提交
export const page_edit = (id,params) =>{
  return http.requestPut(apiUrl+'/cms/page/edit/'+id,params)
}
(2)前端代码
①添加“删除"按钮
page_list.vue
	  编辑

	  删除
②删除方法
page_list.vue
  del:function (pageId) {
	this.$confirm('您确认删除吗?', '提示', { }).then(() => {
	  //调用服务端接口
	  cmsApi.page_del(pageId).then(res=>{

		if(res.success){
		  this.$message.success("删除成功")
		  //刷新页面
		  this.query()
		}else{
		  this.$message.error("删除失败")
		}
	  })
	})
  }
③cms.js
//删除提交
export const page_del = (id) =>{
  return http.requestDelete(apiUrl+'/cms/page/del/'+id)
}
12.异常处理
(1)异常处理流程
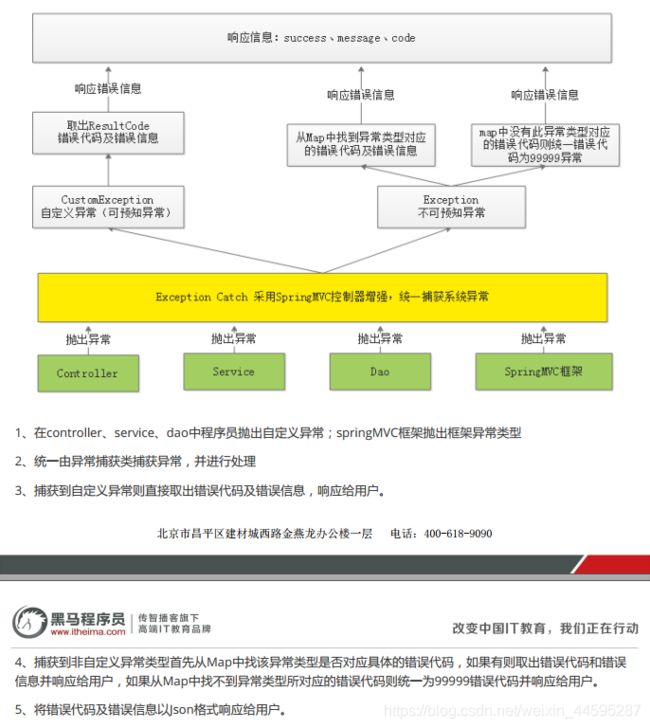
(2)可预知异常处理
①自定义异常CustomException.java
public class CustomException extends RuntimeException {
    private ResultCode resultCode;

    public CustomException(ResultCode resultCode){
        super("错误代码:"+resultCode.code()+"错误信息:"+resultCode.message());
        this.resultCode = resultCode;
    }

    public ResultCode getResultCode(){
    return this.resultCode;
    }
}
②异常抛出类,ExceptionCast.java
不需要自己在程序中抛出,这样更简洁
public class ExceptionCast {

    //使用静态方法抛出自定义异常
    public static void cast(ResultCode resultCode){
        throw new CustomException(resultCode);
    }
}
③异常捕获类,ExceptionCatch.java
使用 @ControllerAdvice和@ExceptionHandler注解来捕获指定类型的异常
@ControllerAdvice  //控制器增强
public class ExceptionCatch {
    //记录ExceptionCatch类日志
    private static final Logger LOGGER = LoggerFactory.getLogger(ExceptionCatch.class);

    //捕获CustomException异常
    @ExceptionHandler(CustomException.class)
    @ResponseBody   //将结果转化为json,否则前端无法解析
    public ResponseResult customException(CustomException e){
        //记录日志
        LOGGER.error("catch exception : {}\r\nexception: ",e.getMessage(),e);
        ResultCode resultCode = e.getResultCode();
        ResponseResult responseResult = new ResponseResult(resultCode);
        return responseResult;
    }
}
④在springBoot的启动类中添加扫描
@ComponentScan(basePackages={"com.xuecheng.framework"})//扫描common工程下的类,含有定义的异常类⑤抛出异常方法
if(cmsPage1 != null){
	//页面已存在抛出异常
	ExceptionCast.cast(CmsCode.CMS_ADDPAGE_EXISTSNAME);
}
(3)不可预知异常处理
①在异常捕获类中添加对Exception异常的捕获:
@ControllerAdvice  //控制器增强
public class ExceptionCatch {
    //记录ExceptionCatch类日志
    private static final Logger LOGGER = LoggerFactory.getLogger(ExceptionCatch.class);

    //使用集合EXCEPTIONS存放异常类型和错误代码映射,ImmutableMap的特点是被创建后不可改变,并且线程安全
    private static ImmutableMap,ResultCode> EXCEPTIONS;
    //使用builder来构建一个异常类型的错误代码的异常
    protected static ImmutableMap.Builder, ResultCode> builder =  ImmutableMap.builder();

    //捕获Exception异常
    @ResponseBody
    @ExceptionHandler(Exception.class)
    public ResponseResult exception(Exception e){
        //记录日志
        LOGGER.error("catch exception : {}\r\nexception: ",e.getMessage(),e);
        if(EXCEPTIONS==null){
            EXCEPTIONS = builder.build();
        }
        final ResultCode resultCode =EXCEPTIONS.get(e.getClass()); //从map中取出异常
            final ResponseResult responseResult;
            if(resultCode != null){
                responseResult = new ResponseResult(resultCode);   //如果map中存在该异常,返回异常结果
            }else{
                responseResult = new ResponseResult(CommonCode.SERVER_ERROR);   //不存在,返回服务器错误
            }
        return  responseResult;
    }

    static {
        //这里加入一些基础的异常类型判断
        builder.put(HttpMessageNotReadableException.class,CommonCode.INVALID_PARAM);
    }
}
13.GridFS
GridFS是MongoDB提供的用于持久化存储文件的模块,CMS使用MongoDB存储数据,使用GridFS可以快速集成开发。
它的工作原理是:
    在GridFS存储文件是将文件分块存储,文件会按照256KB的大小分割成多个块进行存储,GridFS使用两个集合(collection)存储文件,一个集是chunks, 用于存储文件的二进制数据;一个集合是files,用于存储文件的元数据信息(文件名称、块大小、上传时间等信息)。
    从GridFS中读取文件要对文件的各各块进行组装、合并
(1)首先要配置数据库入口
MongoConfig.java@Configuration
public class MongoConfig {
@Value("${spring.data.mongodb.database}") //application.yml中指定的数据库
String db;
//打开下载流
@Bean
public GridFSBucket getGridFSBucket(MongoClient mongoClient){
MongoDatabase database = mongoClient.getDatabase(db);
GridFSBucket bucket = GridFSBuckets.create(database);
return bucket;
}
}(2)向mongodb存储文件、读取(下载)文件、删除文件
@SpringBootTest
@RunWith(SpringRunner.class)
public class GridFsTest {
@Autowired
GridFsTemplate gridFsTemplate;
@Autowired
GridFSBucket gridFSBucket;
//存储文件
@Test
public void testGridFs() throws FileNotFoundException {
//要存储的文件
File file = new File("C:\\Users\\intern\\Desktop\\index_banner.ftl");
//定义输入流
FileInputStream inputStream = new FileInputStream(file);
//向GridFs存储文件,返回文件id
ObjectId objectId = gridFsTemplate.store(inputStream, "轮播图测试文件test05", "");
//得到文件id
String fileId = objectId.toString();
System.out.println(fileId);
//关闭流
try {
inputStream.close();
} catch (IOException e) {
e.printStackTrace();
}
}
//读取.下载文件
@Test
public void queryFile() throws IOException {
String fileId = "5a7719d76abb5042987eec3a";
//根据id查询文件
GridFSFile gridFSFile = gridFsTemplate.findOne(Query.query(Criteria.where("_id").is(fileId)));
//打开下载流对象
GridFSDownloadStream gridFSDownloadStream = gridFSBucket.openDownloadStream(gridFSFile.getObjectId());
//创建girdFsResource,用于获取流对象
GridFsResource gridFsResource = new GridFsResource(gridFSFile, gridFSDownloadStream);
//获取流中的数据
String s = IOUtils.toString(gridFsResource.getInputStream(), "UTF-8");
System.out.println(s);
//关闭流
gridFSDownloadStream.close();
}
//删除文件
@Test
public void testDelFile(){
//根据文件id删除fs.files和fs.chunks中的记录
gridFsTemplate.delete(Query.query(Criteria.where("_id").is("5e0c4a96d0c72c4258447fe8")));
}
}14.静态化,把数据model和前端模板template结合
(1)第一步:获取数据
//获取页面模型数据方法
public Map getModelByPPageId(String pageId){
CmsPage cmsPage = this.getById(pageId);
if(cmsPage == null){
ExceptionCast.cast(CmsCode.CMS_PAGE_NOTEXISTS);
}
//取出dataUrl
String dataUrl = cmsPage.getDataUrl(); // "dataUrl" : "http://localhost:40200/portalview/course/getpre/4028e58161bd3b380161bd3bcd2f0000"
if(StringUtils.isEmpty(dataUrl)){
ExceptionCast.cast(CmsCode.CMS_GENERATEHTML_DATAURLISNULL);
}
ResponseEntity(2)第二步:获取前端模板
//获取页面模板
public String getTemplateByPageId(String pageId){
//1.查询页面信息
CmsPage cmsPage = this.getById(pageId);
if (cmsPage==null){
//页面不存在
ExceptionCast.cast(CmsCode.CMS_PAGE_NOTEXISTS);
}
//2.取页面模板
String templateId = cmsPage.getTemplateId();
if (StringUtils.isEmpty(templateId)){
//页面模板为空
ExceptionCast.cast(CmsCode.CMS_GENERATEHTML_TEMPLATEISNULL);
}
Optional optional = cmsTemplateRepository.findById(templateId);
if (optional.isPresent()){
CmsTemplate cmsTemplate = optional.get();
//3.取出模板文件id,templateFileId
String templateFileId = cmsTemplate.getTemplateFileId();//5aec5d8c0e6618376c08e47d
//4.取出文件模板内容,templateFileId是fs.files数据库的_id,和fs.chunks的files_id
GridFSFile gridFSFile = gridFsTemplate.findOne(Query.query(Criteria.where("_id").is(templateFileId)));
//5.打开下载流对象
GridFSDownloadStream gridFSDownloadStream = gridFSBucket.openDownloadStream(gridFSFile.getObjectId());
//6.创建GridFsResource
GridFsResource gridFsResource = new GridFsResource(gridFSFile, gridFSDownloadStream);
//7.输出流
String content = null;
try {
content = IOUtils.toString(gridFSDownloadStream, "UTF-8");
return content;
} catch (IOException e) {
e.printStackTrace();
}
}
return null;
} (3)页面静态化,将模型数据融入到页面模板
//页面静态化,将模型数据融入到页面模板
public String generateHtml(String tempalate,Map model){
try {
//1.生成配置类
Configuration configuration = new Configuration(Configuration.getVersion());
//2.模板加载器
StringTemplateLoader stringTemplateLoader = new StringTemplateLoader();
stringTemplateLoader.putTemplate("template",tempalate);
//3.配置模板加载器
configuration.setTemplateLoader(stringTemplateLoader);
//4.获取模板
Template template1 = null;
template1 = configuration.getTemplate("template");
String html = FreeMarkerTemplateUtils.processTemplateIntoString(template1, model);
return html;
} catch (Exception e) {
e.printStackTrace();
}
return null;
}(4)开始静态化,综合调用上面3个方法
//页面静态化
public String getPageHtml(String pageId){
//1.获取页面模型数据
Map model = this.getModelByPPageId(pageId);
if(model == null){
//根据页面的数据url获取不到数据
ExceptionCast.cast(CmsCode.CMS_GENERATEHTML_DATAISNULL);
}
//2.获取页面模板
String templateContent = this.getTemplateByPageId(pageId);
if (templateContent==null){
//页面模板为空
ExceptionCast.cast(CmsCode.CMS_GENERATEHTML_TEMPLATEISNULL);
}
//3.执行静态化,将模型数据融入到页面模板
String html = this.generateHtml(templateContent, model);
if (StringUtils.isEmpty(html)){
ExceptionCast.cast(CmsCode.CMS_GENERATEHTML_HTMLISNULL);
}
return html;
}15.页面预览
(1)搭建环境
①在CMS服务中加入freemarker的依赖
org.springframework.boot
spring‐boot‐starter‐freemarker
②在application.yml配置freemarker
spring:
freemarker:
cache: false #关闭模板缓存,方便测试
settings:
template_update_delay: 0 #检查模板更新延迟时间,设置为0表示立即检查,如果时间大于0会有缓存不方便进行模板测试③CmsPagePreviewController.java使用response获取流,输出到页面
@Controller
public class CmsPagePreviewController extends BaseController {
@Autowired
PageService pageService;
@RequestMapping(value = "/cms/preview/{pageId}",method = RequestMethod.GET)
public void preview(@PathVariable("pageId")String pageId){
String pageHtml = pageService.getPageHtml(pageId);
if(StringUtils.isNotEmpty(pageHtml)){
try {
ServletOutputStream outputStream = response.getOutputStream();
outputStream.write(pageHtml.getBytes("UTF-8"));//输出到页面
} catch (IOException e) {
e.printStackTrace();
}
}
}
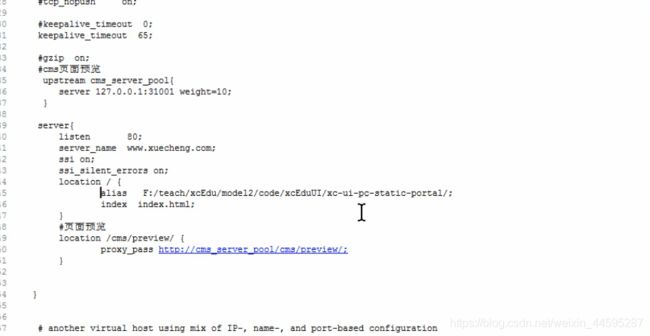
}④配置Nginx代理,通过nginx请求静态资源(css、图片等),通过nginx代理进行页面预览。
E:\nginx-1.14.0\conf\nginx.conf
配置1:
#页面预览
location /cms/preview/ {
proxy_pass http://cms_server_pool/cms/preview/;
}配置2:配置cms_server_pool将请求转发到127.0.0.1:31001/cms/preview/:
upstream cms_server_pool{
server 127.0.0.1:31001 weight=10;
#server 127.0.0.1:31002 weight=10; 可以集群部署
}(2)添加“页面预览”链接
页面预览
preview:function (pageId) {
//打开浏览器窗口
window.open("http://localhost:31001/cms/preview/"+pageId);
}16.RabbitMQ原理测试
(1)生产者test-rabbitmq-producer
①pom.xml
org.springframework.boot
spring-boot-starter-web
org.springframework.boot
spring-boot-starter-amqp
org.springframework.boot
spring-boot-starter-test
org.springframework.boot
spring-boot-starter-logging
com.alibaba
fastjson
②application.yml
server:
port: 44001
spring:
application:
name: test-rabbitmq-producer
rabbitmq:
host: 127.0.0.1
port: 5672
username: guest
password: guest
virtualHost: /③Producer01.java
public class Producer01 {
//队列名
private static final String QUEUE = "helloworld";
public static void main(String[] args) {
//1.通过连接工厂创建新的连接和mq建议连接
ConnectionFactory connectionFactory = new ConnectionFactory();
connectionFactory.setHost("127.0.0.1");
connectionFactory.setPort(5672); //端口
connectionFactory.setUsername("guest");
connectionFactory.setPassword("guest");
connectionFactory.setVirtualHost("/"); //设置虚拟机,一个mq服务可以设置多个虚拟机,每一个虚拟机就相当于一个独立的mq
Connection connection = null;
Channel channel = null;
try {
//2.建立新连接
connection = connectionFactory.newConnection();
//3.创建会话通道,生产者和mq服务所有的通信都在channel通道中完成
channel = connection.createChannel();
//4.声明队列,如果队列在mq中没有要创建
//参数:String queue, boolean durable, boolean exclusive, boolean autoDelete, Map arguments
/**
* 参数明细
* 1、queue 队列名称
* 2、durable 是否持久化,如果持久化,mq重启后队列还在
* 3、exclusive 是否独占连接,队列只允许在该连接中访问,如果connection连接关闭队列则自动删除,如果将此参数设置true可用于临时队列的创建
* 4、autoDelete 自动删除,队列不再使用时是否自动删除此队列,如果将此参数和exclusive参数设置为true就可以实现临时队列(队列不用了就自动删除)
* 5、arguments 参数,可以设置一个队列的扩展参数,比如:可设置存活时间
*/
channel.queueDeclare(QUEUE,true,false,false,null);
//5.发送消息
//参数:String exchange, String routingKey, BasicProperties props, byte[] body
/**
* 参数明细:
* 1、exchange,交换机,如果不指定将使用mq的默认交换机(设置为"")
* 2、routingKey,路由key,交换机根据路由key来将消息转发到指定的队列,如果使用默认交换机,routingKey设置为队列的名称
* 3、props,消息的属性
* 4、body,消息内容
*/
//消息内容
String message = "hello,Mrs Yin";
channel.basicPublish("",QUEUE,null,message.getBytes());
System.out.println("send to mq "+message);
} catch (Exception e) {
e.printStackTrace();
}finally {
try {
//6.关闭通道
channel.close();
//7.关闭连接
connection.close();
} catch (Exception e) {
e.printStackTrace();
}
}
}
}
(2)消费者test-rabbitmq-consumer
①pom.xml
org.springframework.boot
spring-boot-starter-amqp
org.springframework.boot
spring-boot-starter-test
org.springframework.boot
spring-boot-starter-logging
②application.yml
server:
port: 44000
spring:
application:
name: test-rabbitmq-consumer
rabbitmq:
host: 127.0.0.1
port: 5672
username: guest
password: guest
virtualHost: /③Consumer01.java
/**
* 消费队列,1-4步骤和生产队列一样
*/
public class Consumer01 {
//队列名
private static final String QUEUE = "helloworld";
public static void main(String[] args) {
//1.通过连接工厂创建新的连接和mq建议连接
ConnectionFactory connectionFactory = new ConnectionFactory();
connectionFactory.setHost("127.0.0.1");
connectionFactory.setPort(5672); //端口
connectionFactory.setUsername("guest");
connectionFactory.setPassword("guest");
connectionFactory.setVirtualHost("/"); //设置虚拟机,一个mq服务可以设置多个虚拟机,每一个虚拟机就相当于一个独立的mq
Connection connection = null;
Channel channel = null;
try {
//2.建立新连接
connection = connectionFactory.newConnection();
//3.创建会话通道,生产者和mq服务所有的通信都在channel通道中完成
channel = connection.createChannel();
//4.声明队列,如果队列在mq中没有要创建
//参数:String queue, boolean durable, boolean exclusive, boolean autoDelete, Map arguments
/**
* 参数明细
* 1、queue 队列名称
* 2、durable 是否持久化,如果持久化,mq重启后队列还在
* 3、exclusive 是否独占连接,队列只允许在该连接中访问,如果connection连接关闭队列则自动删除,如果将此参数设置true可用于临时队列的创建
* 4、autoDelete 自动删除,队列不再使用时是否自动删除此队列,如果将此参数和exclusive参数设置为true就可以实现临时队列(队列不用了就自动删除)
* 5、arguments 参数,可以设置一个队列的扩展参数,比如:可设置存活时间
*/
channel.queueDeclare(QUEUE,true,false,false,null);
//5.实现消费队列方法
DefaultConsumer defaultConsumer = new DefaultConsumer(channel){
/**
* 当接收到消息后此方法将被调用
* @param consumerTag 消费者标签,用来标识消费者的,在监听队列时设置channel.basicConsume
* @param envelope 信封,通过envelope
* @param properties 消息属性
* @param body 消息内容
* @throws IOException
*/
@Override
public void handleDelivery(String consumerTag, Envelope envelope, AMQP.BasicProperties properties, byte[] body) throws IOException {
//交换机
String exchange = envelope.getExchange();
//消息id,mq在channel中用来标识消息的id,可用于确认消息已接收
long deliveryTag = envelope.getDeliveryTag();
//消息内容
String message= new String(body,"utf-8");
System.out.println("receive message:"+message);
}
};
//监听队列
channel.basicConsume(QUEUE,true,defaultConsumer);
} catch (Exception e) {
e.printStackTrace();
}
}
} 17.RabbitMQ种模式
(1)订阅模式Publish/subscribe
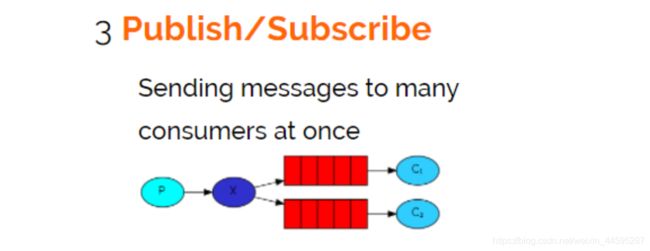
①生产者
声明Exchange_fanout_inform交换机。
声明两个队列并且绑定到此交换机,绑定时不需要指定routingkey
发送消息时不需要指定routingkey
public class Producer02_publish {
//队列名称
private static final String QUEUE_INFORM_EMAIL = "queue_inform_email";
private static final String QUEUE_INFORM_SMS = "queue_inform_sms";
private static final String EXCHANGE_FANOUT_INFORM="exchange_fanout_inform";
public static void main(String[] args) {
//通过连接工厂创建新的连接和mq建立连接
ConnectionFactory connectionFactory = new ConnectionFactory();
connectionFactory.setHost("127.0.0.1");
connectionFactory.setPort(5672);//端口
connectionFactory.setUsername("guest");
connectionFactory.setPassword("guest");
//设置虚拟机,一个mq服务可以设置多个虚拟机,每个虚拟机就相当于一个独立的mq
connectionFactory.setVirtualHost("/");
Connection connection = null;
Channel channel = null;
try {
//建立新连接
connection = connectionFactory.newConnection();
//创建会话通道,生产者和mq服务所有通信都在channel通道中完成
channel = connection.createChannel();
//声明队列,如果队列在mq 中没有则要创建
//参数:String queue, boolean durable, boolean exclusive, boolean autoDelete, Map arguments
/**
* 参数明细
* 1、queue 队列名称
* 2、durable 是否持久化,如果持久化,mq重启后队列还在
* 3、exclusive 是否独占连接,队列只允许在该连接中访问,如果connection连接关闭队列则自动删除,如果将此参数设置true可用于临时队列的创建
* 4、autoDelete 自动删除,队列不再使用时是否自动删除此队列,如果将此参数和exclusive参数设置为true就可以实现临时队列(队列不用了就自动删除)
* 5、arguments 参数,可以设置一个队列的扩展参数,比如:可设置存活时间
*/
channel.queueDeclare(QUEUE_INFORM_EMAIL,true,false,false,null);
channel.queueDeclare(QUEUE_INFORM_SMS,true,false,false,null);
//声明一个交换机
//参数:String exchange, String type
/**
* 参数明细:
* 1、交换机的名称
* 2、交换机的类型
* fanout:对应的rabbitmq的工作模式是 publish/subscribe
* direct:对应的Routing 工作模式
* topic:对应的Topics工作模式
* headers: 对应的headers工作模式
*/
channel.exchangeDeclare(EXCHANGE_FANOUT_INFORM, BuiltinExchangeType.FANOUT);
//进行交换机和队列绑定
//参数:String queue, String exchange, String routingKey
/**
* 参数明细:
* 1、queue 队列名称
* 2、exchange 交换机名称
* 3、routingKey 路由key,作用是交换机根据路由key的值将消息转发到指定的队列中,在发布订阅模式中调协为空字符串
*/
channel.queueBind(QUEUE_INFORM_EMAIL,EXCHANGE_FANOUT_INFORM,"");
channel.queueBind(QUEUE_INFORM_SMS,EXCHANGE_FANOUT_INFORM,"");
//发送消息
//参数:String exchange, String routingKey, BasicProperties props, byte[] body
/**
* 参数明细:
* 1、exchange,交换机,如果不指定将使用mq的默认交换机(设置为"")
* 2、routingKey,路由key,交换机根据路由key来将消息转发到指定的队列,如果使用默认交换机,routingKey设置为队列的名称
* 3、props,消息的属性
* 4、body,消息内容
*/
for(int i=0;i<5;i++){
//消息内容
String message = "send inform message to user";
channel.basicPublish(EXCHANGE_FANOUT_INFORM,"",null,message.getBytes());
System.out.println("send to mq "+message);
}
} catch (Exception e) {
e.printStackTrace();
} finally {
//关闭连接
//先关闭通道
try {
channel.close();
} catch (IOException e) {
e.printStackTrace();
} catch (TimeoutException e) {
e.printStackTrace();
}
try {
connection.close();
} catch (IOException e) {
e.printStackTrace();
}
}
}
} ②消费者
public class Consumer02_subscribe_email {
//队列名称
private static final String QUEUE_INFORM_EMAIL = "queue_inform_email";
private static final String EXCHANGE_FANOUT_INFORM="exchange_fanout_inform";
public static void main(String[] args) throws IOException, TimeoutException {
//通过连接工厂创建新的连接和mq建立连接
ConnectionFactory connectionFactory = new ConnectionFactory();
connectionFactory.setHost("127.0.0.1");
connectionFactory.setPort(5672);//端口
connectionFactory.setUsername("guest");
connectionFactory.setPassword("guest");
//设置虚拟机,一个mq服务可以设置多个虚拟机,每个虚拟机就相当于一个独立的mq
connectionFactory.setVirtualHost("/");
//建立新连接
Connection connection = connectionFactory.newConnection();
//创建会话通道,生产者和mq服务所有通信都在channel通道中完成
Channel channel = connection.createChannel();
/**
* 参数明细
* 1、queue 队列名称
* 2、durable 是否持久化,如果持久化,mq重启后队列还在
* 3、exclusive 是否独占连接,队列只允许在该连接中访问,如果connection连接关闭队列则自动删除,如果将此参数设置true可用于临时队列的创建
* 4、autoDelete 自动删除,队列不再使用时是否自动删除此队列,如果将此参数和exclusive参数设置为true就可以实现临时队列(队列不用了就自动删除)
* 5、arguments 参数,可以设置一个队列的扩展参数,比如:可设置存活时间
*/
channel.queueDeclare(QUEUE_INFORM_EMAIL,true,false,false,null);
//声明一个交换机
//参数:String exchange, String type
/**
* 参数明细:
* 1、交换机的名称
* 2、交换机的类型
* fanout:对应的rabbitmq的工作模式是 publish/subscribe
* direct:对应的Routing 工作模式
* topic:对应的Topics工作模式
* headers: 对应的headers工作模式
*/
channel.exchangeDeclare(EXCHANGE_FANOUT_INFORM, BuiltinExchangeType.FANOUT);
//进行交换机和队列绑定
//参数:String queue, String exchange, String routingKey
/**
* 参数明细:
* 1、queue 队列名称
* 2、exchange 交换机名称
* 3、routingKey 路由key,作用是交换机根据路由key的值将消息转发到指定的队列中,在发布订阅模式中调协为空字符串
*/
channel.queueBind(QUEUE_INFORM_EMAIL, EXCHANGE_FANOUT_INFORM, "");
//实现消费方法
DefaultConsumer defaultConsumer = new DefaultConsumer(channel){
/**
* 当接收到消息后此方法将被调用
* @param consumerTag 消费者标签,用来标识消费者的,在监听队列时设置channel.basicConsume
* @param envelope 信封,通过envelope
* @param properties 消息属性
* @param body 消息内容
* @throws IOException
*/
@Override
public void handleDelivery(String consumerTag, Envelope envelope, AMQP.BasicProperties properties, byte[] body) throws IOException {
//交换机
String exchange = envelope.getExchange();
//消息id,mq在channel中用来标识消息的id,可用于确认消息已接收
long deliveryTag = envelope.getDeliveryTag();
//消息内容
String message= new String(body,"utf-8");
System.out.println("receive message:"+message);
}
};
//监听队列
//参数:String queue, boolean autoAck, Consumer callback
/**
* 参数明细:
* 1、queue 队列名称
* 2、autoAck 自动回复,当消费者接收到消息后要告诉mq消息已接收,如果将此参数设置为tru表示会自动回复mq,如果设置为false要通过编程实现回复
* 3、callback,消费方法,当消费者接收到消息要执行的方法
*/
channel.basicConsume(QUEUE_INFORM_EMAIL,true,defaultConsumer);
}
}短信发送消费者参考上边的邮件发送消费者代码编写。
(2)路由模式Routing
①生产者
声明exchange_routing_inform交换机。
声明两个队列并且绑定到此交换机,绑定时需要指定routingkey
发送消息时需要指定routingkey
public class Producer03_routing {
//队列名称
private static final String QUEUE_INFORM_EMAIL = "queue_inform_email";
private static final String QUEUE_INFORM_SMS = "queue_inform_sms";
private static final String EXCHANGE_ROUTING_INFORM="exchange_routing_inform";
private static final String ROUTINGKEY_EMAIL="inform_email";
private static final String ROUTINGKEY_SMS="inform_sms";
public static void main(String[] args) {
//通过连接工厂创建新的连接和mq建立连接
ConnectionFactory connectionFactory = new ConnectionFactory();
connectionFactory.setHost("127.0.0.1");
connectionFactory.setPort(5672);//端口
connectionFactory.setUsername("guest");
connectionFactory.setPassword("guest");
//设置虚拟机,一个mq服务可以设置多个虚拟机,每个虚拟机就相当于一个独立的mq
connectionFactory.setVirtualHost("/");
Connection connection = null;
Channel channel = null;
try {
//建立新连接
connection = connectionFactory.newConnection();
//创建会话通道,生产者和mq服务所有通信都在channel通道中完成
channel = connection.createChannel();
//声明队列,如果队列在mq 中没有则要创建
//参数:String queue, boolean durable, boolean exclusive, boolean autoDelete, Map arguments
/**
* 参数明细
* 1、queue 队列名称
* 2、durable 是否持久化,如果持久化,mq重启后队列还在
* 3、exclusive 是否独占连接,队列只允许在该连接中访问,如果connection连接关闭队列则自动删除,如果将此参数设置true可用于临时队列的创建
* 4、autoDelete 自动删除,队列不再使用时是否自动删除此队列,如果将此参数和exclusive参数设置为true就可以实现临时队列(队列不用了就自动删除)
* 5、arguments 参数,可以设置一个队列的扩展参数,比如:可设置存活时间
*/
channel.queueDeclare(QUEUE_INFORM_EMAIL,true,false,false,null);
channel.queueDeclare(QUEUE_INFORM_SMS,true,false,false,null);
//声明一个交换机
//参数:String exchange, String type
/**
* 参数明细:
* 1、交换机的名称
* 2、交换机的类型
* fanout:对应的rabbitmq的工作模式是 publish/subscribe
* direct:对应的Routing 工作模式
* topic:对应的Topics工作模式
* headers: 对应的headers工作模式
*/
channel.exchangeDeclare(EXCHANGE_ROUTING_INFORM, BuiltinExchangeType.DIRECT);
//进行交换机和队列绑定
//参数:String queue, String exchange, String routingKey
/**
* 参数明细:
* 1、queue 队列名称
* 2、exchange 交换机名称
* 3、routingKey 路由key,作用是交换机根据路由key的值将消息转发到指定的队列中,在发布订阅模式中调协为空字符串
*/
channel.queueBind(QUEUE_INFORM_EMAIL,EXCHANGE_ROUTING_INFORM,ROUTINGKEY_EMAIL);
channel.queueBind(QUEUE_INFORM_EMAIL,EXCHANGE_ROUTING_INFORM,"inform");
channel.queueBind(QUEUE_INFORM_SMS,EXCHANGE_ROUTING_INFORM,ROUTINGKEY_SMS);
channel.queueBind(QUEUE_INFORM_SMS,EXCHANGE_ROUTING_INFORM,"inform");
//发送消息
//参数:String exchange, String routingKey, BasicProperties props, byte[] body
/**
* 参数明细:
* 1、exchange,交换机,如果不指定将使用mq的默认交换机(设置为"")
* 2、routingKey,路由key,交换机根据路由key来将消息转发到指定的队列,如果使用默认交换机,routingKey设置为队列的名称
* 3、props,消息的属性
* 4、body,消息内容
*/
/* for(int i=0;i<5;i++){
//发送消息的时候指定routingKey
String message = "send email inform message to user";
channel.basicPublish(EXCHANGE_ROUTING_INFORM,ROUTINGKEY_EMAIL,null,message.getBytes());
System.out.println("send to mq "+message);
}
for(int i=0;i<5;i++){
//发送消息的时候指定routingKey
String message = "send sms inform message to user";
channel.basicPublish(EXCHANGE_ROUTING_INFORM,ROUTINGKEY_SMS,null,message.getBytes());
System.out.println("send to mq "+message);
}*/
for(int i=0;i<5;i++){
//发送消息的时候指定routingKey
String message = "send inform message to user";
channel.basicPublish(EXCHANGE_ROUTING_INFORM,"inform",null,message.getBytes());
System.out.println("send to mq "+message);
}
} catch (Exception e) {
e.printStackTrace();
} finally {
//关闭连接
//先关闭通道
try {
channel.close();
} catch (IOException e) {
e.printStackTrace();
} catch (TimeoutException e) {
e.printStackTrace();
}
try {
connection.close();
} catch (IOException e) {
e.printStackTrace();
}
}
}
} ②邮件发送消费者
public class Consumer03_routing_email {
//队列名称
private static final String QUEUE_INFORM_EMAIL = "queue_inform_email";
private static final String EXCHANGE_ROUTING_INFORM="exchange_routing_inform";
private static final String ROUTINGKEY_EMAIL="inform_email";
public static void main(String[] args) throws IOException, TimeoutException {
//通过连接工厂创建新的连接和mq建立连接
ConnectionFactory connectionFactory = new ConnectionFactory();
connectionFactory.setHost("127.0.0.1");
connectionFactory.setPort(5672);//端口
connectionFactory.setUsername("guest");
connectionFactory.setPassword("guest");
//设置虚拟机,一个mq服务可以设置多个虚拟机,每个虚拟机就相当于一个独立的mq
connectionFactory.setVirtualHost("/");
//建立新连接
Connection connection = connectionFactory.newConnection();
//创建会话通道,生产者和mq服务所有通信都在channel通道中完成
Channel channel = connection.createChannel();
/**
* 参数明细
* 1、queue 队列名称
* 2、durable 是否持久化,如果持久化,mq重启后队列还在
* 3、exclusive 是否独占连接,队列只允许在该连接中访问,如果connection连接关闭队列则自动删除,如果将此参数设置true可用于临时队列的创建
* 4、autoDelete 自动删除,队列不再使用时是否自动删除此队列,如果将此参数和exclusive参数设置为true就可以实现临时队列(队列不用了就自动删除)
* 5、arguments 参数,可以设置一个队列的扩展参数,比如:可设置存活时间
*/
channel.queueDeclare(QUEUE_INFORM_EMAIL,true,false,false,null);
//声明一个交换机
//参数:String exchange, String type
/**
* 参数明细:
* 1、交换机的名称
* 2、交换机的类型
* fanout:对应的rabbitmq的工作模式是 publish/subscribe
* direct:对应的Routing 工作模式
* topic:对应的Topics工作模式
* headers: 对应的headers工作模式
*/
channel.exchangeDeclare(EXCHANGE_ROUTING_INFORM, BuiltinExchangeType.DIRECT);
//进行交换机和队列绑定
//参数:String queue, String exchange, String routingKey
/**
* 参数明细:
* 1、queue 队列名称
* 2、exchange 交换机名称
* 3、routingKey 路由key,作用是交换机根据路由key的值将消息转发到指定的队列中,在发布订阅模式中调协为空字符串
*/
channel.queueBind(QUEUE_INFORM_EMAIL, EXCHANGE_ROUTING_INFORM,ROUTINGKEY_EMAIL);
//实现消费方法
DefaultConsumer defaultConsumer = new DefaultConsumer(channel){
/**
* 当接收到消息后此方法将被调用
* @param consumerTag 消费者标签,用来标识消费者的,在监听队列时设置channel.basicConsume
* @param envelope 信封,通过envelope
* @param properties 消息属性
* @param body 消息内容
* @throws IOException
*/
@Override
public void handleDelivery(String consumerTag, Envelope envelope, AMQP.BasicProperties properties, byte[] body) throws IOException {
//交换机
String exchange = envelope.getExchange();
//消息id,mq在channel中用来标识消息的id,可用于确认消息已接收
long deliveryTag = envelope.getDeliveryTag();
//消息内容
String message= new String(body,"utf-8");
System.out.println("receive message:"+message);
}
};
//监听队列
//参数:String queue, boolean autoAck, Consumer callback
/**
* 参数明细:
* 1、queue 队列名称
* 2、autoAck 自动回复,当消费者接收到消息后要告诉mq消息已接收,如果将此参数设置为tru表示会自动回复mq,如果设置为false要通过编程实现回复
* 3、callback,消费方法,当消费者接收到消息要执行的方法
*/
channel.basicConsume(QUEUE_INFORM_EMAIL,true,defaultConsumer);
}
}短信发送消费者参考邮件发送消费者的代码流程,编写短信通知的代码。
(3)通配符模式Topics
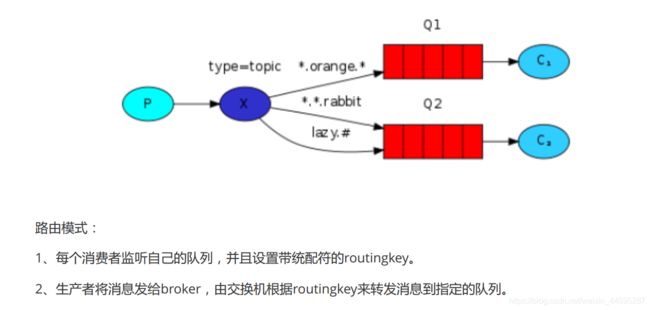
①生产者
声明交换机,指定topic类型:
public class Producer04_topics {
//队列名称
private static final String QUEUE_INFORM_EMAIL = "queue_inform_email";
private static final String QUEUE_INFORM_SMS = "queue_inform_sms";
private static final String EXCHANGE_TOPICS_INFORM="exchange_topics_inform";
private static final String ROUTINGKEY_EMAIL="inform.#.email.#";
private static final String ROUTINGKEY_SMS="inform.#.sms.#";
public static void main(String[] args) {
//通过连接工厂创建新的连接和mq建立连接
ConnectionFactory connectionFactory = new ConnectionFactory();
connectionFactory.setHost("127.0.0.1");
connectionFactory.setPort(5672);//端口
connectionFactory.setUsername("guest");
connectionFactory.setPassword("guest");
//设置虚拟机,一个mq服务可以设置多个虚拟机,每个虚拟机就相当于一个独立的mq
connectionFactory.setVirtualHost("/");
Connection connection = null;
Channel channel = null;
try {
//建立新连接
connection = connectionFactory.newConnection();
//创建会话通道,生产者和mq服务所有通信都在channel通道中完成
channel = connection.createChannel();
//声明队列,如果队列在mq 中没有则要创建
//参数:String queue, boolean durable, boolean exclusive, boolean autoDelete, Map arguments
/**
* 参数明细
* 1、queue 队列名称
* 2、durable 是否持久化,如果持久化,mq重启后队列还在
* 3、exclusive 是否独占连接,队列只允许在该连接中访问,如果connection连接关闭队列则自动删除,如果将此参数设置true可用于临时队列的创建
* 4、autoDelete 自动删除,队列不再使用时是否自动删除此队列,如果将此参数和exclusive参数设置为true就可以实现临时队列(队列不用了就自动删除)
* 5、arguments 参数,可以设置一个队列的扩展参数,比如:可设置存活时间
*/
channel.queueDeclare(QUEUE_INFORM_EMAIL,true,false,false,null);
channel.queueDeclare(QUEUE_INFORM_SMS,true,false,false,null);
//声明一个交换机
//参数:String exchange, String type
/**
* 参数明细:
* 1、交换机的名称
* 2、交换机的类型
* fanout:对应的rabbitmq的工作模式是 publish/subscribe
* direct:对应的Routing 工作模式
* topic:对应的Topics工作模式
* headers: 对应的headers工作模式
*/
channel.exchangeDeclare(EXCHANGE_TOPICS_INFORM, BuiltinExchangeType.TOPIC);
//进行交换机和队列绑定
//参数:String queue, String exchange, String routingKey
/**
* 参数明细:
* 1、queue 队列名称
* 2、exchange 交换机名称
* 3、routingKey 路由key,作用是交换机根据路由key的值将消息转发到指定的队列中,在发布订阅模式中调协为空字符串
*/
channel.queueBind(QUEUE_INFORM_EMAIL,EXCHANGE_TOPICS_INFORM,ROUTINGKEY_EMAIL);
channel.queueBind(QUEUE_INFORM_SMS,EXCHANGE_TOPICS_INFORM,ROUTINGKEY_SMS);
//发送消息
//参数:String exchange, String routingKey, BasicProperties props, byte[] body
/**
* 参数明细:
* 1、exchange,交换机,如果不指定将使用mq的默认交换机(设置为"")
* 2、routingKey,路由key,交换机根据路由key来将消息转发到指定的队列,如果使用默认交换机,routingKey设置为队列的名称
* 3、props,消息的属性
* 4、body,消息内容
*/
for(int i=0;i<5;i++){
//发送消息的时候指定routingKey
String message = "send email inform message to user";
channel.basicPublish(EXCHANGE_TOPICS_INFORM,"inform.email",null,message.getBytes());
System.out.println("send to mq "+message);
}
for(int i=0;i<5;i++){
//发送消息的时候指定routingKey
String message = "send sms inform message to user";
channel.basicPublish(EXCHANGE_TOPICS_INFORM,"inform.sms",null,message.getBytes());
System.out.println("send to mq "+message);
}
for(int i=0;i<5;i++){
//发送消息的时候指定routingKey
String message = "send sms and email inform message to user";
channel.basicPublish(EXCHANGE_TOPICS_INFORM,"inform.sms.email",null,message.getBytes());
System.out.println("send to mq "+message);
}
} catch (Exception e) {
e.printStackTrace();
} finally {
//关闭连接
//先关闭通道
try {
channel.close();
} catch (IOException e) {
e.printStackTrace();
} catch (TimeoutException e) {
e.printStackTrace();
}
try {
connection.close();
} catch (IOException e) {
e.printStackTrace();
}
}
}
}
②消费端
队列绑定交换机指定通配符:
统配符规则:
中间以“.”分隔。
符号#可以匹配多个词,符号*可以匹配一个词语。
public class Consumer04_topics_email {
//队列名称
private static final String QUEUE_INFORM_EMAIL = "queue_inform_email";
private static final String EXCHANGE_TOPICS_INFORM="exchange_topics_inform";
private static final String ROUTINGKEY_EMAIL="inform.#.email.#";
public static void main(String[] args) throws IOException, TimeoutException {
//通过连接工厂创建新的连接和mq建立连接
ConnectionFactory connectionFactory = new ConnectionFactory();
connectionFactory.setHost("127.0.0.1");
connectionFactory.setPort(5672);//端口
connectionFactory.setUsername("guest");
connectionFactory.setPassword("guest");
//设置虚拟机,一个mq服务可以设置多个虚拟机,每个虚拟机就相当于一个独立的mq
connectionFactory.setVirtualHost("/");
//建立新连接
Connection connection = connectionFactory.newConnection();
//创建会话通道,生产者和mq服务所有通信都在channel通道中完成
Channel channel = connection.createChannel();
/**
* 参数明细
* 1、queue 队列名称
* 2、durable 是否持久化,如果持久化,mq重启后队列还在
* 3、exclusive 是否独占连接,队列只允许在该连接中访问,如果connection连接关闭队列则自动删除,如果将此参数设置true可用于临时队列的创建
* 4、autoDelete 自动删除,队列不再使用时是否自动删除此队列,如果将此参数和exclusive参数设置为true就可以实现临时队列(队列不用了就自动删除)
* 5、arguments 参数,可以设置一个队列的扩展参数,比如:可设置存活时间
*/
channel.queueDeclare(QUEUE_INFORM_EMAIL,true,false,false,null);
//声明一个交换机
//参数:String exchange, String type
/**
* 参数明细:
* 1、交换机的名称
* 2、交换机的类型
* fanout:对应的rabbitmq的工作模式是 publish/subscribe
* direct:对应的Routing 工作模式
* topic:对应的Topics工作模式
* headers: 对应的headers工作模式
*/
channel.exchangeDeclare(EXCHANGE_TOPICS_INFORM, BuiltinExchangeType.TOPIC);
//进行交换机和队列绑定
//参数:String queue, String exchange, String routingKey
/**
* 参数明细:
* 1、queue 队列名称
* 2、exchange 交换机名称
* 3、routingKey 路由key,作用是交换机根据路由key的值将消息转发到指定的队列中,在发布订阅模式中调协为空字符串
*/
channel.queueBind(QUEUE_INFORM_EMAIL, EXCHANGE_TOPICS_INFORM,ROUTINGKEY_EMAIL);
//实现消费方法
DefaultConsumer defaultConsumer = new DefaultConsumer(channel){
/**
* 当接收到消息后此方法将被调用
* @param consumerTag 消费者标签,用来标识消费者的,在监听队列时设置channel.basicConsume
* @param envelope 信封,通过envelope
* @param properties 消息属性
* @param body 消息内容
* @throws IOException
*/
@Override
public void handleDelivery(String consumerTag, Envelope envelope, AMQP.BasicProperties properties, byte[] body) throws IOException {
//交换机
String exchange = envelope.getExchange();
//消息id,mq在channel中用来标识消息的id,可用于确认消息已接收
long deliveryTag = envelope.getDeliveryTag();
//消息内容
String message= new String(body,"utf-8");
System.out.println("receive message:"+message);
}
};
//监听队列
//参数:String queue, boolean autoAck, Consumer callback
/**
* 参数明细:
* 1、queue 队列名称
* 2、autoAck 自动回复,当消费者接收到消息后要告诉mq消息已接收,如果将此参数设置为tru表示会自动回复mq,如果设置为false要通过编程实现回复
* 3、callback,消费方法,当消费者接收到消息要执行的方法
*/
channel.basicConsume(QUEUE_INFORM_EMAIL,true,defaultConsumer);
}
}(4)Header模式
header模式与routing不同的地方在于,header模式取消routingkey,使用header中的 key/value(键值对)匹配队列
①生产者
队列与交换机绑定的代码与之前不同,如下:
Map headers_email = new Hashtable();
headers_email.put("inform_type", "email");
Map headers_sms = new Hashtable();
headers_sms.put("inform_type", "sms");
channel.queueBind(QUEUE_INFORM_EMAIL,EXCHANGE_HEADERS_INFORM,"",headers_email);
channel.queueBind(QUEUE_INFORM_SMS,EXCHANGE_HEADERS_INFORM,"",headers_sms); 通知:
String message = "email inform to user"+i;
Map headers = new Hashtable();
headers.put("inform_type", "email");//匹配email通知消费者绑定的header
//headers.put("inform_type", "sms");//匹配sms通知消费者绑定的header
AMQP.BasicProperties.Builder properties = new AMQP.BasicProperties.Builder();
properties.headers(headers);
//Email通知
channel.basicPublish(EXCHANGE_HEADERS_INFORM, "", properties.build(), message.getBytes()); ②发送邮件消费者
channel.exchangeDeclare(EXCHANGE_HEADERS_INFORM, BuiltinExchangeType.HEADERS);
Map headers_email = new Hashtable();
headers_email.put("inform_email", "email");
//交换机和队列绑定
channel.queueBind(QUEUE_INFORM_EMAIL,EXCHANGE_HEADERS_INFORM,"",headers_email);
//指定消费队列
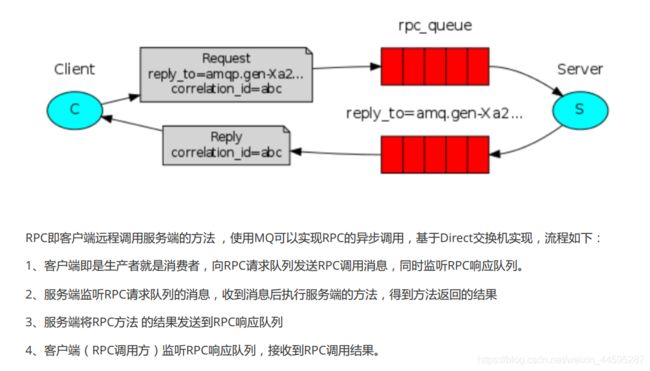
channel.basicConsume(QUEUE_INFORM_EMAIL, true, consumer); (5)客户端远程调用服务端RPC
18.Spring整合RibbitMQ
(1)搭建SpringBoot环境
org.springframework.boot
spring-boot-starter-amqp
org.springframework.boot
spring-boot-starter-test
org.springframework.boot
spring-boot-starter-logging
(2)配置application.yml
server:
port: 44001
spring:
application:
name: test-rabbitmq-producer
rabbitmq:
host: 127.0.0.1
port: 5672
username: guest
password: guest
virtualHost: /(3)定义RabbitConfig类,配置Exchange、Queue、及绑定交换机。
@Configuration
public class RabbitmqConfig {
public static final String QUEUE_INFORM_EMAIL = "queue_inform_email"; //队列
public static final String QUEUE_INFORM_SMS = "queue_inform_sms";
public static final String EXCHANGE_TOPICS_INFORM="exchange_topics_inform"; //交换机
public static final String ROUTINGKEY_EMAIL="inform.#.email.#";
public static final String ROUTINGKEY_SMS="inform.#.sms.#"; //routingkey
//1.声明交换机"exchange_topics_inform"
@Bean(EXCHANGE_TOPICS_INFORM)
public Exchange EXCHANGE_TOPICS_INFORM(){
//设置交换机为通配符模式topic
return ExchangeBuilder.topicExchange(EXCHANGE_TOPICS_INFORM).durable(true).build();//durable(true) 持久化,mq重启之后交换机还在
}
//2.1声明QUEUE_INFORM_EMAIL队列
@Bean(QUEUE_INFORM_EMAIL)
public Queue QUEUE_INFORM_EMAIL(){
return new Queue(QUEUE_INFORM_EMAIL);
}
//2.21QUEUE_INFORM_EMAIL队列绑定交换机,指定routingkey
@Bean
public Binding BINDING_QUEUE_INFORM_EMAIL(@Qualifier(QUEUE_INFORM_EMAIL) Queue queue, @Qualifier(EXCHANGE_TOPICS_INFORM) Exchange exchange){ //@Qualifier注入
return BindingBuilder.bind(queue).to(exchange).with(ROUTINGKEY_EMAIL).noargs();
}
//3.1声明QUEUE_INFORM_SMS队列
@Bean(QUEUE_INFORM_SMS)
public Queue QUEUE_INFORM_SMSL(){
return new Queue(QUEUE_INFORM_SMS);
}
//3.2QUEUE_INFORM_SMS队列绑定交换机,指定routingkey
@Bean
public Binding BINDING_QUEUE_INFORM_SMS(@Qualifier(QUEUE_INFORM_SMS) Queue queue, @Qualifier(EXCHANGE_TOPICS_INFORM) Exchange exchange){ //@Qualifier注入
return BindingBuilder.bind(queue).to(exchange).with(ROUTINGKEY_SMS).noargs();
}
}(4)生产端
//使用rabbitTemplate发送Email
@Test
public void testSendEmail(){
String message = "send email message to user";
/**
* 参数:
* 1、交换机名称
* 2、routingKey
* 3、消息内容
*/
rabbitTemplate.convertAndSend(RabbitmqConfig.EXCHANGE_TOPICS_INFORM,"inform.email",message);
System.out.println("Send Message is:'" + message + "'");
}
//使用rabbitTemplate发送SMS
@Test
public void testSendSMS(){
String message = "send SMS message to user";
/**
* 参数:
* 1、交换机名称
* 2、routingKey
* 3、消息内容
*/
rabbitTemplate.convertAndSend(RabbitmqConfig.EXCHANGE_TOPICS_INFORM,"inform.sms",message);
System.out.println("Send Message is:'" + message + "'");
}(5)消费端
@Component
public class ReceiveHandler {
//监听email队列
@RabbitListener(queues = {RabbitmqConfig.QUEUE_INFORM_EMAIL})
public void receive_email(String msg,Message message,Channel channel){
System.out.println(msg);
}
//监听sms队列
@RabbitListener(queues = {RabbitmqConfig.QUEUE_INFORM_SMS})
public void receive_sms(String msg,Message message,Channel channel){
System.out.println(msg);
}
}19.页面发布
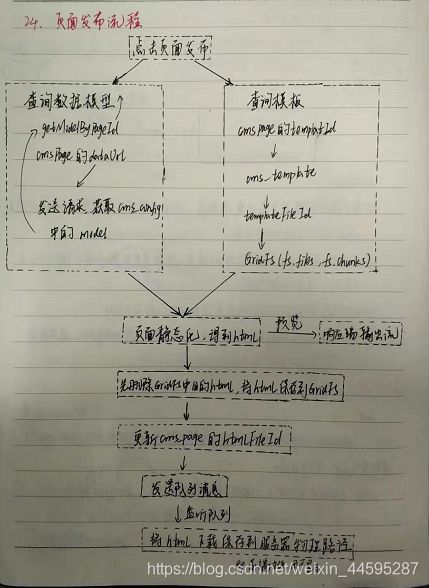
(1)页面生产
①配置文件application.yml
server:
port: 31001
spring:
application:
name: xc-service-manage-cms
data:
mongodb:
uri: mongodb://root:[email protected]:27017
# uri: mongodb://root:[email protected]:27017
database: xc_cms
rabbitmq:
host: 127.0.0.1
port: 5672
username: guest
password: guest
virtualHost: /
freemarker:
cache: false #关闭模板缓存,方便测试
settings:
template_update_delay: 0 #检查模板更新延迟时间,设置为0表示立即检查,如果时间大于0会有缓存不方便进行模板测试②RabbitMQConfig配置
由于cms作为页面发布方要面对很多不同站点的服务器,面对很多页面发布队列,所以这里不再配置队列,只需要
配置交换机即可。
@Configuration
public class RabbitmqConfig {
public static final String EX_ROUTING_CMS_POSTPAGE="ex_routing_cms_postpage"; //交换机
//1.声明交换机"ex_routing_cms_postpage"
@Bean(EX_ROUTING_CMS_POSTPAGE)
public Exchange EXCHANEX_ROUTING_CMS_POSTPAGEGE_TOPICS_INFORM(){
//设置交换机为通配符模式topic
return ExchangeBuilder.directExchange(EX_ROUTING_CMS_POSTPAGE).durable(true).build();//durable(true) 持久化,mq重启之后交换机还在
}
}③CmsPageController.java
@Override
@PostMapping("/postPage/{pageId}")
public ResponseResult post(@PathVariable("pageId") String pageId) {
return pageService.postPage(pageId);
}④PageService.java
//页面发布
public ResponseResult postPage(String pageId){
//1.执行静态化
String pageHtml = this.getPageHtml(pageId);
if (StringUtils.isEmpty(pageHtml)){
ExceptionCast.cast(CmsCode.CMS_GENERATEHTML_HTMLISNULL);
}
//2.保存静态化文件到Gridfs
CmsPage cmsPage = this.saveHtml(pageId, pageHtml);
//3.消息队列发送消息
this.sendPostPage(pageId);
return new ResponseResult(CommonCode.SUCCESS);
}
//1.页面静态化
public String getPageHtml(String pageId){
//1.1获取页面模型数据
Map model = this.getModelByPPageId(pageId);
if(model == null){
//根据页面的数据url获取不到数据
ExceptionCast.cast(CmsCode.CMS_GENERATEHTML_DATAISNULL);
}
//1.2.获取页面模板
String templateContent = this.getTemplateByPageId(pageId);
if (templateContent==null){
//页面模板为空
ExceptionCast.cast(CmsCode.CMS_GENERATEHTML_TEMPLATEISNULL);
}
//1.3.执行静态化,将模型数据融入到页面模板
String html = this.generateHtml(templateContent, model);
if (StringUtils.isEmpty(html)){
ExceptionCast.cast(CmsCode.CMS_GENERATEHTML_HTMLISNULL);
}
return html;
}
//1.1获取页面模型数据
public Map getModelByPPageId(String pageId){
CmsPage cmsPage = this.getById(pageId);
if(cmsPage == null){
ExceptionCast.cast(CmsCode.CMS_PAGE_NOTEXISTS);
}
//取出dataUrl
String dataUrl = cmsPage.getDataUrl(); // "dataUrl" : "http://localhost:40200/portalview/course/getpre/4028e58161bd3b380161bd3bcd2f0000"
if(StringUtils.isEmpty(dataUrl)){
ExceptionCast.cast(CmsCode.CMS_GENERATEHTML_DATAURLISNULL);
}
ResponseEntity(2)发布消费方,xc-service-manage-cms-client工程
①配置文件application.yml
server:
port: 31000
spring:
application:
name: xc-service-manage-cms-client
data:
mongodb:
uri: mongodb://root:[email protected]:27017
# uri: mongodb://root:[email protected]:27017
database: xc_cms
rabbitmq:
host: 127.0.0.1
port: 5672
username: guest
password: guest
virtualHost: /
xuecheng:
mq:
#cms客户端监控的队列名称(不同的客户端监控的队列不能重复)
queue: queue_cms_postpage_01
routingKey: 5a751fab6abb5044e0d19ea1 #此routingKey为门户站点ID②配置交换机和队列,RabbitmqConfig
@Configuration
public class RabbitmqConfig {
public static final String QUEUE_CMS_POSTPAGE = "queue_cms_postpage"; //队列,QUEUE_CMS_POSTPAGE相当于代号,供注入使用
public static final String EX_ROUTING_CMS_POSTPAGE="ex_routing_cms_postpage"; //交换机
//1.绑定配置文件里的值
//队列的名称
@Value("${xuecheng.mq.queue}")
public String queue_cms_postpage_name; //queue_cms_postpage_name,队列的名称
//routingkey
@Value("${xuecheng.mq.routingkey}")
public String routingkey;
//2.声明交换机使用direct类型
@Bean(EX_ROUTING_CMS_POSTPAGE)
public Exchange EXCHANGE_DIRECT_INFORM(){
//设置交换机为通配符模式topic
return ExchangeBuilder.directExchange(EX_ROUTING_CMS_POSTPAGE).durable(true).build();//durable(true) 持久化,mq重启之后交换机还在
}
//3.声明QUEUE_CMS_POSTPAGE队列
@Bean(QUEUE_CMS_POSTPAGE)
public Queue QUEUE_CMS_POSTPAGE(){
return new Queue(queue_cms_postpage_name);
}
//4.QUEUE_INFORM_SMS队列绑定交换机,指定routingkey
@Bean
public Binding BINDING_QUEUE_INFORM_SMS(@Qualifier(QUEUE_CMS_POSTPAGE) Queue queue, @Qualifier(EX_ROUTING_CMS_POSTPAGE) Exchange exchange){ //@Qualifier注入
return BindingBuilder.bind(queue).to(exchange).with(routingkey).noargs();
}
}③打开下载流,MongoConfig.java
@Configuration
public class MongoConfig {

    @Value("${spring.data.mongodb.database}")  //application.yml中指定的数据库
            String db;

    //打开下载流
    @Bean
    public GridFSBucket getGridFSBucket(MongoClient mongoClient){
        MongoDatabase database = mongoClient.getDatabase(db);
        GridFSBucket bucket = GridFSBuckets.create(database);
        return bucket;
    }
}④消费队列,处理消息,ConsumerPostPage.java
@Component
public class ConsumerPostPage {
    //记录日志
    private static final Logger LOGGER = LoggerFactory.getLogger(ConsumerPostPage.class);

    @Autowired
    CmsPageRepository cmsPageRepository;

    @Autowired
    PageService pageService;

    @RabbitListener(queues = {"${xuecheng.mq.queue}"})
    public void postPage(String msg){
        //解析消息
        Map map = JSON.parseObject(msg, Map.class);
        LOGGER.info("receive cms post page:{}",msg);
        //取出页面id
        String pageId = (String) map.get("pageId");
        //先判断页面信息是否存在
        Optional optional = cmsPageRepository.findById(pageId);
        if(!optional.isPresent()){
            LOGGER.error("receive cms post page,cmsPage is null:{}",msg.toString());
            return ;
        }

        //将页面保存到服务器物理路径
        pageService.savePageToServerPath(pageId);
    }
}
⑤PageService.java
@Service
public class PageService {

    @Autowired
    CmsPageRepository cmsPageRepository;

    @Autowired
    CmsSiteRepository cmsSiteRepository;

    @Autowired
    GridFsTemplate gridFsTemplate;

    @Autowired
    GridFSBucket gridFSBucket;

    //保存html页面到服务器物理路径
    public void savePageToServerPath(String pageId){
        Optional optional = cmsPageRepository.findById(pageId);
        if (!optional.isPresent()){
            ExceptionCast.cast(CmsCode.CMS_PAGE_NOTEXISTS);
        }
        CmsPage cmsPage = optional.get();
        //根据siteId得到cmssite
        CmsSite cmsSite = this.getCmsSiteById(cmsPage.getSiteId());

        //页面物理路径
        String pagePath = cmsSite.getSitePhysicalPath() + cmsPage.getPagePhysicalPath() + cmsPage.getPageWebPath();

        //查询静态文件,将数据库中文件下载保存到物理路径
        String htmlFileId = cmsPage.getHtmlFileId();
        InputStream inputStream = this.getFileById(htmlFileId);
        if(inputStream==null){
            ExceptionCast.cast(CmsCode.CMS_GENERATEHTML_HTMLISNULL);
        }
        FileOutputStream fileOutputStream = null;
        try {
            fileOutputStream = new FileOutputStream(new File(pagePath));
            IOUtils.copy(inputStream,fileOutputStream);
        } catch (Exception e) {
            e.printStackTrace();
        }finally {
            try {
                //关闭流
                inputStream.close();
            } catch (IOException e) {
                e.printStackTrace();
            }
            try {
                fileOutputStream.close();
            } catch (IOException e) {
                e.printStackTrace();
            }
        }
    }

    //根据站点id得到站点
    public CmsSite getCmsSiteById(String siteId){
        Optional optional = cmsSiteRepository.findById(siteId);
        if (optional.isPresent()){
            CmsSite cmsSite = optional.get();
            return cmsSite;
        }
        return null;
    }

    //根据文件id获取文件内容
    public InputStream getFileById(String fileId){
        try {
            //根据id查询文件
            GridFSFile gridFSFile = gridFsTemplate.findOne(Query.query(Criteria.where("_id").is(fileId)));

            //打开下载流对象
            GridFSDownloadStream gridFSDownloadStream = gridFSBucket.openDownloadStream(gridFSFile.getObjectId());

            //创建girdFsResource,用于获取流对象
            GridFsResource gridFsResource = new GridFsResource(gridFSFile, gridFSDownloadStream);

            return gridFsResource.getInputStream();
        } catch (IOException e) {
            e.printStackTrace();
        }
        return null;
    }

}
(3)前端页面
  postPage: function (pageId) {
	this.$confirm('您确认发布吗?', '提示', {}).then(() => {
	  //调用服务端接口
	  cmsApi.page_postPage(pageId).then(res => {
		if (res.success) {
		  console.log('发布页面id=' + pageId);
		  this.$message.success("发布成功")
		  //刷新页面
		  // this.query()
		} else {
		  this.$message.error("发布失败")
		}
	  })
	})
  }
①②③④⑤⑥⑦⑧⑨⑩
