SpringCloud第六篇-Zuul
Zuul简介
Zuul可以通过加载动态过滤机制,从而实现以下各项功能:
- 验证与安全保障: 识别面向各类资源的验证要求并拒绝那些与要求不符的请求。
- 审查与监控: 在边缘位置追踪有意义数据及统计结果,从而为我们带来准确的生产状态结论。
- 动态路由: 以动态方式根据需要将请求路由至不同后端集群处。
- 压力测试: 逐渐增加指向集群的负载流量,从而计算性能水平。
- 负载分配: 为每一种负载类型分配对应容量,并弃用超出限定值的请求。
- 静态响应处理: 在边缘位置直接建立部分响应,从而避免其流入内部集群。
- 多区域弹性: 跨越AWS区域进行请求路由,旨在实现ELB使用多样化并保证边缘位置与使用者尽可能接近。
除此之外,Netflix公司还利用Zuul的功能通过金丝雀版本实现精确路由与压力测试。
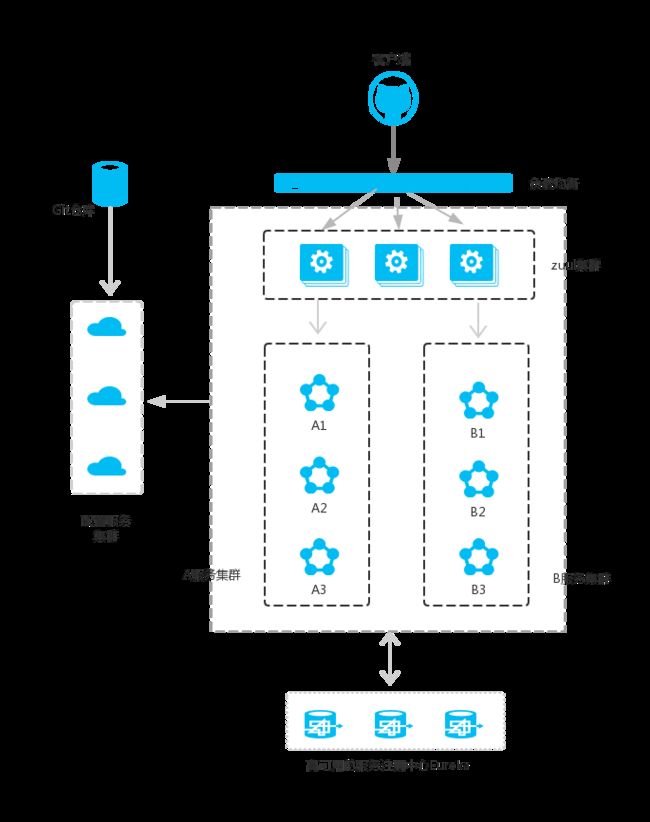
在微服务架构中,需要几个基础的服务治理组件,包括服务注册与发现、服务消费、负载均衡、断路器、智能路由、配置管理等,由这几个基础组件相互协作,共同组建了一个简单的微服务系统。一个简答的微服务系统如下图:

注意:A服务和B服务是可以相互调用的,作图的时候远作者方志朋忘记了。并且配置服务也是注册到服务注册中心的。
在Spring Cloud微服务系统中,一种常见的负载均衡方式是,客户端的请求首先经过负载均衡(zuul、Ngnix),再到达服务网关(zuul集群),然后再到具体的服。,服务统一注册到高可用的服务注册中心集群,服务的所有的配置文件由配置服务管理(下一篇文章讲述),配置服务的配置文件放在git仓库,方便开发人员随时改配置。
更加典型的结构图如下
![]()
项目准备
- 运行注册中心eureka-server
- 修改home方法,并运行service-hello:只用运行一个就可以了
改写home方法如下:方便后面的请求的不同
public String home(String name ) {
        return "hello "+name+"from port:" +port;
    }
- 修改service-ribbon下的HelloService方法,运行service-ribbon
修改部分如下,name参数加入ribbon_前缀
 public String helloService(String name) {
         return restTemplate.getForObject("http://SERVICE-HELLO/hello?name=ribbon_"+name,String.class);
        //return restTemplate.getForObject("http://SERVICE-HELLO/hello",String.class);
    }
- 运行service-feign
通过运行http://desktop-180i6sh:8764/hello?name=bamboo
http://desktop-180i6sh:8765/hello?name=bamboo
我们可也看出返回的字符串区别,加了ribbon_前缀的是从service-ribbon请求过去,而没有加的则是service-feign请求过去
hello ribbon_bamboofrom port:8762
hello bamboofrom port:8762
- service-zuul:新建项目
创建service-zuul工程
另起一个project,取名叫service-zuul
pom
    4.0.0
    com.bamboo
    service-zuul
    1.0-SNAPSHOT


        org.springframework.boot
        spring-boot-starter-parent
        1.5.2.RELEASE


        UTF-8
        UTF-8
        1.8


            org.springframework.cloud
            spring-cloud-starter-eureka


            org.springframework.cloud
            spring-cloud-starter-zuul


            org.springframework.boot
            spring-boot-starter-web


            org.springframework.boot
            spring-boot-starter-test
            test


                org.springframework.cloud
                spring-cloud-dependencies
                Dalston.RC1
                pom
                import


                org.springframework.boot
                spring-boot-maven-plugin


            spring-milestones
            Spring Milestones
            https://repo.spring.io/milestone

                false
yml
application.yml
server:
  port: 8769
spring:
  application:
    name: service-zuul
    #服务名为service-zuul;

eureka:
  client:
    serviceUrl:
      defaultZone: http://localhost:8761/eureka/


#以/api-a/ 开头的请求都转发给service-ribbon服务;以/api-b/开头的请求都转发给service-feign服务
zuul:
	# strip-prefix: true  #请求转发时去掉转发路径(path中的值)/api-a/hello会转成/hello
  routes:
    api-a:
      path: /api-a/**
      serviceId: service-ribbon
    api-b:
      path: /api-b/**
      serviceId: service-feign
指定服务注册中心的地址为http://localhost:8761/eureka/,服务的端口为8769,服务名为service-zuul;以/api-a/ 开头的请求都转发给service-ribbon服务;以/api-b/开头的请求都转发给service-feign服务;
配置扩展
zuul:
  ignored-services: * #忽略所有路由,基本无法访问,忽略某些可以有逗号分隔
  prefix: /api #所有请求都需要加上这个前缀
  ignoredPatterns: /**/admin/** 过滤掉path包含admin的请求
  routes:
    spring-boot-user:
      path: /user/**
      strip-prefix: false # 是否忽略路由前缀,默认true忽略前缀prefix
      url: forward: www.baidu.com # /user/***路径都转发到www.baidu.com
一般访问方式,这种方式是可以负载均衡的(避免直走)
路由地址:端口/服务名称/ 访问路径
zuul.prefix: 我们可以指定一个全局的前缀
strip-prefix: 是否将加上代理前缀,默认是true,false时
通过api/访问user服务:
http://zuul:8050/api/spring-boot-user/user/1
prefix注释掉后,eg如下
strip-prefix默认为true
http://zuul:8050/spring-boot-user/user/1
strip-prefix:false时都可以,前提是多个服务的路径不会冲突
http://zuul:8050/spring-boot-user/user/1
http://zuul:8050/user/1
更多详细解读请参看:
https://www.iteye.com/blog/huan1993-2424676
java
package com.bamboo;

import org.springframework.boot.SpringApplication;
import org.springframework.boot.autoconfigure.SpringBootApplication;
import org.springframework.cloud.netflix.eureka.EnableEurekaClient;
import org.springframework.cloud.netflix.zuul.EnableZuulProxy;

/**
 *
 *
 * Created by bamboo on 2017/10/24.
 * 更新注释2020/6/11
 */
//启动类加上注解@EnableZuulProxy
//它默认加上了@EnableCircuitBreaker和@EnableDiscoveryClient
@EnableZuulProxy
@SpringBootApplication
public class ZuulApplication {

    public static void main(String[] args) {
        SpringApplication.run(ZuulApplication.class, args);
    }


}
启动运行并查看结果
打开浏览器访问:http://localhost:8769/api-a/hello?name=bamboo ;浏览器显示:
hello ribbon_bamboofrom port:8762
http://localhost:8769/api-b/hello?name=bamboo ;浏览器显示:
hello ribbonfrom port:8762
通过返回的字符串我们知道,service-zuul根据路径把请求发送到不同的服务上了,因此路由转发的功能是确定的。
zuul拦截器:服务授权过滤
相当于servlet中的filter拦截器功能,但是显然要比它强大。
创建MyFilter.java,实现一个简单的接口授权功能
package com.bamboo;

import com.netflix.zuul.ZuulFilter;
import com.netflix.zuul.context.RequestContext;
import org.slf4j.Logger;
import org.slf4j.LoggerFactory;
import org.springframework.stereotype.Component;

import javax.servlet.http.HttpServletRequest;

/**
 *
 * zuul不仅只是路由,并且还能过滤,做一些安全验证
 * Created by xialeme on 2017/10/24.
 */
@Component
public class MyFilter extends ZuulFilter {

    private static Logger log = LoggerFactory.getLogger(MyFilter.class);
    @Override
    public String filterType() {
        return "pre";//路由之前
    }

    @Override
    public int filterOrder() {
        return 0;
    }

/**
     * 过滤器是否生效
     * 返回true则会进入run方法中执行
     *返回false则说明不需要过滤直接返回请求路径的结果
     * @return
     */
    @Override
    public boolean shouldFilter() {

        RequestContext requestContext = RequestContext.getCurrentContext();
        HttpServletRequest request = requestContext.getRequest();

        //System.out.println(request.getRequestURI()); ///apigateway/product/api/v1/product/lis
        // System.out.println(request.getRequestURL()); //http://localhost:9000/apigateway/product/api/v1/product/list
        //ACL

        log.info("权限检查:{}", request.getRequestURI());
        //符合以下路径的则需要进行过滤,否则直接返回请求路径的结果
        if ("/apigateway/api/v1/order/save".equalsIgnoreCase(request.getRequestURI())) {
            return true;
        } else if ("/apigateway/order/api/v1/order/list".equalsIgnoreCase(request.getRequestURI())) {
            return true;
        } else if ("/apigateway/order/api/v1/order/find".equalsIgnoreCase(request.getRequestURI())) {
            return true;
        }else if ("/sys-admin/group/1".equalsIgnoreCase(request.getRequestURI())) {
            return true;
        }
        return false;
    }


    //过滤器的具体逻辑。可用很复杂,包括查sql,nosql去判断该请求到底有没有权限访问。
    @Override
    public Object run() {
        RequestContext ctx = RequestContext.getCurrentContext();
        HttpServletRequest request = ctx.getRequest();
        log.info(String.format("%s >>> %s", request.getMethod(), request.getRequestURL().toString()));
        Object accessToken = request.getParameter("token");//获取请求中的token参数
        if(accessToken == null) {
            log.warn("token is empty");
            ctx.setSendZuulResponse(false);
            ctx.setResponseStatusCode(401);
            try {
                ctx.getResponse().getWriter().write("token is empty");
            }catch (Exception e){}

            return null;
        }
        log.info("ok");
        return null;
    }
}
filterType:返回一个字符串代表过滤器的类型,在zuul中定义了四种不同生命周期的过滤器类型,具体如下:
pre:路由之前
routing:路由之时
post: 路由之后
error:发送错误调用
filterOrder:过滤的顺序
shouldFilter:这里可以写逻辑判断,是否要过滤,本文true,永远过滤。
run:过滤器的具体逻辑。可用很复杂,包括查sql,nosql去判断该请求到底有没有权限访问。
这时访问:http://localhost:8769/api-a/hello?name=forezp ;网页显示:
token is empty
加上token再试一次
http://desktop-180i6sh:8769/api-a/hello?name=bamboo&token=111
hello ribbon_bamboofrom port:8762
接口访问成功了
JWT和spring sercurity都是可以在zuul中实现权限的拦截和判断,进入整合进授权过滤功能中
参考资料
zuul官网
方志朋-史上最简单的SpringCloud教程 | 第五篇: 路由网关(zuul)
