Android7.1 Presentation双屏异显 DEMO 样例
转自 https://blog.csdn.net/fu_kevin0606/article/details/79420621
https://blog.csdn.net/fishtosky/article/details/47165573
绪论
随着用户的需求增多,特别是对于一些Android平板电脑以及其他的一些Android智能设备可能有多个屏幕,用户不仅想要在主屏幕上显示内容,同样在第二屏幕上也要显示想要的内容,这样可以达到更好的体验效果。Google也是不负众望在Android4.2版本以后提供了Presentation类,可以轻松实现在两块屏幕上同时显示不同的内容。
Presentation是一个特殊的dialog,它的目的是显示内容到第二屏幕。在Presentation创建的时候关联一个目标设备,确定Presentation要显示在那个设备上,根据这个设备的信息来配置Presentation的context和resources信息。
Presentation的context与包含它的Activity的context是不相同的,用presentation的上下文来填充一个presentation的layout和加载其它的资源是非常重要的,可以确保我们加载的目标设备正确的尺寸密度assets。
当Presentation附属的display被移除的话,Presentation就会自动被取消。当创建Presentation的Activity自己处于paused或者resumed,无论Presentation在显示什么内容,该Activity就要关心对Presentation 进行pausing and resuming。
本文将讲解如何使用Presentation类做到双屏异显,以及实现的原理。
使用方法
在将presentation显示出来之前,最重要的事情就是选择要将presentation显示在哪个设备上。要选择一个presentation显示在哪个设备可能是一件非常困难的事情,因为有可能此时系统中有多个设备。与其自己猜想哪个设备是最适合显示presentation,可以让系统帮我们选择一个最好的设备。在Android系统中为我们提供了两种使用presentation的方法:
media router
选择显示presentation的设备最简单的方法就是使用Media Router,media router服务持续追踪在系统中哪个音频视频线路是可用的,当routes被选择或者不被选择,或者更好的显示presentation display的线路发生改变后media router就会发送消息。所以一些应用程序可以自动监视这些消息来在首选设备上显示或取消presentation。
首选显示presentation的设备是Media Router进行推荐的,如果应用想要显示内容在第二屏幕上就该使用该设备。有时可能没有首选显示presentation的设备,在这种情况下,应用可以在本地显示内容而不使用presentation。
下面将给出如何使用media router在首选的设备创建和显示presentation。
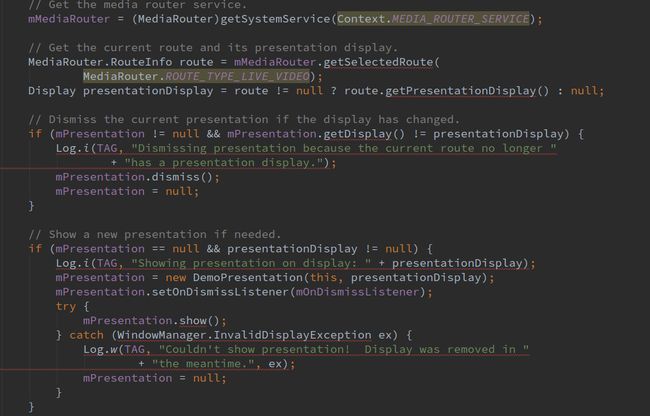
根据上面代码可以看出通过系统服务Media Router来选择一个合适的route,从route中来获取首选的display,如果之前已经有presentation,就要判断一下之前presentation显示的display是否与新的display相同,如果不相同说明首选的display发生了改变,就将该presentation取消,置空,再去创建,否则不用创建。如果是第一次创建presentation只要首选的display不为空就会创建该presentation,创建完成后调用presentation的show方法将该presentation显示出来。
display manager
另外一个获取首选display的方法是直接使用display Manager来获取。display manager服务提供方法枚举和描述系统中所有的设备,包括可以显示presentation的设备。display manager持续追踪系统中所有的设备,然而,并不是所有的设备都适合显示presentation,例如,如果一个Activity试图在主屏幕上显示一个presentation,它可能会掩盖自己的内容,这就象在Activity上打开一个dialog一样。
下面将给出例子,演示如何使用Display Manager获取合适的display显示presentation。
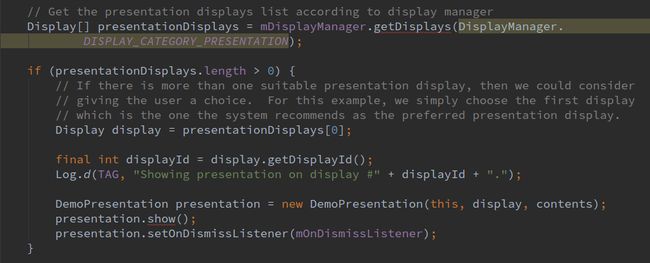
根据上面代码可以看出通过系统服务Display Manager来获取所有适合显示presentation的display列表,如果获取到了多个适合display对象,之后我们就要考虑给用户一个选择,我们选择第一个为首选的display。最后显示presentation。
获取首选显示设备
根据上文可以知道我们有两种方法使用presentation,而在本文中主要讲解第二种直接使用display Manager来获取首选display。
获取display服务

我们在Activity中使用getSystemService函数,通过参数Context.DISPLAY_SERVICE来指定要获取Service的类型。调用到Activity.java的getSystemService函数中,如果去需要创建的对象为Window manager或者search manager就直接将对象返回,因为在activity.java中有这两个对象,如果我们要获取display Service就需要继续获取。

由于Activity.java继承自ContextThemeWrapper.java,所以就会调用父类的getSystemService函数。

在父类中首先判断获取的Service是否是inflater服务,如果是就创建一个mInflater返回,否则就调用getBaseContext函数获取在ContextWrapper.java中设置的context对象,在创建Activity的时候ActivityThread调用ContextImpl的createActivityContext函数创建一个ContextImpl对象,然后通过Activity的attach函数将该contex对象设置到ContextWrapper中。所以getBaseContext函数获取的也就是一个ContextImpl对象,之后会调用该对象的getSystemService函数。最后就会调用到SystemServiceRegistry的getSystemService函数获取服务。

根据SystemServiceRegistry的名字可以看出来,该类是注册了系统服务的,我们通过context以及需要获取对象的name就可以获取相应的系统服务了。下面详细讲解该类。
SystemServiceRegistry的作用就是管理系统中的所有的服务,并且使用context通过getSystemService获取服务对象。
SystemServiceRegistry对象配置在了preloaded-classes文件中,当系统启动的时候在ZygoteInit的preload函数中进行加载该文件,对该文件中的对象进行预加载初始化。在SystemServiceRegistry对象的静态代码块中调用registerService函数将系统中的服务注册在SYSTEM_SERVICE_NAMES和SYSTEM_SERVICE_FETCHERS中,例如我们要获取的Display服务:

将Context.DISPLAY_SERVICE,DisplayManager.class以及CachedServiceFetcher对象类型为DisplayManager传入registerService函数。
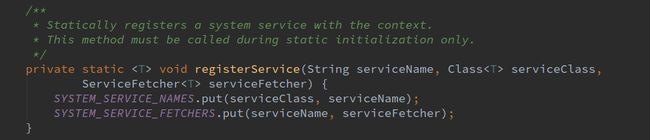
在该函数中将传入的对象记录在两个hashMap中,这两个map在初始化完成后就不允许改变了。

如上文当我们使用getSystemService获取服务时,根据服务name从SYSTEM_SERVICE_FETCHERS中取出fetcher对象,display对象的fetcher对象为CachedServiceFetcher。
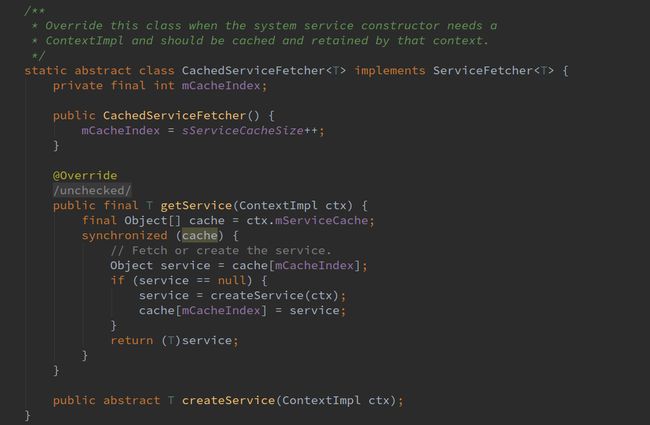
调用getService函数来获取服务,先从cache里面获取service,如果cache中没有服务对象就调用createService函数进行创建,将新创建的服务对象放入cache中用对应下标记录。createService函数为抽象函数在子类中实现,从上文注册display对象时可以看出createService函数创建了DisplayManager对象传入参数context对象,context对象为调用getSystemService函数的activity。

在DisplayManager的构造函数中将传入的context对象记录在mContext成员变量中,并且创建DisplayManagerGlobal对象,mGlobal对象的创建属于单例模式。
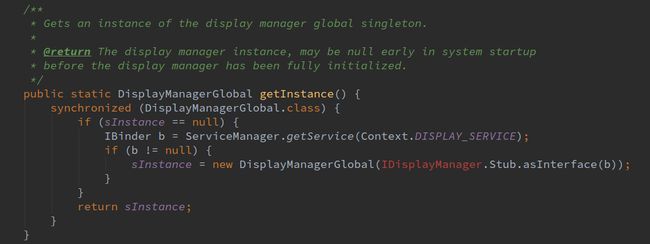
在getInstance函数中,创建一个Display服务的binder对象,将binder转换成IDisplayManager接口对象,记录在成员变量mDm中。
将创建好的服务返回记录在cache中,并且返回到获取服务的Activity中。这就获取到了display服务了。
设备初始化
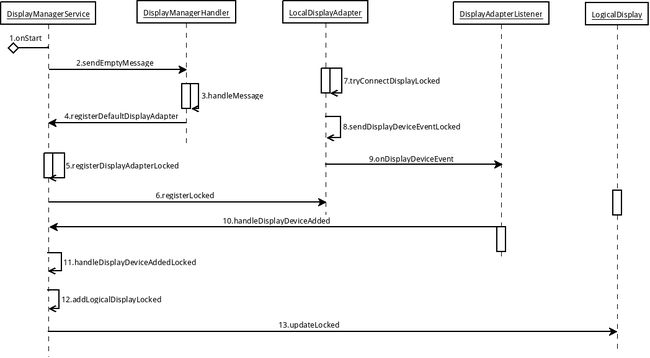
在讲解获取设备时,首先讲一下系统中的设备如何初始化。在开机过程中系统调用DisplayManagerService的onStart函数来注册本地服务,并且发送Handle消息MSG_REGISTER_DEFAULT_DISPLAY_ADAPTER来注册本地设备。在调用registerDisplayAdapterLocked函数时,创建LocalDisplayAdapter对象传入该函数。

在registerDisplayAdapterLocked函数中将传入的adapter对象放入mDisplayAdapters列表,并且调用LocalDisplayAdapter的registerLocked函数来注册设备。
在注册设备时遍历BUILT_IN_DISPLAY_IDS_TO_SCAN列表,在该列表中有主屏幕,HDMI屏幕,依附HDMI的TERTIARY屏幕三种类型的屏幕。依次根据这三个设备调用tryConnectDisplayLocked函数来尝试连接设备。

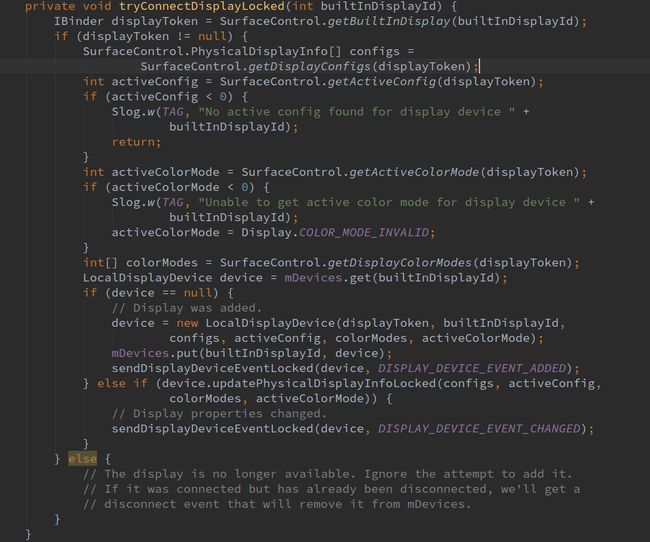
在尝试连接设备时调用SurfaceControl的getBuiltInDisplay函数获取到对应设备id的token对象,如果token为null说明不存在该设备,如果找到对应的token对象,看一下该设备有没有可用的configs,如果没有直接返回。再判断有没有活动的配置activeConfig,如果没有也会返回。最后都满足要求的话,在mDevices列表中获取Device,如果此时还没有创建Device对象,就创建LocalDisplayDevice对象,并且加入mDevices列表,调用sendDisplayDeviceEventLocked发送设备添加的消息,如果之前已经创建过了Device对象就判断该设备的信息是否更新了,如果更新了就发送设备改变的消息。
在发送消息时, 通过mHandle对象发送一个Runnable对象,在run函数中调用mListener的onDisplayDeviceEvent函数通知监听器设备变化。mHandle与mListener都是在创建LocalDisplayAdapter的时候进行赋值的,如上文调用registerDisplayAdapterLocked函数时创建,最后回到DisplayManagerService的DisplayAdapterListener对象中。

在DisplayAdapterListener中监听了设备的增加,变化,移除事件。

当设备增加时调用handleDisplayDeviceAdded函数,并且将前边创建的LocalDisplayDevice传给该对象。

之后调用LocalDisplayDevice的getDisplayDeviceInfoLocked函数获取设备信息,在该函数中设置主屏设备,以及其他设备的初始化信息。之后调用addLogicalDisplayLocked函数基于所给的display信息来添加一个logical display。

首先获取设备的信息,根据设备的flag来判断是否是默认主屏幕,以设备id,layerStack,LocalDisplayDevice作为参数创建LogicalDisplay对象。

在创建LogicalDisplay时也创建一个mBaseDisplayInfo对象,之后调用updateLocked函数来根据可用的Device来更新logical display,如果logical display依附的设备已经被移除了它就不可用了。updateLocked函数主要内容如下:
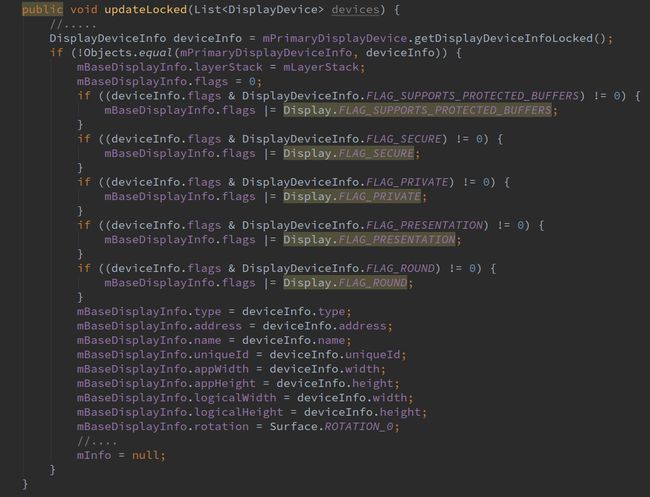
mPrimaryDisplayDevice对象在LogicalDisplay的构造函数中进行赋值是一个LocalDisplayDevice,调用该对象的getDisplayDeviceInfoLocked获取设备的基本信息,赋值给mBaseDisplayInfo对象中。
更新完设备信息回到addLogicalDisplayLocked函数,将新创建的设备对象放入mLogicalDisplays列表中,我们可以通过设备id在该列表中获取我们需要的设备对象。
获取设备
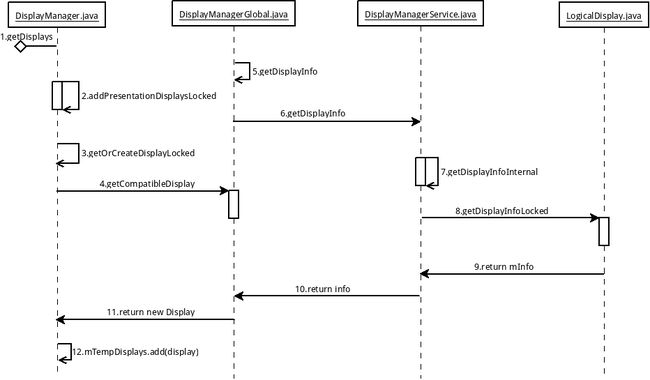
当获取display服务后调用getDisplays函数,通过参数DisplayManager.DISPLAY_CATEGORY_PRESENTATION 确定获取的设备为可以显示presentation的设备。代码位于DisplayManager.java中

在该函数中首先获取系统中所有的设备id,如果传入的category为null调用addAllDisplaysLocked函数获取所有的设备信息,如果category为DISPLAY_CATEGORY_PRESENTATION,以设备类型为TYPE_WIFI,TYPE_HDMI,TYPE_OVERLAY, TYPE_VIRTUAL 这些系统中可能存在的设备来调用addPresentationDisplaysLocked函数来寻找合适设备。

遍历所有的设备id,通过getOrCreateDisplayLocked来获取或者创建设备,当获取到设备后如果设备有FLAG_PRESENTATION标签,并且设备的类型与传入的类型相同,说明该设备适合显示presentation,将该设备加入列表displays列表。下面具体分析getOrCreateDisplayLocked如何获取设备。

在该函数中根据设备id从mDisplays列表中获取display,如果设备已经添加到了mDisplays列表,并且设备可用,就直接把设备返回。如果设备没有创建出来,就调用DisplayManagerGlobal的getCompatibleDisplay函数创建设备对象,将创建出来的设备添加进mDisplays列表。
在getCompatibleDisplay函数中调用getDisplayInfo函数获取设备信息,根据设备信息,设备id,以及兼容性设备信息以及activityToken创建Display对象返回。在调用getDisplayInfo函数获取设备信息时,先判断设备信息是否使用缓存技术,如果使用就先从缓存中找设备信息,如果找到直接返回。如果找不到再使用BInder远程调用到DisplayManagerService中的getDisplayInfo,获取到设备信息后再放入缓存中,让下次调用使用。如果不使用缓存,直接去DisplayManagerService中获取。
在DisplayManagerService中调用getDisplayInfoInternal获取设备信息。

根据设备id从列表mLogicalDisplays获取出对应的LogicalDisplay对象,当系统在启动时会将LogicalDisplay与对应的设备id记录在mLogicalDisplays列表中,如上文。如果通过设备id在列表中找不到设备信息,说明系统中不存在该设备返回null,如果找到LogicalDisplay,就调用该对象的getDisplayInfoLocked函数获取设备信息。
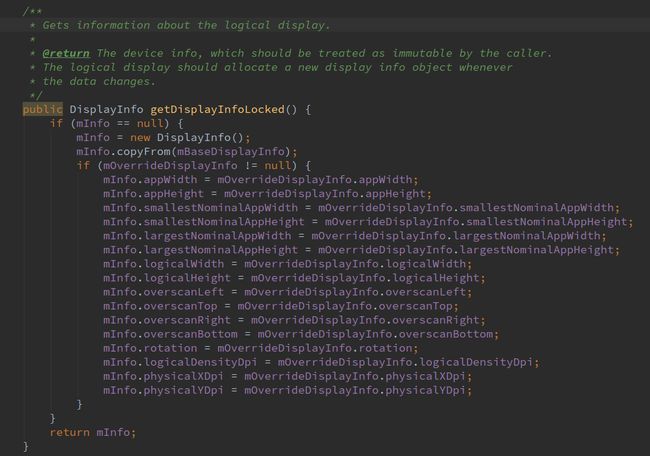
在该函数中新创建一个DisplayInfo对象,将mBaseDisplayInfo copy到新创建的DisplayInfo对象中,如果mOverrideDisplayInfo不为空就重新赋值DisplayInfo,根据之前分析屏幕旋转可以知道到设备旋转时mOverrideDisplayInfo不为空。如上面分析mBaseDisplayInfo对象在设备初始化时创建以及赋值,此时我们就获取到所需要的设备。
创建presentation对象
获取到presentation要显示的设备后,就将Activity的context对象和设备信息作为参数来创建Presentation对象。

由于Presentation继承自Dialog,在创建Presentation时首选调用父类的构造函数,将presentation的上下文传给父类,之后将设备记录在成员变量mDisplay中,创建DisplayManagerService的远程BInder对象,WindowManagerService的远程BInder对象。最后将presentation设置为不能在外部点击取消。
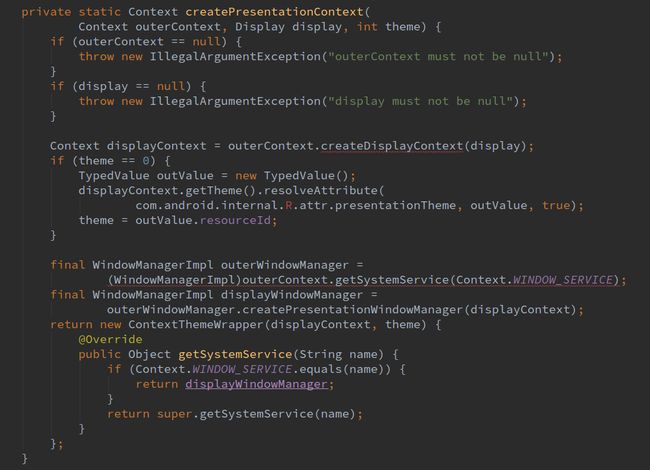
下面分析一下createPresentationContext函数创建presentation上下文的过程。outerContext为我们创建presentation的context,创建presentation必须有一个context对象,如果为null就抛出异常。同时,如果没有指定presentation要显示在哪个设备上,也会抛出异常。之后通过outerContext根据设备信息来创建displayContext,该context是一个ContextImpl对象,根据displayContext来获取设备的主题信息。
之后根据外部的Window manager获取设备的Window manager,这样做主要是由于外部的Window manager有一些如父窗口的额外信息,如果presentation使用应用窗口类型这样做是非常重要的。最后创建ContextThemeWrapper对象返回,如果用户通过presentation的context调用getSystemService函数获取系统服务时,如果获取的是Window manager就直接将displayWindowManager返回,如果获取别的就调用父类获取,如上文讲解。
获取到presentation的context对象后,就调用父类Dialog的构造函数。CreateContextThemeWrapper为false,将presentation的context赋值给mContext对象。将displayWindowManager赋值给mWindowManager,创建PhoneWindow对象记录在mWindow对象中,之后创建ListenersHandler对象,监听dialog的消失,取消,显示事件。

这时就创建成功了一个presentation对象。
请求显示presentation

当创建presentation对象后调用presentation对象的show方法请求显示presentation,在Presentation中的show方法直接调用父类Dialog的show方法。
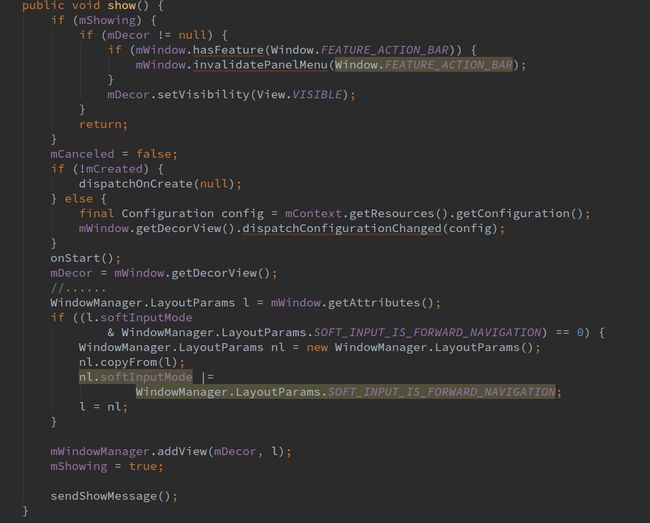
如果已经调用过presentation的show方法那么mShowing为true,并且mDecor(最顶层的Window)已经创建过,就直接将mDecor设置为VISIBLE,并返回。如果是第一次调用show方法,mCreated为false 那么dispatchOnCreate函数调用我们presentation的onCreate来调用setContentView设置presentation的布局,并且初始化一些对象。之后调用onStart函数,由于Presentation重写了父类的onStart函数,所以首先调用子类的onStart函数。

在Presentation的onStart函数中注册mDisplayListener监听,用来监听设备的移除,配置改变。现在就要开始监视设备的改变了,可能display metrics已经发生改变,例如转屏等事件发生,如果设备信息真的发生了改变就需要将presentation立即取消。
重新回到Dialog的show函数中,通过PhoneWindow的getDecorView函数获取顶层的mDecor对象,如果mDecor为空就调用installDecor函数进行获取Decor对象。获取到mDecor对象后调用addView将该对象添加到WindowManager中。最后调用到WindowManagerGlobal的addView函数来添加view。

在添加view时获取Window的参数wparams,如果该Window存在父窗口,就根据参数为子窗口调节布局参数。如果不存在父窗口就判断是否有硬件加速,如果应用设置了硬件加速,就在wparams进行标记。

之后开始监听系统配置的变化,创建Runnable对象mSystemPropertyUpdater,将该对象添加到SystemProperties中,如果系统配置发生变化就会调用该对象的run函数,在run函数中遍历mRoots列表中的ViewRootImpl对象来加载每个view的系统配置。

接着在系统中获取view的下标,根据下标进行判断,如果下标小于0说明view已经添加进了Window Manager,如果大于零再判断该view是否已经死亡,如果死亡就调用ViewRootImpl的doDie函数处理。
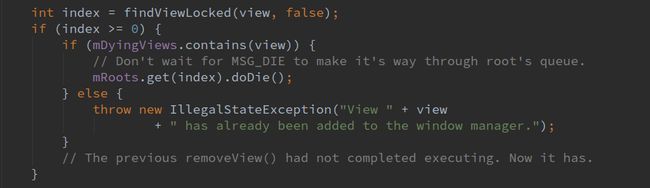
如果这个view是一个面板窗口,需要找到他所连接的窗口,以便未来进行参考。首先判断该窗口类型是否大于第一个子窗口,小于等于最后一个子窗口,如果是就从mRoots列表中找到一个View窗口Binder对象和传入view的Binder对象相同,就从对应的mVIews中取出panelParentView。

下面就是比较重要的操作根据view的上下文和设备信息来创建一个ViewRootImpl对象,ViewRootImpl构造函数内容如下所示。

将传入的context参数记录在全局变量mContext中,display记录在mDisplay中,创建mWindowSession对象,这个比较重要下面分析,创建W类的对象mWindow是ViewRootImpl中的一个内部类,再初始化一些其他的对象,最后加载系统配置信息。下面分析一下mWindowSession对象的创建过程,在WindowManagerGlobal.java中实现。
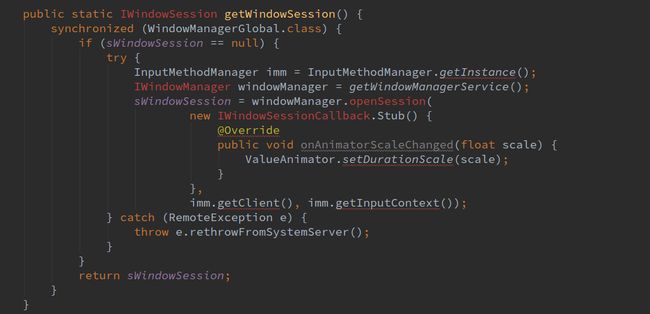
如果sWindowSession已经创建过直接返回,如果没有创建过先创建input method的服务对象imm,之后创建WIndowManagerService的服务对象windowManager,调用windowManager的openSession函数将IWindowSessionCallback对象,input method的客户端,input method的上下文最为参数,通BInder传输到WindowManagerService中。

在WindowManagerService中创建Session对象返回。这就创建完成了一个mWindowSession对象。回到上文当创建完成一个ViewRootImpl对象,继续在WindowManagerGlobal的addView函数中执行。

设置view的参数,将view加入到mViews列表,新创建的ViewRootImpl对象加入mRoots列表,view参数信息加入mParams列表。
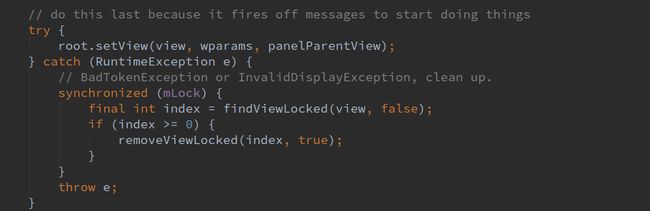
最后调用ViewRootImpl的setView函数,将view对象,wparams,panelParentView设置到ViewRootImpl中。在ViewRootImpl中进行添加Window到WIndowManager,测量,布局,以及绘制Window流程,下面将详细讲解。
添加窗口

在setView函数中首先根据mView是否为NULL,判断是否已经为该ViewRootImp设置过view了,如果已经设置过了就什么也不用操作,如果该ViewRootImp还没有设置过任何的view对象,就会将需要设置的view对象赋值给成员变量mView。对一些其它的对象进行赋值,静mAdded赋值为true表示已经添加过view对象.

之后用res变量来记录添加Window的返回结果,调用requestLayout函数来请求layout,在后文详细分析。如果input类型不是没有input channel就为该Window创建一个mInputChannel对象用来接收input事件。判断Window是否存在属性PRIVATE_FLAG_FORCE_DECOR_VIEW_VISIBILITY。
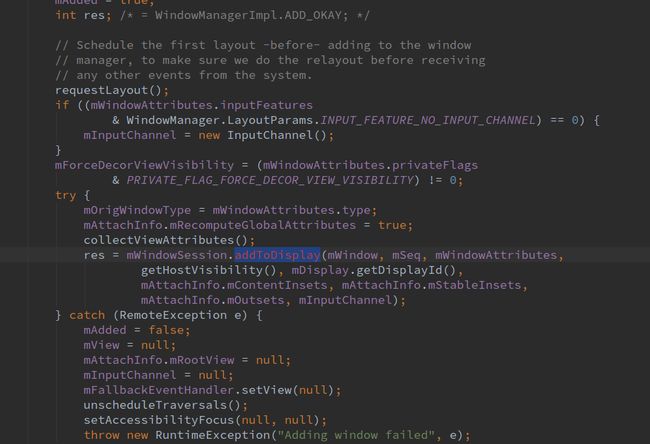
最后调用Session的addToDisplay函数,将该Window添加到WindowManager中,以后详细分析。
DEMO代码 :
选择display的方法主要有两种
一是利用MediaRouter
二是利用DisplayManager,
本例演示的是后一种方法
创建主布局文件:activity_main.xml
主要是一个用于控制显示所有屏幕的复选框和一个显示所有屏幕的列表框
<LinearLayout xmlns:android="http://schemas.android.com/apk/res/android"
    xmlns:tools="http://schemas.android.com/tools"
    android:layout_width="match_parent"
    android:layout_height="match_parent"
    android:padding="5dp"
    android:orientation="vertical">

    <TextView
        android:layout_width="match_parent"
        android:layout_height="wrap_content"
        android:textAppearance="?android:attr/textAppearanceMedium"
        android:text="       Tish demostrates how to use a presentation and the DisplayManger to show content on other display
        try connecting a second display and watch what happenes selecting a display and will open a presentatio on it."/>
    <CheckBox
        android:id="@+id/show_all_presentation"
        android:layout_width="wrap_content"
        android:layout_height="wrap_content"
        android:text="显示所有pressentation"/>
    <ListView
        android:id="@+id/listView"
        android:layout_width="match_parent"
        android:layout_height="match_parent">

    ListView>


LinearLayout>
编写MainActivity
public class MainActivity extends Activity implements OnCheckedChangeListener {

    private static final String PRESENTATION_KEY = "presentation";
    private DisplayManager displayManager;
    private CheckBox show_all_displays;
    private DisplayListAdapter displayAdapter;
    private ListView listView;
    // 定义存储photo的数组
    private int[] photos = new int[] { R.drawable.guild1, R.drawable.guild2,
            R.drawable.guild3, R.drawable.ic_launcher, R.drawable.puzzle,
            R.drawable.test };
    // 记录下一张照片的Id
    private int nextPhotoNumber = 0;
    /*
     * 利用SparseArray存储所有屏幕的prsentation上显示的内容(尤其是当屏幕不止一个时数组的作用更大)
     * SparseArray:稀疏数组,在存储数据不多的情况下可以大大地节省空间,此时可以代替hasmap使用
     */
    SparseArray mSavedPresentationContents;

    // 根据displayId记录当前显示的presentation
    SparseArray mActivePresentations = new SparseArray();

    @Override
    protected void onCreate(Bundle savedInstanceState) {
        super.onCreate(savedInstanceState);
        setContentView(R.layout.activity_main);
        // 首先检查是否存在需要恢复的状态信息
        if (savedInstanceState != null) {
            mSavedPresentationContents = savedInstanceState
                    .getSparseParcelableArray(PRESENTATION_KEY);
        } else {
            mSavedPresentationContents = new SparseArray();
        }
        displayManager = (DisplayManager) getSystemService(Context.DISPLAY_SERVICE);
        show_all_displays = (CheckBox) findViewById(R.id.show_all_presentation);
        show_all_displays.setOnCheckedChangeListener(this);
        listView = (ListView) findViewById(R.id.listView);
        displayAdapter = new DisplayListAdapter(this);
        listView.setAdapter(displayAdapter);
    }

    /**
     * 定义listView的适配器,用于显示所有的屏幕信息
     *
     * @author aaaa
     *
     */
    private class DisplayListAdapter extends ArrayAdapter<Display> {
        private Context mContext;

        // 构造函数,布局文件为R.layout.list_item
        public DisplayListAdapter(Context context) {
            super(context, R.layout.list_item);
            mContext = context;
        }

        @Override
        public View getView(int position, View convertView, ViewGroup parent) {
            View v = null;
            if (convertView == null) {
                v = LayoutInflater.from(mContext).inflate(R.layout.list_item,
                        null);
            } else {
                v = convertView;
            }
            // 找到各个组件
            CheckBox cb_display_presentation = (CheckBox) v
                    .findViewById(R.id.cb_presentation);
            TextView tv_showId = (TextView) v.findViewById(R.id.tv_displayId);
            Button bt_info = (Button) v.findViewById(R.id.bt_info);

            Display display = getItem(position);
            String text = "Display#" + display.getDisplayId()
                    + display.getName();

            tv_showId.setText(text);
            // 将dispaly设置为复选框的标志位,将dispaly与复选框绑定在一起,找到复选框时就可以找到display了
            cb_display_presentation.setTag(display);
            // 如果当前presentation可见(存在于mActivePresentations中)或者mSavedPresentationContents中保存了
            // 当前presentation显示的内容,则复选框为选中状态,否则为非选中状态
            cb_display_presentation.setChecked(mActivePresentations
                    .indexOfKey(display.getDisplayId()) >= 0
                    || mSavedPresentationContents.indexOfKey(display
                            .getDisplayId()) >= 0);
            cb_display_presentation
                    .setOnCheckedChangeListener(MainActivity.this);

            bt_info.setTag(display);
            bt_info.setOnClickListener(mInfoClickListener);
            return v;
        }

        /**
         * 更新listVIew的显示信息
         */
        public void updateListView() {
            // 清空一下数据
            clear();
            String displayCategory = getDisplayCategory();
            if (displayCategory == null) {
                System.out.println("displayCategory is null");
            }
            Display[] displays = displayManager.getDisplays(displayCategory);
            // 将所有的屏幕添加到数组中
            addAll(displays);
        }

        /**
         * 当复选框处于选中状态时列出所有的屏幕信息 处于非选中状态时只列出presentation屏幕信息
         *
         * @return
         */
        private String getDisplayCategory() {
            System.out.println(show_all_displays.isChecked());
            return show_all_displays.isChecked() ? null
                    : DisplayManager.DISPLAY_CATEGORY_PRESENTATION;
        }

    }

    private OnClickListener mInfoClickListener = new OnClickListener() {
        /**
         * 点击时创建一个对话框,用于显示dispaly的信息
         */
        @Override
        public void onClick(View v) {
            Context context = v.getContext();
            AlertDialog.Builder builder = new Builder(context);
            Display display = (Display) v.getTag();
            String title = "Dispaly #" + display.getDisplayId() + "Info";
            builder.setTitle(title).setMessage(display.toString())
                    .setNeutralButton("OK", new DialogInterface.OnClickListener() {
                        @Override
                        public void onClick(DialogInterface dialog, int which) {
                            dialog.dismiss();
                        }
                    });
            builder.show();
        }
    };

    /**
     * 同时为两个复选框提供监听服务
     */
    @Override
    public void onCheckedChanged(CompoundButton buttonView, boolean isChecked) {
        if (buttonView == show_all_displays) {
            // 更新列表框
            displayAdapter.updateListView();
        } else {
            // 从复选框中取出Display
            Display display = (Display) buttonView.getTag();
            if (isChecked) {
                // 显示下一张图片
                PresentationContents contents = new PresentationContents(
                        getNextPhoto());
                showPresentation(display, contents);
            } else {
                hidePresentation(display);
            }
        }
    }

    private int getNextPhoto() {
        int nextPhoto = photos[nextPhotoNumber];
        nextPhotoNumber = (nextPhotoNumber + 1) % photos.length;
        return nextPhoto;
    }

    private void showPresentation(Display display, PresentationContents contents) {
        int dispalyId = display.getDisplayId();
        // 如果当前resentation已经是显示状态则直接返回
        if (mActivePresentations.get(dispalyId) != null) {
            return;
        }
        // 否则则新建一个presentation,并存储到mActivePresentations当中
        DemoPresentation presentation = new DemoPresentation(this, display,
                contents);
        presentation.show();
        // 设置prsentation的解除监听
        presentation.setOnDismissListener(mPresentationDismissListener);
        mActivePresentations.put(dispalyId, presentation);
    }

    private void hidePresentation(Display display) {
        int dispalyId = display.getDisplayId();
        DemoPresentation presentation = mActivePresentations.get(dispalyId);
        if (presentation != null) {
            presentation.dismiss();
            mActivePresentations.remove(dispalyId);
        }
    }

    private OnDismissListener mPresentationDismissListener = new OnDismissListener() {
        @Override
        public void onDismiss(DialogInterface dialog) {
            DemoPresentation prsentation = (DemoPresentation) dialog;
            int displayId = prsentation.getDisplay().getDisplayId();
            // 从presentation数组当中将当前presentation删除
            mActivePresentations.delete(displayId);
            // 更新listView
            displayAdapter.notifyDataSetChanged();
        }
    };

    /**
     * 当activity恢复时,首先从之前在pause状态中保存的presentation中显示的内容恢复过来
     */
    @Override
    protected void onResume() {
        super.onResume();
        // 更新listView
        displayAdapter.updateListView();
        // 恢复保存的presentationContent
        if (mSavedPresentationContents.size() > 0) {
            for (int i = 0; i < displayAdapter.getCount(); i++) {
                Display display = displayAdapter.getItem(i);
                PresentationContents content = mSavedPresentationContents
                        .get(display.getDisplayId());
                if (content != null) {
                    showPresentation(display, content);
                }
            }
            // 恢复完成后清空mSavedPresentationContents中的内容
            mSavedPresentationContents.clear();
        }
        // 注册屏幕的监听事件
        displayManager.registerDisplayListener(mDisplayListener, null);
    }

    /**
     * 当activity不可见时保存presentation中显示的内容 将所有屏幕的presentation解除
     */
    @Override
    protected void onPause() {
        super.onPause();
        // 注销掉对屏幕的监听
        displayManager.unregisterDisplayListener(mDisplayListener);
        // 遍历当前所有可见的presentation
        for (int i = 0; i < mActivePresentations.size(); i++) {
            // 如果当前的presentation是可见的则将共内容保存
            DemoPresentation presentation = mActivePresentations.valueAt(i);
            int displayId = mActivePresentations.keyAt(i);
            if (presentation != null) {
                // 将所有display的显示内容保存
                mSavedPresentationContents.put(displayId,
                        presentation.getmContents());
                presentation.dismiss();
            }
            // 清空所mActivePresentations数组(所有presentation都不可见了)
            mActivePresentations.clear();
        }
    }

    /**
     * 保存presentation的状态信息,用于当activity被非正常杀死时再次调用oncreate方法重建activity时 恢复状态
     */
    @Override
    protected void onSaveInstanceState(Bundle outState) {
        super.onSaveInstanceState(outState);
        outState.putSparseParcelableArray(PRESENTATION_KEY,
                mSavedPresentationContents);
    }

    private DisplayManager.DisplayListener mDisplayListener = new DisplayManager.DisplayListener() {

        @Override
        public void onDisplayRemoved(int displayId) {
            displayAdapter.updateListView();
        }

        @Override
        public void onDisplayChanged(int displayId) {
            displayAdapter.updateListView();
        }

        @Override
        public void onDisplayAdded(int displayId) {
            displayAdapter.updateListView();
        }
    };
}
创建listView的item的布局文件listview_item.xml
主要是一个用于控制显示resentation的复选框,一个显示图片和display信息的textView。还有一个Button点击时显示display的详细信息。
<RelativeLayout xmlns:android="http://schemas.android.com/apk/res/android"
    android:layout_width="match_parent"
    android:layout_height="match_parent"
    android:padding="5dp" >
    <CheckBox
        android:id="@+id/cb_presentation"
        android:layout_width="wrap_content"
        android:layout_height="wrap_content"
        android:layout_alignParentLeft="true"
        android:layout_centerVertical="true"/>
    <TextView
        android:id="@+id/tv_displayId"
        android:layout_toRightOf="@id/cb_presentation"
        android:paddingLeft="10dp"
        android:layout_width="wrap_content"
        android:layout_height="wrap_content"
        android:layout_centerVertical="true"
        android:textAppearance="?android:attr/textAppearanceMedium"
        android:text="Display #?:内置屏幕"/>
    <Button
        android:id="@+id/bt_info"
        android:layout_width="wrap_content"
        android:layout_height="wrap_content"
        android:layout_alignParentRight="true"
        android:layout_centerVertical="true"
        android:text="info"/>


RelativeLayout>
创建presentation的布局文件,简单地显示了一个imageView和一个textView
<FrameLayout xmlns:android="http://schemas.android.com/apk/res/android"
    android:layout_width="match_parent"
    android:layout_height="match_parent"
    >

    <ImageView
        android:id="@+id/presentation_image"
        android:layout_width="wrap_content"
        android:layout_height="wrap_content"
        android:src="@drawable/ic_launcher"
        android:layout_gravity="center"
        />
    <TextView
        android:id="@+id/presentation_text"
        android:layout_width="wrap_content"
        android:layout_height="wrap_content"
        android:layout_gravity="center"
        android:textAppearance="?android:attr/textAppearanceMedium"
        android:text="text"/>

FrameLayout>
创建DemoPresentation类继承Presentation
/**
 * 创建Presentation的子类,prsentation是一种特殊的对话框,它用来在另外的屏幕上显示内容
 * 需要注意的是在创建它之前就必须要和它的目标屏幕进行绑定,指定目标屏幕的方式有两种一是利用MediaRouter
 * 二是利用DisplayManager,本例演示的是后一种方法
 * @author aaaa
 *
 */
public class DemoPresentation extends Presentation {

    private PresentationContents mContents;
    public DemoPresentation(Context outerContext, Display display,PresentationContents contents) {
        super(outerContext, display);
        this.mContents=contents;
    }

    @Override
    protected void onCreate(Bundle savedInstanceState) {
        super.onCreate(savedInstanceState);
        //根据prsentation的上下文获取到资源文件
        Resources r=getContext().getResources();
        setContentView(R.layout.presentation);

        //获取到与之关联的屏幕
        int photo=mContents.getPhoto();
        Display display=getDisplay();
        int displayId=display.getDisplayId();
        String diplayName=display.getName();

        TextView tv_desc=(TextView) findViewById(R.id.presentation_text);
        ImageView iv_photo=(ImageView) findViewById(R.id.presentation_image);

        //设置文本显示的内容:描述显示的图片的Id,屏幕的Id,屏幕的名字等信息
        tv_desc.setText(r.getString(R.string.prsentation_photo_text,1,displayId,diplayName));
        iv_photo.setImageDrawable(r.getDrawable(photo));

        //GradientDrawable 支持使用渐变色来绘制图形,用其为activity设置渐变的背景色
        GradientDrawable drawable=new GradientDrawable();
        //设置图形模式为矩形
        drawable.setShape(GradientDrawable.RECTANGLE);
        //设置渐变的模式为圆形渐变
        drawable.setGradientType(GradientDrawable.RADIAL_GRADIENT);

        //获取到屏幕的大小
        Point outSize=new Point();
        getDisplay().getSize(outSize);
        //设置圆形渐变的半径为屏幕长和宽的最大值的一半
        drawable.setGradientRadius((Math.max(outSize.x, outSize.y))/2);
        //设置渐变的颜色
        drawable.setColors(mContents.getColors());
        //为presentation的主界面添加渐变背景色
        findViewById(android.R.id.content).setBackground(drawable);
    }

    public PresentationContents getmContents() {
        return mContents;
    }

}
创建PresentationContents类,用于定义在Presentation上显示的内容,该类实现了pacelable接口。该接口用于实现对象的序列化,可以实现在多个activity之间进行复杂的数据传递
/**
 * 创建类,用于定义在presentation上显示的内容
 * 该类实现了parcelable接口用于实现对象的序列化,
 * 序列化之后就可以方便地在多个activity之间传递复杂的数据
 * 实现parcelable接口必须实现三个方法
 * 1.public int describeContents() 默认返回0即可
 * 2.public void writeToParcel将类中的数据写入到包中(打包的过程)
 * 3.public static final Creator CREATOR=new Creator(){}
 * public static final一个都不能少,方法名CREATOR不能更改
 * @author aaaa
 *
 */
public class PresentationContents implements Parcelable {
    private int photo;
    private int[] colors;
    @Override
    public int describeContents() {
        return 0;
    }

    @Override
    public void writeToParcel(Parcel dest, int flags) {
        dest.writeInt(photo);
        dest.writeInt(colors[0]);
        dest.writeInt(colors[1]);
    }

    public static final Creator CREATOR=new Creator() {
        /**
         * 返回一组对象
         */
        @Override
        public PresentationContents[] newArray(int size) {
            return new PresentationContents[size];
        }
        /**
         * 返回单个对象
         */
        @Override
        public PresentationContents createFromParcel(Parcel source) {
            return new PresentationContents(source);
        }
    };

    //从包中解析数据
    private PresentationContents(Parcel source) {
        photo=source.readInt();
        colors=new int[]{source.readInt(),source.readInt()};
    }

    public PresentationContents(int photo) {
        super();
        this.photo = photo;
        colors=new int[]{
            //获取两种随机颜色
            ((int) (Math.random()*Integer.MAX_VALUE))|0xff000000,
            ((int) (Math.random()*Integer.MAX_VALUE))|0xff000000
        };
    }

    public int getPhoto() {
        return photo;
    }

    public void setPhoto(int photo) {
        this.photo = photo;
    }

    public int[] getColors() {
        return colors;
    }

}