使用 Doc2Vec & Logistic Regretion 进行多类文本分类
目标是使用Doc2Vec和Logistic回归将消费者金融投诉分为12个预定义类
Doc2vec是一个NLP工具,用于将文档表示为向量,是word2vec方法的概括。
使用Scikit-Learn进行多类文本分类时使用相同的数据集,在本文中,我们将使用Gensim中的doc2vec技术按产品对投诉叙述进行分类。
- The Data
The goal is to classify consumer finance complaints into 12 pre-defined classes. The data can be downloaded from data.gov
import pandas as pd
import numpy as np
from tqdm import tqdm
tqdm.pandas(desc="progress-bar")
from gensim.models import Doc2Vec
from sklearn import utils
from sklearn.model_selection import train_test_split
import gensim
from sklearn.linear_model import LogisticRegression
from gensim.models.doc2vec import TaggedDocument
import re
import seaborn as sns
import matplotlib.pyplot as plt
df = pd.read_csv('Consumer_Complaints.csv')
df = df[['Consumer complaint narrative','Product']]
df = df[pd.notnull(df['Consumer complaint narrative'])]
df.rename(columns = {'Consumer complaint narrative':'narrative'}, inplace = True)
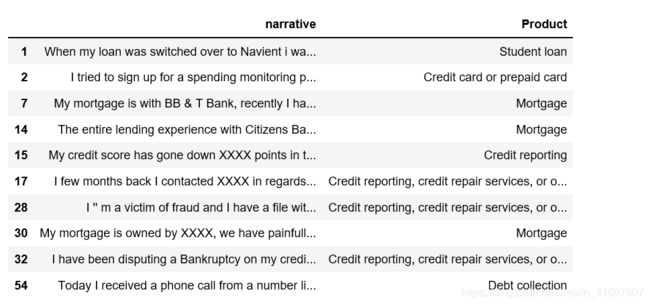
df.head(10)
df.shape
(318718, 2)
df.index = range(318718)
df['narrative'].apply(lambda x: len(x.split(' '))).sum()
63420212
我们有超过6300万字,它是一个相对较大的数据集。
- Exploring
cnt_pro = df['Product'].value_counts()
plt.figure(figsize=(12,4))
sns.barplot(cnt_pro.index, cnt_pro.values, alpha=0.8)
plt.ylabel('Number of Occurrences', fontsize=12)
plt.xlabel('Product', fontsize=12)
plt.xticks(rotation=90)
plt.show();
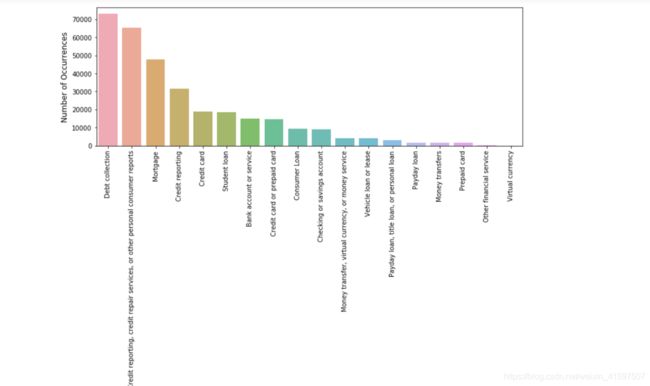
这些类是不平衡的,然而,一个天真的分类器预测一切都是债务收集只会达到20%以上的准确性。
让我们看一下投诉叙述及其相关产品的几个例子。
def print_complaint(index):
    example = df[df.index == index][['narrative', 'Product']].values[0]
    if len(example) > 0:
        print(example[0])
        print('Product:', example[1])
print_complaint(12)
print_complaint(20)
- Text Preprocessing
下面我们定义一个函数将文本转换为小写,并从单词中删除标点符号/符号等。
from bs4 import BeautifulSoup
def cleanText(text):
text = BeautifulSoup(text, "lxml").text
text = re.sub(r'\|\|\|', r' ', text)
text = re.sub(r'http\S+', r'' , text)
text = text.lower()
text = text.replace('x', '')
return text
df['narrative'] = df['narrative'].apply(cleanText)
以下步骤包括70/30的训练/测试分割,使用NLTK标记器删除停用词和标记化文本。 对于我们的第一次尝试,我们用其产品标记每个投诉叙述。
train, test = train_test_split(df, test_size=0.3, random_state=42)
import nltk
from nltk.corpus import stopwords
def tokenize_text(text):
    tokens = []
    for sent in nltk.sent_tokenize(text):
        for word in nltk.word_tokenize(sent):
            if len(word) < 2:
                continue
            tokens.append(word.lower())
    return tokens
train_tagged = train.apply(
    lambda r: TaggedDocument(words=tokenize_text(r['narrative']), tags=[r.Product]), axis=1)
test_tagged = test.apply(
    lambda r: TaggedDocument(words=tokenize_text(r['narrative']), tags=[r.Product]), axis=1)
这就是培训条目的样子 - 一个由“信用报告”标记的示例投诉叙述。
train_tagged.values[30]
- Set-up Doc2Vec Training & Evaluation Models
首先,我们实例化一个doc2vec模型 - Distributed Bag of Words(DBOW)。 在word2vec架构中,两个算法名称是“连续词袋”(CBOW)和“skip-gram”(SG); 在doc2vec架构中,相应的算法是“分布式存储器”(DM)和“分布式字袋”(DBOW)。
- Distributed Bag of Words (DBOW)
DBOW是doc2vec模型,类似于word2vec中的Skip-gram模型。 通过训练神经网络来获得段落向量,该神经网络用于预测段落中的单词的概率分布,给出来自段落的随机采样的单词。
我们将改变以下参数:
If dm=0, distributed bag of words (PV-DBOW) is used; if dm=1,‘distributed memory’ (PV-DM) is used.
300- dimensional feature vectors.
min_count=2, ignores all words with total frequency lower than this.
negative=5 , specifies how many “noise words” should be drawn.
hs=0 , and negative is non-zero, negative sampling will be used.
sample=0 , the threshold for configuring which higher-frequency words are randomly down sampled.
workers=cores , use these many worker threads to train the model (=faster training with multicore machines).
import multiprocessing
cores = multiprocessing.cpu_count()
- Building a Vocabulary
model_dbow = Doc2Vec(dm=0, vector_size=300, negative=5, hs=0, min_count=2, sample = 0, workers=cores)
model_dbow.build_vocab([x for x in tqdm(train_tagged.values)])
![]()
在Gensim中训练doc2vec模型相当直接,我们初始化模型并训练30个时期。
%%time
for epoch in range(30):
    model_dbow.train(utils.shuffle([x for x in tqdm(train_tagged.values)]), total_examples=len(train_tagged.values), epochs=1)
    model_dbow.alpha -= 0.002
    model_dbow.min_alpha = model_dbow.alpha
- Building the Final Vector Feature for the Classifier
def vec_for_learning(model, tagged_docs):
    sents = tagged_docs.values
    targets, regressors = zip(*[(doc.tags[0], model.infer_vector(doc.words, steps=20)) for doc in sents])
    return targets, regressorsdef vec_for_learning(model, tagged_docs):
    sents = tagged_docs.values
    targets, regressors = zip(*[(doc.tags[0], model.infer_vector(doc.words, steps=20)) for doc in sents])
    return targets, regressors
- Train the Logistic Regression Classifier.
y_train, X_train = vec_for_learning(model_dbow, train_tagged)
y_test, X_test = vec_for_learning(model_dbow, test_tagged)
logreg = LogisticRegression(n_jobs=1, C=1e5)
logreg.fit(X_train, y_train)
y_pred = logreg.predict(X_test)
from sklearn.metrics import accuracy_score, f1_score
print('Testing accuracy %s' % accuracy_score(y_test, y_pred))
print('Testing F1 score: {}'.format(f1_score(y_test, y_pred, average='weighted')))
Testing accuracy 0.6683609437751004
Testing F1 score: 0.651646431211616
- Distributed Memory (DM)
分布式内存(DM)充当内存,可以记住当前上下文中缺少的内容 - 或者作为段落的主题。 虽然单词向量表示单词的概念,但文档向量旨在表示文档的概念。 我们再次实例化一个具有300个单词的矢量大小的Doc2Vec模型,并在训练语料库上迭代30次。
model_dmm = Doc2Vec(dm=1, dm_mean=1, vector_size=300, window=10, negative=5, min_count=1, workers=5, alpha=0.065, min_alpha=0.065)
model_dmm.build_vocab([x for x in tqdm(train_tagged.values)])
![]()
%%time
for epoch in range(30):
    model_dmm.train(utils.shuffle([x for x in tqdm(train_tagged.values)]), total_examples=len(train_tagged.values), epochs=1)
    model_dmm.alpha -= 0.002
    model_dmm.min_alpha = model_dmm.alpha
- Train the Logistic Regression Classifier
y_train, X_train = vec_for_learning(model_dmm, train_tagged)
y_test, X_test = vec_for_learning(model_dmm, test_tagged)
logreg.fit(X_train, y_train)
y_pred = logreg.predict(X_test)
print('Testing accuracy %s' % accuracy_score(y_test, y_pred))
print('Testing F1 score: {}'.format(f1_score(y_test, y_pred, average='weighted')))
Testing accuracy 0.47498326639892907
Testing F1 score: 0.4445833078167434
- Model Pairing
根据关于IMDB情绪数据集的Gensim doc2vec教程,结合来自Distributed Bag of Words(DBOW)和Distributed Memory(DM)的段落向量可以提高性能。 我们将跟随,将模型配对在一起进行评估。
首先,我们删除临时培训数据以释放RAM。
model_dbow.delete_temporary_training_data(keep_doctags_vectors=True, keep_inference=True)
model_dmm.delete_temporary_training_data(keep_doctags_vectors=True, keep_inference=True)
连接两个模型。
from gensim.test.test_doc2vec import ConcatenatedDoc2Vec
new_model = ConcatenatedDoc2Vec([model_dbow, model_dmm])
建立特征向量。
def get_vectors(model, tagged_docs):
    sents = tagged_docs.values
    targets, regressors = zip(*[(doc.tags[0], model.infer_vector(doc.words, steps=20)) for doc in sents])
    return targets, regressors
训练Logistic回归
y_train, X_train = get_vectors(new_model, train_tagged)
y_test, X_test = get_vectors(new_model, test_tagged)
logreg.fit(X_train, y_train)
y_pred = logreg.predict(X_test)
print('Testing accuracy %s' % accuracy_score(y_test, y_pred))
print('Testing F1 score: {}'.format(f1_score(y_test, y_pred, average='weighted')))
esting accuracy 0.6778572623828648
Testing F1 score: 0.664561533967402
The result improved by 1%.
对于本文,我使用训练集训练doc2vec,但是,在Gensim的教程中,整个数据集用于训练,我尝试了这种方法,使用整个数据集训练doc2vec分类器进行消费者投诉分类,我能够 达到70%的准确率。


