一、tengine安装过程
1.1 下载
http://tengine.taobao.org/download.html找到下载包并且下载(Tengine-2.2.1.tar.gz)
1.2 解压
tar zxvf Tengine-2.2.1.tar.gz
1.3 配置检查
进入解压后的目录 ./configure
异常1:
[root@bogon tengine]# ./configure
checking for OS
 + Linux 3.10.0-327.el7.x86_64 x86_64
checking for C compiler ... not found
./configure: error: C compiler cc is not found
也就是c编译器 gcc找不到
安装gcc,执行:
yum -y install gcc
继续检查
异常2:
./configure
checking for PCRE library ... not found
checking for PCRE library in /usr/local/ ... not found
checking for PCRE library in /usr/include/pcre/ ... not found
checking for PCRE library in /usr/pkg/ ... not found
checking for PCRE library in /opt/local/ ... not found
./configure: error: the HTTP rewrite module requires the PCRE library.
You can either disable the module by using --without-http_rewrite_module
缺少pcre和pcre-devel 安装命令:
yum -y install pcre pcre-devel
这里安装好后 可以通过
rpm -qa | grep pcre找到所有pcre的包
rpm -ql 完整包名 查看安装的路径
异常3:
./configure
checking for OpenSSL library ... not found
缺少openssl和openssl-devel 执行安装命令:
yum -y install openssl openssl-devel
继续检测成功,可以在日志看到 需要pcre openssl zlib(安装openssl自动安装)的库 ,可以看出现在只差jemalloc库不可用了,如果没有需要优化tengine内存的话,可以不用安装。
Configuration summary
  + using system PCRE library
  + using system OpenSSL library
  + md5: using OpenSSL library
  + sha1: using OpenSSL library
  + using system zlib library
  + jemalloc library is disabled

  nginx path prefix: "/usr/local/nginx"
  nginx binary file: "/usr/local/nginx/sbin/nginx"
  nginx configuration prefix: "/usr/local/nginx/conf"
  nginx configuration file: "/usr/local/nginx/conf/nginx.conf"
  nginx pid file: "/usr/local/nginx/logs/nginx.pid"
  nginx error log file: "/usr/local/nginx/logs/error.log"
  nginx http access log file: "/usr/local/nginx/logs/access.log"
  nginx http client request body temporary files: "client_body_temp"
  nginx dso module path: "/usr/local/nginx/modules/"
  nginx http proxy temporary files: "proxy_temp"
  nginx http fastcgi temporary files: "fastcgi_temp"
  nginx http uwsgi temporary files: "uwsgi_temp"
  nginx http scgi temporary files: "scgi_temp"
其中jemalloc库若需要的话,也可以安装下,下载 jemalloc-3.6.0.tar.bz2包,解压
tar jvxf jemalloc-3.6.0.tar.bz2
最后将设置tengine的安装路径为/usr/local/tengine,jemalloc模块的路径指定为~/jemalloc-3.6.0/,也就是jemalloc解压的路径,执行下面命令:
./configure --prefix=/usr/local/tengine --user=venky --group=venky
--with-http_gzip_static_module --with-http_realip_module
--with-http_stub_status_module --with-http_concat_module
--with-jemalloc=~/jemalloc-3.6.0/
1.4 安装
配置完成后,执行命令:
make && make install
安装成功后,会在/usr/local/tengine下看到tengine的安装文件。
1.5 配置
两台虚拟tengine主机都按照如下配置。
#user  nobody;
worker_processes  1;
events {
    worker_connections  1024;
}
http {
    include       mime.types;
    default_type  application/octet-stream;
    sendfile        on;
    keepalive_timeout  65;
    upstream myServer{
      server 192.168.216.128:9080;
      server 192.168.216.135:9080;
    }
    server {
        listen       9080;
        server_name  localhost;
        server_name_in_redirect off;
        proxy_set_header Host $host:$server_port;
        proxy_set_header X-Real-IP $remote_addr;
        proxy_set_header REMOTE-HOST $remote_addr;
        proxy_set_header X-Forwarded-For $proxy_add_x_forwarded_for;
        location / {
            proxy_pass  http://myServer;
        }
        error_page   500 502 503 504  /50x.html;
        location = /50x.html {
            root   html;
        }
    }
}
1.6 执行命令
进入/usr/local/tengine/sbin/,执行命令:
./nginx -V
可以看到tengine安装的所有的模块信息。
tengine常用命令以及参数:
nginx -m 显示所有加载的模块
nginx -l 显示所有可以使用的指令
nginx -t 检查nginx的配置文件是否正确
nginx -s 启动nginx
nginx -s reload 重启nginx
nginx -s stop 停止nginx
二、Keepalived安装与配置
keepalived的高可用分为两种模式,一种是抢占模式,一种是非抢占模式。抢占模式即MASTER从故障中恢复后,会将VIP从BACKUP节点中抢占过来。非抢占模式即MASTER恢复后不抢占BACKUP升级为MASTER后的VIP。下面分别介绍Red Hat 6.5下抢占模式和非抢占模式的配置方式
2.1 安装keepalived
安装的服务环境是Red Hat Enterprise Linux Server release 6.5,使用yum方式安装
# yum install -y keepalived
查看安装的keepalived版本
# keepalived -v
Keepalived v1.2.13 (03/19,2015)
2.2 tengine监控脚本
该脚本的作用是检查tengine节点是否已经停止,如果停止尝试启动tengine,如果无法启动则停止keepalived服务,让其他服务器接管。两台虚拟主机配置相同。
vim /etc/keepalived/check_nginx.sh
#!/bin/bash
counter=$(ps -C nginx --no-heading|wc -l)
if [ "${counter}" = "0" ]; then
    /usr/local/bin/nginx
    sleep 2
    counter=$(ps -C nginx --no-heading|wc -l)
    if [ "${counter}" = "0" ]; then
        /etc/init.d/keepalived stop
    fi
fi
2.3 keepalived配置
2.3.1 抢占模式配置
主机192.168.216.128配置:
! Configuration File for keepalived
global_defs {
   notification_email {
     [email protected]
     [email protected]
     [email protected]
   }
   notification_email_from [email protected]
   smtp_server 192.168.200.1
   smtp_connect_timeout 30
   router_id LVS_DEVEL
}
vrrp_script chk_nginx {
    script "/etc/keepalived/check_nginx.sh" #tengine监控脚本
    interval  2
    weight -5
    fall 3
    rise 2
}
vrrp_instance VI_1 {
    state MASTER #设置为主节点
    interface eth0
    virtual_router_id 51
    priority 100 #优先级
    advert_int 1
    #不争抢
    #nopreempt
    authentication {
        auth_type PASS
        auth_pass 1111
    }
    virtual_ipaddress {
        #192.168.200.16
        #192.168.200.17
        192.168.216.188
    }
    track_script {
       chk_nginx
    }
}
主机192.168.216.135配置:
! Configuration File for keepalived
global_defs {
   notification_email {
     [email protected]
     [email protected]
     [email protected]
   }
   notification_email_from [email protected]
   smtp_server 192.168.200.1
   smtp_connect_timeout 30
   router_id LVS_DEVEL
}
cript chk_nginx {
    script "/etc/keepalived/check_nginx.sh"
    interval  2
    weight -5
    fall 3
    rise 2
}
vrrp_instance VI_1 {
    state BACKUP #设置为从节点
    interface eth0
    virtual_router_id 51
    priority 90 #优先级要小于主节点
    advert_int 1
    #nopreempt
    authentication {
        auth_type PASS
        auth_pass 1111
    }
    virtual_ipaddress {
        #192.168.200.16
        #192.168.200.17
        192.168.216.188
    }
    track_script {
        chk_nginx
    }
}
两台虚拟主机配置了同一个vip,都是192.168.216.188。
启动keepalived服务
# service keepalived restart
# ps -ef | grep keepalived
root      53626      1  0 14:02 ?        00:00:02 /usr/sbin/keepalived -D
root      53628  53626  0 14:02 ?        00:00:11 /usr/sbin/keepalived -D
root      53629  53626  0 14:02 ?        00:00:30 /usr/sbin/keepalived -D
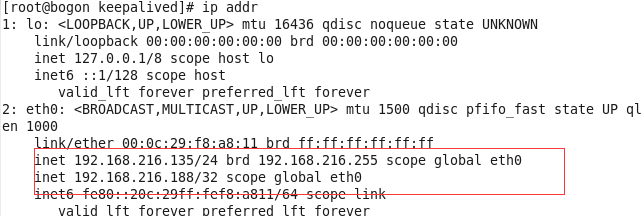
如果看到如上进程信息,表示keepalived已经启动成功。下面用ip add命令查看vip绑定的情况,如下图所示:
从上图可以看出,vip地址192.168.216.188绑定在MASTER(192.168.216.128)的eth0网卡上。
测试主机发生故障
停止在128机器上的主节点的keepalived节点服务。
# service keepalived stop
# ip addr
可以发现,停止主节点后vip的地址立刻从128主机飘到135主机上。
再次启动128上的keepalived服务。
# service keepalived start
# ip addr
可以发现,VIP又再次回到128的主机上。
2.3.2 非抢占模式配置
非抢占模式和抢占模式的不同的地方是,非抢占模式master从故障中恢复后,不会抢占备份节点的vip。
! Configuration File for keepalived
global_defs {
   notification_email {
     [email protected]
     [email protected]
     [email protected]
   }
   notification_email_from [email protected]
   smtp_server 192.168.200.1
   smtp_connect_timeout 30
   router_id LVS_DEVEL
}
vrrp_script chk_nginx {
    script "/etc/keepalived/check_nginx.sh" #tengine监控脚本
    interval  2
    weight -5
    fall 3
    rise 2
}
vrrp_instance VI_1 {
    state BACKUP #设置为从节点
    interface eth0
    virtual_router_id 51
    priority 100 #优先级
    advert_int 1
    #不争抢
    nopreempt
    authentication {
        auth_type PASS
        auth_pass 1111
    }
    virtual_ipaddress {
        #192.168.200.16
        #192.168.200.17
        192.168.216.188
    }
    track_script {
       chk_nginx
    }
}
和非抢占模式的配置相比,只改了两个地方:
- 在vrrp_instance块下两个节点各增加了nopreempt指令,表示不争抢vip
- 节点的state都为BACKUP
两个keepalived节点都启动后,默认都是BACKUP状态,双方在发送组播信息后,会根据优先级来选举一个MASTER出来。由于两者都配置了nopreempt,所以MASTER从故障中恢复后,不会抢占vip。这样会避免VIP切换可能造成的服务延迟。
不懂运维的程序员不是好的吉他手o( ̄︶ ̄)o


