一、实现效果
1. python代码
import requests
from lxml import etree
import re
import tkinter as tk
from PIL import Image, ImageTk
from xpinyin import Pinyin


def get_image(file_nam, width, height):
  im = Image.open(file_nam).resize((width, height))
  return ImageTk.PhotoImage(im)


def spider():
  headers = {
    'user-agent': 'Mozilla/5.0 (Windows NT 6.2; WOW64) AppleWebKit/535.24 (KHTML, like Gecko) Chrome/19.0.1055.1 Safari/535.24',
    "referer": "https://lishi.tianqi.com/chengdu/index.html"
  }
  p = Pinyin()
  place = ''.join(p.get_pinyin(b1.get()).split('-'))      # 获取地区文本框的输入 变为拼音
  # 处理用户输入的时间
  # 规定三种格式都可以 2018/10/1 2018年10月1日 2018-10-1
  date = b2.get()  # 获取时间文本框的输入
  if '/' in date:
    tm_list = date.split('/')
  elif '-' in date:
    tm_list = date.split('-')
  else:
    tm_list = re.findall(r'\d+', date)

  if int(tm_list[1]) < 10:    # 1-9月 前面加 0
    tm_list[1] = f'0{tm_list[1]}'
  # 分析网页规律 构造url
  # 直接访问有该月所有天气信息的页面 提高查询效率
  url = f"https://lishi.tianqi.com/{place}/{''.join(tm_list[:2])}.html"
  resp = requests.get(url, headers=headers)
  html = etree.HTML(resp.text)
  # xpath定位提取该日天气信息
  info = html.xpath(f'//ul[@class="thrui"]/li[{int(tm_list[2])}]/div/text()')
  # 输出信息格式化一下
  info1 = ['日期:', '最高气温:', '最低气温:', '天气:', '风向:']
  datas = [i + j for i, j in zip(info1, info)]
  info = '\n'.join(datas)
  t.insert('insert', '    查询结果如下    \n\n')
  t.insert('insert', info)
  print(info)


win = tk.Tk()
win.title('全国各地历史天气查询系统')
win.geometry('500x500')

# 画布 设置背景图片
canvas = tk.Canvas(win, height=500, width=500)
im_root = get_image('test.jpg', width=500, height=500)
canvas.create_image(250, 250, image=im_root)
canvas.pack()

# 单行文本
L1 = tk.Label(win, bg='yellow', text="地区:", font=("SimHei", 12))
L2 = tk.Label(win, bg='yellow', text="时间:", font=("SimHei", 12))
L1.place(x=85, y=100)
L2.place(x=85, y=150)

# 单行文本框 可采集键盘输入
b1 = tk.Entry(win, font=("SimHei", 12), show=None, width=35)
b2 = tk.Entry(win, font=("SimHei", 12), show=None, width=35)
b1.place(x=140, y=100)
b2.place(x=140, y=150)

# 设置查询按钮
a = tk.Button(win, bg='red', text="查询", width=25, height=2, command=spider)
a.place(x=160, y=200)

# 设置多行文本框 宽 高 文本框中字体 选中文字时文字的颜色
t = tk.Text(win, width=30, height=8, font=("SimHei", 18), selectforeground='red') # 显示多行文本
t.place(x=70, y=280)

# 进入消息循环
win.mainloop()
2. 运行效果
运行效果如下:
二、基本思路
导入用到的库
import requests
from lxml import etree
import re
import tkinter as tk
from PIL import Image, ImageTk
from xpinyin import Pinyin
1. 爬虫部分
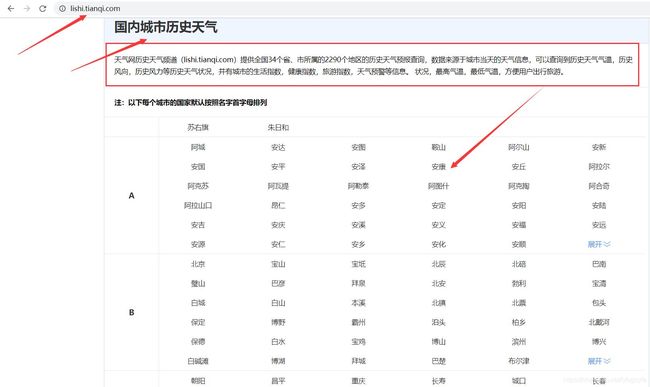
目标url:https://lishi.tianqi.com/
该网站提供了全国34个省、市所属的2290个地区的历史天气预报查询,数据来源于城市当天的天气信息,可以查询到历史天气气温,历史风向,历史风力等历史天气状况。
分析网页可以发现,某个地区、某个月的所有天气数据的url为:https://lishi.tianqi.com/ + 地区名字的拼音 + ‘/' + 年月.html。
根据用户输入的地区和时间,进行字符串的处理,构造出url,用于request请求有该月所有天气信息的页面,获取响应后Xpath定位提取用户输入的要查询的日期的天气信息,查询结果显示在tkinter界面。
爬虫代码如下:
def spider():
  headers = {
    'user-agent': 'Mozilla/5.0 (Windows NT 6.2; WOW64) AppleWebKit/535.24 (KHTML, like Gecko) Chrome/19.0.1055.1 Safari/535.24',
    "referer": "https://lishi.tianqi.com/chengdu/index.html"
  }
  p = Pinyin()
  place = ''.join(p.get_pinyin(b1.get()).split('-'))      # 获取地区文本框的输入 变为拼音
  # 处理用户输入的时间
  # 规定三种格式都可以 2018/10/1 2018年10月1日 2018-10-1
  date = b2.get()  # 获取时间文本框的输入
  if '/' in date:
    tm_list = date.split('/')
  elif '-' in date:
    tm_list = date.split('-')
  else:
    tm_list = re.findall(r'\d+', date)

  if int(tm_list[1]) < 10:    # 1-9月 前面加 0
    tm_list[1] = f'0{tm_list[1]}'
  # 分析网页发现规律  构造url
  # 直接访问有该月所有天气信息的页面 提高查询效率
  url = f"https://lishi.tianqi.com/{place}/{''.join(tm_list[:2])}.html"
  resp = requests.get(url, headers=headers)
  html = etree.HTML(resp.text)
  # xpath定位提取该日天气信息
  info = html.xpath(f'//ul[@class="thrui"]/li[{int(tm_list[2])}]/div/text()')
  # 输出信息格式化一下
  info1 = ['日期:', '最高气温:', '最低气温:', '天气:', '风向:']
  datas = [i + j for i, j in zip(info1, info)]
  info = '\n'.join(datas)
  t.insert('insert', '    查询结果如下    \n\n')
  t.insert('insert', info)
  print(info)
2. tkinter界面
代码如下:
def get_image(file_nam, width, height):
  im = Image.open(file_nam).resize((width, height))
  return ImageTk.PhotoImage(im)


win = tk.Tk()
# 设置窗口title和大小
win.title('全国各地历史天气查询系统')
win.geometry('500x500')

# 画布 设置背景图片
canvas = tk.Canvas(win, height=500, width=500)
im_root = get_image('test.jpg', width=500, height=500)
canvas.create_image(250, 250, image=im_root)
canvas.pack()

# 单行文本
L1 = tk.Label(win, bg='yellow', text="地区:", font=("SimHei", 12))
L2 = tk.Label(win, bg='yellow', text="时间:", font=("SimHei", 12))
L1.place(x=85, y=100)
L2.place(x=85, y=150)

# 单行文本框 可采集键盘输入
b1 = tk.Entry(win, font=("SimHei", 12), show=None, width=35)
b2 = tk.Entry(win, font=("SimHei", 12), show=None, width=35)
b1.place(x=140, y=100)
b2.place(x=140, y=150)

# 设置查询按钮 点击 调用爬虫函数实现查询
a = tk.Button(win, bg='red', text="查询", width=25, height=2, command=spider)
a.place(x=160, y=200)

# 设置多行文本框 宽 高 文本框中字体 选中文字时文字的颜色
t = tk.Text(win, width=30, height=8, font=("SimHei", 18), selectforeground='red') # 显示多行文本
t.place(x=70, y=280)

# 进入消息循环
win.mainloop()
tkinter界面效果如下:
到此这篇关于Python tkinter界面实现历史天气查询的示例代码的文章就介绍到这了,更多相关Python tkinter历史天气查询内容请搜索脚本之家以前的文章或继续浏览下面的相关文章希望大家以后多多支持脚本之家!


