前端学习 --Vue.js Day7
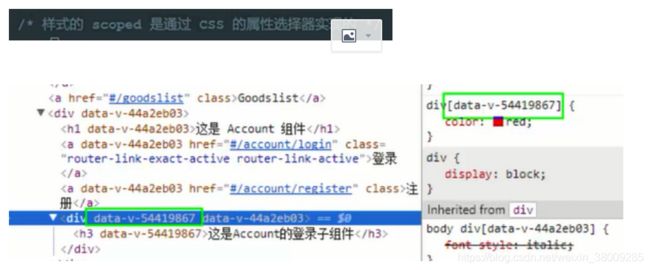
1、scoped属性选择器的实现原理
2、Mint-UI中按钮组件的使用
default
3、Mint-UI中Toast组件的使用
解决bootstrap 4.x 版本不显示字体图标的方法:
所以glyphyicon这个样式,必须要关联到glyphicons-halflings-regular.eot等文件才能正常使用。
https://blog.csdn.net/nongweiyilady/article/details/53611094
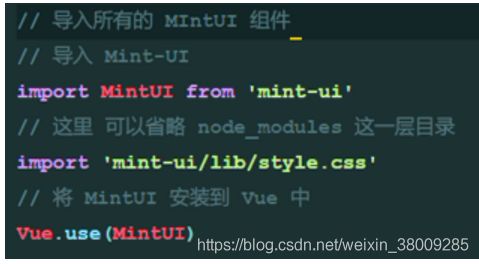
4、Mint-UI按需导入组件
//按需导入Mint-UI的组件
import { Button } from 'mint-ui'
//使用Vue.component注册按钮组件
Vue.component(Button.name, Button)
5、介绍MUI
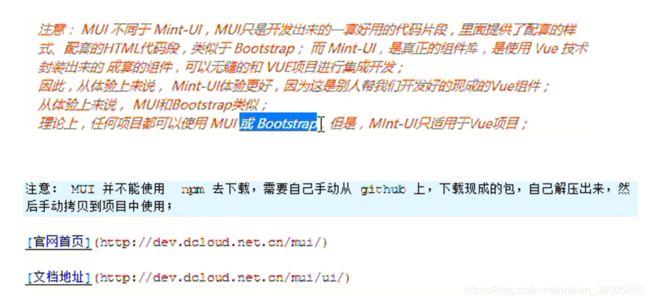
Vue.use():只有有Vue去封装的代码才能使用这个语法
6、MUI的使用:
主要的两个包(dist,放置css、js、font;example,用于寻找按钮等使用方式和代码)

步骤:
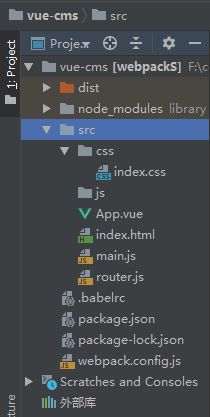
(1)在项目的src目录下创建lib目录,用于放置手动拷贝的第三方包(利用npm下载的第三方包都放置在node_xxx这个包中),接着将MUI中的dist复制到lib目录下,并改名为mui
MUI的使用
主要的两个包(dist,放置css、js、font;example,用于寻找按钮等使用方式和代码)

- 步骤:
- (1)在项目的src目录下创建lib目录,用于放置手动拷贝的第三方包(利用npm下载的第三方包都放置在node_xxx这个包中),接着将MUI中的dist复制到lib目录下,并改名为mui
(2)在main.js中引用(语法类似于引用bootstrap)

一个vue项目
1.标题整理出一个基本的项目模板:
2. 项目–制作项目首页的Header和Tabbar区域:
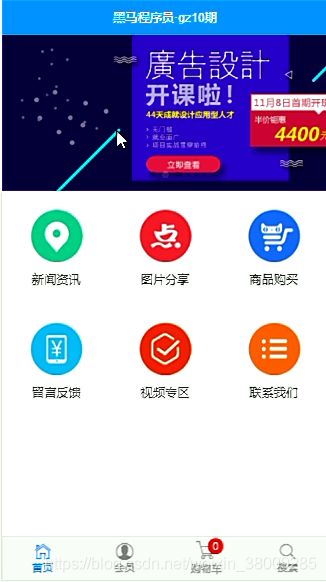
2.1 项目首页分析:

2.2 Header和Tabber:
利用mint-ui中的header组件去完成header区域
http://mint-ui.github.io/docs/#/zh-cn2/header
利用mui中的Tadder组件去完成tabber区域
mui需要手动下载zip包,并且手动复制dist文件到src/lib中,改dist名字为mui
App.vue:
<!--Header 区域-->
 <mt-header fixed title="vue小项目"></mt-header>
<!-- Tabber 区域-->
 <nav class="mui-bar mui-bar-tab">
            <a class="mui-tab-item mui-active" href="">
                <span class="mui-icon mui-icon-home"></span>
                <span class="mui-tab-label">首页</span>
            </a>
            <a class="mui-tab-item" href=" ">
                <span class="mui-icon mui-icon-email"><span class="mui-badge">9</span></span>
                <span class="mui-tab-label">消息</span>
            </a>
            <a class="mui-tab-item" href=" ">
                <span class="mui-icon mui-icon-contact"></span>
                <span class="mui-tab-label">通讯录</span>
            </a>
            <a class="mui-tab-item" href=" ">
                <span class="mui-icon mui-icon-gear"></span>
                <span class="mui-tab-label">设置</span>
            </a>
        </nav>
main.js
//按需导入mint-ui中的组件
import { Header } from 'mint-ui';
Vue.component(Header.name, Header);
//导入mui样式(与bootstrap导入语法一致)
import './lib/mui/css/mui.min.css'

//导入mui样式(与bootstrap导入语法一致)
import './lib/mui/css/mui.min.css'
3. 把本地项目托管到码云:
步骤1:创建相关的文件(与src同一目录下)
.gitignore:
node_modules
.idea
.vscode
.git
README.md:
#这是一个黑马程序员Vue教程中的一个vue项目
##这是一个移动端的项目
在mui下载好的包中复制LICENSE文件到项目根目录下
步骤2:操作本地项目
// 在本地创建一个.git文件
git init
// 检查状态
git status
// 将文件放入.git文件中(注意:".")
 >git add .
// 将文件放入.git文件中(注意:".")
 > git commit -m "第一次提交"
// 再次检查状态
 >>git status
步骤3:
将项目放到码云上
(1)先创建账户SSH公钥(设置SSH 公钥才能上传和下载代码)
(2)将本地项目上传到码云仓库中
cd 项目根目录
git remote add origin https://gitee.com/jklennon/vue-cms.git
git push -u origin master
方法二:先在码云上创建库,利用克隆然后将本地的项目复制到一个克隆地址上的空文件夹中
(1) 创建第一个码云项目:
https://www.cnblogs.com/xiaoxiaoccaiya/p/7125136.html
(2) 将本地创建好的项目送到码云上: https://blog.csdn.net/embrace924/article/details/78189208/
4. 使用webstorm中的git工具进行更加快速高效的代码管理:
https://www.cnblogs.com/jinguangguo/p/4868152.html

5. 项目–完成tabbar的小图标设置:
6. 项目–完成tabbar路由链接的改造和路由高亮:
(1)引入路由(main.js)
//1.1导入路由的包
import VueRouter from 'vue-router'
//1.2安装路由
Vue.use(VueRouter)
//1.3导入自己的router.js路由模块
import router from './router.js'
// 1.4挂载路由对象到VM实例上
 router
(2) 设置路由链接切换(修改地址App.vue):
![]()
<router-link class="mui-tab-item" to="/home">
<router-link class="mui-tab-item" to="/member">
<router-link class="mui-tab-item" to="/shopcar">
<router-link class="mui-tab-item" to="/search">
(3)修改默认的路由高亮的类
![]()
var router = new VueRouter({
 routes:[    //配置路由规则
 ],
 //    覆盖默认的路由高亮的类,默认的类叫做router-link-active
 linkActiveClass:'mui-active'
})
7. 项目–实现tabbar路由组件的切换功能:
(1)新建组件:
HomeContainer.vue:
<template>
    <h1>HomeContainer</h1>
</template>
MemberContainer.vue:
<template>
    <h1>MemberContainer</h1>
</template>
SearchContainer.vue:
<template>
    <h1>SearchContainer</h1>
</template>
ShopcarContainer.vue:
<template>
 <h1>ShopcarContainer</h1>
</template>
(2)在router.js中导入组件
//导入对应的路由组件
import HomeContainer from './components/tabbar/HomeContainer.vue'
import MemberContainer from './components/tabbar/MemberContainer.vue'
import SearchContainer from './components/tabbar/SearchContainer.vue'
import ShopcarContainer from './components/tabbar/ShopcarContainer.vue'

routes:[    //配置路由规则
     {path:'/home', component:HomeContainer},
     {path:'/member', component:MemberContainer},
     {path:'/search', component:SearchContainer},
     {path:'/shopcar', component:ShopcarContainer}
 ],
(3)App.vue中显示:
<!-- 中间的路由 router-view 区域开始-->
     <router-view></router-view>
<!-- 中间的路由 router-view 区域结束-->
8. 项目–完成首页轮播图样式布局:
(1)在HomeContainer.vue导入相关组件,并设置样式
 <mt-swipe :auto="4000">
         <mt-swipe-item>1</mt-swipe-item>
         <mt-swipe-item>2</mt-swipe-item>
         <mt-swipe-item>3</mt-swipe-item>
     </mt-swipe>
<style scoped>
 .mint-swipe{
     /*如果不设置的话,轮播图将没有高度,不会显示*/
     height: 200px;
     /*相对于视口的宽度。视口被均分为100单位的vw*/
     width: 100vw;
 }
 .mint-swipe .mint-swipe-item:nth-child(1){
     background-color: red;
 }
 .mint-swipe .mint-swipe-item:nth-child(2){
     background-color: blue;
 }
 .mint-swipe .mint-swipe-item:nth-child(3){
     background-color: pink;
 }
</style>
(2)main.js中导入组件
   //按需导入mint-ui中的组件
import { Header, Swipe, SwipeItem } from 'mint-ui';
Vue.component(Header.name, Header);
Vue.component(Swipe.name, Swipe);
Vue.component(SwipeItem.name, SwipeItem);
由于黑马程序员接口连接出现问题,此文暂停于2018.12.27
