Firewalld的常见操作总结
1. 防火墙的基本概念
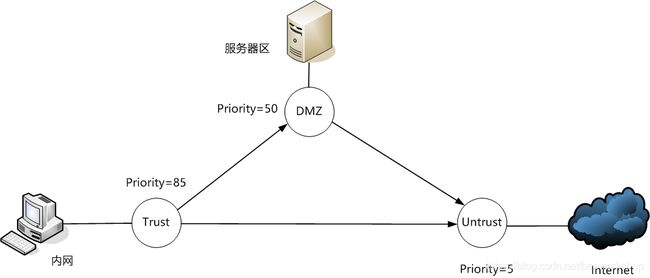
传统防火墙的基本理念构建于区域之上。区域是网络接口的集合,归入区域的网络接口上承载的流量具有相同的安全级别。我们说把相同安全级别的设备划入一个区域,就是把连接这些设备的接口归入一个区域。不同区域之间构成了网路边界。我们称这个网络边界为“域间”。防火墙主要就是通过区域间的规则——域间规则,来进行访问控制。所以防火墙实际本质上是根据区域的划分和域间规则的构建来进行流量的访问控制。
-
区域(zone)
网络接口被划入一个区域,而网络接口连接的设备具有相同的安全级别。这个安全级别通常被赋予一个数值,这个数值越高,表示安全区级别越高。在这里我们可以用priority来表示安全级别。 -
域间规则
在inbound和outbound两个方向上设定流量通行的规则。规则包括协议,source ip,destination ip,端口等。 -
有向图
把区域抽象为点,点之间的连线(业务流量)构成一个有向边。有向边只能从priority值大的点指向priority值小的点。这种指向对应的是默认的域间规则。如果反过来,从priority值小的点指向priority值大的点则必须有特定的域间规则来指定,默认是没有规则放行的。 -
流量的方向性和单向导通特性
以TCP为例,包含SYN标记的报文是方向标记报文。以有向边表示,SYN标记的TCP报文源地址对应箭尾,目标地址对应箭头。当通过报文标记字段明确了流量方向后,防火墙就可以根据流量的方向和流量穿越的区域通过域间规则实现访问控制,这就是单向导通性。 -
状态跟踪
防火墙会在内存中保持一个session table(由设备发起的报文触发形成)。设备发起的连接报文会在防火墙中形成一个会话表项(会话表项有老化时间,且对于双主的防火墙必须在两台防火墙之间同步会话表项),根据这个会话表项防火墙可以通过相应的ALG模块来跟踪上下行流量的状态,发觉会话之间的关联,存在关联性的会话流量在匹配域间规则的条件下才会放行。这种会话的关联性称之为“有因才有果”。防火墙基于已存在的会话表项,才能做出关联性的判断。所以如果没有始发的流量在防火墙中先形成会话表项,那么后续的流量报文会被防火墙认为非法,予以阻断。毕竟“天下不存在无缘无故的爱”。
防火墙内存中的会话表项记录了NAT转换前后数据包5元组(source ip,destination ip,protocol number,source port,destination port)的对应关系。 -
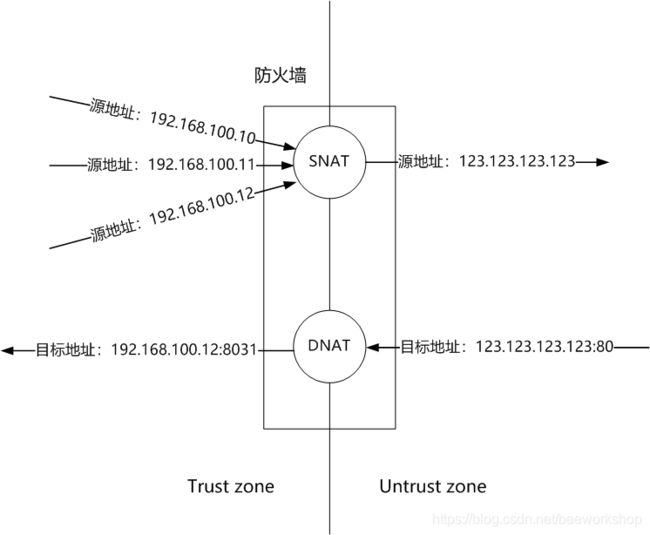
NAT
在实际应用中主要关注两种类型的NAT:
① SNAT(源地址转换,source-nat)
数据流量从trust zone发往untrust zone,在此期间把outbound的流量的source ip由tust zone地址空间中的地址转换为untrust zone地址空间中的地址,并在防火墙中形成会话表项以便匹配inbound的流量予以放行。outbound的流量是先匹配路由表在进行NAT,而inbound的流量是先NAT在匹配路由表。SNAT通常是多对一映射(超载,override或者PAT)。防火墙需要在本地对会话流量的报文的源端口进行变换,以避免不同会话出现源端口冲突的情况,同时对多个会话在本地统一进行管理。
SNAT的主要应用场景是内网地址/主机隐藏,内网用户上网。这里可以提供一种正向代理的功能。
② DNAT(目标地址转换,端口转发,nat server)
数据流量从untrust zone发往trust zone,在此期间把inbound流量的destination ip由untrust zone的地址空间转换为trust zone地址空间中的地址,并在防火墙中形成会话表项以便匹配outbound的流量予以放行。inbound的流量是先进行NAT再路由。当然在DNAT过程中也可以不变换目标地址,而只进行目标端口的转换——由此得名端口转发。让防火墙可以看到四层以上甚至应用层的数据,把目标端口的转换与负载均衡算法结合就能实现所谓的反向代理,实现负载均衡。DNAT主要是一对一映射。在映射过程中需要对入站的包的源端口在本地进行变换,以避免不同会话出现源端口冲突的情况,同时对多个会话在本地统一进行管理。
DNAT的主要应用场景是外网用户访问内网提供的服务(内网需要暴露应用到外网)。
上述两种类型的NAT可以在提供相同转换目标地址的情况下并行不悖。

-
非军事区(DMZ)
在划分区域的时候有时很难做到非黑即白,将所有的业务应用都归入trust zone和untrust zone。业务服务器的存在需要引入一个缓冲区——DMZ,使得DMZ中的服务器可以访问公网,trust zone中的主机也可以访问公网,反过来公网不能访问内网,而公网又可以访问DMZ中服务器提供的服务,一旦DMZ被公网攻破也不至于顺利成章地访问内网,对内网造成威胁。

2. Firewalld的基本使用 -
配置目录
| 配置目录 | 用途 |
|---|---|
| /etc/firewalld/ | 存放用户提供的配置,优先起效。 |
| /usr/lib/firewalld/ | 存放默认配置(模版),升级软件后会被更新。 |
- 主配置文件
位于目录/etc/firewalld/中
| 配置文件 | 描述 |
|---|---|
| firewalld.conf | 配置firewalld的基本信息。 |
| lockdown-whitelist.xml | 当Lockdown为yes的时候用来限制可以通过D-BUS接口操作firewalld的程序 |
| direct.xml | 通过这个文件可以直接使用防火墙的过滤规则,这对于熟悉iptables的用户来说会非常顺手,另外也对从原来的iptables到firewalld的迁移提供了一条绿色通道 |
firewalld.conf的配置内容
# firewalld config file

# default zone
# The default zone used if an empty zone string is used.
# Default: public
DefaultZone=public

# Minimal mark
# Marks up to this minimum are free for use for example in the direct
# interface. If more free marks are needed, increase the minimum
# Default: 100
MinimalMark=100

# Clean up on exit
# If set to no or false the firewall configuration will not get cleaned up
# on exit or stop of firewalld
# Default: yes
CleanupOnExit=yes

# Lockdown
# If set to enabled, firewall changes with the D-Bus interface will be limited
# to applications that are listed in the lockdown whitelist.
# The lockdown whitelist file is lockdown-whitelist.xml
# Default: no
Lockdown=no

# IPv6_rpfilter
# Performs a reverse path filter test on a packet for IPv6. If a reply to the
# packet would be sent via the same interface that the packet arrived on, the
# packet will match and be accepted, otherwise dropped.
# The rp_filter for IPv4 is controlled using sysctl.
# Default: yes
IPv6_rpfilter=yes

# IndividualCalls
# Do not use combined -restore calls, but individual calls. This increases the
# time that is needed to apply changes and to start the daemon, but is good for
# debugging.
# Default: no
IndividualCalls=no

# LogDenied
# Add logging rules right before reject and drop rules in the INPUT, FORWARD
# and OUTPUT chains for the default rules and also final reject and drop rules
# in zones. Possible values are: all, unicast, broadcast, multicast and off.
# Default: off
LogDenied=off

# AutomaticHelpers
# For the secure use of iptables and connection tracking helpers it is
# recommended to turn AutomaticHelpers off. But this might have side effects on
# other services using the netfilter helpers as the sysctl setting in
# /proc/sys/net/netfilter/nf_conntrack_helper will be changed.
# With the system setting, the default value set in the kernel or with sysctl
# will be used. Possible values are: yes, no and system.
# Default: system
AutomaticHelpers=system
- zones
# ll /usr/lib/firewalld/zones
total 36
-rw-r--r--. 1 root root 299 Aug  5  2017 block.xml
-rw-r--r--. 1 root root 293 Aug  5  2017 dmz.xml
-rw-r--r--. 1 root root 291 Aug  5  2017 drop.xml
-rw-r--r--. 1 root root 304 Aug  5  2017 external.xml
-rw-r--r--. 1 root root 369 Aug  5  2017 home.xml
-rw-r--r--. 1 root root 384 Aug  5  2017 internal.xml
-rw-r--r--. 1 root root 315 Aug  5  2017 public.xml
-rw-r--r--. 1 root root 162 Aug  5  2017 trusted.xml
-rw-r--r--. 1 root root 311 Aug  5  2017 work.xml
上述配置文件对zone的默认行为提供了定义。
- services
# ls /usr/lib/firewalld/services/
amanda-client.xml        freeipa-replication.xml  libvirt-tls.xml           postgresql.xml       spideroak-lansync.xml
amanda-k5-client.xml     freeipa-trust.xml        libvirt.xml               privoxy.xml          squid.xml
bacula-client.xml        ftp.xml                  managesieve.xml           proxy-dhcp.xml       ssh.xml
bacula.xml               ganglia-client.xml       mdns.xml                  ptp.xml              synergy.xml
bitcoin-rpc.xml          ganglia-master.xml       mosh.xml                  pulseaudio.xml       syslog-tls.xml
bitcoin-testnet-rpc.xml  high-availability.xml    mountd.xml                puppetmaster.xml     syslog.xml
bitcoin-testnet.xml      https.xml                mssql.xml                 quassel.xml          telnet.xml
bitcoin.xml              http.xml                 ms-wbt.xml                radius.xml           tftp-client.xml
ceph-mon.xml             imaps.xml                mysql.xml                 RH-Satellite-6.xml   tftp.xml
ceph.xml                 imap.xml                 nfs.xml                   rpc-bind.xml         tinc.xml
cfengine.xml             ipp-client.xml           nrpe.xml                  rsh.xml              tor-socks.xml
condor-collector.xml     ipp.xml                  ntp.xml                   rsyncd.xml           transmission-client.xml
ctdb.xml                 ipsec.xml                open.xml               samba-client.xml     vdsm.xml
dhcpv6-client.xml        iscsi-target.xml         ovirt-imageio.xml         samba.xml            vnc-server.xml
dhcpv6.xml               kadmin.xml               ovirt-storageconsole.xml  sane.xml             wbem-https.xml
dhcp.xml                 kerberos.xml             ovirt-vmconsole.xml       sips.xml             xmpp-bosh.xml
dns.xml                  kibana.xml               pmcd.xml                  sip.xml              xmpp-client.xml
docker-registry.xml      klogin.xml               pmproxy.xml               smtp-submission.xml  xmpp-local.xml
dropbox-lansync.xml      kpasswd.xml              pmwebapis.xml             smtps.xml            xmpp-server.xml
elasticsearch.xml        kshell.xml               pmwebapi.xml              smtp.xml
freeipa-ldaps.xml        ldaps.xml                pop3s.xml                 snmptrap.xml
freeipa-ldap.xml         ldap.xml                 pop3.xml                  snmp.xml
看一个默认service配置文件
<service>
  <short>WWW (HTTP)short>
  <description>HTTP is the protocol used to serve Web pages. If you plan to make your Web server publicly available, enable this option. This option is not required for viewing pages locally or developing Web pages.description>
  <port protocol="tcp" port="80"/>
service>
- 自定义配置文件的方法
从/usr/lib/firewalld/services/目录中拷贝一个配置模版文件(*.xml)到/etc/firewalld/services/目录下。给一个service名字。比如
cp /usr/lib/firewalld/services/http.xml /etc/firewalld/services/foo.xml
vim foo.xml
修改内容如下
<service>
  <short>fooshort>
  <description>come on in foodescription>
  <port protocol="tcp" port="8080"/>
service>
这样就完成自定以service配置文件的定义。
- 常用操作
启动firewalld
systemctl start  firewalld

查看状态
systemctl status firewalld 或者 firewall-cmd --state

停止firewalld
systemctl disable firewalld

禁用firewalld
systemctl stop firewalld

查看default zone和active zone(默认都为public)
firewall-cmd --get-default-zone
firewall-cmd --get-active-zones

列出全部启用的区域的特性
firewall-cmd --list-all-zones

输出区域 <zone> 全部启用的特性
firewall-cmd [–zone=<zone>] –list-all
firewall-cmd --zone=work --list-all

设置默认区域
firewall-cmd --set-default-zone=work

根据接口获取区域
firewall-cmd –get-zone-of-interface=<interface>

将接口增加到区域
firewall-cmd [--zone=<zone>] --add-interface=<interface>

修改接口所属区域
firewall-cmd [--zone=<zone>] --change-interface=<interface>

从区域中删除一个接口
firewall-cmd [--zone=<zone>] --remove-interface=<interface>

查询区域中是否包含某接口
firewall-cmd [--zone=<zone>] --query-interface=<interface>

查看当前开了哪些端口
一个服务对应一个端口,每个服务对应/etc/firewalld/services/下面一个xml配置文件
(/usr/lib/firewalld/services/下面是默认的配置文件)
firewall-cmd --list-services

查看还有哪些服务可以打开
firewall-cmd --get-services

查看所有打开的端口
firewall-cmd --zone=public --list-ports

更新防火墙规则
firewall-cmd --reload           不中断已有会话
firewall-cmd --complete-reload  中断已有会话

添加一个服务到firewalld
firewall-cmd --add-service=foo
持久化
firewall-cmd --permanent --add-service=http

启用应急模式阻断所有网络连接
firewall-cmd --panic-on

禁用应急模式
firewall-cmd --panic-off

查询应急模式
firewall-cmd --query-panic

使区域中的 foo 服务生效60秒
firewall-cmd --zone=home --add-service=foo --timeout=60

启用区域的 ICMP 阻塞功能
firewall-cmd [--zone=<zone>] --add-icmp-block=<icmptype>

禁止区域的 ICMP 阻塞功能
firewall-cmd [--zone=<zone>] --remove-icmp-block=<icmptype>

查询区域的 ICMP 阻塞功能
firewall-cmd [--zone=<zone>] --query-icmp-block=<icmptype>
firewall-cmd --zone=public --add-icmp-block=echo-reply

在区域中启用端口转发或映射
firewall-cmd [--zone=<zone>] --add-forward-port=port=<port>[-<port>]:proto=<protocol> { :toport=<port>[-<port>] | :toaddr=<address> | :toport=<port>[-<port>]:toaddr=<address> }
如:把原本访问本机888端口的流量转发到22端口,要求当前和长期均有效
firewall-cmd --permanent --zone=public --add-forward-port=port=888:proto=tcp:toport=22:toaddr=192.168.10.10

禁止区域的端口转发或者端口映射
firewall-cmd [--zone=<zone>] --remove-forward-port=port=<port>[-<port>]:proto=<protocol> { :toport=<port>[-<port>] | :toaddr=<address> | :toport=<port>[-<port>]:toaddr=<address> }

查询区域的端口转发或者端口映射
firewall-cmd [--zone=<zone>] --query-forward-port=port=<port>[-<port>]:proto=<protocol> { :toport=<port>[-<port>] | :toaddr=<address> | :toport=<port>[-<port>]:toaddr=<address> }
firewall-cmd --zone=home --add-forward-port=port=22:proto=tcp:toaddr=127.0.0.2
- SNAT配置
将内部的地址转换为外网接口地址
firewall-cmd --permanent [--zone=<zone>] --add-masquerade
firewall-cmd --reload

firewall-cmd [--zone=<zone>] --add-masquerade
firewall-cmd [--zone=<zone>] --remove-masquerade
firewall-cmd --permanent [--zone=<zone>] --remove-masquerade
firewall-cmd [--zone=<zone>] --query-masquerade
firewall-cmd --permanent [--zone=<zone>] --query-masquerade
- DNAT配置
法一:
cp /usr/lib/firewalld/services/http.xml /etc/firewalld/services/foo.xml

修改foo.xml的配置

firewall-cmd --zone=public --add-service=foo --permanent

firewall-cmd --reload

删除
firewall-cmd --zone=public --remove-service=http --permanent
法二:
添加规则
firewall-cmd --zone=public --add-port=80/tcp --permanent
firewall-cmd --zone=public --add-port=8080-8081/tcp --permanent

载入当前规则集
firewall-cmd --reload

查看规则
firewall-cmd --zone= public --query-port=80/tcp

删除规则
firewall-cmd --zone= public --remove-port=80/tcp --permanent
- 富规则的使用
firewalld中的富规则表示更细致、更详细的防火墙策略配置,它可以针对系统服务、端口号、源地址和目标地址等诸多信息进行更有针对性的策略配置。它的优先级在所有的防火墙策略中也是最高的。比如,我们可以在firewalld服务中配置一条富规则,使其拒绝192.168.10.0/24网段的所有用户访问本机的ssh服务(22端口):
firewall-cmd --permanent --zone=public --add-rich-rule="rule family="ipv4" source address="192.168.10.0/24" service name="ssh" reject"
firewall-cmd --reload
