CountDownLatch 深度解析 由浅入深的了解高并发编程
目录
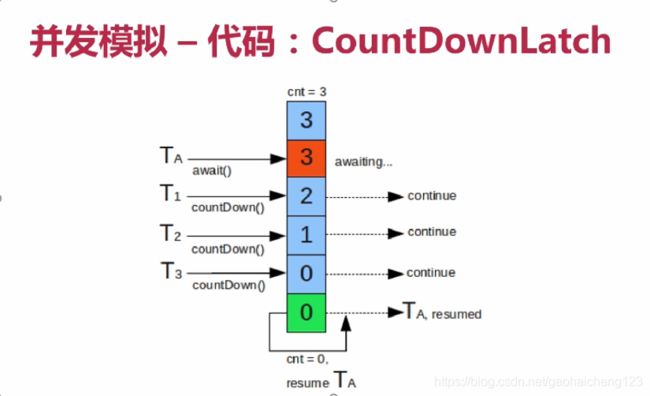
一、CountDownLatch的应用场景
1、做并发性能测试
2、多线程执行任务,最后汇总
情景模拟
上代码:
二、分析一下CountDownLatch底层实现
CountDownLatch我们如何接近你:
JDK1.8 CountDownLatch源码:
CountDownLatch中的核心方法
三、线程的挂起和恢复#
unpark#
park#
四、CountDownLatch 的唤醒机制

AbstractQueuedSynchronizer,简称AQS。是一个用于构建锁和同步器的框架,许多同步器都可以通过AQS很容易并且高效地构造出来,如常用的
ReentrantLock、Semaphore、CountDownLatch等。基于AQS来构建同步器能带来许多好处。它不仅能极大地减少实现工作,而且也不必处理在多个位置上发生的竞争问题。在基于AQS构建的同步器中,只可能在一个时刻发生阻塞,从而降低上下文切换的开销,并提高吞吐量。Doug Lea 大神在设计AQS时也充分考虑了可伸缩性,因此java.util.concurrent中所有基于AQS构建的同步器都能获得这个优势。大多数开发者都不会直接使用AQS,JUC中标准同步器类都能够满足绝大多数情况的需求。但如果能了解标准同步器类的实现方式,那么对理解它们的工作原理是非常有帮助的。
一、CountDownLatch的应用场景
1、做并发性能测试
这是一种真正意义上的并发,不再是启动一个线程,调用一下start()方法了,而是开启线程后,让线程在同一起跑线上开始竞争资源,测试代码的并发能力。
2、多线程执行任务,最后汇总
由于业务比较复杂,每个功能比较独立而且十分耗时,但是条件是等待每个功能都执行完毕后,主线程才能继续向下执行。
针对于以上使用背景,我们可以模拟一种场景,将上述的两种情况都覆盖到:
情景模拟
背景:
今年学校组织了一场运动会,其中有一个项目是1000米跑步比赛。
参赛人员:
在经过一系列的比赛过后,最后决赛就只剩下了5个人,他们分别是:
张三
李四
王五
赵六
* 田七
他们开始了最终的决赛。
比赛要求:
1、听发令枪后开始跑。
2、不得抢跑。
3、最后由裁判统计好结果后比赛结束。
上代码:
运动员类:
package org.hcgao.common.blog.AQS.countdownlatch;

import java.util.concurrent.CountDownLatch;

public class Sportsman implements Runnable {

    	private String sportsmanName;
    	// 发令枪信号
    	private CountDownLatch firingGunSignal;
    	// 赛场所有运动员都到达目的地
    	private CountDownLatch answer;

    	public Sportsman(String sportsmanName, CountDownLatch firingGunSignal, CountDownLatch answer) {
    		this.sportsmanName = sportsmanName;
    		this.firingGunSignal = firingGunSignal;
    		this.answer = answer;
    	}

		@Override
		public void run() {
			 try {
				System.out.println("选手--" + sportsmanName + "--准备就绪,正在等待裁判发布口令");
				firingGunSignal.await();
	            System.out.println("选手--" + sportsmanName + "--已接受裁判口令");
	            long time = (long) (Math.random() * 10000);
	            Thread.sleep(time);
	            System.out.println("选手--" + sportsmanName + "--到达终点, 用时  :  "+ time + "毫秒");
	            answer.countDown();
			} catch (InterruptedException e) {
                e.printStackTrace();
            }

		}
    }
调用方法:
package org.hcgao.common.blog.AQS.countdownlatch;

import java.util.concurrent.CountDownLatch;
import java.util.concurrent.ExecutorService;
import java.util.concurrent.Executors;
/**
 * 背景:
 *     今年学校组织了一场运动会,其中有一个项目是1000米跑步比赛。
 * 参赛人员:
 *     在经过一系列的比赛过后,最后决赛就只剩下了5个人,他们分别是:
 *     张三
 *     李四
 *     王五
 *     赵六
 *     田七
 *     他们开始了最终的决赛。
 *比赛要求:
 *	1、听发令枪后开始跑。
 *	2、不得抢跑。
 *	3、最后由裁判统计好结果后比赛结束。
 *
 * @author gaohaicheng123
 *
 */
public class CountdownLatchGun {
    public static void main(String[] args) {
        ExecutorService service = Executors.newCachedThreadPool();
        final CountDownLatch firingGunSignal = new CountDownLatch(1);
        final CountDownLatch answer = new CountDownLatch(5);

        Sportsman zhangsan = new Sportsman("张三", firingGunSignal, answer);
        Sportsman lisi = new Sportsman("李四", firingGunSignal, answer);
        Sportsman wangwu = new Sportsman("王五", firingGunSignal, answer);
        Sportsman zhaoliu = new Sportsman("赵六", firingGunSignal, answer);
        Sportsman tianqi = new Sportsman("田七", firingGunSignal, answer);
        service.execute(zhangsan);
        service.execute(lisi);
        service.execute(wangwu);
        service.execute(zhaoliu);
        service.execute(tianqi);
        try {
            Thread.sleep((long) (Math.random() * 10000));
            System.out.println("裁判"+Thread.currentThread().getName()+"即将发射信号枪");
            firingGunSignal.countDown();
            System.out.println("裁判"+Thread.currentThread().getName()+"已发信号枪,正在等待所有选手到达终点");
            answer.await();
            System.out.println("所有运动员均到达了目的地,裁判得到了他们的比赛数据。");
            System.out.println("裁判"+Thread.currentThread().getName()+"汇总成绩,进行排名,颁奖,比赛结束");
        } catch (InterruptedException e) {
            e.printStackTrace();
        }
        service.shutdown();
    }


}
执行结果:
选手王五准备就绪,正在等待裁判发布口令
选手张三准备就绪,正在等待裁判发布口令
选手赵六准备就绪,正在等待裁判发布口令
选手李四准备就绪,正在等待裁判发布口令
选手田七准备就绪,正在等待裁判发布口令
裁判main即将发射信号枪
选手王五已接受裁判口令
选手张三已接受裁判口令
选手李四已接受裁判口令
选手赵六已接受裁判口令
选手田七已接受裁判口令
裁判main已发信号枪,正在等待所有选手到达终点
选手赵六到达终点, 用时  :  225毫秒
选手王五到达终点, 用时  :  492毫秒
选手张三到达终点, 用时  :  1153毫秒
选手田七到达终点, 用时  :  4516毫秒
选手李四到达终点, 用时  :  6936毫秒
所有运动员均到达了目的地,裁判得到了他们的比赛数据。
裁判main汇总成绩,进行排名,颁奖,比赛结束
二、分析一下CountDownLatch底层实现
CountDownLatch我们如何接近你:
JDK1.8 CountDownLatch源码:
public class CountDownLatch {
/**
* Synchronization control For CountDownLatch.
* Uses AQS state to represent count.
*/
private static final class Sync extends AbstractQueuedSynchronizer {
        private static final long serialVersionUID = 4982264981922014374L;

        Sync(int count) {
            setState(count);
        }

        int getCount() {
            return getState();
        }

        protected int tryAcquireShared(int acquires) {
            return (getState() == 0) ? 1 : -1;
        }

        protected boolean tryReleaseShared(int releases) {
            // Decrement count; signal when transition to zero
            for (;;) {
                int c = getState();
                if (c == 0)
                    return false;
                int nextc = c-1;
                if (compareAndSetState(c, nextc))
                    return nextc == 0;
            }
        }
    }
private final Sync sync;
/**
* Constructs a {@code CountDownLatch} initialized with the given count.
*
* @param count the number of times {@link #countDown} must be invoked
* before threads can pass through {@link #await}
* @throws IllegalArgumentException if {@code count} is negative
*/
public CountDownLatch(int count) {
if (count < 0) throw new IllegalArgumentException("count < 0");
this.sync = new Sync(count);
}
/**
* Causes the current thread to wait until the latch has counted down to
* zero, unless the thread is {@linkplain Thread#interrupt interrupted}.
*
* If the current count is zero then this method returns immediately.
*
*
If the current count is greater than zero then the current
* thread becomes disabled for thread scheduling purposes and lies
* dormant until one of two things happen:
*
* - The count reaches zero due to invocations of the
* {@link #countDown} method; or
*
- Some other thread {@linkplain Thread#interrupt interrupts}
* the current thread.
*
*
* If the current thread:
*
* - has its interrupted status set on entry to this method; or
*
- is {@linkplain Thread#interrupt interrupted} while waiting,
*
* then {@link InterruptedException} is thrown and the current thread's
* interrupted status is cleared.
*
* @throws InterruptedException if the current thread is interrupted
* while waiting
*/
public void await() throws InterruptedException {
        sync.acquireSharedInterruptibly(1);
    }
/**
* Causes the current thread to wait until the latch has counted down to
* zero, unless the thread is {@linkplain Thread#interrupt interrupted},
* or the specified waiting time elapses.
*
* If the current count is zero then this method returns immediately
* with the value {@code true}.
*
*
If the current count is greater than zero then the current
* thread becomes disabled for thread scheduling purposes and lies
* dormant until one of three things happen:
*
* - The count reaches zero due to invocations of the
* {@link #countDown} method; or
*
- Some other thread {@linkplain Thread#interrupt interrupts}
* the current thread; or
*
- The specified waiting time elapses.
*
*
* If the count reaches zero then the method returns with the
* value {@code true}.
*
*
If the current thread:
*
* - has its interrupted status set on entry to this method; or
*
- is {@linkplain Thread#interrupt interrupted} while waiting,
*
* then {@link InterruptedException} is thrown and the current thread's
* interrupted status is cleared.
*
* If the specified waiting time elapses then the value {@code false}
* is returned. If the time is less than or equal to zero, the method
* will not wait at all.
*
* @param timeout the maximum time to wait
* @param unit the time unit of the {@code timeout} argument
* @return {@code true} if the count reached zero and {@code false}
* if the waiting time elapsed before the count reached zero
* @throws InterruptedException if the current thread is interrupted
* while waiting
*/
public boolean await(long timeout, TimeUnit unit)
throws InterruptedException {
return sync.tryAcquireSharedNanos(1, unit.toNanos(timeout));
}
/**
* Decrements the count of the latch, releasing all waiting threads if
* the count reaches zero.
*
*
If the current count is greater than zero then it is decremented.
* If the new count is zero then all waiting threads are re-enabled for
* thread scheduling purposes.
*
*
If the current count equals zero then nothing happens.
*/
public void countDown() {
sync.releaseShared(1);
}
/**
* Returns the current count.
*
*
This method is typically used for debugging and testing purposes.
*
* @return the current count
*/
public long getCount() {
return sync.getCount();
}
/**
* Returns a string identifying this latch, as well as its state.
* The state, in brackets, includes the String {@code "Count ="}
* followed by the current count.
*
* @return a string identifying this latch, as well as its state
*/
public String toString() {
return super.toString() + "[Count = " + sync.getCount() + "]";
}
}
CountDownLatch中的核心方法
首先看一下 CountDownLatch中的内部类,是一个继承了AQS的内部类。
private static final class Sync extends AbstractQueuedSynchronizer {
private static final long serialVersionUID = 4982264981922014374L;
Sync(int count) {
setState(count);
}
int getCount() {
return getState();
}
protected int tryAcquireShared(int acquires) {
return (getState() == 0) ? 1 : -1;
}
protected boolean tryReleaseShared(int releases) {
// Decrement count; signal when transition to zero
for (;;) {
int c = getState();
if (c == 0)
return false;
int nextc = c-1;
if (compareAndSetState(c, nextc))
return nextc == 0;
}
}
}其中 CountDownLatch的构造方法 入参最后的赋值给 private volatile int state;
从例子中我们知道:CountDownLatch answer = new CountDownLatch(5);
state = 5;1、每一次 answer#countDown();方法调用 state会-1
2、线程调用 await()时线程发生阻塞。
1、await()方法:
public void await() throws InterruptedException {
sync.acquireSharedInterruptibly(1);
}其实是调用了AbstractQueuedSynchronizer #acquireSharedInterruptibly 方法
public final void acquireSharedInterruptibly(int arg)
            throws InterruptedException {
        if (Thread.interrupted())
            throw new InterruptedException();
        // state状态变量比较
        if (tryAcquireShared(arg) < 0)
            doAcquireSharedInterruptibly(arg);
    }
首先判断是否被中断,中断就抛出异常,的话与tryAcquireShared(arg)的返回值相比较,具体实现如下
protected int tryAcquireShared(int acquires) {
    return (getState() == 0) ? 1 : -1;
}
如果此时 state == 0,则继续执行,如果state >0,则进入阻塞的功能 : doAcquireSharedInterruptibly(int arg) 。
/**
     * Acquires in shared interruptible mode.
     * @param arg the acquire argument
     */
    private void doAcquireSharedInterruptibly(int arg)
    throws InterruptedException {
    final Node node = addWaiter(Node.SHARED); //该函数 用于将当前线程相关的节点将入链表尾部
    boolean failed = true;
    try {
        for (;;) {                         //将入无限for循环
            final Node p = node.predecessor();  //获得它的前节点
            if (p == head) {
                int r = tryAcquireShared(arg);
                if (r >= 0) {                  //唯一退出条件,也就是await()方法返回的条件非常重要!!
                    setHeadAndPropagate(node, r);  //该方法很关键具体下面分析
                    p.next = null; // help GC
                    failed = false;
                    return;  //到这里返回
                }
            }
            if (shouldParkAfterFailedAcquire(p, node) &&
                parkAndCheckInterrupt())// 先知道线程由该函数来阻塞的的
                throw new InterruptedException();
        }
    } finally {
        if (failed)                //如果失败或出现异常,失败 取消该节点,以便唤醒后续节点
            cancelAcquire(node);
    }
}
addWaiter进行具体的剖析:
private Node addWaiter(Node mode) {
    Node node = new Node(Thread.currentThread(), mode); //首先 new 首先创建一个新节点,并将当前线程实例封装在内部,该节点维持一个线程引用
    // Try the fast path of enq; backup to full enq on failure
    Node pred = tail; //获取tail节点,tail是volatile型的
    if (pred != null) {  //不为空
        node.prev = pred;
        if (compareAndSetTail(pred, node)) { //利用CAS设置,允许失败,后面有补救措施
            pred.next = node;
            return node;
        }
    }
    enq(node); //设置失败,表明是第一个创建节点,或者是已经被别的线程修改过了会进入这里
    return node;
}
再次进入 enq 进行具体的剖析:
上述方法设置未节点失败,表明是第一个创建节点,或者是已经被别的线程修改过了会进入这里。
仍然使用 自旋 for (;;) { ... },直到设置成功才可以推出方法。
private Node enq(final Node node) {
    for (;;) {
        Node t = tail;
        if (t == null) { // Must initialize 第一个创建时为节点为空
            if (compareAndSetHead(new Node()))
                tail = head; //初始化时 头尾节点相等
        } else {
            node.prev = t;
            if (compareAndSetTail(t, node)) { //注意这里,只有设置成功才会退出,所以该节点一定会被添加
                t.next = node;
                return t;
            }
        }
    }
}
继续分析最上面的那个方法 doAcquireSharedInterruptibly(int arg) 中的内容:
for (;;) {
final Node p = node.predecessor();
if (p == head) {/**
protected int tryAcquireShared(int acquires) {
return (getState() == 0) ? 1 : -1;
}
*/
int r = tryAcquireShared(arg); // 此处仍然是比较 state状态
if (r >= 0) { // 退出 自 旋 的唯一机会
setHeadAndPropagate(node, r);
p.next = null; // help GC
failed = false;
return;
}
}
if (shouldParkAfterFailedAcquire(p, node) &&
parkAndCheckInterrupt())
throw new InterruptedException();
}
看一下红色字体部分 if ( shouldParkAfterFailedAcquire(p, node) && parkAndCheckInterrupt() ) :
shouldParkAfterFailedAcquire(p, node)方法:
/*
		可以看到针对前驱结点pred的状态会进行不同的处理

		1.pred状态为SIGNAL,则返回true,表示要阻塞当前线程。
		2.pred状态为CANCELLED,则一直往队列头部回溯直到找到一个状态不为CANCELLED的结点,将当前节点node挂在这个结点的后面。
		3.pred的状态为初始化状态,此时通过compareAndSetWaitStatus(pred, ws, Node.SIGNAL)方法将pred的状态改为SIGNAL。

     	!!!  其实这个方法的含义很简单,就是确保当前结点的前驱结点的状态为SIGNAL,
     	SIGNAL意味着线程释放锁后会唤醒后面阻塞的线程。毕竟,只有确保能够被唤醒,当前线程才能放心的阻塞。
     	但是要注意只有在前驱结点已经是SIGNAL状态后才会执行后面的方法立即阻塞,对应上面的第一种情况。其他两种情况则因为返回false而重新执行一遍
		for循环。这种延迟阻塞其实也是一种高并发场景下的优化,试想我如果在重新执行循环的时候成功获取了锁,是不是线程阻塞唤醒的开销就省了呢?
     */
    private static boolean shouldParkAfterFailedAcquire(Node pred, Node node) {
        int ws = pred.waitStatus; // 获取前节点的状态
        if (ws == Node.SIGNAL)    // 状态为SIGNAL -1  表明前节点可以运行
            /*
             * This node has already set status asking a release
             * to signal it, so it can safely park.
             */
            return true;
        /*
         * 	如果不是则首先遍历node链条找到状态是0的节点,然后把我们新加进来的node变为这个节点的下一个节点,然后更新这个0的节点状态为-1.
         */
        if (ws > 0) { 	//状态为CANCELLED, 如果前节点状态大于0表明已经中断,
            /*
             * Predecessor was cancelled. Skip over predecessors and
             * indicate retry.
             */
            do {
                node.prev = pred = pred.prev;
            } while (pred.waitStatus > 0);
            pred.next = node;

        } else {  //状态为初始化状态(ReentrentLock语境下)
            /*
             * waitStatus must be 0 or PROPAGATE.  Indicate that we
             * need a signal, but don't park yet.  Caller will need to
             * retry to make sure it cannot acquire before parking.
             */
            compareAndSetWaitStatus(pred, ws, Node.SIGNAL); //等于0进入这里
        }
        return false;  // 只有前节点状态为Node.SIGNAL才返回真
    }
对shouldParkAfterFailedAcquire来进行一个整体的概述,首先应该明白节点的状态,节点的状态是为了表明当前线程的良好度,如果当前线程被打断了,在唤醒的过程中是不是应该忽略该线程,这个状态标志就是用来做这个的具体有如下几种:
1、线程已经被取消
/** waitStatus value to indicate thread has cancelled */
static final int CANCELLED = 1;2、线程需要去被唤醒
/** waitStatus value to indicate successor's thread needs unparking */
static final int SIGNAL = -1;3、线程正在唤醒等待条件
/** waitStatus value to indicate thread is waiting on condition */
static final int CONDITION = -2;4、线程的共享锁应该被无条件传播
/**
* waitStatus value to indicate the next acquireShared should //
* unconditionally propagate
*/
static final int PROPAGATE = -3;
注意:
线程状态 大于 0 时表明该线程已近被取消,已近是无效节点,不应该被唤醒,注意:初始化链头节点时头节点状态值为0。
当该函数 shouldParkAfterFailedAcquire 返true时 线程调用 parkAndCheckInterrupt 这个阻塞自身。到这里基本每个调用await函数都阻塞在这里 (很关键哦,应为下次唤醒,从这里开始执行哦)
/*
     * 	在这个方法里如果返回true,则执行parkAndCheckInterrupt()方法:
     * 	这里首先调用LockSupport的park方法把线程寄存,然后在判断线程的状态,
     * 	使用interrupted和interrupt方法的区别还记得吗?如果调用了interrupted方法,
     * 	会取消线程的中断状态。如果成功,则线程安全的寄存,如果寄存失败,则返回线程的中断状态并取消这个中断状态。
     */
    private final boolean parkAndCheckInterrupt() {
        LockSupport.park(this); //到这里就完成了线程的等待,这里的核心是调用了park方法实现的。
        return Thread.interrupted();
    }
Java中interrupt、interrupted和isInterrupted的关系与区别:
1、interrupt()方法
调用interrupt()方法仅仅是在当前线程中打了一个停止的标记,并不是真的停止线程,需要用户自己去监视线程的状态为并做处理。这一方法实际上完成的是,在线程受到阻塞时抛出一个中断信号,这样线程就得以退出阻塞的状态。更确切的说,如果线程被Object.wait, Thread.join和Thread.sleep三种方法之一阻塞,那么,它将接收到一个中断异常(InterruptedException),从而提早地终结被阻塞状态。
 public void interrupt() {
        if (this != Thread.currentThread())
            checkAccess();

        synchronized (blockerLock) {
            Interruptible b = blocker;
            if (b != null) {
                interrupt0();           // Just to set the interrupt flag
                b.interrupt(this);
                return;
            }
        }
        interrupt0();
    }
2、interrupted()方法
interrupted():测试当前线程(当前线程是指运行interrupted()方法的线程)是否已经中断,且清除中断状态。public static boolean interrupted() { return currentThread().isInterrupted(true); }3、
isInterrupted()方法
isInterrupted():测试线程(调用该方法的线程)是否已经中断,不清除中断状态。
public boolean isInterrupted() {
        return isInterrupted(false);
    }
interrupted和 isInterrupted两个方法有两个主要区别:
interrupted 是作用于当前线程,isInterrupted 是作用于调用该方法的线程对象所对应的线程。(线程对象对应的线程不一定是当前运行的线程。例如我们可以在A线程中去调用B线程对象的isInterrupted方法。)
这两个方法最终都会调用同一个方法——isInterrupted(boolean ClearInterrupted),只不过参数 ClearInterrupted 固定为一个是true,一个是false;下面是该方法,该方法是一个本地方法。private native boolean isInterrupted(boolean ClearInterrupted);
测试当前线程是否已经中断。线程的中断状态由该方法清除。换句话说,如果连续两次调用该方法,则第二次调用将放回false(在第一次调用已经清除了其中断的状态之后,且第二次调用检验完中断状态之前,当前线程再次中断的情况除外)。
park(Object blocker)方法进行阻塞等待唤醒:
public static void park(Object blocker) {
        Thread t = Thread.currentThread();
        setBlocker(t, blocker);
        UNSAFE.park(false, 0L);
        setBlocker(t, null);
    }
线程的挂起和恢复#
sun.misc.Unsafe 下的类 Unsafe,对线程的操作:
unpark#
public native void unpark(Object thread);释放被
park创建的在一个线程上的阻塞。这个方法也可以被使用来终止一个先前调用park导致的阻塞。这个操作是不安全的,因此必须保证线程是存活的(thread has not been destroyed)。从Java代码中判断一个线程是否存活的是显而易见的,但是从native代码中这机会是不可能自动完成的。park#
public native void park(boolean isAbsolute, long time);阻塞当前线程直到一个
unpark方法出现(被调用)、一个用于unpark方法已经出现过(在此park方法调用之前已经调用过)、线程被中断或者time时间到期(也就是阻塞超时)。在time非零的情况下,如果isAbsolute为true,time是相对于新纪元之后的毫秒,否则time表示纳秒。这个方法执行时也可能不合理地返回(没有具体原因)。并发包java.util.concurrent中的框架对线程的挂起操作被封装在LockSupport类中,LockSupport类中有各种版本pack方法,但最终都调用了Unsafe#park()方法。
如果执行到这里就知道该线程已经被挂起了,等着被唤醒了。
接下来我们就看一下可以唤醒线程的的方法吧:
2、 countDown方法:
public void countDown() {
        sync.releaseShared(1);
    }
该函数也是委托其内部类完成,具体实现如下 arg为1:
public final boolean releaseShared(int arg) {
    if (tryReleaseShared(arg)) {
        doReleaseShared();
        return true;
    }
    return false;
}
判断条件tryReleaseShared:
protected boolean tryReleaseShared(int releases) {
    // Decrement count; signal when transition to zero
    for (;;) {   // 状态自旋 -1
        int c = getState();
        if (c == 0)
            return false;
        int nextc = c-1;
        if (compareAndSetState(c, nextc)) 此处使用CAS线程安全 -1 操作
            return nextc == 0;  // nextc  为0时才返回真
    }
}
releaseShared方法,就是说当state减1后为0时才会返回为true, 执行后面的唤醒条件,否则全部忽视,假设达到唤醒条件 具体来看如何唤醒:
private void doReleaseShared() {
    for (;;) {
        Node h = head; //获取头节点,
        if (h != null && h != tail) {
            int ws = h.waitStatus;
            if (ws == Node.SIGNAL) { // 头结点的状态为Node.SIGNAL
                if (!compareAndSetWaitStatus(h, Node.SIGNAL, 0))
                    continue;            // loop to recheck cases
                unparkSuccessor(h); // 这里唤醒 很重要
            }
            else if (ws == 0 &&
                     !compareAndSetWaitStatus(h, 0, Node.PROPAGATE))
                continue;                // loop on failed CAS
        }
        if (h == head)                   // loop if head changed
            break;  //这里是否有疑问明明都有这个 Node h = head为啥还要在判断一次?多次一举别着急后面有原因
    }
}
线程的共享锁应该被无条件传播
static final int PROPAGATE = -3;
下面执行唤醒添加
private void unparkSuccessor(Node node) {
    int ws = node.waitStatus;
    if (ws < 0)
        compareAndSetWaitStatus(node, ws, 0);

    Node s = node.next;
    if (s == null || s.waitStatus > 0) {
        s = null;
        for (Node t = tail; t != null && t != node; t = t.prev)
            if (t.waitStatus <= 0)
                s = t;
    }
    if (s != null)
        LockSupport.unpark(s.thread); //唤醒线程
}
首先取该节点的后节点就行唤醒,如果后节点已被取消,则从最后一个开始往前找,找一个满足添加的节点进行唤醒,
那么看线程被唤醒后怎么执行呢,再次看一下线程阻塞的方法:
/**
     * Acquires in shared interruptible mode.
     * @param arg the acquire argument
     */
    private void doAcquireSharedInterruptibly(int arg)
    throws InterruptedException {
    final Node node = addWaiter(Node.SHARED); //该函数 用于将当前线程相关的节点将入链表尾部
    boolean failed = true;
    try {
        for (;;) {                         //将入无限for循环
            final Node p = node.predecessor();  //获得它的前节点
            if (p == head) {
                int r = tryAcquireShared(arg);
                if (r >= 0) {                  //唯一退出条件,也就是await()方法返回的条件非常重要!!
                    setHeadAndPropagate(node, r);  //该方法很关键具体下面分析
                    p.next = null; // help GC
                    failed = false;
                    return;  //到这里返回
                }
            }
            if (shouldParkAfterFailedAcquire(p, node) &&
                parkAndCheckInterrupt())// 先知道线程由该函数来阻塞的的
                throw new InterruptedException();
        }
    } finally {
        if (failed)                //如果失败或出现异常,失败 取消该节点,以便唤醒后续节点
            cancelAcquire(node);
    }
}
被唤醒后的线程会继续执行代码:
由于线程在这里被阻塞,唤醒后继续执行,由于满足条件【唤醒方法的调用条件就是 state的状态值为0】,则现在state的状态值为0,函数返回值为1 ,大于0会进入其中我们继续往下看 :
for (;;) { //将入无限for循环
final Node p = node.predecessor(); //获得它的前节点
if (p == head) {
int r = tryAcquireShared(arg);
if (r >= 0) { //唯一退出条件,也就是await()方法返回的条件非常重要!!
setHeadAndPropagate(node, r); // 该方法很关键
p.next = null; // help GC
failed = false;
return; //到这里返回
}
}
则进入setHeadAndPropagate(node, r); 方法的调用了。
private void setHeadAndPropagate(Node node, int propagate) {
    Node h = head; // Record old head for check below
    setHead(node); //这里重新设置头节点 (已上面  第一次释放锁 h== head 的重复判断相对应)

    if (propagate > 0 || h == null || h.waitStatus < 0) {
        Node s = node.next;
        if (s == null || s.isShared())
            doReleaseShared(); //注意这里 会进入这里
    }
}
再次进入 doReleaseShared()方法,就是上面唤醒线程的方法。
private void doReleaseShared() {
    	for (;;) {
            Node h = head; //获取头节点,
            if (h != null && h != tail) {
                int ws = h.waitStatus;
                if (ws == Node.SIGNAL) { // 头结点的状态为Node.SIGNAL
                    if (!compareAndSetWaitStatus(h, Node.SIGNAL, 0))
                        continue;            // loop to recheck cases
                    unparkSuccessor(h); // 这里唤醒 很重要哦
                }
                else if (ws == 0 &&
                         !compareAndSetWaitStatus(h, 0, Node.PROPAGATE))
                    continue;                // loop on failed CAS
            }
            if (h == head)                   // loop if head changed
                break;
        })
    }
CountDownLatch 的唤醒机制
-
先唤醒一个头节点 线程(第一个阻塞的线程)
-
然后被唤醒的线程重新设置头节点然后再次进入唤醒方法中,执行唤醒线程动作。
-
如此重复下去 最终所有线程都会被唤醒,其实这也是AQS共享锁的唤醒原理,自此完成了对countDownLatch阻塞和唤醒原理的基本分析