CentOS7.5安装arcgis for server 10.3
CentOS7.5安装arcgis for server 10.3
一、 环境介绍
操作系统:linux7.5 & linux7.8
 软件:Arcgis server 10.3
二、 安装步骤
2.1安装Xvfb
使用root用户执行以下命令
$ yum install xorg-x11-server-Xvfb
2.2创建arcgis用户组,创建arcgis用户
// 创建用户组arcgis
$ groupadd arcgis
// 创建用户ags
$ useradd -g arcgis ags
// 设置用户 ags 的密码
$ passwd ags
2.3上传安装包并解压
//创建文件夹存放压缩包
Mkdir -p /opt/arcgis
//上传安装包
用xshell或crt登录进入存放安装包的路径下,执行rz命令进行上传
上传完成之后执行
$ tar -xzvf ArcGIS_for_Server_Linux_1031_145870.tar.gz
2.4 切换ags用户,运行安装脚本
Cd命令进入arcgis安装包目录,进入存放setup文件的目录下。执行./Setup命令
运行安装脚本后会进行安装环境检测,检测通过才可以开始安装。
安装过程中如果提示以下错误:
There were 2 failure(s) and 2 warning(s) found:
FAILURES:
*** DIAG003: The hostname of this machine contains one or more invalid
characters. Valid characters include alpha numeric a-z, 0-9, ‘-’
and ‘.’ characters. See RFC952.
*** DIAG005: For ArcGIS Server to run properly, the file handle limits
for the install user are required to be set to 65535 and the number of
processes limits set to 25059. The current file handle limit is 1000000
and the number of processes limit is 3893.
To set these limits, you’ll need to edit the /etc/security/limits.conf
file as super user and add the following lines:
    ags soft nofile 65535
    ags hard nofile 65535
    ags soft nproc 25059
    ags hard nproc 25059
In order for the new values to take effect, you’ll need to log out and
then log back in as the ags user. To verify, run:
    ulimit -Hn -Hu
    ulimit -Sn -Su
For additional details, see the ArcGIS for Server installation guide.
WARNINGS:
*** DIAG024: The hostname entry in the /etc/hosts file must be in the
following format:
For example:
111.222.333.444 hostname.esri.com hostname
Federating an ArcGIS Server site with Portal for ArcGIS will fail if
this entry is formatted differently. Update the hostname entry before
creating your ArcGIS Server site.
*** DIAG004: The following required packages were not found:
fontconfig
These packages are required for the proper support of ArcGIS Server.
Check the ArcGIS for Server System Requirements for details.
根据提示,一个一个地来解决问题。出现的问题仅供参考,在实际安装过程中我只出现了第二个limit限制问题;所以只执行了第二步;
• (1) 解决 hostname 问题
// 查看 hostname
$ hostname
// 果然不符合规则
// 修改hostname
$ hostnamectl set-hostname centos.arcgis
• (2) 解决 limits 问题
// 编辑 limits.conf 文件
$ vim /etc/security/limits.conf
/* 追加
ags soft nofile 65535
ags hard nofile 65535
ags soft nproc 25059
ags hard nproc 25059
*/
// 根据提示:切换用户过去又切换回来,检查
/*
[root@VM_0_14_centos security]# su root
[root@VM_0_14_centos security]# su ags
[ags@VM_0_14_centos security]$ ulimit -Hn -Hu
open files (-n) 65535
max user processes (-u) 25059
[ags@VM_0_14_centos security]$ ulimit -Sn -Su
open files (-n) 65535
max user processes (-u) 25059
*/
• (3) 安装 fontconfig
$ yum install fontconfig
• (4) 继续安装
// 执行安装脚本
$ ./Setup
没有再报错,一路 Enter 下去即可。
2.5 授权
运行到最后一步会提示输入授权文件路径。和在windows上授权是一样的,选择授权文件确定即可;
2.6开放端口
虽然安装好了,但是还需要开放端口 6080 和 6443 才能在外网访问。
// 添加配置
$ /sbin/iptables --insert INPUT -p tcp --dport 6080 -j ACCEPT
$ /sbin/iptables --insert INPUT -p tcp --dport 6443 -j ACCEPT
// 保存
service iptables save
// 重启
/bin/systemctl restart iptables
我在安装的时候是提前永久关闭了防火墙所以没设置以上端口开放;永久关闭防火墙操作
- 1.首先查看防火墙状态:
- service iptables status
- 永久性生效,重启后不会复原
- 开启:
- chkconfig iptables on
- 关闭:
- chkconfig iptables off
三、 arcgis基本操作
3.1查看服务是否在运行
$ netstat -lntp
/*
[root@centos ~]# netstat -lntp
Active Internet connections (only servers)
Proto Recv-Q Send-Q Local Address Foreign Address State PID/Program name
///…
tcp 0 0 0.0.0.0:6443 0.0.0.0:* LISTEN 8377/java
tcp 0 0 0.0.0.0:22 0.0.0.0:* LISTEN 740/sshd
tcp 0 0 0.0.0.0:6080 0.0.0.0:* LISTEN 8377/java
*/
3.2服务启动和关闭
// 进入安装目录
$ cd /home/ags/arcgis/server
/*
这个目录下有很多文件,其中
startserver.sh
stopserver.sh
分别用来启动和关闭服务
测试发现直接输入 stopserver.sh 不能执行。
改为输入 ./stopserver.sh 就可以了
*/
3.3卸载
// 进入安装目录
$ cd /home/ags/arcgis/server
// 运行卸载程序
$ ./.uninstall_ArcGISServer
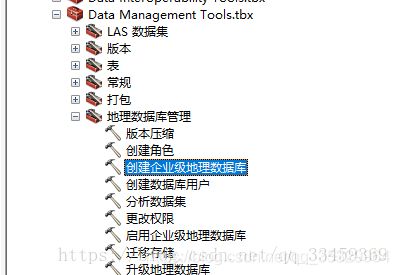
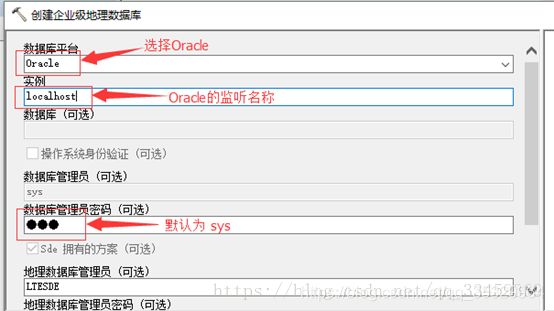
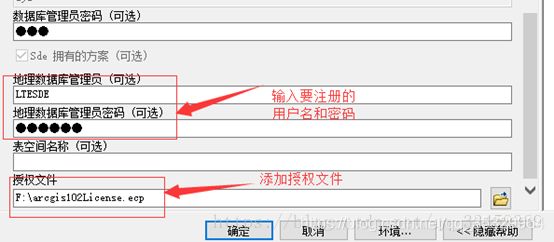
四、 Sde数据库创建
在本地windows系统打开arccatlog,打开arctoolbox工具,找到【数据管理工具】创建
实例如果不是本地创建的话,请填写ip/数据库实例名,表空间名称和用户名称我们一般都是sde

五、 发布服务
5.1创建sd文件
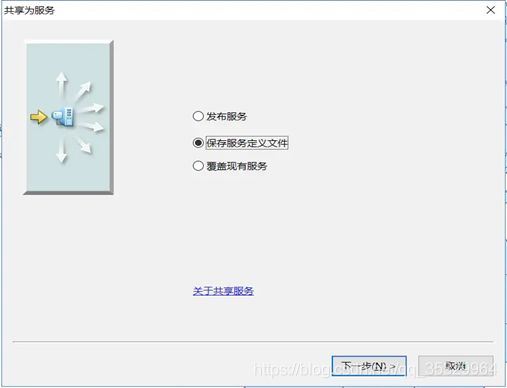
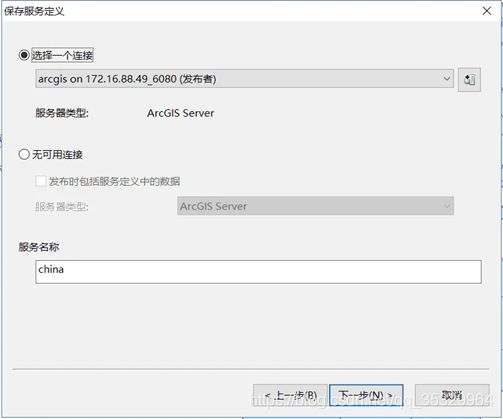
在本地打开arcmap,添加数据(可以是本地shap数据也可以是SDE表空间里的数据),右键 图层,选择共享为服务,在以下窗口选择保存服务定义文件
定义文件名称
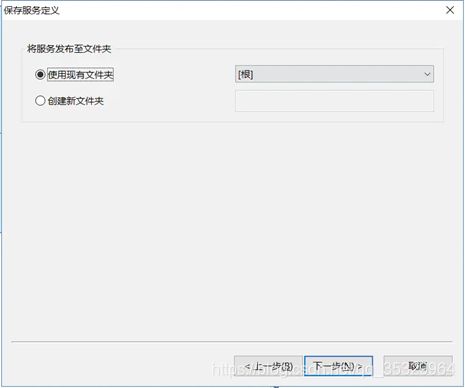
选择保存服务定义路径
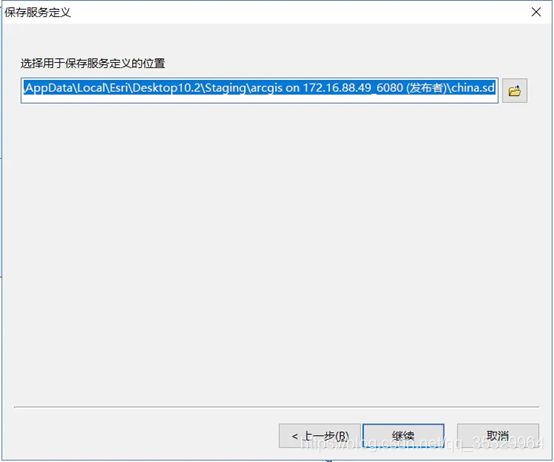
选择用于保存服务定义的位置
定义切片图层,动态图层一些参数配置,可以选择默认参数(和正常发布服务是一样的)
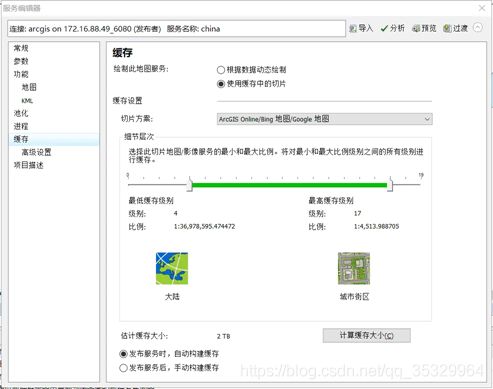
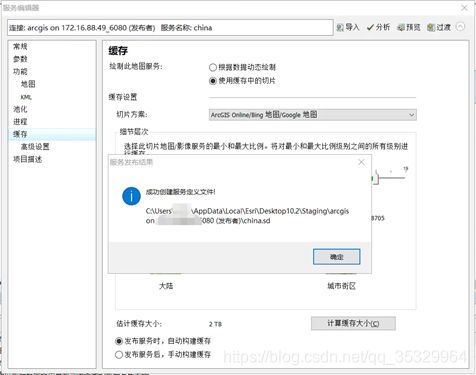
点击过渡生成.sd文件
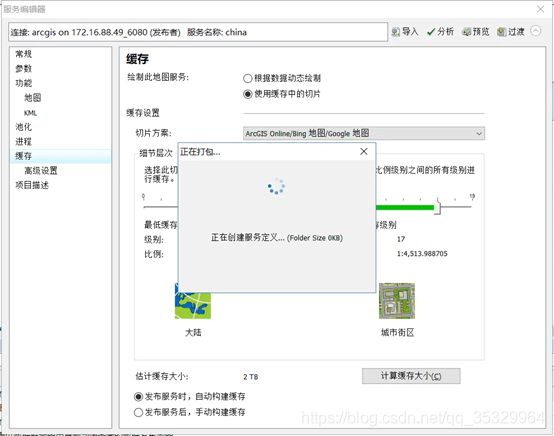
创建完成
5.2发布服务
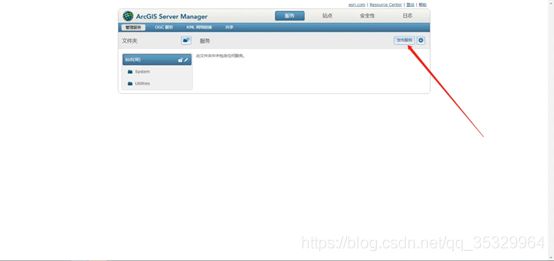
登录http://ip/arcgis/manager
输入账户和密码

点击发布服务
选择生成的sd文件
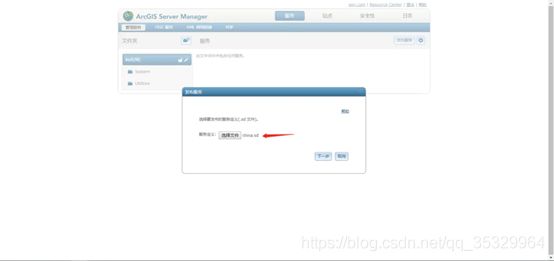
等待服务发布到服务器
