Java:深入理解ServiceLoader类与SPI机制
Java:深入理解ServiceLoader类与SPI机制
- 一、SPI接口介绍
- 1.1 SPI与API区别
- 1.2 应用场景
- 二、Demo展示
- 三、源码分析
- 四、总结
一、SPI接口介绍
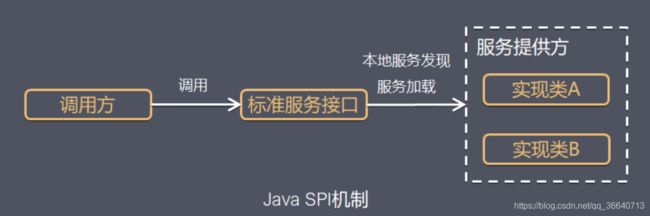
SPI(Service Provider Interface),是JDK内置的一种 服务提供发现机制,可以用来启用框架扩展和替换组件,主要是被框架的开发人员使用,比如java.sql.Driver接口,其他不同厂商可以针对同一接口做出不同的实现,MySQL和PostgreSQL都有不同的实现提供给用户,而Java的SPI机制可以为某个接口寻zhao服务实现。Java中SPI机制主要思想是将装配的控制权移到程序之外,在模块化设计中这个机制尤其重要,其核心思想就是 解耦。
JDK自带有ServiceLoader来实现这种机制,当然更为出名的是Spring的SpringFactoriesLoader
(Dubbo也有自己的SPI实现),具体实现方式上都大同小异。
另外,这里所指的Interface并不强要求必须是接口,比如本文里使用均为抽象类,也是一样的可以正常使用。
1.1 SPI与API区别
- API是类、接口、方法…的描述 ,用于调用并使用它实现一个目标。
- SPI可用于扩展和实现一个类、接口或者方法…的描述
换句话说,API 为操作提供特定的类、方法,SPI 通过操作来扩展特定的类、方法。
参考: https://stackoverflow.com/questions/2954372/difference-between-spi-and-api?answertab=votes#tab-top
当服务的提供者提供了一种接口的实现之后,需要在classpath下的META-INF/services/目录里创建一个以服务接口命名的文件,这个文件里的内容就是这个接口的具体的实现类。当其他的程序需要这个服务的时候,就可以通过查找这个jar包(一般都是以jar包做依赖)的META-INF/services/中的配置文件,配置文件中有接口的具体实现类名,可以根据这个类名进行加载实例化,就可以使用该服务了。JDK中查找服务的实现的工具类是:java.util.ServiceLoader。
1.2 应用场景
SPI扩展机制应用场景有很多,比如Common-Logging,JDBC,Dubbo等等。
SPI流程:
- 有关组织和公式定义接口标准
- 第三方提供具体实现: 实现具体方法, 配置 META-INF/services/${interface_name} 文件
- 开发者使用
比如JDBC场景下:
- 首先在Java中定义了接口java.sql.Driver,并没有具体的实现,具体的实现都是由不同厂商提供。
- 在MySQL的jar包mysql-connector-java-6.0.6.jar中,可以找到META-INF/services目录,该目录下会有一个名字为java.sql.Driver的文件,文件内容是com.mysql.cj.jdbc.Driver,这里面的内容就是针对Java中定义的接口的实现。
- 同样在PostgreSQL的jar包PostgreSQL-42.0.0.jar中,也可以找到同样的配置文件,文件内容是org.postgresql.Driver,这是PostgreSQL对Java的java.sql.Driver的实现。
二、Demo展示
1.定义一个抽象类
package com.googleasy.spi.service;
public abstract class AbstractService {

    public abstract void printMsg();
}
2.完成多个实现
public class TempAServiceImpl extends AbstractService {
    private final static Logger logger = LoggerFactory.getLogger(TempAServiceImpl.class);

    @Override
    public void printMsg() {
        logger.info("this temp A");
    }
}

//--------------------------------------------------------------
public class TempBServiceImpl extends AbstractService {
    private final static Logger logger = LoggerFactory.getLogger(TempBServiceImpl.class);

    @Override
    public void printMsg() {
        logger.info("this temp b");
    }
}
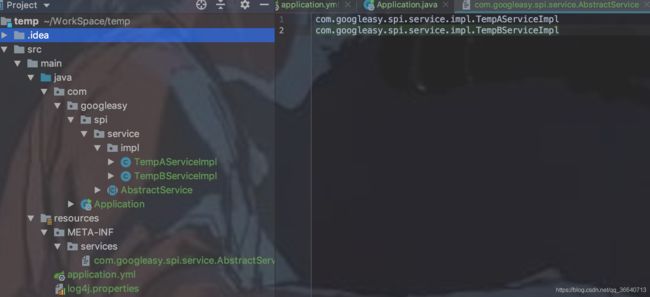
在resources/META-INF/services/目录里创建一个以com.googleasy.spi.service.AbstractService命名的文件,这个文件里的内容就是这个接口的具体的实现类地址,参考如下:
3.使用 ServiceLoader 来加载配置文件中指定的实现
   @Override
    public void run(String... args) throws Exception {
        ServiceLoader<AbstractService> loaders = ServiceLoader.load(AbstractService.class);
        for (AbstractService loader : loaders) {
            loader.printMsg();
        }
    }
执行输出结果如下:
2020-05-13 13:26:47.421  INFO 16762 --- [           main] c.g.spi.service.impl.TempAServiceImpl    : this temp A
2020-05-13 13:26:47.421  INFO 16762 --- [           main] c.g.spi.service.impl.TempBServiceImpl    : this temp b
三、源码分析
ServiceLoader主要的功能是用来完成对SPI的provider的加载。
先看下它的成员:
public final class ServiceLoader<S>
     implements Iterable<S> {
    private static final String PREFIX = "META-INF/services/";
    // The class or interface representing the service being loaded
    private final Class<S> service;
    // The class loader used to locate, load, and instantiate providers
    private final ClassLoader loader;
    // The access control context taken when the ServiceLoader is created
    private final AccessControlContext acc;
    // Cached providers, in instantiation order
    private LinkedHashMap<String,S> providers = new LinkedHashMap<>();
    // The current lazy-lookup iterator
    private LazyIterator lookupIterator;
    ......
}
可以看到他首先是实现了Iterable接口,可以迭代。
- PREFIX:指明了路径是在"META-INF/services/"下。
- service:表示正在加载的服务的类或接口。
- loader:使用的类加载器。
- acc:创建ServiceLoader时获取的访问控制上下文。
- providers:缓存的服务提供集合。
- lookupIterator:是其内部使用的迭代器,用于类的懒加载,只有在迭代时加载。
其构造方法是一个private方法,不对外提供,在使用时我们需要调用其静态的load方法,由其自身产生ServiceLoader对象:
public static <S> ServiceLoader<S> load(Class<S> service) {
    ClassLoader cl = Thread.currentThread().getContextClassLoader();
    return ServiceLoader.load(service, cl);
}
public static <S> ServiceLoader<S> load(Class<S> service,
                                             ClassLoader loader) {
    return new ServiceLoader<>(service, loader);
}
可以看到对load方法进行了重载,其中参数service是要加载的类;单参方法没有类加载器,使用的是当前线程的类加载器;最后调用的是双参的load方法;而双参的load方法也很简单,只是直接调用ServiceLoader的构造方法,实例化了一个对象。
 private ServiceLoader(Class<S> svc, ClassLoader cl) {
        service = Objects.requireNonNull(svc, "Service interface cannot be null");
        loader = (cl == null) ? ClassLoader.getSystemClassLoader() : cl;
        acc = (System.getSecurityManager() != null) ? AccessController.getContext() : null;
        reload();
    }
可以看到其构造方法逻辑依旧很简单,首先是判断传入的svc(即传入的service)是否为空,若是为空直接报异常,否则给service 成员赋值:
    public static <T> T requireNonNull(T obj, String message) {
        if (obj == null)
            throw new NullPointerException(message);
        return obj;
    }
然后给进行cl的非空判断,给loader 成员赋值;接着给acc 成员赋值,其根据是否设置了安全管理器SecurityManager来赋值;最后调用reload方法。
 /**
     * Clear this loader's provider cache so that all providers will be
     * reloaded.
     *
     *  After invoking this method, subsequent invocations of the {@link
     * #iterator() iterator} method will lazily look up and instantiate
     * providers from scratch, just as is done by a newly-created loader.
     *
     *  This method is intended for use in situations in which new providers
     * can be installed into a running Java virtual machine.
     */
    public void reload() {
        providers.clear();
        lookupIterator = new LazyIterator(service, loader);
    }
可以看到reload方法是一个public方法,那么在每次调用reload时就需要将之前加载的清空掉,所以直接使用providers这个map的clear方法清空掉缓存;接着使用刚才赋值后的service和loader产生一个LazyIterator对象赋值给lookupIterator成员。
LazyIterator是ServiceLoader的内部类,其定义如下:
private class LazyIterator
          implements Iterator<S> {
    Class<S> service;
    ClassLoader loader;
    Enumeration<URL> configs = null;
    Iterator<String> pending = null;
    String nextName = null;
    private LazyIterator(Class<S> service, ClassLoader loader) {
        this.service = service;
        this.loader = loader;
    }
    ......
}
这里就可以看到ServiceLoader的实际加载过程就交给了LazyIterator来做,将ServiceLoader的service和loader成员分别赋值给了LazyIterator的service和loader成员。
configs是服务的URL枚举;
pending是保存要加载的服务的名称集合;
nextName是下一个要加载的服务名称;
ServiceLoader实现了Iterable接口,其实现的iterator方法如下:
 private Iterator<String> parse(Class<?> service, URL u)
        throws ServiceConfigurationError
    {
        InputStream in = null;
        BufferedReader r = null;
        ArrayList<String> names = new ArrayList<>();
        try {
            in = u.openStream();
            r = new BufferedReader(new InputStreamReader(in, "utf-8"));
            int lc = 1;
            while ((lc = parseLine(service, u, r, lc, names)) >= 0);
        } catch (IOException x) {
            fail(service, "Error reading configuration file", x);
        } finally {
            try {
                if (r != null) r.close();
                if (in != null) in.close();
            } catch (IOException y) {
                fail(service, "Error closing configuration file", y);
            }
        }
        return names.iterator();
    }
可以看到它是直接创建了一个Iterator对象返回;其knownProviders成员直接获取providers的entrySet集合的迭代器;在hasNext和next方法中我们可以看到,它是先通过判断knownProviders里有没有(即providers),若没有再去lookupIterator中找;
前面我们可以看到providers里并没用put任何东西,那么就说明put操作也是在lookupIterator中完成的。
先看到lookupIterator的next方法:
public S next() {
    if (acc == null) {
        return nextService();
    } else {
        PrivilegedAction<S> action = new PrivilegedAction<S>() {
            public S run() {
                return nextService();
            }
        }
        ;
        return AccessController.doPrivileged(action, acc);
    }
}
首先根据判断acc是否为空,若为空则说明没有设置安全策略直接调用nextService方法,否则以特权方式调用nextService方法。
private S nextService() {
    if (!hasNextService())
              throw new NoSuchElementException();
    String cn = nextName;
    nextName = null;
    Class<?> c = null;
    try {
        c = Class.forName(cn, false, loader);
    }
    catch (ClassNotFoundException x) {
        fail(service,
                      "Provider " + cn + " not found");
    }
    if (!service.isAssignableFrom(c)) {
        fail(service,
                      "Provider " + cn  + " not a subtype");
    }
    try {
        S p = service.cast(c.newInstance());
        providers.put(cn, p);
        return p;
    }
    catch (Throwable x) {
        fail(service,
                      "Provider " + cn + " could not be instantiated",
                      x);
    }
    throw new Error();
    // This cannot happen
}
首先根据hasNextService方法判断,若为false直接抛出NoSuchElementException异常,否则继续执行。
hasNextService方法:
private Boolean hasNextService() {
    if (nextName != null) {
        return true;
    }
    if (configs == null) {
        try {
            String fullName = PREFIX + service.getName();
            if (loader == null)
                              configs = ClassLoader.getSystemResources(fullName); else
                             configs = loader.getResources(fullName);
        }
        catch (IOException x) {
            fail(service, "Error locating configuration files", x);
        }
    }
    while ((pending == null) || !pending.hasNext()) {
        if (!configs.hasMoreElements()) {
            return false;
        }
        pending = parse(service, configs.nextElement());
    }
    nextName = pending.next();
    return true;
}
hasNextService方法首先根据nextName成员是否为空判断,若不为空,则说明已经初始化过了,直接返回true,否则继续执行。接着configs成员是否为空,configs 是一个URL的枚举,若是configs 没有初始化,就需要对configs初始化。
configs初始化逻辑也很简单,首先根据PREFIX前缀加上PREFIX的全名得到完整路径,再根据loader的有无,获取URL的枚举。其中fail方法时ServiceLoader的静态方法,用于异常的处理,后面给出。
在configs初始化完成后,还需要完成pending的初始化或者添加。
可以看到只有当pending为null,或者没有元素时才进行循环。循环时若是configs里没有元素,则直接返回false;否则调用ServiceLoader的parse方法,通过service和URL给pending赋值;
parse方法:
private Iterator<String> parse(Class<?> service, URL u)
        throws ServiceConfigurationError
    {
        InputStream in = null;
        BufferedReader r = null;
        ArrayList<String> names = new ArrayList<>();
        try {
            in = u.openStream();
            r = new BufferedReader(new InputStreamReader(in, "utf-8"));
            int lc = 1;
            while ((lc = parseLine(service, u, r, lc, names)) >= 0);
        } catch (IOException x) {
            fail(service, "Error reading configuration file", x);
        } finally {
            try {
                if (r != null) r.close();
                if (in != null) in.close();
            } catch (IOException y) {
                fail(service, "Error closing configuration file", y);
            }
        }
        return names.iterator();
    }
可以看到parse方法直接通过URL打开输入流,通过parseLine一行一行地读取将结果保存在names数组里。
parseLine方法:
private int parseLine(Class<?> service, URL u, BufferedReader r, int lc,
                          List<String> names)
        throws IOException, ServiceConfigurationError
    {
        String ln = r.readLine();
        if (ln == null) {
            return -1;
        }
        int ci = ln.indexOf('#');
        if (ci >= 0) ln = ln.substring(0, ci);
        ln = ln.trim();
        int n = ln.length();
        if (n != 0) {
            if ((ln.indexOf(' ') >= 0) || (ln.indexOf('\t') >= 0))
                fail(service, u, lc, "Illegal configuration-file syntax");
            int cp = ln.codePointAt(0);
            if (!Character.isJavaIdentifierStart(cp))
                fail(service, u, lc, "Illegal provider-class name: " + ln);
            for (int i = Character.charCount(cp); i < n; i += Character.charCount(cp)) {
                cp = ln.codePointAt(i);
                if (!Character.isJavaIdentifierPart(cp) && (cp != '.'))
                    fail(service, u, lc, "Illegal provider-class name: " + ln);
            }
            if (!providers.containsKey(ln) && !names.contains(ln))
                names.add(ln);
        }
        return lc + 1;
    }
parseLine方法就是读该URL对应地文件地一行,可以看到通过对“#”的位置判断,忽略注释,并且剔除空格,接着是一系列的参数合法检验,然后判断providers和names里是否都没包含这个服务名称,若都没包含names直接add,最后返回下一行的行标;
当parse将所有内容读取完毕,返回names.iterator()赋值给hasNextService中的pending。循环结束,获取pending中的第一个元素赋值给nextName,返回true,hasNextService方法结束。
在nextService方法往下执行时,先用cn保存nextName的值,再让nextName=null,为下一次的遍历做准备;接着通过类加载,加载名为cn的类,再通过该类实例化对象,并用providers缓存起来,最后返回该实例对象。
其中cast方法是判断对象是否合法:
public T cast(Object obj) {
    if (obj != null && !isInstance(obj))
             throw new ClassCastException(cannotCastMsg(obj));
    return (T) obj;
}
至此ServiceLoader的迭代器的next方法结束。其hasNext方法与其类似,就不详细分析了。
而其remove方法就更直接,直接抛出异常来避免可能出现的危险情况:
public void remove() {
    throw new UnsupportedOperationException();
}
其中使用到的静态fail方法只是抛出异常:
private static void fail(Class<?> service, String msg, Throwable cause)
          throws ServiceConfigurationError {
    throw new ServiceConfigurationError(service.getName() + ": " + msg,
                                                  cause);
}
private static void fail(Class<?> service, String msg)
          throws ServiceConfigurationError {
    throw new ServiceConfigurationError(service.getName() + ": " + msg);
}
private static void fail(Class<?> service, URL u, int line, String msg)
         throws ServiceConfigurationError {
    fail(service, u + ":" + line + ": " + msg);
}
ServiceLoader除了load的两个方法外还有个loadInstalled方法:
public static <S> ServiceLoader<S> loadInstalled(Class<S> service) {
    ClassLoader cl = ClassLoader.getSystemClassLoader();
    ClassLoader prev = null;
    while (cl != null) {
        prev = cl;
        cl = cl.getParent();
    }
    return ServiceLoader.load(service, prev);
}
该方法与load方法不同在于loadInstalled使用的是扩展类加载器,而load使用的是传入进来的或者是线程的上下文类加载器,其他都一样。
ServiceLoader源码分析到此全部结束。
四、总结
SPI的理念:通过动态加载机制实现面向接口编程,提高了框架和底层实现的分离;
- ServiceLoader 类提供的 SPI 实现方法只能通过遍历迭代的方法实现获得Provider的实例对象,如果要注册了多个接口的实现类,那么显得效率不高;
- 虽然通过静态方法返回,但是每一次Service.load方法的调用都会产生一个ServiceLoader实例,不属于单例设计模式;
- ServiceLoader与ClassLoader是类似的,都可以负责一定的类加载工作,但是前者只是单纯地加载特定的类,即要求实现了Service接口的特定实现类;而后者几乎是可以加载所有Java类;
对于SPi机制的理解有两个要点:- 理解动态加载的过程,知道配置文件是如何被利用,最终找到相关路径下的类文件,并加载的;
- 理解 SPI 的设计模式:接口框架 和底层实现代码分离;
- 之所以将ServiceLoader类内部的迭代器对象称为LazyInterator,是因为在ServiceLoader对象创建完毕时,迭代器内部并没有相关元素引用,只有真正迭代的时候,才会去解析、加载、最终返回相关类(迭代的元素);
缺点:
1.不能按需加载,需要遍历所有的实现,并实例化,然后在循环中才能找到我们需要的实现。如果不想用某些实现类,或者某些类实例化很耗时,它也被载入并实例化了,这就造成了浪费。
2.获取某个实现类的方式不够灵活,只能通过 Iterator 形式获取,不能根据某个参数来获取对应的实现类。
3.多个并发多线程使用 ServiceLoader 类的实例是不安全的。
方案:
针对以上的不足点,我们在SPI机制选择时,可以考虑使用dubbo实现的SPI机制。
具体参考: http://dubbo.apache.org/zh-cn/blog/introduction-to-dubbo-spi.html