Qt学习(1)——如何基于TCP协议写一个通信小助手(服务器)界面,并生成自定义图标的.exe启动程序,以及将其打包发布
本次的任务要求:1、利用Qt,设计一个基于Tcp协议的通讯小助手;2、该助手作为服务器端;3、其拥有最基本的通信功能,能够提示服务器/客户端的ip以及端口信息、收发数据信息;4、根据自身需要,其具有一键发送自定义信息的按钮控件,用于发送特定信息给客户端,从而达到一种通过服务器发送指令去控制客户端的相应操作的效果。
其最终的服务器端界面效果如下:

图0 服务器界面
下载链接:
1、不在乎积分的看这里:https://download.csdn.net/download/binheon/11453281
2、或者:https://pan.baidu.com/s/1yZs2Y3bknRv7-oGpybghTw 提取码:2akw
注1:无客户端连接时,界面中的所有控制按钮无法使用;当有客户端连接上时方可激活按钮,进而使用。
注2:关于Tcp相关知识,可参考以下几篇博文:
https://blog.csdn.net/sinat_36629696/article/details/80740678
https://blog.csdn.net/zhang6223284/article/details/81414149
注3、基于Tcp设计网络调试助手,可参考以下几篇博文:
https://blog.csdn.net/feiyangqingyun/article/details/80319413
https://blog.csdn.net/qq_40194498/article/details/79710824
https://blog.csdn.net/weixin_41682169/article/details/94634335
1、Qt工程的建立
1)、打开Qt Creator 4.8.0软件(基于Qt 5.12.0),“+New Project”(新建工程)。
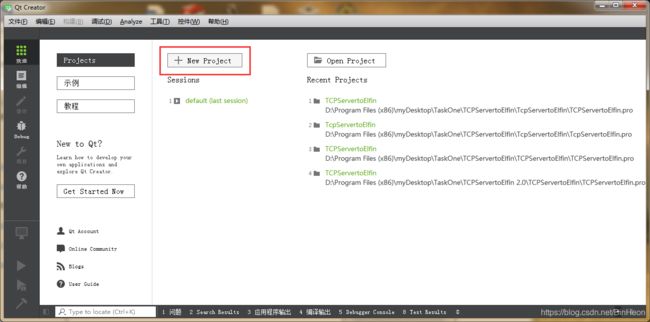
图1-1 qt新建工程界面
2)、在弹出的“新建项目”窗口选择“Application”——“Qt Widgets Application”,然后点击“Chose…”进入下一步选择。
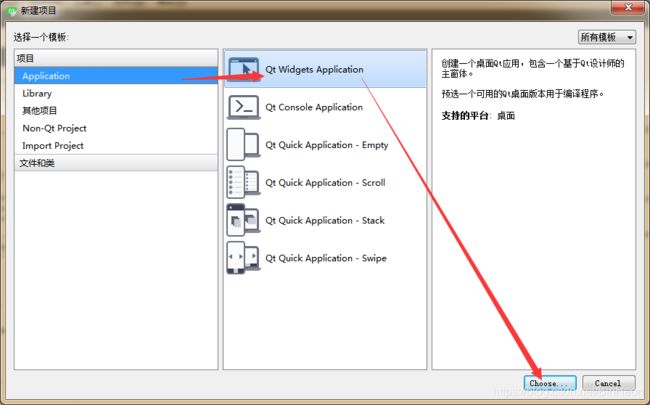
图1-2 qt新建项目的选择
3)、进入到如下1-3的“Qt Widgets Application”项目设置窗口,对该工程项目进行命名以及保存路径的选择;然后点击“下一步”。
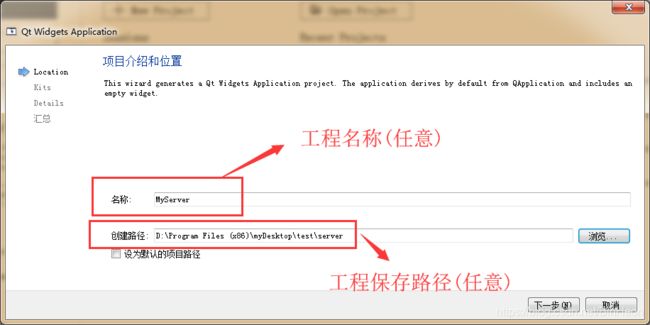
图1-3 qt新建项目的设置窗口——项目名与保存路径
4)、kit选择。该处与编译有关,所以很重要。Qt的编译方式主要有MSVC和MinGW两种,我这里选择“MSVC”。
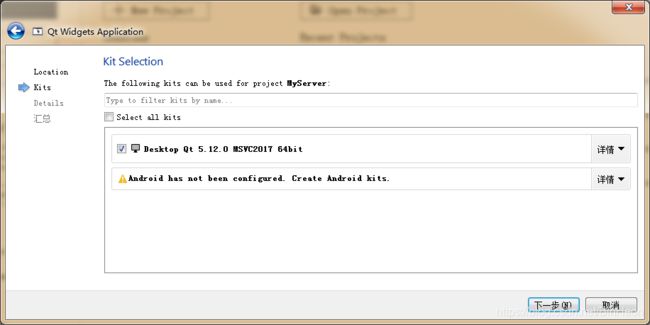
图1-4 qt新建项目的设置窗口——kit选择
注:此处可能出现找不到kit的情况;此时可参考如下博文处理:
https://bbs.csdn.net/topics/391857760?page=1
或重装,Qt Creator 的安装与配置:https://jingyan.baidu.com/article/2c8c281dbae09a0009252a6a.html
5)、类信息。该处其实对新建的项目中所自动生成的工程模板命名(包括类、头文件、源文件、ui等),所以很重要;如下图1-5改好之后,便可点击“下一步”。
注:①如果使用的代码是参考别人的,那么此处的类名必须与参考代码中的类名相同,不然会抓狂。②基类的选择,决定所设计的ui窗口,我这里选择的QWidget。QMainWindow提供一个带有菜单条、工具条、状态栏的主应用程序窗;QWidget就是一个普通的窗口部件,所有的界面效果需要我们自己设计,它是所有用户界面的一个基本单元;QDialog是对话框窗口的基类。详细可参考博文:https://blog.csdn.net/sinat_36053757/article/details/70142070
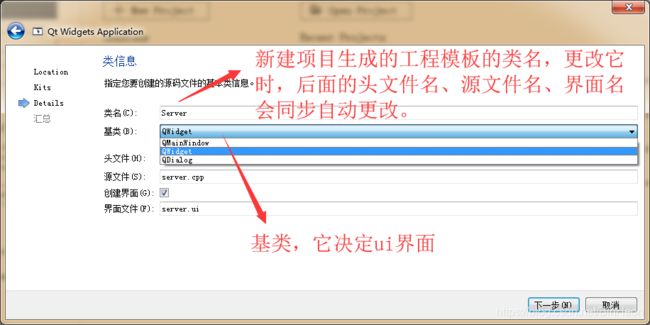
图1-5 qt新建项目的设置窗口——类信息
6)、项目管理。此处默认即可,然后点击“完成”。
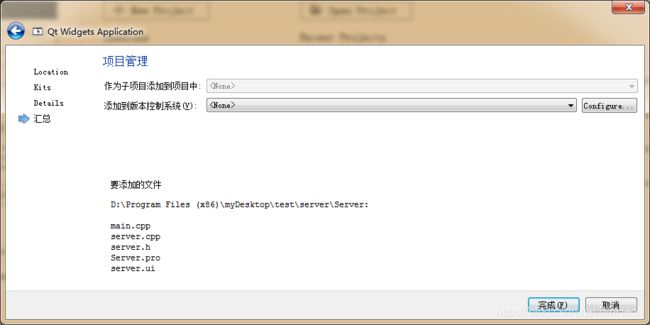
图1-6 qt新建项目的设置窗口——项目管理
7)、经过以上的设置,可得到如下图1-7所示,到此便新建项目完成。工程项目中包括: Server.pro,以及对应的.h、.c、.ui文件。.pro文件与该工程项目的编译有关、.h/.c则是程序设计(编程文件)、.ui文件则是用于ui界面设计(设计软件界面)。
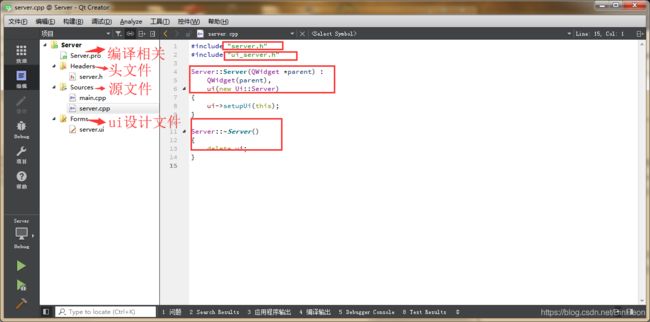
图1-7 qt完成新建项目
2、ui界面设计与编程
对于设计通讯小助手,首先我们需要根据自己需求,在.ui文件中设计好界面(即ui界面);但是光设计一个ui界面只是让其具有界面效果,而无法使得其具有任何功能或者响应。所以需要在对应的.c/.h中进行编程,从而在点击界面中的按钮等控件时,能够实现一定的响应与操作。
2.1、ui界面设计
以我本次所设计的服务器端为例,进行以下叙述。首先我们在工程中,双击鼠标左键打开server.ui文件便自动进入如下图2-1界面。界面中主要的部分如图所示:①工程菜单:包括“欢迎”(点击进入启动Qt Creator的欢迎界面)、“编辑”:切回工程界面、“设计”即ui设计界面、“Debug”、“项目”:该项目设置界面;②工程编译与调试:“电脑图标”为构建选项(主要选“debug调试”/“release生成可执行文件”)、以及编译运行;③控件栏:包含ui设计的各种所需控件,如用于布局的Layouts、用于添加空格符的“Spacers”、“Button按钮”、用于分割容纳不同控件的“Containers容器”、“Input/Display Widgets输入/显示控件”等;④ui设计界面;⑤设计界面中所选用的控件列表;⑥所选控件对象的属性。

图2-1 ui设计界面
1)、Tab Widget 制作双页效果(Assiant页与Control页)——“Containers”中“Tab Widget”
由于我的设计界面具有两页用于不同操作界面,所以首先添加Tab Widget制作分页;然后再在各个页面中添加所需的控件。如下图2-1-1所示,在“控件栏”——“Containers”中找到“Tab Widget”然后鼠标左键按住将其拖进设计窗口即可将其添加。
紧接着,在界面右上方对象列表栏中鼠标左击选中拖入的Tab Widget,便可在右下方属性栏中更改常用属性,如“ObjectName”(命名)、“enable”(是否使能)、“geometry”(位置与长宽)、“tabPositon”(tab位置)、“tabShape”(tab形状)、“currentTab Text”(tab中当前页的文本内容)、“currentTab Name”(tab中当前页的命名)等。
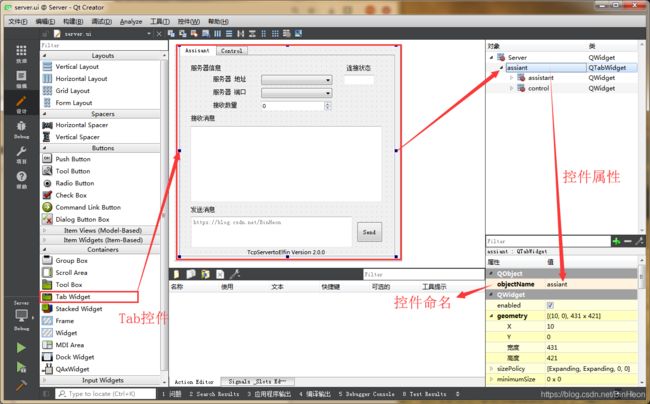
图2-1-1 Tab Widget控件添加
2)、页面1——assiant页面
页面1中所包含的控件如下图2-1-2所示,我们选好所需控件并改好属性(自己最好看看不同控件类的属性都有什么),然后按照自己意愿进行布局即可。其中:
1个“QPushButton”(按钮类)-命名为“btn_Send”-作为“Send”按钮;
1个“QLineEdit”(行编辑框类)-命名为“client_status”-作为“连接状态提示信息框”;
2个“QComboBox”(下拉框类)-命名为“comboBox_ip”、“comboBox_port”-作为ip\端口下拉选择框;
8个“QLabel”(标签类)-作为纯文本标签;
1个“QTextBrowser”(文本浏览框类)-命名为“receive_info”-作为接受信息显示框;注:该框默认属性时,框内字符只做浏览,不可键盘输入字符。
1个“QSpinBox”(整数显示框类)-命名为“receive_num”-作为自定义可接受的数据字符长度;
1个“QTextEdit”(文本编辑框类)-命名为“send_info”-作为发送数据的字符输入框。注:属性里可设置如我图中的背景字符。

图2-1-2 Tab Widget assisant页面设计
3)、页面2——Control页面
该页面中我利用“QGroupBox”(分组框类)将其分为了三个区域:命名为“con_SendCom_info”、“con_Power_Security”、“con_Command”分别作为“Send Command Infomation”区域、“Power/Security”区域、“Command”区域。
然后再在各个分区中进行布局,其具体布局如下图2-1-3;具体的所含类这里就不再一一描述,按照图中来即可。
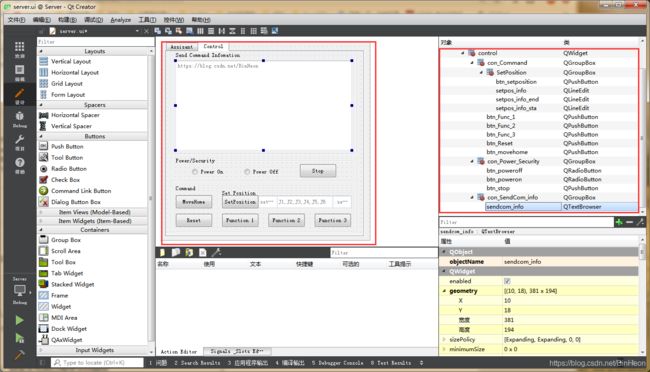
图2-1-3 Tab Widget Control页面设计
2.2、编程
1)、.pro文件中添加“QT += network”语段用于添加网络服务
#-------------------------------------------------
#
# Project created by QtCreator 2019-07-29T19:20:17
#
#-------------------------------------------------

QT       += core gui

QT       += network     #加入网络服务,从而能够添加“QTcpServer/QTcpSocket”

RC_FILE = jude.rc # 自定义程序图标

greaterThan(QT_MAJOR_VERSION, 4): QT += widgets

TARGET = Server
TEMPLATE = app

# The following define makes your compiler emit warnings if you use
# any feature of Qt which has been marked as deprecated (the exact warnings
# depend on your compiler). Please consult the documentation of the
# deprecated API in order to know how to port your code away from it.
DEFINES += QT_DEPRECATED_WARNINGS

# You can also make your code fail to compile if you use deprecated APIs.
# In order to do so, uncomment the following line.
# You can also select to disable deprecated APIs only up to a certain version of Qt.
#DEFINES += QT_DISABLE_DEPRECATED_BEFORE=0x060000    # disables all the APIs deprecated before Qt 6.0.0

CONFIG += c++11

SOURCES += \
        main.cpp \
        server.cpp

HEADERS += \
        server.h

FORMS += \
        server.ui

# Default rules for deployment.
qnx: target.path = /tmp/$${TARGET}/bin
else: unix:!android: target.path = /opt/$${TARGET}/bin
!isEmpty(target.path): INSTALLS += target
2)、.h文件代码
#ifndef SERVER_H
#define SERVER_H
#include <QWidget>
#include <QTcpServer>
#include <QTcpSocket>
#include <QHostAddress>
#include <QHostInfo>
#include <iostream>
#include "QCloseEvent"
#include <QDateTime>
#define DEBUG
#define BUFSIZE 10000
using namespace std;
namespace Ui {
class Server;
}
class Server : public QWidget
{
Q_OBJECT
public:
explicit Server(QWidget *parent = nullptr);
~Server();
void getHostInfo();
public slots:
void newConnectSlot();
void readyReadSlot();
void clientDisconnectSlot();
void initUI();
void setIpAndPort(QString ip,QString port);
void setUiButtonEnable(bool enordis);
QString setinfoBoxDisplayTime(QTcpSocket *cur_cli,QString info);
private slots:
void on_btn_Send_clicked();
void on_btn_poweron_clicked();
void on_btn_poweroff_clicked();
void on_btn_stop_clicked();
void on_btn_movehome_clicked();
void on_btn_setposition_clicked();
void on_btn_Reset_clicked();
void on_btn_Func_1_clicked();
void on_btn_Func_2_clicked();
void on_btn_Func_3_clicked();
private:
Ui::Server *ui;
QTcpServer *server;
QTcpSocket *currentClient;
QString serverIP;
uint16_t serverPort = 10003;
char *readBuf;
QString writeBuf;
int serverReceiveBufSize = 1000;
protected:
void closeEvent(QCloseEvent *event);
};
#endif
3)、.c文件代码(main文件中不用更改,默认生成)
#include "server.h"
#include "ui_server.h"
Server::Server(QWidget *parent) :
QWidget(parent),
ui(new Ui::Server)
{
ui->setupUi(this);
initUI();
getHostInfo();
server = new QTcpServer(this);
server->listen(QHostAddress::Any,serverPort);
connect(server,SIGNAL(newConnection()),this,SLOT(newConnectSlot()));
readBuf = (char*)calloc(BUFSIZE,sizeof(char));
}
Server::~Server()
{
delete ui;
free(readBuf);
}
void Server::initUI()
{
setWindowFlags(windowFlags()&~Qt::WindowMaximizeButtonHint);
setFixedSize(this->width(),this->height());
ui->receiver_num->setValue(serverReceiveBufSize);
ui->receiver_num->setMaximum(BUFSIZE);
setUiButtonEnable(false);
}
void Server::setIpAndPort(QString ip,QString port)
{
ui->comboBox_ip->addItem(ip);
ui->comboBox_port->addItem(port);
}
void Server::getHostInfo()
{
QString pcHostName = QHostInfo::localHostName();
QHostInfo pcHostInfo = QHostInfo::fromName(pcHostName);
QList<QHostAddress> addList = pcHostInfo.addresses();
if(!addList.isEmpty())
{
for(int i=0; i < addList.count(); i++)
{
QHostAddress hostIP = addList.at(i);
if(QAbstractSocket::IPv4Protocol == hostIP.protocol())
{
serverIP = hostIP.toString();
qDebug() << "\nserverIP" << serverIP;
qDebug() << "port " << serverPort;
setIpAndPort(serverIP,QString::number(serverPort));
}
}
}
}
void Server::setUiButtonEnable(bool enordis)
{
ui->btn_Send->setEnabled(enordis);
ui->con_Power_Security->setEnabled(enordis);
ui->con_Command->setEnabled(enordis);
}
QString Server::setinfoBoxDisplayTime(QTcpSocket *cur_cli,QString info)
{
QString cur_cli_ip = cur_cli->peerAddress().toString();
quint16 cur_cli_port = cur_cli->peerPort();
QDateTime local(QDateTime::currentDateTime());
QString localTime = local.toString("yyyy-MM-dd:hh:mm:ss");
QString temp = QString("[%1:%2]:%3 %4").arg(cur_cli_ip).arg(cur_cli_port).arg(info).arg(localTime);
return temp;
}
void Server::newConnectSlot()
{
#ifdef DEBUG
cout << "new client connect" << endl;
#endif
currentClient = new QTcpSocket(this);
currentClient = server->nextPendingConnection();
connect(currentClient,SIGNAL(readyRead()),this,SLOT(readyReadSlot()));
connect(currentClient,SIGNAL(disconnected()),this,SLOT(clientDisconnectSlot()));
QString connectinfo = QString("Con OK!");
QString temp = setinfoBoxDisplayTime(currentClient,connectinfo);
ui->receive_info->append(temp);
ui->client_status->setText(" OK!");
int64_t originalReadBufSize = currentClient->readBufferSize();
qDebug() << "originalReadBufSize = " << originalReadBufSize << endl;
setUiButtonEnable(true);
}
void Server::clientDisconnectSlot()
{
setUiButtonEnable(false);
QString connectinfo = QString("Con No!");
QString temp = setinfoBoxDisplayTime(currentClient,connectinfo);
ui->receive_info->append(temp);
ui->client_status->setText(" No!");
}
void Server::readyReadSlot()
{
QString connectinfo = QString("Receive!");
QString temp = setinfoBoxDisplayTime(currentClient,connectinfo);
ui->receive_info->append(temp);
QByteArray array = currentClient->readAll();
ui->receive_info->append(array);
ui->receive_info->setVerticalScrollBarPolicy(Qt::ScrollBarAlwaysOn);
ui->receive_info->setHorizontalScrollBarPolicy(Qt::ScrollBarAlwaysOn);
QTextCursor text_cursor(ui->receive_info->textCursor());
text_cursor.movePosition(QTextCursor::End);
ui->receive_info->setTextCursor(text_cursor);
#ifdef DEBUG
qDebug() << "new data:" << readBuf;
#endif
memset(readBuf,0,BUFSIZE);
}
void Server::on_btn_Send_clicked()
{
this->writeBuf = (ui->send_info->toPlainText());
this->currentClient->write(writeBuf.toUtf8().data());
}
void Server::on_btn_poweron_clicked()
{
QString comm = QString("GrpPowerOn,rbtID,;");
this->writeBuf = comm;
this->currentClient->write(writeBuf.toUtf8().data());
QString connectinfo = QString("Send Com!");
QString temp = setinfoBoxDisplayTime(currentClient,connectinfo);
ui->sendcom_info->append(temp);
QString comminfo = QString("Command: Detail:<%1>").arg(comm);
ui->sendcom_info->append(comminfo);
}
void Server::on_btn_poweroff_clicked()
{
QString comm = QString("GrpPowerOff,rbtID,;");
this->writeBuf = comm;
this->currentClient->write(writeBuf.toUtf8().data());
QString connectinfo = QString("Send Com!");
QString temp = setinfoBoxDisplayTime(currentClient,connectinfo);
ui->sendcom_info->append(temp);
QString comminfo = QString("Command: Detail:<%1>").arg(comm);
ui->sendcom_info->append(comminfo);
}
void Server::on_btn_stop_clicked()
{
QString comm = QString("GrpStop,rbtID,;");
this->writeBuf = comm;
this->currentClient->write(writeBuf.toUtf8().data());
QString connectinfo = QString("Send Com!");
QString temp = setinfoBoxDisplayTime(currentClient,connectinfo);
ui->sendcom_info->append(temp);
QString comminfo = QString("Command: Detail:<%1>").arg(comm);
ui->sendcom_info->append(comminfo);
}
void Server::on_btn_Reset_clicked()
{
QString comm = QString("GrpReset,rbtID,;");
this->writeBuf = comm;
this->currentClient->write(writeBuf.toUtf8().data());
QString connectinfo = QString("Send Com!");
QString temp = setinfoBoxDisplayTime(currentClient,connectinfo);
ui->sendcom_info->append(temp);
QString comminfo = QString("Command: Detail:<%1>").arg(comm);
ui->sendcom_info->append(comminfo);
}
void Server::on_btn_movehome_clicked()
{
QString comm = QString("MoveHoming,rbtID,;");
this->writeBuf = comm;
this->currentClient->write(writeBuf.toUtf8().data());
QString connectinfo = QString("Send Com!");
QString temp = setinfoBoxDisplayTime(currentClient,connectinfo);
ui->sendcom_info->append(temp);
QString comminfo = QString("Command: Detail:<%1>").arg(comm);
ui->sendcom_info->append(comminfo);
}
void Server::on_btn_setposition_clicked()
{
QString comm_begin = ui->setpos_info_sta->text();
QString comm_info = ui->setpos_info->text();
QString comm_end = ui->setpos_info_end->text();
QString comm = QString("%1%2%3").arg(comm_begin).arg(comm_info).arg(comm_end);
this->writeBuf = comm;
this->currentClient->write(writeBuf.toUtf8().data());
QString connectinfo = QString("Send Com!");
QString temp = setinfoBoxDisplayTime(currentClient,connectinfo);
ui->sendcom_info->append(temp);
QString comminfo = QString("Command: Detail:<%1>").arg(comm);
ui->sendcom_info->append(comminfo);
}
void Server::on_btn_Func_1_clicked()
{
QString comm = QString("Func_1");
this->writeBuf = comm;
this->currentClient->write(writeBuf.toUtf8().data());
QString connectinfo = QString("Send Com!");
QString temp = setinfoBoxDisplayTime(currentClient,connectinfo);
ui->sendcom_info->append(temp);
QString comminfo = QString("Command: Detail:<%1>").arg(comm);
ui->sendcom_info->append(comminfo);
}
void Server::on_btn_Func_2_clicked()
{
QString comm = QString("Func_2");
this->writeBuf = comm;
this->currentClient->write(writeBuf.toUtf8().data());
QString connectinfo = QString("Send Com!");
QString temp = setinfoBoxDisplayTime(currentClient,connectinfo);
ui->sendcom_info->append(temp);
QString comminfo = QString("Command: Detail:<%1>").arg(comm);
ui->sendcom_info->append(comminfo);
}
void Server::on_btn_Func_3_clicked()
{
QString comm = QString("Func_3");
this->writeBuf = comm;
this->currentClient->write(writeBuf.toUtf8().data());
QString connectinfo = QString("Send Com!");
QString temp = setinfoBoxDisplayTime(currentClient,connectinfo);
ui->sendcom_info->append(temp);
QString comminfo = QString("Command: Detail:<%1>").arg(comm);
ui->sendcom_info->append(comminfo);
}
void Server::closeEvent(QCloseEvent *event)
{
if(this->server->isListening())
this->server->close();
}
4)、运行
选择“Debug构建”,然后点击“绿三角”运行(如图2-4-1)就可得到图2-4-5的运行界面。
注:在工程中,如果当前处于Control界面(页面2)去进行编译运行,那么所生成的通信助手程序则默认启动后处于Control界面。同理,如果需要默认打开通信助手处于Assisant界面(页面1),则需要使其处于页面1,再去编译运行。
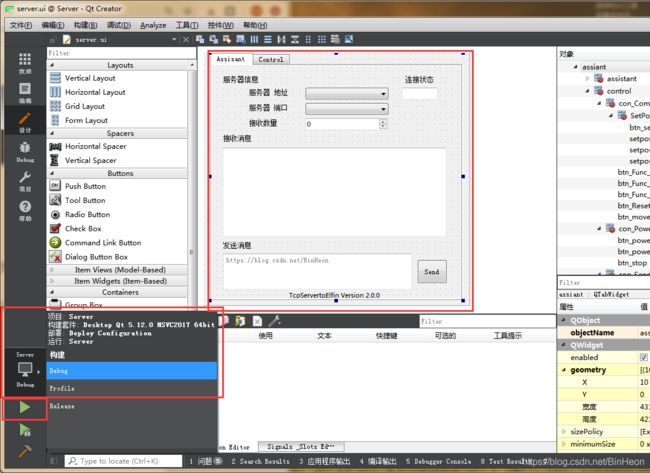
图2-1-4 运行
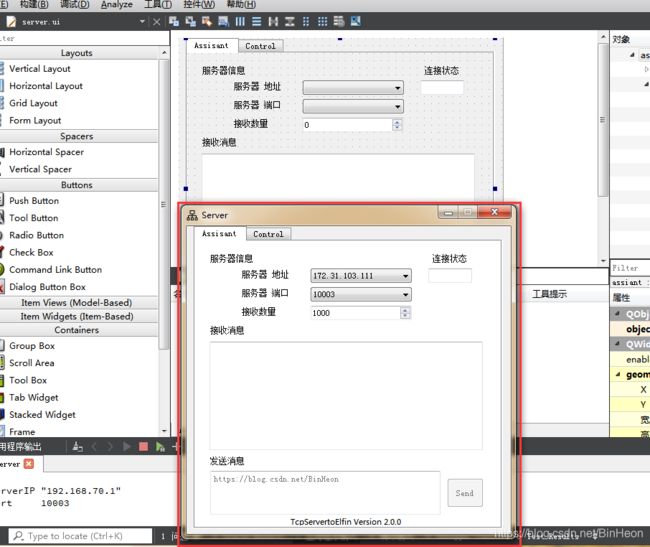
图2-1-5 通信助手运行效果
3、如何自定义生成的程序图标(windows)
如果不设置,Qt所生成的可执行程序是无图标的(也就默认一个很丑的图标),如何自定义生成如下图3所示的图标,可看本节描述。

图3 通信助手程序自定义图标效果
1)、获得图标文件(.ico文件),如我的图标为“Bin.ico”。具体怎样获得图标文件一是可以网上查找,二是可以利用制作图标的软件自己制作(如软件:Axialis IconWorkshop—链接:https://pan.baidu.com/s/1YwXXu26BePkIdn0NIbXhKw 提取码:nouh )
2)、在工程路径中新建一个文本文档,并输入:
IDI_ICON1 ICON DISCARDABLE "Bin.ico"
然后将其文本文档重命名为“.rc”格式文件,如我的“jude.rc”。
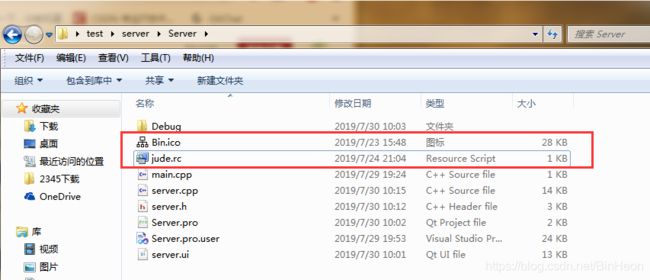
3)、在工程代码中的“.pro”文件中,添加代码:
RC_FILE = jude.rc # 自定义程序图标

4)、将工程目录中之前所构建生成的文件夹删掉(没有自行设置构建属性的前提下,如用debug构建,则会自动生成一个含有“debug”字样的文件夹,我们将其删除),然后再进行编译运行,从而使得以上的更改生效(即重新构建)。
注:在对工程更该(特别是.ui文件)之后,如果发现直接运行时并没有出现更改效果,可用此办法试试。
4、可执行程序.exe的生成与打包
4.1 Release构建生成可发布的.exe执行程序
1)、选择“Release构建”进行编译运行,从而得到所自动生成的含有“Release”字样的构建文件夹。如下图4-1所示(由于我更改了构建自动生成文件夹的格式,所以我这里是“Release”文件夹;默认情况该文件夹名字很长一串,然后“Release”字样差不多出现在其命名的最后)。

图4-1 选择“Release构建”重新构建并运行生成含有“Release”字样文件夹
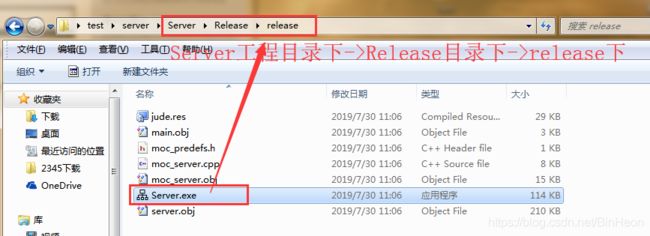
2)、在该文件夹下的“release”文件夹中含有“.exe文件”;该.exe便是用于打包的可执行文件(不过当前的.exe文件由于缺少文件,不可直接运行,因而需要通过4.2节生成环境)。如我的目录如下:
4.2 利用windeploy生成可发布的.exe可执行程序生成运行环境
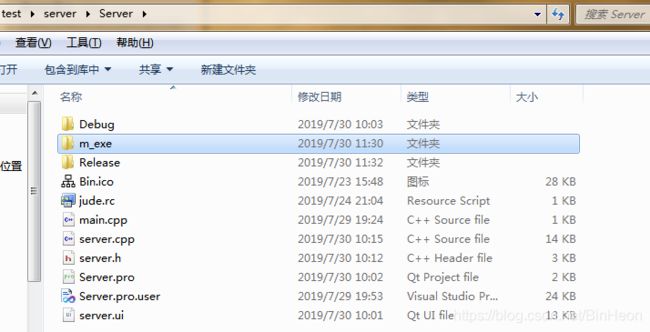
1)、在工程路径下新建文件夹m_exe,将上面的可发布的.exe文件拷进来。(因为生成运行环境会产生很多文件,这里新建一个文件夹只是便于整理,所以文件夹名字任意取)

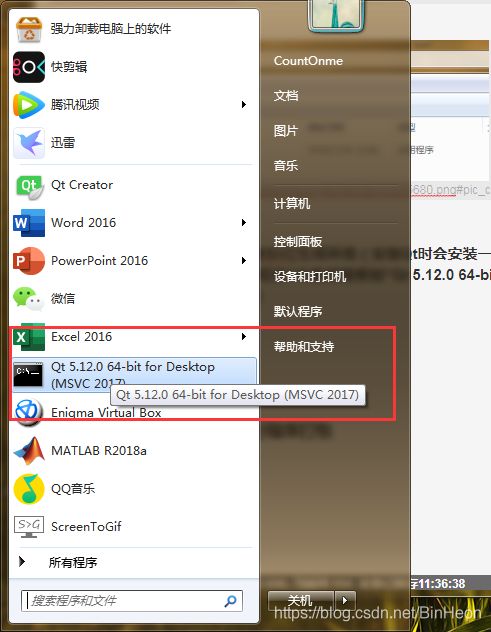
2)、利用windeployqt 生成环境(安装Qt时会安装一个cmd运行程序,我们可在“开始-所以程序”中查找搜索如“Qt 5.12.0 64-bit for Desktop(MSVC 2017)”的程序)
打开之后,如下图4-2-1所示,在终端依次输入以下两条指令,并回车运行之后便生成所需文件,得到执行环境;此时程序便可直接运行(如图4-2-2)。
cd /d D:\Program Files (x86)\myDesktop\test\server\Server\m_exe
windeployqt Server.exe

图4-2-1 生成环境
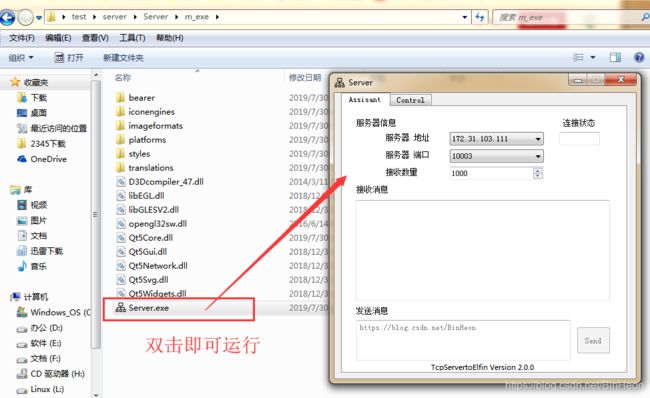
图4-2-2 生成环境与直接运行程序效果
4.3 Engima Virtual Box打包
通过上面描述,一个通信助手的可执行程序便得到了;但是我们在使用中,需要执行环境的可执行程序显得过于臃肿,我们通常希望直接一个可执行程序就能这儿用哪儿用而不需要拷贝一份具有环境的文件夹。所以对其打包就显得必不可少了。
打包步骤
①:打开Engima Virtual Box,如下图4-3-1选择需要打包的程序(这里既上面m_exe文件夹下的Server.exe);

图4-3-1 Engima Virtual Box的使用
②:将m_exe文件夹下所有文件拖到Engima Virtual Box的Virtual Box Files中;
③:在Engima Virtual Box界面的右下角“Files Options”选项中,勾选上“Compress Files”(压缩);
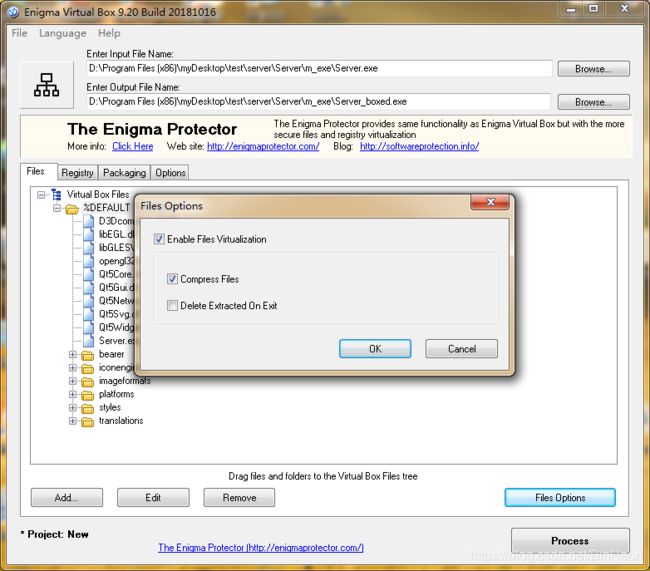
④:点击Engima Virtual Box界面的右下角“Process”,打包生成“Server_boxed.exe”(如下图4-3-2),该可执行程序能够拷贝到任意目录下运行(如下图4-3-4)。

图4-3-3 生成打包好的可执行文件
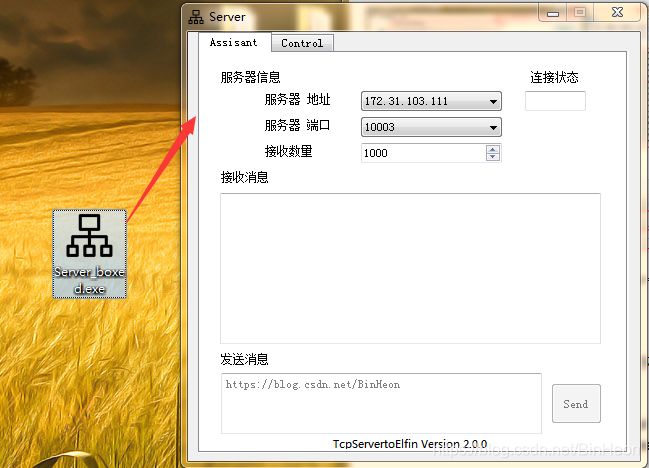
图4-3-4 拷贝至桌面上直接双击运行效果
注:Engima Virtual Box下载:https://enigmaprotector.com/en/downloads.html


