Git常用命令——分支操作
Git常用命令——分支操作
分支操作
-
git branch 列出,创建或者删除分支
- git branch
:创建一个分支 - git branch -d
:删除指定分支 - git branch -v :显示现在的所有分支信息
- git branch
PS:当在master分支提交时,默认的master指针会跟着指向最新的提交,head指针也会指向最新的提交。
SwitchdeMacBook-Pro:git-tutorial switch$ git branch next
SwitchdeMacBook-Pro:git-tutorial switch$ git branch -v
* master 4757e41 full commit
next 4757e41 full commit
* master 4757e41 full commit
next 4757e41 full commit
SwitchdeMacBook-Pro:git-tutorial switch$ git log --graph --oneline
* 4757e41 full commit
* 53a1a79 initial commit
* 4757e41 full commit
* 53a1a79 initial commit
SwitchdeMacBook-Pro:git-tutorial switch$
PS:可以看到在4757e41这次提交上,现在有两个分支,一个是master(默认)分支,一个是刚刚创建的next分支。
SwitchdeMacBook-Pro:git-tutorial switch$ cat .git/refs/heads/master
4757e417cb400c7cb6a45985ec5317fd51efaba4
4757e417cb400c7cb6a45985ec5317fd51efaba4
SwitchdeMacBook-Pro:git-tutorial switch$
PS:因为git中一个分支引用,只是一个文本文件,里面只有一个40位的Sha1编码,所以git的分支是非常轻量级的。
SwitchdeMacBook-Pro:git-tutorial switch$ ls .git/refs/heads/
master next
master next
SwitchdeMacBook-Pro:git-tutorial switch$
PS:当前项目的所有的分支引用都会在,项目主目录/.git/refs/heads目录下。
SwitchdeMacBook-Pro:git-tutorial switch$ git commit -a -m 'three commit'
[master 32dd26e] three commit
1 file changed, 1 insertion(+)
SwitchdeMacBook-Pro:git-tutorial switch$ git log --graph --oneline
* 32dd26e three commit
* 4757e41 full commit
[master 32dd26e] three commit
1 file changed, 1 insertion(+)
SwitchdeMacBook-Pro:git-tutorial switch$ git log --graph --oneline
* 32dd26e three commit
* 4757e41 full commit
*
53a1a79 initial commit
SwitchdeMacBook-Pro:git-tutorial switch$ git branch -v
* master 32dd26e three commit
next 4757e41 full commit
* master 32dd26e three commit
next 4757e41 full commit
SwitchdeMacBook-Pro:git-tutorial switch$
PS:commit之后,会创建一个提交对象,并且master和head指针都会指向该提交对象,但是next指针不会移动,这是因为创建了next分支,却并没有切换到该分支。
-
git checkout(补充:对于内容来说,该操作是检出版本,本质上只是移动head指针)
- git checkout
:将head指针指向目标分支 - git checkout -b
:创建该分支,并将head指针指向它 - git checkout
:将head指针移动到任何引用对象上 - git checkout - :恢复到上一个head指向的分支
- git checkout
SwitchdeMacBook-Pro:git-tutorial switch$ git checkout next
Switched to branch 'next'
Switched to branch 'next'
SwitchdeMacBook-Pro:git-tutorial switch$ git branch -v
master 32dd26e three commit
* next 31397de next four commit
* next 31397de next four commit
SwitchdeMacBook-Pro:git-tutorial switch$
PS:切换到next分支。
SwitchdeMacBook-Pro:git-tutorial switch$ echo '123456' >> README.md
SwitchdeMacBook-Pro:git-tutorial switch$ cat README.md
Read me
SwitchdeMacBook-Pro:git-tutorial switch$ cat README.md
Read me
123456
SwitchdeMacBook-Pro:git-tutorial switch$ git commit -a -m 'next four commit'
[next 31397de] next four commit
1 file changed, 1 insertion(+)
SwitchdeMacBook-Pro:git-tutorial switch$ git log --graph --oneline
* 31397de next four commit
* 4757e41 full commit
* 53a1a79 initial commit
[next 31397de] next four commit
1 file changed, 1 insertion(+)
SwitchdeMacBook-Pro:git-tutorial switch$ git log --graph --oneline
* 31397de next four commit
* 4757e41 full commit
* 53a1a79 initial commit
SwitchdeMacBook-Pro:git-tutorial switch$
PS:可以看到,master指向的分支和next指向的分支的sha1值是不同的,这也就说明,在4757e41提交之后,就分叉了。
SwitchdeMacBook-Pro:git-tutorial switch$ git checkout -
Switched to branch 'master'
SwitchdeMacBook-Pro:git-tutorial switch$ git branch -v
* master 32dd26e three commit
next 31397de next four commit
SwitchdeMacBook-Pro:git-tutorial switch$ git log --graph --oneline
* 32dd26e three commit
* 4757e41 full commit
* 53a1a79 initial commit
Switched to branch 'master'
SwitchdeMacBook-Pro:git-tutorial switch$ git branch -v
* master 32dd26e three commit
next 31397de next four commit
SwitchdeMacBook-Pro:git-tutorial switch$ git log --graph --oneline
* 32dd26e three commit
* 4757e41 full commit
* 53a1a79 initial commit
SwitchdeMacBook-Pro:git-tutorial switch$
PS:通过git checkout - 命令可以回到上一次head所在的分支。
SwitchdeMacBook-Pro:git-tutorial switch$ git checkout -b issue1
Switched to a new branch 'issue1'
SwitchdeMacBook-Pro:git-tutorial switch$ git branch -v
* issue1 32dd26e three commit
master 32dd26e three commit
next 31397de next four commit
Switched to a new branch 'issue1'
SwitchdeMacBook-Pro:git-tutorial switch$ git branch -v
* issue1 32dd26e three commit
master 32dd26e three commit
next 31397de next four commit
SwitchdeMacBook-Pro:git-tutorial switch$
PS:创建一个分支并将head指针指向该分支。
SwitchdeMacBook-Pro:git-tutorial switch$ git log --graph --oneline
* 32dd26e three commit
* 4757e41 full commit
* 53a1a79 initial commit
SwitchdeMacBook-Pro:git-tutorial switch$ git checkout 4757e41
Note: checking out '4757e41'.
You are in 'detached HEAD' state. You can look around, make experimental
changes and commit them, and you can discard any commits you make in this
state without impacting any branches by performing another checkout.
If you want to create a new branch to retain commits you create, you may
do so (now or later) by using -b with the checkout command again. Example:
git checkout -b
HEAD is now at 4757e41... full commit
SwitchdeMacBook-Pro:git-tutorial switch$ git branch -v
* (HEAD detached at 4757e41) 4757e41 full commit
issue1 32dd26e three commit
master 32dd26e three commit
next 31397de next four commit
SwitchdeMacBook-Pro:git-tutorial switch$
PS:checkout切换head指针指令可以传入任意一个引用对象,提交sha1值、分支名、tag都可以,上面的操作使head指向了一个未有分支指向的提交对象,这就叫做detached head(分离head)。
PS:在这种状态下,所做的任何提交都被视为没有被引用,这样当head重新回到master指针指向的提交对象上时,这些修改提交都会被舍弃。当然可以使用git branch -b 分支名,来保存这些提交(使其合法化)。
PS:当然,这种状态下,工作区和暂存区里的内容状态都和当前状态一致。
-
git reset(补充:将当前分支回退到历史某个版本)
- git reset --mixed
(默认):内容复制回暂存区 - git reset --soft
:内容区和暂存区保存原有状态 - git reset --hard
:内容复制回工作区和暂存区 - git reset
^:回退到branchName的父提交 - git reset
~n:回退到branchName前的第n次提交
- git reset --mixed
-
git reflog(按从新到旧的顺序,记录head访问提交的记录)
SwitchdeMacBook-Pro:git-tutorial switch$ git reflog
4757e41 HEAD@{0}: checkout: moving from issue1 to 4757e41
32dd26e HEAD@{1}: checkout: moving from master to issue1
32dd26e HEAD@{2}: checkout: moving from next to master
31397de HEAD@{3}: commit: next four commit
4757e41 HEAD@{4}: checkout: moving from master to next
32dd26e HEAD@{5}: commit: three commit
4757e41 HEAD@{6}: commit: full commit
53a1a79 HEAD@{7}: commit (initial): initial commit
SwitchdeMacBook-Pro:git-tutorial switch$
reset和checkout操作对file和commit的比较

-
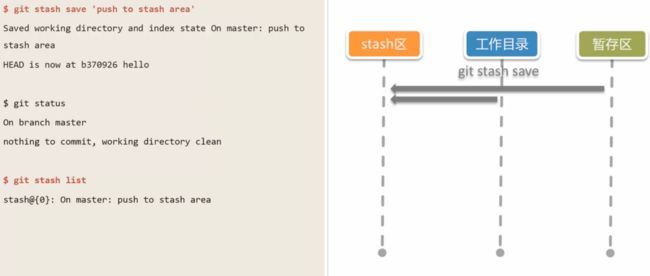
git stash(保存目前的工作目录和暂存区状态,并返回到干净的工作空间)
- git stash save ‘message’ :压入stash区栈顶
- git stash list :列出stash区的元素
- git stash apply stash编号 :将stash栈中对应编号的对应的状态返回给工作区
- git stash drop stash编号 :删除stash栈中对应编号的状态
- git stash pop :等价于 stash apply 栈顶元素+ stash drop 栈顶元素

-
git merge(合并分支)
- git merge branchName1 branchName2 :将分支1合并到分支2
- git merge branchName :将branchName合并到当前分支
- git merge branchName —ff :将branchName合并到当前分支,使用fast-forward方式
- fast-forward(快速向前合并)的形式是,两个分支,有一个并未有提交记录。
- git merge branchName --no-ff :将branchName合并到当前分支,不使用fast-forward方式
SwitchdeMacBook-Pro:git-tutorial switch$ git branch -v
issue1 32dd26e three commit
* master 32dd26e three commit
next 101fda8 next five
SwitchdeMacBook-Pro:git-tutorial switch$ git log --graph --oneline
* 32dd26e three commit
* 4757e41 full commit
* 53a1a79 initial commit
SwitchdeMacBook-Pro:git-tutorial switch$ git checkout -
Switched to branch 'next'
SwitchdeMacBook-Pro:git-tutorial switch$ git branch -v
issue1 32dd26e three commit
master 32dd26e three commit
* next 101fda8 next five
SwitchdeMacBook-Pro:git-tutorial switch$ git log --graph --oneline
* 101fda8 next five
* 31397de next four commit
* 4757e41 full commit
* 53a1a79 initial commit
issue1 32dd26e three commit
* master 32dd26e three commit
next 101fda8 next five
SwitchdeMacBook-Pro:git-tutorial switch$ git log --graph --oneline
* 32dd26e three commit
* 4757e41 full commit
* 53a1a79 initial commit
SwitchdeMacBook-Pro:git-tutorial switch$ git checkout -
Switched to branch 'next'
SwitchdeMacBook-Pro:git-tutorial switch$ git branch -v
issue1 32dd26e three commit
master 32dd26e three commit
* next 101fda8 next five
SwitchdeMacBook-Pro:git-tutorial switch$ git log --graph --oneline
* 101fda8 next five
* 31397de next four commit
* 4757e41 full commit
* 53a1a79 initial commit
SwitchdeMacBook-Pro:git-tutorial switch$
PS:可以看到master分支和next分支在4757e41就fork了。
SwitchdeMacBook-Pro:git-tutorial switch$ git merge next master
Auto-merging README.md
CONFLICT (content): Merge conflict in README.md
Automatic merge failed; fix conflicts and then commit the result.
Auto-merging README.md
CONFLICT (content): Merge conflict in README.md
Automatic merge failed; fix conflicts and then commit the result.
SwitchdeMacBook-Pro:git-tutorial switch$
PS:可以看到这次合并在README.md中发生的冲突,merge命令会将两个分支的共同祖先、两个分支当前所指的提交状态合并在一起。合并的结果将会被复制到工作目录和暂存区。如果没有发生冲突,则自动提交,父节点为两个分支,发生冲突,则需要手动提交。
SwitchdeMacBook-Pro:git-tutorial switch$ vim README.md
SwitchdeMacBook-Pro:git-tutorial switch$ git commit -a -m 'resolve'
[master 56fdf65] resolve
SwitchdeMacBook-Pro:git-tutorial switch$ git log --graph --oneline
* 56fdf65 resolve
| \
| * 101fda8 next five
| * 31397de next four commit
* | 32dd26e three commit
|/
* 4757e41 full commit
* 53a1a79 initial commit
SwitchdeMacBook-Pro:git-tutorial switch$
PS:修改冲突文件之后,提交,然后再查看日志,可以看到合并成功了。
-
git cat-file(查看git仓库中对象的信息)
- git cat-file -p head :打印head指向提交对象的信息
SwitchdeMacBook-Pro:git-tutorial switch$ git cat-file -p head
tree 3c221ae1529d61605e394447da6972633bb27041
parent 32dd26e684a88b58a692872d4f21ddb1fa23a3af
parent 101fda89564e18e4583105fbd647c87249917fdc
author switch < [email protected]> 1471768711 +0800
committer switch < [email protected]> 1471768711 +0800
resolve
tree 3c221ae1529d61605e394447da6972633bb27041
parent 32dd26e684a88b58a692872d4f21ddb1fa23a3af
parent 101fda89564e18e4583105fbd647c87249917fdc
author switch < [email protected]> 1471768711 +0800
committer switch < [email protected]> 1471768711 +0800
resolve
SwitchdeMacBook-Pro:git-tutorial switch$
PS:可以看到在上面merge操作后,该提交对象有两个parent对象。
-
git rebase(修剪提交历史基线,变基)
- git rebase master :将head所指向的分支在master分支上重演。

-
- git rebase --onto master 5751363 :将5751363后的提交在master上重演。

rebase和merge的比较

-
git tag(对某个提交设置一个不变的别名)
- git tag tagName 提交对象Sha1值 :对对应提交对象设置一个别名
SwitchdeMacBook-Pro:git-tutorial switch$ git tag 'nfc'31397de
SwitchdeMacBook-Pro:git-tutorial switch$ git checkout nfc
Note: checking out 'nfc'.
You are in 'detached HEAD' state. You can look around, make experimental
changes and commit them, and you can discard any commits you make in this
state without impacting any branches by performing another checkout.
If you want to create a new branch to retain commits you create, you may
do so (now or later) by using -b with the checkout command again. Example:
git checkout -b
HEAD is now at 31397de... next four commit
SwitchdeMacBook-Pro:git-tutorial switch$
PS:可以直接使用git checkout 标签名,代替git checkout 提交对象Sha1值。
SwitchdeMacBook-Pro:git-tutorial switch$ ls .git/refs/tags/
initcom nfc
initcom nfc
SwitchdeMacBook-Pro:git-tutorial switch$
PS:可以看到tag和分支指针一样都是一个文本文件,其存的就是对应提交的sha1值,这也就是为什么用tag能指向对应提交对象的原因了。
PS:标签要push到远程服务器上,要叫—tags参数。
-------------参考《网易云课堂.Java Web开发入门》