Tensorflow模型——计算图、张量、会话、神经网络
一、Tensorflow计算模型——计算图
1 Tensorflow程序一般可以分为两个阶段
第一阶段需要定义计算图中所有的计算
第二阶段为执行计算
2 通过tf.get_default_graph函数可以获取当前默认的计算图
import tensorflow as tf
a = tf.constant([1.0, 2.0], name="a")
print(a.graph is tf.get_default_graph())
返回结果为True
3 不同计算图上的张量和运算不会共享
import tensorflow as tf

g1 = tf.Graph()
g1.device('/gpu:0')
with g1.as_default():
    v = tf.get_variable("v", initializer=tf.zeros_initializer, shape=[1])

g2 = tf.Graph()
g2.device('/gpu:1')
with g2.as_default():
    v = tf.get_variable("v", initializer=tf.ones_initializer, shape=[1])

with tf.Session(graph=g1) as sess:
    tf.global_variables_initializer().run()
    with tf.variable_scope("", reuse=True):
        print(sess.run(tf.get_variable("v")))

with tf.Session(graph=g2) as sess:
    tf.global_variables_initializer().run()
    with tf.variable_scope("", reuse=True):
        print(sess.run(tf.get_variable("v")))
同时定义了两个计算图,都使用了名字为 “v“ 的变量,但是会输出两个结果。
二、Tensorflow数据模型——张量
张量可以简单理解为多维数组
1 Tensorflow的计算结果不是一个数字,而是一个张量的结构。
#vector_addition

import tensorflow as tf

a = tf.constant([1.0, 2.0], name="a")
b = tf.constant([2.0, 3.0], name="b")
result = tf.add(a, b, name="add")
print(result)
'''
输出:
Tensor("add:0", shape=(2,), dtype=float32)
‘’‘2 每一个张量会有一个唯一的类型
两个不同类型的张量相加时程序会报错。
比如:
import tensorflow as tf

a = tf.constant([1, 2], name="a")
b = tf.constant([2.0, 3.0], name="b")
result = a + b
print(result)
程序会报类型不匹配的错误,可以进行强制类型转换:
a = tf.constant([1, 2], name="a", dtype=tf.float32)如果不指定类型,程序会给出默认的类型,不带小数点的会被默认为int32,带小数点的会被默认为float32。
Tensorflow支持的数据类型有: tf.float32, tf.float64, tf.int8, tf.int16, tf.int32, tf.int64, tf.uint8, tf.bool, tf.complex64, tf.complex128
三、Tensorflow运行模型——会话
四、Tensorflow实现神经网络
Tensorflow游乐场,通过网页浏览器就可以训练的简单神经网络并实现了可视化训练过程的工具。
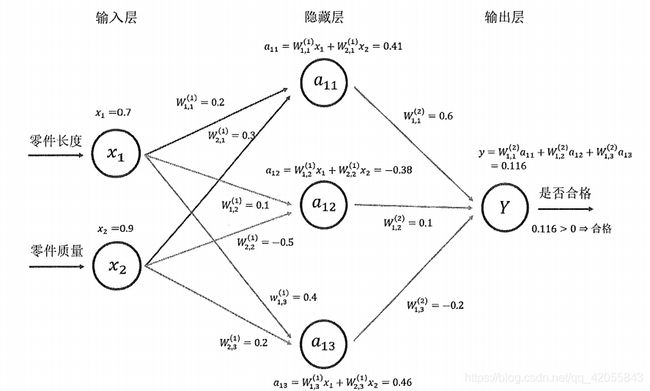
1 前向传播算法
#神经网络的前向传播过程
import tensorflow as tf
import os

#设定gpu设备
os.environ["CUDA_VISIBLE_DEVICES"] = "1"
config = tf.ConfigProto()
config.gpu_options.allow_growth = True

#申明w1, w2两个变量,并设定随机种子,可以保证每次运行的结果都一样
w1 = tf.Variable(tf.random_normal([2, 3], stddev=1, seed=2))
w2 = tf.Variable(tf.random_normal([3, 1], stddev=1, seed=2))

#定义输入x
x = tf.constant([[0.7, 0.9]])

a = tf.matmul(x, w1)
y = tf.matmul(a, w2)

with tf.Session() as sess:
    sess.run(w1.initializer)
    sess.run(w2.initializer)
    print(sess.run(y))
当申明了变量w1, w2之后,可以通过w1和w2来定义神经网络的前向传播过程并得到中间结果a和最后答案y
在session之前,只是定义了Tensorflow计算图中的所有计算,第二步通过session来计算结果。
虽然在定义变量时给出了变量初始化方法,但是这个方法并没有被真正执行。所以在计算y之前,需要对w1和w2进行初始化,当变量数目很多时,可以通过如下指令对变量初始化:
init_op = tf.global_variables_initializer()
sess.run(init_op)
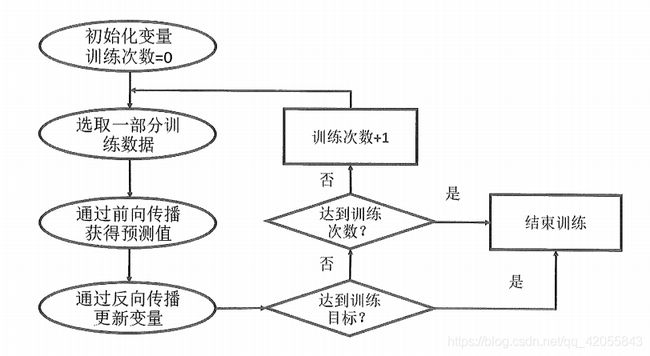
2 通过Tensorflow训练神经网络模型
每次迭代的开始,首先需要选取一小部分训练数据,这一小部分叫做一个batch。
- Tensorflow提供placeholder机制用于提供数据输入,程序中只需要将数据通过placeholder传入Tensorflow计算图。在定义placeholder时数据类型需要指定,数据类型也不可以改变。
#使用placeholder实现前向传播算法
import tensorflow as tf
import os
os.environ["CUDA_VISIBLE_DEVICES"] = "1"
config = tf.ConfigProto()
config.gpu_options.allow_growth = True

w1 = tf.Variable(tf.random_normal([2, 3], stddev=1))
w2 = tf.Variable(tf.random_normal([3, 1], stddev=1))

x = tf.placeholder(tf.float32, shape=(1, 2), name="input")
a = tf.matmul(x, w1)
y = tf.matmul(a, w2)

with tf.Session() as sess:
    init_op = tf.global_variables_initializer()
    sess.run(init_op)
    print(sess.run(y, feed_dict={x: [[0.7, 0.9]]}))
在程序中计算前向传播算法时,需要提供一个feed_dict来指定x的取值。feed_dict是一个字典(map)。
将输入的1x2矩阵改为nx2的矩阵就可以得到n个样例的输出:import tensorflow as tf import os os.environ["CUDA_VISIBLE_DEVICES"] = "1" config = tf.ConfigProto() config.gpu_options.allow_growth = True w1 = tf.Variable(tf.random_normal([2, 3], stddev=1)) w2 = tf.Variable(tf.random_normal([3, 1], stddev=1)) #x = tf.placeholder(tf.float32, shape=(1, 2), name="input") x = tf.placeholder(tf.float32, shape=(3, 2), name="input") #修改输入矩阵 a = tf.matmul(x, w1) y = tf.matmul(a, w2) with tf.Session() as sess: init_op = tf.global_variables_initializer() sess.run(init_op) # print(sess.run(y)) print(sess.run(y, feed_dict={x: [[0.7, 0.9], [0.1, 0.4], [0.5, 0.8]]})) - 完整神经网络样例
import tensorflow as tf
from numpy.random import RandomState
import os

#设定gpu参数
os.environ["CUDA_VISIBLE_DEVICES"] = "1"
config = tf.ConfigProto()
config.gpu_options.allow_growth = True

#定义batch的大小
batch_size = 8

#定义神经网络的参数
w1 = tf.Variable(tf.random_normal([2, 3], stddev=1, seed=1))
w2 = tf.Variable(tf.random_normal([3, 1], stddev=1, seed=1))

#在shape的一个维度上使用None,可以方便调整batch的大小。
#较大的batch容易导致内存溢出
x = tf.placeholder(tf.float32, shape=(None, 2), name="x-input")
y_ = tf.placeholder(tf.float32, shape=(None, 1), name="y_input")

#定义神经网络前向传播过程
a = tf.matmul(x, w1)
y = tf.matmul(a, w2)

#定义损失函数和反向传播算法
y = tf.sigmoid(y)
cross_entropy = -tf.reduce_mean(y_ * tf.log(tf.clip_by_value(y, 1e-10, 1.0)) + (1-y) * tf.log(tf.clip_by_value(1-y, 1e-10, 1.0)))
train_step = tf.train.AdamOptimizer(0.001).minimize(cross_entropy)

#通过随机数生成一个模拟数据集
rdm = RandomState(1)
dataset_size = 128
X = rdm.rand(dataset_size, 2)
Y = [[int(x1+x2 < 1)] for (x1, x2) in X]

#创建一个会话来运行Tensorflow程序
with tf.Session() as sess:
    init_op = tf.global_variables_initializer()    #变量初始化
    sess.run(init_op)

    查看初始的网络参数值
    print(sess.run(w1))
    print(sess.run(w2))

    #设定训练轮数
    STEPS = 5000

    for i in range(STEPS):
        start = (i * batch_size) % dataset_size
        end = min(start + batch_size, dataset_size)

        #通过选取的样本训练神经网络并跟新参数
        sess.run(train_step, feed_dict={x: X[start:end], y_: Y[start:end]})

        if i % 1000 == 0:
            #每隔一段时间计算所有数据上的交叉熵
            total_cross_entropy = sess.run(cross_entropy, feed_dict={x: X, y_: Y})
            print("After %d training setp(s), corss entropy on all data is %g" %(i, total_cross_entropy))

    #输出训练之后的神经网络的参数值
    print(sess.run(w1))
    print(sess.run(w2))
在本例子中,batch_size = 8, 迭代5000次,数据集大小为128。
训练过程为 0-8, 1-9, 2-10, ... ... 120-128, 121-128, 122-128, ...... 127-128, 0-8, 1-9, ... ... 共有5000次。
总结:
- 有些函数在不同的版本中使用格式不一样
- 注意多使用with结构
- 随机种子seed的使用


