openapi:swagger-ui/swagger-editor 部署
openapi:搭建部署 swagger-ui/swagger-editor
主机环境:Centos 7.2
[root@test1280 ~]# cat /etc/redhat-release
CentOS Linux release 7.2.1511 (Core)
[root@test1280 ~]# uname -a
Linux test1280 3.10.0-327.el7.x86_64 #1 SMP Thu Nov 19 22:10:57 UTC 2015 x86_64 x86_64 x86_64 GNU/Linux
[root@test1280 ~]# npm -v
3.10.10
[root@test1280 ~]# node -v
v6.17.1
[root@test1280 ~]# openssl version
OpenSSL 1.0.2k-fips  26 Jan 2017
搭建部署:
1.下载 swagger-ui/swagger-editor 源码
git clone https://github.com/swagger-api/swagger-ui
git clone https://github.com/swagger-api/swagger-editor
注:可以从github上下载历史发布版本:
- https://github.com/swagger-api/swagger-ui/releases
- https://github.com/swagger-api/swagger-editor/releases
我这里下载的是:
- https://codeload.github.com/swagger-api/swagger-ui/tar.gz/v3.24.2
- https://codeload.github.com/swagger-api/swagger-editor/tar.gz/v3.7.0
[test1280@test1280 ~]$ tar zxf swagger-editor-3.7.0.tar.gz
[test1280@test1280 ~]$ tar zxf swagger-ui-3.24.2.tar.gz
[test1280@test1280 ~]$ ls
swagger-editor-3.7.0  swagger-editor-3.7.0.tar.gz  swagger-ui-3.24.2  swagger-ui-3.24.2.tar.gz
2.使用 http-server 做服务端
2.1) 安装 aliyun epel 源:
[root@test1280 ~]# wget -O /etc/yum.repos.d/epel.repo http://mirrors.aliyun.com/repo/epel-7.repo
安装阿里云epel源可以参考:
https://blog.csdn.net/test1280/article/details/102886522
2.2) 安装 npm/node:
[root@test1280 ~]# yum install -y npm
2.3) 安装 http-server :npm install -g http-server
如果出现错误:
npm: relocation error: npm: symbol SSL_set_cert_cb, version libssl.so.10 not defined in file libssl.so.10 with link time reference
请参考以下文章解决:
https://blog.csdn.net/test1280/article/details/102937023
安装 http-server 成功:
[root@test1280 ~]# npm install -g http-server
/usr/bin/http-server -> /usr/lib/node_modules/http-server/bin/http-server
/usr/bin/hs -> /usr/lib/node_modules/http-server/bin/http-server
/usr/lib
└─┬ [email protected]
  ├── [email protected]
  ├── [email protected]
  ├─┬ [email protected]
  │ ├── [email protected]
  │ ├── [email protected]
  │ ├── [email protected]
  │ └── [email protected]
  ├─┬ [email protected]
  │ ├── [email protected]
  │ ├── [email protected]
  │ └── [email protected]
  ├── [email protected]
  ├─┬ [email protected]
  │ ├── [email protected]
  │ └── [email protected]
  ├─┬ [email protected]
  │ ├─┬ [email protected]
  │ │ └── [email protected]
  │ ├─┬ [email protected]
  │ │ └── [email protected]
  │ └─┬ [email protected]
  │   └── [email protected]
  └─┬ [email protected]
    └── [email protected]

[root@test1280 ~]# which http-server
/usr/bin/http-server
2.4) 启动 http-server
- 启动 swagger-ui:
[test1280@test1280 ~]$ http-server -p 8081 swagger-ui-3.24.2/dist
Starting up http-server, serving swagger-ui-3.24.2/dist
Available on:
  http://127.0.0.1:8081
  http://192.168.75.132:8081
Hit CTRL-C to stop the server
- 启动 swagger-editor:
[test1280@test1280 ~]$ http-server -p 8082 swagger-editor-3.7.0
Starting up http-server, serving swagger-editor-3.7.0
Available on:
  http://127.0.0.1:8082
  http://192.168.75.132:8082
Hit CTRL-C to stop the server
2.5) 测试
关闭防火墙:(或者开放8081、8082端口)
[root@test1280 ~]# systemctl stop firewalld.service
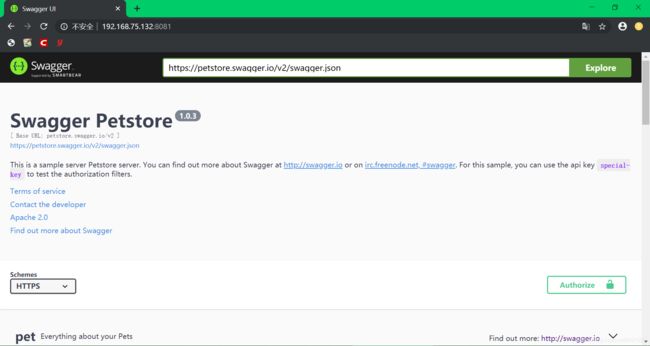
浏览器访问:http://192.168.75.132:8081/

浏览器访问:http://192.168.75.132:8082/
将自己的 swagger 接口文件由 swagger-ui 渲染显示
最近使用 apache service-center 做微服务注册、发现中心,以 service-center 为例:
service-center 的契约接口文件有 v3.yaml 和 v4.yaml 两种:
- https://github.com/apache/servicecomb-service-center/blob/master/server/core/swagger/v3.yaml
- https://github.com/apache/servicecomb-service-center/blob/master/server/core/swagger/v4.yaml
将其下载到本地,上传到 swagger-ui-3.24.2/dist 目录下:

在浏览器中访问 swagger-ui 的地址,然后查询 v3.yaml 和 v4.yaml:
将 http-server 启动在后台
[test1280@test1280 ~]$ nohup http-server -p 8082 swagger-editor-3.7.0 > swagger-editor.log 2>&1 &
[1] 40593
[test1280@test1280 ~]$ nohup http-server -p 8081 swagger-ui-3.24.2/dist > swagger-ui.log 2>&1 &
[2] 40614
这样当我们关闭终端,http-server 也不会终止,仍能提供服务。
使用 nginx 做服务端
1.安装 nginx,请参考:
https://blog.csdn.net/test1280/article/details/102876730
2.修改 nginx 配置文件:
$HOME/nginx/conf/nginx.conf
    server {
        listen       8083;
        server_name  localhost;
        location / {
            root   /home/test1280/swagger-ui-3.24.2/dist;
            index  index.html index.htm;
        }
        error_page   500 502 503 504  /50x.html;
        location = /50x.html {
            root   html;
        }
    }

    server {
        listen       8084;
        server_name  localhost;
        location / {
            root   /home/test1280/swagger-editor-3.7.0;
            index  index.html index.htm;
        }
        error_page   500 502 503 504  /50x.html;
        location = /50x.html {
            root   html;
        }
    }
3.启动 nginx
nginx -c $HOME/nginx/conf/nginx.conf
4.渲染
参考:
1.https://swagger.io/
2.https://swagger.io/tools/swagger-ui/
3.https://swagger.io/tools/swagger-editor/
4.https://github.com/swagger-api/swagger-ui
5.https://github.com/swagger-api/swagger-editor
6.https://nodejs.org/dist/


