ios uiview动画_iOS UIView动画
ios uiview动画
In this tutorial, we’ll be animating our UI Views in various ways in the iOS Application.
在本教程中,我们将在iOS应用程序中以各种方式对UI视图进行动画处理。
iOS UIView动画 (iOS UIView Animations)
Animations are a vital component in building beautiful UIs.
动画是构建漂亮的UI的重要组成部分。
Following are some of the basic properties of a view that can be animated:
以下是可以设置动画的视图的一些基本属性:
- center 中央
- alpha α
- frame 帧
- bounds 界线
- transform 转变
- backgroundColor 背景颜色
- contentStretch contentStretch
The syntaxes for UIView Animations are:
UIView动画的语法为:
UIView.animate(withDuration:, animations:)
UIView.animate(withDuration:, delay:, animations:)
UIView.animate(withDuration:, delay:, options:, animations:)
UIView.animate(withDuration:, delay:, options:, animations:, completion:)
UIView.animate(withDuration: 5.0, animations: {
self.myView.alpha = 0
print("animations")
})With Delay:
有延迟:
UIView.animate(withDuration: 5.0, delay: 2.0, animations: {
self.myView.alpha = 0
print("animations")
})Notice that there is a two second delay:
请注意,有两秒钟的延迟:
With Options
有选项
UIView.animate(withDuration: 5.0, delay: 2.0, options: [.autoreverse], animations: {
self.myView.alpha = 0
print("animations")
})There are plenty of options available that we will see later in this tutorial. The above one auto-reverses the animation once before vanishing it off.
有很多可用的选项,我们将在本教程的后面部分看到。 上面的动画会在动画消失之前自动反转一次。
With completion
A Completion handler closure gets called when the animation is completed.
We can add a completion handler as shown below:
随着完成
动画完成后,将调用完成处理程序关闭。
我们可以添加一个完成处理程序,如下所示:
UIView.animate(withDuration: 5.0, animations: {
self.myView.alpha = 0
print("animations")
},completion:
{finished in
print("Is finished? \(finished)")
UIView.animate(withDuration: 1.0, animations:{
self.myView.alpha = 0.5
},completion: nil)
})In this, we’ve chained another animation when the first is completed.
在此,当第一个动画完成时,我们链接了另一个动画。
A completion is a trailing closure. We can enhance the readability of the code by calling the completion outside function as shown below:
完成是尾随的结束。 我们可以通过调用complete外部函数来增强代码的可读性,如下所示:
UIView.animate(withDuration: 5.0, animations: {
            self.myView.alpha = 0
            print("animations")
}){finished in
print("Is finished? \(finished)")
UIView.animate(withDuration: 1.0, animations:{
self.myView.alpha = 0.5
})
}Note: finished is a boolean.
注意:完成是布尔值。
UIView.animateWithDuration(5.0, animations: {
    println("animations")
}, completion: { finished in
    println("completion")
})
This is because no UIView was animated.
这是因为没有UIView具有动画效果。
You must call a view and animate it in the animation block.
您必须调用视图并在动画块中为其设置动画。
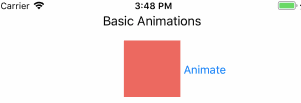
Let’s open up our Main.storyboard in our new XCode Project.
Following is the UI we’ve created for the next three basic animations that we’ll perform:
让我们在新的XCode项目中打开Main.storyboard。
以下是我们为接下来将要执行的三个基本动画创建的UI:
Create an IBAction in the ViewController.swift for each of the other Buttons similarly.
类似地,在ViewController.swift中为其他每个Button创建一个IBAction。
动画色彩 (Animating Color)
@IBAction func animateColor(_ sender: Any) {

    UIView.animate(withDuration: 1, animations: {
        self.myView.backgroundColor = UIColor.black
    }, completion: nil)

}
动画运动 (Animate Movement)
Here we change the position of the view using the frame origin as the reference.
A negative in x-direction means it goes to the left.
A negative in the y-direction means it goes to the top.
在这里,我们以帧原点为参考来更改视图的位置。
x方向为负表示它向左移动。
y方向上的负值表示它到达顶部。
@IBAction func animateMovement(_ sender: Any) {
    UIView.animate(withDuration: 1, animations: {
        self.myView.frame.origin.x -= 40
    }, completion: nil)

}
动画大小 (Animate Size)
Here we change the frame size width and height.
在这里,我们更改框架大小的宽度和高度。
@IBAction func animateSize(_ sender: Any) {
    UIView.animate(withDuration: 1, animations: {
        self.myView.frame.size.width += 40
        self.myView.frame.size.height += 10
    }){ finished in
        UIView.animate(withDuration: 1, animations: {
            self.myView.frame.size.width -= 40
            self.myView.frame.size.height -= 10
        })
    }
}
一起动画 (Animate Together)
Here we’ll animate the size, color and position of the View together.
在这里,我们将为“视图”的大小,颜色和位置设置动画。
@IBAction func animateAllTogether(_ sender: Any) {

    if(animationRunning){
        self.myView.layer.removeAllAnimations()
        animationRunning = !animationRunning
    }
    else{
        animationRunning = !animationRunning
    UIView.animate(withDuration: 1, animations: {
        self.myView.backgroundColor = UIColor.green
        self.myView.frame.size.width += 50
        self.myView.frame.size.height += 20
        self.myView.center.x += 20
    }) { _ in
        UIView.animate(withDuration: 1, delay: 0.25, options: [.autoreverse, .repeat], animations: {
            self.myView.frame.origin.y -= 20
        })
    }
    }
}
animateRunning is a boolean variable that is used to toggle the UIView Animation.
To stop the animation we do : self.myView.layer.removeAllAnimations().
We’ve set the options to auto-reverse and repeat forever.
animateRunning是一个布尔变量,用于切换UIView动画。
要停止动画,我们要做: self.myView.layer.removeAllAnimations() 。
我们将选项设置为自动反向并永久重复。
The output of the above 4 basic animations is given below:
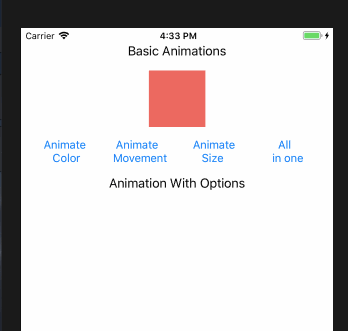
上面4个基本动画的输出如下:
Next, we’ll look at Transform Animations and use the various options.
接下来,我们将看一下“变换动画”并使用各种选项。
变换动画 (Transform Animations)
We can transform the scale, rotate the views to show animations.
我们可以变换比例,旋转视图以显示动画。
Following is the setup from the storyboard:
以下是情节提要中的设置:
In the above storyboard, we’ve linked all the 4 buttons to the same IBAction function. The same function would be triggered when any of these buttons is clicked. We can set a button tag to identify the buttons from each other.
在上面的故事板上,我们已将所有4个按钮链接到相同的IBAction函数。 单击这些按钮中的任何一个将触发相同的功能。 我们可以设置一个按钮标签来相互识别按钮。
There are 4 main types of animation curves:
动画曲线有4种主要类型:
- curveEaseIn curveEaseIn
- curveEaseOut curveEaseOut
- curveEaseInOut curveEaseInOut
- curveLinear curveLinear
Note: They are called curves since their animation graphs are curves!
注意:因为它们的动画图是曲线,所以它们称为曲线!
To Transform animations we do:
要转换动画,我们要做:
self.optionsView.transform = CGAffineTransform(scaleX: 0, y: 0)

            UIView.animate(withDuration: 1.0, delay: 0.0, options: [.curveEaseIn], animations: {
                self.optionsView.transform  = .identity
            })
CGAffineTransform sets the intial scale.
self.optionsView.transform = .identity transforms the view to it’s original scale.
CGAffineTransform设置初始比例。
self.optionsView.transform = .identity将视图转换为其原始比例。
We can set each of the options in their respective button tags as shown below:
我们可以在各自的按钮标签中设置每个选项,如下所示:
The output of the application in action for the above transform animation is given below:
下面给出了上述变换动画的实际应用程序输出:
Spring动画 (Spring Animations)
Spring Animations behave like real-life springs. With their damping velocity and elasticity, they make a cool animation.
弹簧动画的行为类似于现实中的弹簧。 凭借其衰减速度和弹性,他们制作了很酷的动画。
Spring Animations can be set by adding the following syntax for the UIView Animations animate function.
可以通过为UIView Animations animate功能添加以下语法来设置Spring Animations。
UIView.animate(withDuration: 1, delay:, usingSpringWithDamping:, initialSpringVelocity:, options: [], animations: , completion:)usingSpringWithDamping requires a number between 0 and 1. It represents the damping ratio. The higher the number the springier the animation will be.
Higher the intialSpringVelocity, higher the intial momentum.
usingSpringWithDamping需要一个介于0和1之间的数字。它表示阻尼比。 数字越高 ,动画越弹性 。
初始弹簧速度越高,初始动量越高。
Again we’re creating a StackView with 4 Buttons for different use cases in our Main.storyboard:
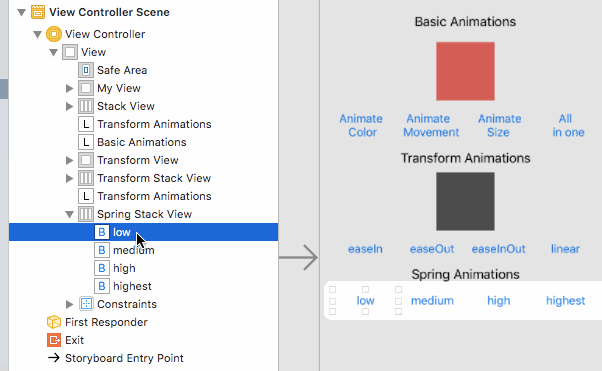
再次,我们在Main.storyboard中为不同的用例创建一个带有4个按钮的StackView:
The function springAnimationWithOptions is triggered everytime when any of the buttons is clicked:
每次单击任何一个按钮时,都会触发springAnimationWithOptions函数:
@IBAction func springAnimationWithOptions(_ sender: UIButton!) {

        if(sender.tag == 1)
        {
            self.optionsView.transform = CGAffineTransform(scaleX: 0, y: 0)
            UIView.animate(withDuration: 1, delay: 0, usingSpringWithDamping: 1, initialSpringVelocity: 0, options: .curveEaseInOut, animations: {
                self.optionsView.transform = .identity
            }, completion: nil)
        }
        else if(sender.tag == 2)
        {
            self.optionsView.transform = CGAffineTransform(scaleX: 0, y: 0)
            UIView.animate(withDuration: 1, delay: 0, usingSpringWithDamping: 0.8, initialSpringVelocity: 0, options: .curveEaseInOut, animations: {
                self.optionsView.transform = .identity
            }, completion: nil)
        }
        else if(sender.tag == 3)
        {
            self.optionsView.transform = CGAffineTransform(scaleX: 0, y: 0)
            UIView.animate(withDuration: 1, delay: 0, usingSpringWithDamping: 0.5, initialSpringVelocity: 0, options: .curveEaseInOut, animations: {
                self.optionsView.transform = .identity
            }, completion: nil)
        }
        else if(sender.tag == 4)
        {
            self.optionsView.transform = CGAffineTransform(scaleX: 0, y: 0)
            UIView.animate(withDuration: 1, delay: 0, usingSpringWithDamping: 0.3, initialSpringVelocity: 0.8, options: .curveEaseInOut, animations: {
                self.optionsView.transform = .identity
            }, completion: nil)
        }
    }
The output is:
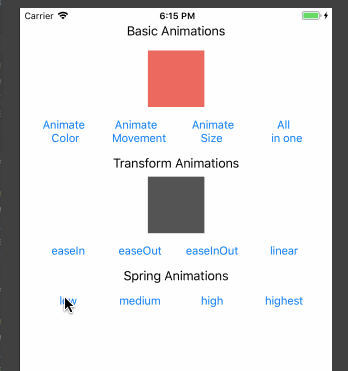
输出为:
变换动画–平移,缩放,旋转 (Transform Animation – Translate, Scale, Rotate)
We can scale translate and rotate in the following way:
我们可以按以下方式缩放平移和旋转:
let translate = CGAffineTransform(translationX: 120, y: 120)
let rotate = CGAffineTransform(rotationAngle: 360)
let scale = CGAffineTransform(scaleX: 2, y: 2)
We can also chain together each of these by using the concatenating method:
我们还可以通过使用串联方法将每个链接在一起:
self.view.transform = translate.concatenating(rotate)Our Main.storyboard again hooks the 4 buttons for the use cases to a common IBAction button click function:
我们的Main.storyboard再次将用例的4个按钮挂钩到一个通用的IBAction按钮单击功能:
The code for the STRAnimationWithOptions function is given below:
STRAnimationWithOptions函数的代码如下:
@IBAction func STRAnimationWithOptions(_ sender: UIButton!) {

        if(sender.tag == 1)
        {
            let scale = CGAffineTransform(scaleX: 2, y: 2)
            self.optionsView.transform = scale
            UIView.animate(withDuration: 1, delay: 0, options: .curveEaseInOut, animations: {
                self.optionsView.transform = .identity
            }, completion: nil)
        }
        else if(sender.tag == 2)
        {
            let translate = CGAffineTransform(translationX: -120, y: -120)
            self.optionsView.transform = translate
            UIView.animate(withDuration: 1, delay: 0, options: .curveEaseInOut, animations: {
                self.optionsView.transform = .identity
            }, completion: nil)
        }
        else if(sender.tag == 3)
        {
            let rotate = CGAffineTransform(rotationAngle: 360)
            self.optionsView.transform = rotate
            UIView.animate(withDuration: 3, delay: 0, options: .curveEaseInOut, animations: {
                self.optionsView.transform = .identity
            }, completion: nil)
        }
        else if(sender.tag == 4)
        {
            let rotate = CGAffineTransform(rotationAngle: 360)
            let translate = CGAffineTransform(translationX: -120, y: -120)
            let scale = CGAffineTransform(scaleX: 2, y: 2)
            self.optionsView.transform = rotate.concatenating(translate).concatenating(scale)
            UIView.animate(withDuration: 3, delay: 0,usingSpringWithDamping: 0.8,initialSpringVelocity: 0.5, options: [.autoreverse,.curveEaseInOut], animations: {
                self.optionsView.transform = .identity
            }, completion: nil)
        }
    }
In the last one, we’ve added spring animation as well. Check out the output of the Scale Rotate Translate Transform Animations.
在上一个中,我们还添加了spring动画。 检出“缩放旋转平移变换动画”的输出。
过渡选项 (Transition Options)
Besides the curved animation option discussed above there are a few more.
除了上面讨论的弯曲动画选项以外,还有其他一些选项。
To create transition animations we do the following in Swift:
要创建过渡动画,我们在Swift中执行以下操作:
UIView .transition(with: self.myTextField, duration: 4, options: .transitionCrossDissolve,
                               animations: {
                                self.myTextField.textColor = UIColor.red
            })
Let’s see some of the important transition options by example.
让我们以示例的方式查看一些重要的过渡选项。
First we need to set up the last part of our ViewController in the Main.storyboard:

首先,我们需要在Main.storyboard中设置ViewController的最后一部分:
We’ve created a UITextField and linked it to the ViewController.swift along with the three buttons.
我们创建了一个UITextField并将其与三个按钮一起链接到ViewController.swift。
The code for the transitionAnimationWithOptions function is given below:
下面给出了transitionAnimationWithOptions函数的代码:
@IBAction func transitionAnimationWithOptions(_ sender: UIButton!) {

        if(sender.tag == 1)
        {
            UIView .transition(with: self.myTextField, duration: 4, options: .transitionCrossDissolve,
                               animations: {
                                self.myTextField.textColor = UIColor.red
            }){finished in
                self.myTextField.textColor = UIColor.white
            }
        }
        else if(sender.tag == 2)
        {
            UIView .transition(with: self.myTextField, duration: 4, options: .transitionFlipFromRight,
                               animations: {
                                self.myTextField.textColor = UIColor.red
            }){finished in
                self.myTextField.textColor = UIColor.white
            }
        }
        else if(sender.tag == 3)
        {
            UIView .transition(with: self.myTextField, duration: 4, options: .transitionCurlUp,
                               animations: {
                                self.myTextField.textColor = UIColor.red
            })
        }
    }
The output of the above application in action is given below:
上面应用程序的输出如下:
Wow, that’s the best for the last!
哇,这是最后的最好!
This brings an end to this tutorial. You can download the full XCode project with all the animations from the link below:
本教程到此结束。 您可以从下面的链接下载完整的XCode项目以及所有动画:
翻译自: https://www.journaldev.com/22104/ios-uiview-animations
ios uiview动画