“Windows + VirtualBox Ubuntu” 问题与解决笔记【持续更新】
系统版本 Ubuntu 16.04 LTS
一、Virtual Box 相关问题
1. virtualbox+ubuntu设置共享文件夹
http://www.cnblogs.com/huanghuang/archive/2011/09/23/2185968.html
http://www.linuxidc.com/Linux/2014-02/96713.htm
手动挂载共享文件夹:
mkdir share_windows
sudo mount -t vboxsf myshare share_windows
cd share_windows
ls
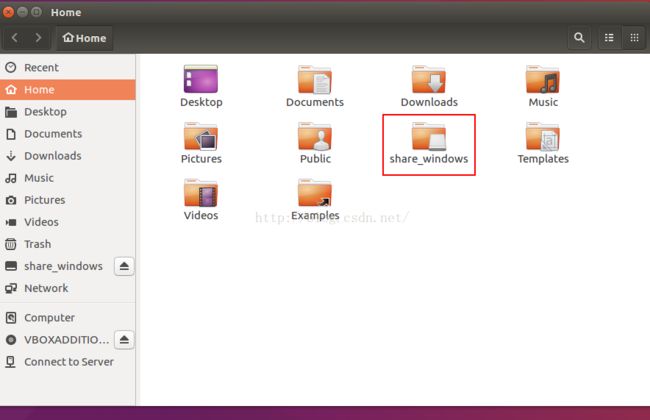
在Home目录下就可以看到共享文件夹了
卸载命令为:
sudo umount -f share_windows2. VitualBox 出现 "FATAL: could not read from the boot medium" 问题
https://zhidao.baidu.com/question/234582301.html
二、Ubuntu 相关问题
1. su 认证失败
解决方法:sudo passwd root (更新密码),然后再su root(输入新密码)
退出root权限:
① exit
② logout
③ ctrl D
2. Ubuntu apt-get 卸载命令
http://www.php100.com/html/webkaifa/Linux/2012/1113/11546.html3. Linux(Ubuntu)下如何安装JDK
http://www.cnblogs.com/savagemorgan/p/3650926.html
① tar.gz 文件的解压命令:
sudo tar zxvf xxx.tar.gz② bin 文件的解压安装命令:
sudo chmod u+x a.bin  //此行给文件执行权限

sudo ./a.bin
③ deb文件的安装命令:
dpkg -i file.deb ④ 如果Eclipse 找不到 JDK 的路径
在eclipse目录下新建jre目录,并连接jdk下的jre/bin目录到该目录下。
mkdir jre

cd jre

ln -s 你的JDK目录/bin bin
4. ubuntu常用命令
mv:移动文件或文件夹
http://jingyan.baidu.com/article/0aa22375b8d9bf88cc0d643f.html
rm: 删除文件或文件夹
http://jingyan.baidu.com/article/3f16e003cb810f2591c10339.html
5. ~/.bashrc 的编辑
我还是习惯用 gedit ~/.bashrc,虽然很多人推崇vi / vim
6. Permission denied
chmod 777如果想连其所有子目录都一起修改:
chmod -R 777 https://zhidao.baidu.com/question/506645291.html
或者得到root 权限
【$NDK/build 有时也会遇到这个问题,如果以上修改权限后还不行,尝试手动删除obj目录】
7. Unable to lock the administration directory (/var/lib/dpkg/)
sudo rm /var/lib/apt/lists/lock
或 sudo rm /var/cache/apt/archives/lock
http://askubuntu.com/questions/15433/unable-to-lock-the-administration-directory-var-lib-dpkg-is-another-process
8. ubuntu上安装ffmpeg
http://thierry-xing.iteye.com/blog/2017864
△ 带x264库的安装
http://blog.csdn.net/season_hangzhou/article/details/24399371
△ 带fdk-aac库的安装
① http://blog.csdn.net/vblittleboy/article/details/25223699
其中乱码的代码如下:
git clone --depth 1 git://github.com/mstorsjo/fdk-aac.git
cd fdk-aac
autoreconf -fiv
//./configure --disable-shared 	// 禁用shared的情况
./configure --enable-shared	// 启用shared的情况
make && make install

ldconfig /usr/local/lib

./configure --enable-libfdk_aac --enable-nonfree --enable-libmp3lame
经过整理之后,最终的configure选项应为:
/configure --prefix=/usr/local/ffmpeg --enable-shared --enable-yasm --enable-libx264 --enable-gpl --enable-pthreads --enable-libfdk-aac --enable-nonfree --enable-pic --enable-libmp3lame --extra-cflags=-I/usr/local/x264/include --extra-ldflags=-L/usr/local/x264/lib② http://www.cnblogs.com/lixiaodi/p/4702535.html
③ 如果以上两个库都是通过包管理器下载安装的话,那configure 就可以简化为
./configure --enable-shared --enable-libfaac --enable-libx264 --enable-gpl --enable-nonfree --enable-pic附上:
ffmpeg 的 configure选项 对照表
9. Ubuntu 安装 OpenCV
http://blog.csdn.net/junmuzi/article/details/49888123
10. OpenCV 安装遇到 “libavcodec.a make fails - recompile with -fPIC”
完整错误信息:/usr/bin/ld: /usr/local/lib/libavcodec.a(avpacket.o): relocation R_X86_64_32S against `av_destruct_packet' can not be used when making a shared object; recompile with -fPIC
需要重新configure 并 make ffmpeg
sudo CFLAGS="-fPIC" ./configure --enable-nonfree --enable-pic --enable-shared
make clean
make
make install
11. apt 的 搜索命令
sudo apt-cache search xxx12. Ubuntu 下 打不开 Android SDK Manager
进入sdk目录下的tools,用 ./android 运行即可
13. Ubuntu 下 NDK的安装
http://blog.csdn.net/telencool/article/details/47057065
14. 修改系统环境变量的方法(以添加NDK的路径为例):
修改系统环境变量
sudo gedit /etc/profile在profile文件下面添加,保存并退出
export ANDROID_NDK= ndk路径
export PATH=$ANDROID_NDK:$PATH
使添加生效
source /etc/profile15. git错误:fatal: Not a git repository (or any of the parent directories): .git
提示说没有.git这样一个目录,git init就可以了
16. Android/NDK编译 x264、fdk-aac、FFmpeg
http://blog.chinaunix.net/uid-26000296-id-5213411.html
http://blog.chinaunix.net/uid-26000296-id-5213410.html
http://www.itnose.net/detail/6219672.html
最后是我自己将它们整理之后,亲测有效的脚本
http://blog.csdn.net/panda1234lee/article/details/53099203
17. 中文输入法的切换
http://jingyan.baidu.com/article/adc815134f4b92f722bf7350.html
18. Dos2Unix命令
http://codingstandards.iteye.com/blog/810900
转换整个文件夹:
cd 到想转换的目录下,然后输入以下命令
$ find . -type f -exec dos2unix {} \;