Flutter学习六之实现一个带筛选的列表页面
上期实现了一个网络轮播图的效果,自定义了一个轮播图组件,继承自StatefulWidget,我们知道Flutter中并没有像Android中activity的概念。页面见的跳转是通过路由从一个全屏组件跳转到另外的一个全屏组件,那如果我想在A组件中更新B组件的数据应该怎么实现呢?
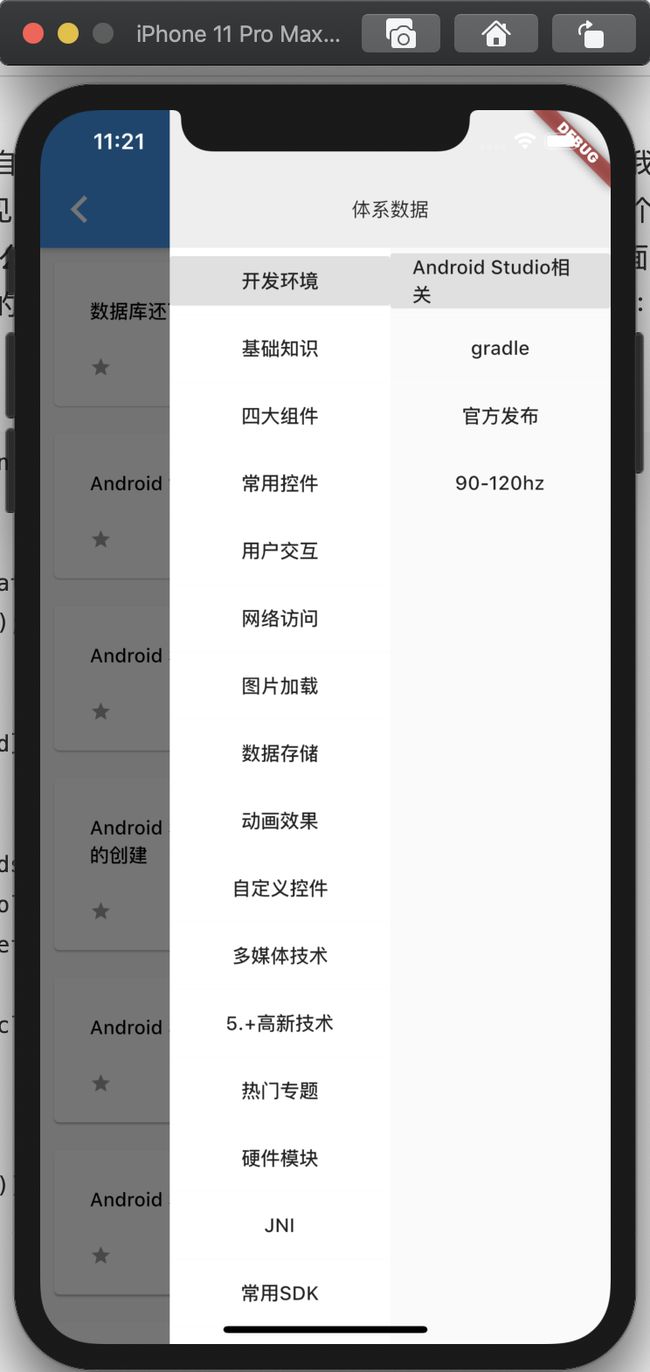
今天我们来实现一个支持筛选的列表页面。前面我们已经实现来一个支持下拉刷新和上拉加载更多的列表组件,这里就不在做更多介绍来,效果图如下:

通过点击左滑菜单筛选列表的数据。由于列表在之前的一篇文章已经说明过Flutter学习四之实现一个支持刷新加载的列表,所以这里就直接上列表的代码:我们将列表定义程一个组件,方便,页面引用,列表的请求也放在组件内部。
class ArticleListBaseWidget extends StatefulWidget {
  int cid = 0; //文章分类的id
  @override
  State createState() {
    return ArticleListBaseState();
  }

  ArticleListBaseWidget({this.cid});
}

class ArticleListBaseState extends State {
  RefreshController refreshController =
      RefreshController(initialRefresh: true);
  int pageNum = 0;
  List _articles = [];

  void onRefresh() {
    pageNum = 0;
    getArticle(true, getApiName());
  }

  void loadMore() {
    pageNum++;
    getArticle(false, getApiName());
  }

//根据cid参数来处理apiName,如果没有传cid参数进来表示不支持分类筛选。
  String getApiName() {
    String apiName = "";
      if (widget.cid > 0) {
        apiName = "article/list/$pageNum/json?cid=${widget.cid}";
      } else {
        apiName = "article/list/$pageNum/json";
      }
    print("apiName=$apiName");
    return apiName;
  }

  ///置顶文章
  void getArticle(bool isRefresh, String apiName) async {
    ///文章接口请求
    dio.get(apiName).then((value) {
      ///文章实体解析
      ArticleListEntityEntity articleBeanEntity =
          ArticleListEntityEntity().fromJson(jsonDecode(value.toString()));
      if (isRefresh) {
        _articles = articleBeanEntity.data.datas;
      } else {
        _articles.addAll(articleBeanEntity.data.datas);
      }

      ///接口调用成功后更新数据需要调用setState()方法
      setState(() {

      });

      if (articleBeanEntity.data.datas.length ==0) {
        //如果接口没有数据返回
        if (isRefresh) {
          //如果是下拉刷新的时候并且接口没有返回数据,隐藏列表控件,展示空页面
          refreshController.refreshFailed();
        } else {
          //如果是上啦加载更多并且没有返回数据,就展示列表控件,但是下拉提示没有更多数据了
          refreshController.loadNoData();
        }
      } else {
        //如果有数据返回,展示列表控件
        if (isRefresh) {
          //如果是下拉刷新,并且有数据返回正常展示页面数据
          refreshController.refreshCompleted();
        } else {
          //如果是上啦加载,并且有数据返回正常展示页面数据
          refreshController.loadComplete();
        }
      }
    }).catchError((onError) {
      if (isRefresh) {
        //如果下拉刷新,并且接口出错,展示错误页面
        refreshController.refreshFailed();
      } else {
        //如果上拉加载更多,并且接口出错,展示列表控件,底部下拉位置展示加载失败
        refreshController.loadFailed();
      }
    });
  }

  @override
  Widget build(BuildContext context) {
    return
      SmartRefresher(
        controller: refreshController,
        enablePullUp: true,
        onRefresh: onRefresh,
        onLoading: loadMore,
        header: WaterDropHeader(),
        footer: ClassicFooter(),
        child:
            ListView.builder(
                itemBuilder: (context, index) => ItemPage(_articles[index]),
                itemCount: _articles.length)
    );
  }
}
因为要实现的列表支持筛选项,所以我们这里要在构造方法中接收一个cid参数,用来进行列表筛选的,代码很简单,主要是定义来一个下拉刷新和上拉加载更多要执行的方法,然后在接口返回中针对返回的数据处理来对应的刷新状态,以及对异常的处理,注释已经写的很清楚来。
接下来我们新建一个页面,
 @override
  Widget build(BuildContext context) {
    return Scaffold(
        appBar: AppBar(title: Text("文章列表")),
        endDrawer: drawerSystem(),
        body:ArticleListBaseWidget(key:key,cid: cid));
  }
这里endDrawer方法是用来添加一个左滑菜单栏的,这里我们用来显示需要筛选的分类数据组件drawerSystem,该组件是由两个联动的列表组成的,同时在构造方法中,传人两个列表的点击时间,方便调用该组件的页面进行数据更新。这里要注意的是获取状态栏的高度和appbar的高度,还有我们要在endDrawer中自定义一个标题栏,但是endDrawer页面默认会有一个距离顶部的空白高度,我们要利用MediaQuery.removePadding方法来去掉顶部留白的部分,然后设置自己定义的标题栏。这里的appbar高度用常量kToolbarHeight来获取,MediaQuery.of(context).padding.top就是状态栏的高度,看到往上很多是直接写死,这样在不同的机型上面展示的效果会不一样的。
具体代码:
 Widget drawerSystem() {
    return MediaQuery.removePadding(
        context: context,
        removeTop: true,
        child: Container(
            color: Colors.blue,
            width: 320,
            child: Column(
              mainAxisSize: MainAxisSize.max,
              children: [
                Container(
                    child: Text("体系数据"),
                    height: kToolbarHeight + MediaQuery.of(context).padding.top,
                    //appbar高度+状态栏高度
                    padding: EdgeInsets.only(
                        top: MediaQuery.of(context).padding.top),
                    alignment: Alignment.center,
                    color: Colors.grey[200]),
                Expanded(
                    child: Row(
                  mainAxisSize: MainAxisSize.max,
                  children: [
                    Expanded(
                        child: Container(
                            child: ListView.separated(
                                separatorBuilder: (context, index) {
                                  return Divider(
                                      height: 1, color: Colors.grey[50]);
                                },
                                itemBuilder: (context, index) => ItemPageSystem(
                                    screenList[index],
                                    null,
                                    index,
                                    (index) => {onItemClick(index)}),
                                itemCount: screenList.length),
                            color: Colors.white)),
                    Expanded(
                        child: Container(
                            child: ListView.separated(
                                separatorBuilder: (context, index) {
                                  return Divider(
                                      height: 1, color: Colors.white);
                                },
                                itemBuilder: (context, index) => ItemPageSystem(
                                    null,
                                    screenChildList[index],
                                    index,
                                    (index) => onItemClickChild(index)),
                                itemCount: screenChildList.length),
                            color: Colors.grey[50]))
                  ],
                ))
              ],
            )));
  }
ItemPageSystem是listView每该item的样式,可以自己定义,这里要注意的一下,就是listview item的点击事件,这里为来方便在父组件进行数据的处理,所以是从item组件的构造方法将方法传进去的,
 ItemPageSystem(
      this.screenDataBean, this.screenChild, this.index, this.function);
然后就可以在点击事件处理筛选的联动效果了,
 //一级筛选点击事件处理
  onItemClick(int index) {
    setState(() {
      //全局记住点击位置
      this.index = index;
      //设置二级菜单数据集合
      screenChildList = screenList[index].children;
      //遍历一级数据设置一级菜单标示,是否选中
      updateListSelect(index, screenList);
    });
  }

  //二级筛选事件处理
  onItemClickChild(int index) {
    setState(() {
      //全局记住二级菜单点击位置
      indexChild = index;
      //双层循环遍历清空二级菜单为非选中状态
      for (int i = 0; i < screenList.length; i++) {
        updateListSelect(-1, screenList[i].children);
      }
      //设置当前点击数据为选中状态
      updateListSelect(index, screenChildList);
      cid = screenChildList[index].id;
      Navigator.pop(context);//关闭侧边菜单栏
      key.currentState.refreshController.requestRefresh();
    });
  }
到这一步基本已经完成了,我们看下效果发现,点击了筛选后并不能更新列表数据,这是为什么呢,查找了半天不知道问题处在哪里,通过查阅文档发现,如果想在父组件里面更新继承自StatefulWidget的组件的数据,光设置setStat还是不行,因为组件的Key是相同的没有改变,所以要想在父组件更新StatefulWidget组件的数据,需要用到GlobalKey,GlobalKey 能够跨 Widget 访问状态,简单来说就是可以通过GlobalKey来调用子组件的方法或者属性。
具体用法:
//在子组件的构造方法中添加一个Key参数。并且调用super方法返回
  ArticleListBaseWidget({Key key,this.cid}):super(key:key);

//在父组件中初始化组件,ArticleListBaseState为你要更改状态的子组件
  final GlobalKey key = GlobalKey();

 //在父组件中初始化子组件的位置,将GlobalKey对象传回到子组件
 ArticleListBaseWidget(key:key,cid: cid));

 //父组件中,在你需要更新子组件的位置利用GlobalKey对象调用子组件的方法
  key.currentState.refreshController.requestRefresh();
在此运行发现,可以通过筛选条件来更新列表了。