从内核驱动到android app
了解android驱动框架:
1.方法1——jni调用底层驱动
在android框架中写入c/c++直接调用底层linux驱动,并向上提供jni接口给应用程序:
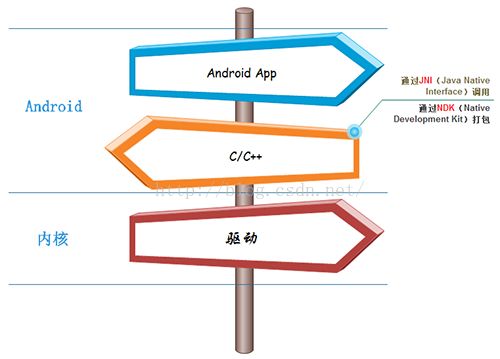
优点:简单易行;
缺点:主要在于驱动程序,由于在linux中需要遵循GPL协议,需要开源,而许多厂商的一些代码不希望开源。
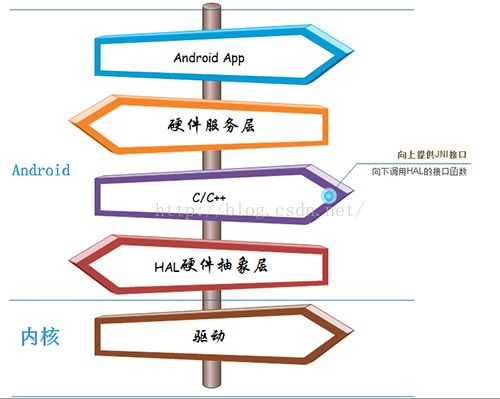
2.方法2——增加硬件抽象层
将驱动程序一分为二,一部分开源在内核中,一部分不开源在android框架中:
led android驱动:
从这里我们将看到整个应用框架层到底层驱动的走向。首先,无论是哪种方法,我们都需要实现一个linux驱动以供上层访问led资源。
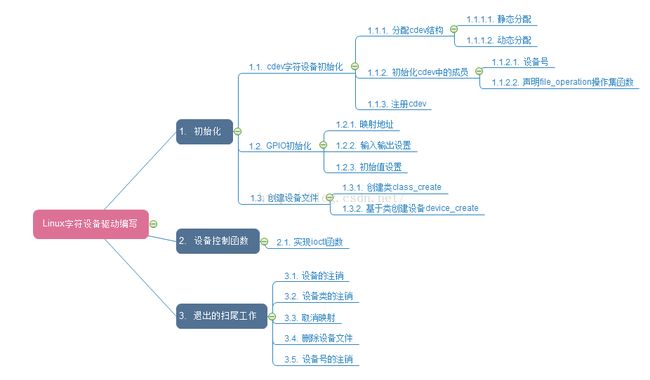
1.linux驱动:
linux的字符设备驱动编写:
- #include
- #include
- #include
- #include
- #include
- #include
- #include
- #include
- static struct cdev dev;
- static dev_t dev_num;
- #define GPM4CON 0x110002E0
- #define GPM4DAT 0X110002E4
- #define LED_ON _IOW('G',0,int)
- #define LED_OFF _IOW('G',1,int)
- static unsigned int *led_con = NULL;
- static unsigned int *led_dat = NULL;
- static struct class *led_class = NULL;
- static long led_ioctl(struct file *file, unsigned int cmd, unsigned long arg)
- {
- switch(cmd)
- {
- case LED_ON:
- {
- writel(readl(led_dat)& ~(0x1<
- break;
- }
- case LED_OFF:
- {
- writel(readl(led_dat)| (0x1<
- break;
- }
- default:
- {
- return -EINVAL;
- break;
- }
- }
- return 0;
- }
- static struct file_operations led_fops = {
- .owner = THIS_MODULE,
- .unlocked_ioctl = led_ioctl,
- };
- static void hw_init()//GPM4_0-3
- {
- //1.2.1 映射地址
- led_con = ioremap(GPM4CON,4);
- led_dat = ioremap(GPM4DAT,4);
- //1.2.2 设置为输出状态
- writel((readl(led_con)& ~0xffff) | 0x1111, led_con);
- //1.2.3 设置为高电平
- writel(readl(led_dat)|0xf, led_dat);
- }
- static int led_init()
- {
- //1.1 cdev字符设备初始化
- //1.1.1 分配cdev结构(静态分配)
- //1.1.2 初始化cdev结构
- alloc_chrdev_region(&dev_num,0,1,"callon_led");
- cdev_init(&dev, &led_fops);
- dev.owner = THIS_MODULE;
- //1.1.3 注册cdev结构
- cdev_add(&dev,dev_num,1);
- //1.2 硬件初始化
- hw_init();
- //1.3 创建设备文件
- //1.3.1 创建类
- led_class = class_create(THIS_MODULE,"callon_led");
- //1.3.2 创建设备
- device_create(led_class,NULL,dev_num,NULL,"%s","callon_led");
- printk("init led device is OK!\n");
- return 0;
- }
- static void led_exit()
- {
- device_destroy(led_class,dev_num);
- class_destroy(led_class);
- iounmap(led_dat);
- iounmap(led_con);
- cdev_del(&dev);
- unregister_chrdev_region(dev_num,1);
- }
- module_init(led_init);
- module_exit(led_exit);
2 实现第一种方法:
首先,说明一下为什么使用jni:
1.基于对代码的保护,java相对容易被反编译,而c/c++库反汇编难度较大;
2.可以方便地使用现存的开源库;
3.提高执行效率;
4.java在某些文件操作方面,找不到相关的API,如此处的ioctl.
其次,为什么使用ndk?
ndk提供了一系列的工具,能够帮助开发者快速开发c/c++的动态库,并能自动将.so动态库和java一起打包成apk.
第一种方法的设计思路如下所示:

在第一步中想要使用javah命令自动产生头文件需要先编写app程序,但是此时的app程序并不需要很完善,只需要提出一个你想要的native接口就好(但是你的android程序必须要Rebuild正确才会正确产生头文件):
- package com.led.ndk.example.callon.ndk_led;
- import android.app.Activity;
- import android.os.Bundle;
- import android.view.View;
- import android.widget.CheckBox;
- public class MainActivity extends Activity {
- private CheckBox[] Led = new CheckBox[4];
- @Override
- protected void onCreate(Bundle savedInstanceState) {
- super.onCreate(savedInstanceState);
- setContentView(R.layout.activity_main);
- Led[0] = (CheckBox)findViewById(R.id.checkbox_led1);
- Led[1] = (CheckBox)findViewById(R.id.checkbox_led2);
- Led[2] = (CheckBox)findViewById(R.id.checkbox_led3);
- Led[3] = (CheckBox)findViewById(R.id.checkbox_led4);
- }
- private void SendCmd(View view)
- {
- for(int i =1; i<5; i++)
- {
- if(Led[i].isChecked())
- {
- cmdLeds(1, i);
- }
- else
- {
- cmdLeds(0, i);
- }
- }
- }
- public native void cmdLeds(int cmd, int arg);
- }
根据如上简单的app,使用命令:
javah -d jni -classpath 你的sdk目录/platforms/你的平台名/android.jar:你的应用程序/app/build/intermediates/classes/debug/ 你的包名.主类名
如:
- javah -d jni -classpath /opt/AndroidSDK/platforms/android-23/android.jar:/home/callon/Downloads/callon_ndk_led/ndk_led/app/build/intermediates/classes/debug/ com.led.ndk.example.callon.ndk_led.MainActivity
此时自动产生出jni文件夹,其中包含头文件com_led_ndk_example_callon_ndk_led_MainActivity.h,头文件比较重要的:
- JNIEXPORT void JNICALL Java_com_led_ndk_example_callon_ndk_1led_MainActivity_cmdLeds
- (JNIEnv *, jobject, jint, jint);
这也就是我们编写源文件需要实现的方法名,下面直接编写源文件:
- #include "com_led_ndk_example_callon_ndk_led_MainActivity.h"
- #include
- #include
- #include
- #include
- #include
- #include
- #include
- #define LED_ON _IOW('G',0,int)
- #define LED_OFF _IOW('G',1,int)
- JNIEXPORT void JNICALL Java_com_led_ndk_example_callon_ndk_1led_MainActivity_cmdLeds
- (JNIEnv * env, jobject thiz, jint cmd, jint arg)
- {
- int fd;
- int temp_cmd;
- fd = open("/dev/callon_led",O_WRONLY);
- if(cmd == 1)
- temp_cmd = LED_ON;
- else
- temp_cmd = LED_OFF;
- ioctl(fd, temp_cmd, arg);
- close(fd);
- }
就是一些对内核驱动文件的操作,然后编写Android.mk即makefile:
- LOCAL_PATH := $(call my-dir)
- include $(CLEAR_VARS)
- LOCAL_MODULE := callon_ndk_led
- LOCAL_SRC_FILES := ndk_led.c
- include $(BUILD_SHARED_LIBRARY)
- callon@ubuntu:~/Downloads/callon_ndk_led/jni$ ls
- Android.mk com_led_ndk_example_callon_ndk_led_MainActivity.h ndk_led.c
- callon@ubuntu:~/Downloads/callon_ndk_led/jni$ cd ..
- callon@ubuntu:~/Downloads/callon_ndk_led$ ndk-build
- [armeabi] Compile thumb : callon_ndk_led <= ndk_led.c
- [armeabi] SharedLibrary : libcallon_ndk_led.so
- [armeabi] Install : libcallon_ndk_led.so => libs/armeabi/libcallon_ndk_led.so
- callon@ubuntu:~/Downloads/callon_ndk_led$
最后一步,完善app:
首先,用Project形式来看我们的app,并在app->src->main下创建一个目录"jniLibs";
然后,将我们.so所在的armeabi目录拷贝到jniLibs目录下;
最后在我们的app代码的最后加上:
- static
- {
- System.loadLibrary("callon_ndk_led");
- }
然后Rebuild Project即可!
3 实现第二种方法:
1.HAL程序编写:

首先在 安卓源代码根目录/hardware/libhardware/modules/下创建自己的hal代码存放路径,如led。
最终编写的文件为:安卓源代码根目录/hardware/libhardware/modules/led/led_hal.c和Android.mk,安卓源代码根目录/hardware/libhardware/include/hardware/led.h。
- #include
- #include
- #include
- #include
- #include
- #include
- #include
- #include
- #include
- #include
- #define LOG_TAG "callon_led"
- static int fd;
- static int led_close(struct hw_device_t *device)
- {
- struct led_device_t* led = (struct led_device_t*)device;
- free(led);
- close(fd);
- return 0;
- }
- int led_on(struct led_device_t* dev,int arg)
- {
- ioctl(fd,LED_ON,arg);
- return 0;
- }
- int led_off(struct led_device_t* dev,int arg)
- {
- ioctl(fd,LED_OFF,arg);
- return 0;
- }
- static struct led_device_t led_dev = {
- .led_device = {
- .tag = HARDWARE_DEVICE_TAG,
- .close = led_close,
- },
- .set_on = led_on,
- .set_off = led_off,
- };
- static int open_led(const struct hw_module_t* module, char const* name,
- struct hw_device_t** device)
- {
- *device = &led_dev;
- fd = open("/dev/callon_led",O_RDWR);
- if(fd < 0)
- {
- ALOGD(LOG_TAG, "open device fail!");
- return -1;
- }
- return 0;
- }
- static struct hw_module_methods_t led_methods = {
- .open = open_led,
- };
- struct hw_module_t HAL_MODULE_INFO_SYM = {
- .tag = HARDWARE_MODULE_TAG,
- .id = "led",
- .methods = &led_methods,
- };
led.h
- #ifndef _HARDWARE_LED_H
- #define _HARDWARE_LED_H
- #include
- #define LED_ON _IOW('G',0,int)
- #define LED_OFF _IOW('G',1,int)
- struct led_device_t {
- struct hw_device_t led_device;
- int (*set_on)(struct led_device_t* dev,int arg);//means led_number
- int (*set_off)(struct led_device_t* dev,int arg);
- };
- #endif // _HARDWARE_LED_H
Android.mk
- LOCAL_PATH := $(call my-dir)
- include $(CLEAR_VARS)
- LOCAL_MODULE := led.default
- # HAL module implementation stored in
- # hw/
.default.so - LOCAL_MODULE_RELATIVE_PATH := hw
- LOCAL_C_INCLUDES := hardware/libhardware
- LOCAL_SRC_FILES := led_hal.c
- LOCAL_SHARED_LIBRARIES := liblog
- LOCAL_MODULE_TAGS := eng
- include $(BUILD_SHARED_LIBRARY)
编译则在 安卓源代码根目录下使用
- $ . setenv
- $ lunch
- $ mmm hardware/libhardware/modules/led/
- target SharedLib: led.default (out/target/product/tiny4412/obj/SHARED_LIBRARIES/led.default_intermediates/LINKED/led.default.so)
- target Symbolic: led.default (out/target/product/tiny4412/symbols/system/lib/hw/led.default.so)
- Export includes file: hardware/libhardware/modules/led/Android.mk -- out/target/product/tiny4412/obj/SHARED_LIBRARIES/led.default_intermediates/export_includes
- target Strip: led.default (out/target/product/tiny4412/obj/lib/led.default.so)
- Install: out/target/product/tiny4412/system/lib/hw/led.default.so
- make: Leaving directory `/opt/Tiny4412/Android/android-5.0.2'
- #### make completed successfully (1 seconds) ####
即可,最后产生的就在out/target/product/tiny4412/system/lib/hw/led.default.so了。
我们将system.img重做,这里通过一个脚本./gen-img.sh完成。
2.硬件服务编写:
首先,Service Manager为了解决访问冲突而存在的,在有Service Manager的基础之上,我们的底层需要先编写硬件服务,注册到Service Manager,我们的app才能通过Service Manager获取到服务,操作底层。
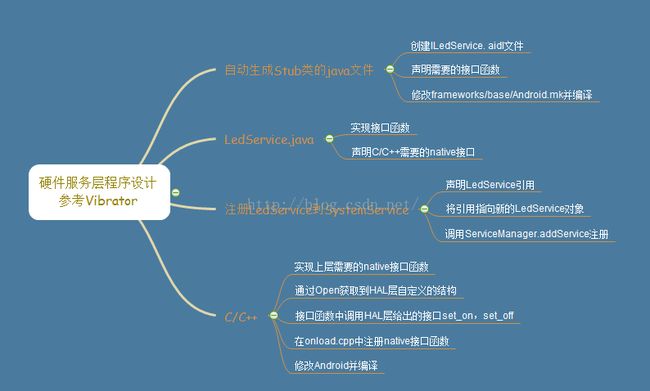
由于涉及到许多目录操作,细化操作后为:
1.创建 ILedService.aidl
仿照 frameworks/base/core/java/android/os/IVibratorService.aidl
- package android.os;
- /** {@hide} */
- interface ILedService
- {
- int LedOpen();
- int LedOn(int arg);
- int LedOff(int arg);
- }
2.修改frameworks/base/Android.mk
- core/java/android/os/ILedService.aidl \
3.自动生成ILedService.java
mmm frameworks/base/编译自动生成out/target/common/obj/JAVA_LIBRARIES/framework_intermediates/src/core/java/android/os/ILedService.java
4.创建 LedService.java 实现接口函数
仿照frameworks/base/services/core/java/com/android/server/VibratorService.java
- package com.android.server;
- import android.util.Slog;
- import android.os.ILedService;
- public class LedService extends ILedService.Stub{
- private static final String TAG = "LedService";
- public LedService()
- {
- Slog.d(TAG,"LedService");
- }
- public int LedOpen() throws android.os.RemoteException
- {
- return native_LedOpen();
- }
- public int LedOn(int arg) throws android.os.RemoteException
- {
- return native_LedOn(arg);
- }
- public int LedOff(int arg) throws android.os.RemoteException
- {
- return native_LedOff(arg);
- }
- public static native int native_LedOpen();
- public static native int native_LedOn(int arg);
- public static native int native_LedOff(int arg);
- }
5.将服务注册到Service Manager当中
- LedService led = null;
- Slog.i(TAG, "Led Service");
- led = new LedService();
- ServiceManager.addService("led", led);
6.实现com_android_server_LedService.cpp
为什么需要它?因为我们的hal代码并没有提供jni的接口(这里提供了一种新的方法来提供native方法,之前是自动产生头文件然后来实现的)。
根据frameworks/base/services/core/jni/com_android_server_VibratorService.cpp
- /*
- * Copyright (C) 2009 The Android Open Source Project
- *
- * Licensed under the Apache License, Version 2.0 (the "License");
- * you may not use this file except in compliance with the License.
- * You may obtain a copy of the License at
- *
- * http://www.apache.org/licenses/LICENSE-2.0
- *
- * Unless required by applicable law or agreed to in writing, software
- * distributed under the License is distributed on an "AS IS" BASIS,
- * WITHOUT WARRANTIES OR CONDITIONS OF ANY KIND, either express or implied.
- * See the License for the specific language governing permissions and
- * limitations under the License.
- */
- #define LOG_TAG "LedService"
- #include "jni.h"
- #include "JNIHelp.h"
- #include "android_runtime/AndroidRuntime.h"
- #include
- #include
- #include
- #include
- struct led_device_t *led_dev;
- namespace android
- {
- static jint LedOpen(JNIEnv *env, jobject clazz)
- {
- hw_module_t *module;
- hw_device_t *device;
- hw_get_module("led",(hw_module_t const **)&module);
- module->methods->open(module, NULL, &device);
- led_dev = (struct led_device_t*)device;
- return 0;
- }
- static jint LedOn(JNIEnv *env, jobject clazz, int arg)
- {
- led_dev->set_on(led_dev,arg);
- return 0;
- }
- static jint LedOff(JNIEnv *env, jobject clazz, int arg)
- {
- led_dev->set_off(led_dev,arg);
- return 0;
- }
- static JNINativeMethod method_table[] = {
- { "native_LedOpen", "()I", (void*)LedOpen },
- { "native_LedOn", "(I)I", (void*)LedOn },
- { "native_LedOff", "(I)I", (void*)LedOff}
- };
- int register_android_server_LedService(JNIEnv *env)
- {
- return jniRegisterNativeMethods(env, "com/android/server/LedService",
- method_table, NELEM(method_table));
- }
- };
7.注册native接口
在frameworks/base/services/core/jni/onload.cpp中添加
- int register_android_server_LedService(JNIEnv* env);
- register_android_server_LedService(env);
8.修改Android.mk
在frameworks/base/services/core/jni/Android.mk中加入自己写的com_android_server_LedService.cpp
- $(LOCAL_REL_DIR)/com_android_server_LedService.cpp \
9.mmm frameworks/base/services/编译
- Copying: out/target/common/obj/JAVA_LIBRARIES/services_intermediates/classes.dex
- target Jar: services (out/target/common/obj/JAVA_LIBRARIES/services_intermediates/javalib.jar)
- Install: out/target/product/tiny4412/system/framework/services.jar
- make: Leaving directory `/opt/Tiny4412/Android/android-5.0.2'
- #### make completed successfully (50 seconds) ####
其中碰到一阵错误,非常无语:
- make: Entering directory `/opt/Tiny4412/Android/android-5.0.2'
- make: *** No rule to make target `frameworks/base/services/core/.java', needed by `out/target/common/obj/JAVA_LIBRARIES/services.core_intermediates/classes-full-debug.jar'. Stop.
- make: Leaving directory `/opt/Tiny4412/Android/android-5.0.2'
- #### make failed to build some targets (1 seconds) ####
最后继续使用./gen-img.sh完成system.img的编译,烧写进开发板,为写应用程序做准备。
3.应用程序设计:
- package com.led.hal.example.callon.callonhalled;
- import android.os.RemoteException;
- import android.support.v7.app.AppCompatActivity;
- import android.os.Bundle;
- import android.view.View;
- import android.widget.CheckBox;
- import android.os.ILedService;
- import android.os.ServiceManager;
- public class MainActivity extends AppCompatActivity {
- private CheckBox[] Led = new CheckBox[4];
- private ILedService iLedService = null;
- @Override
- protected void onCreate(Bundle savedInstanceState) {
- super.onCreate(savedInstanceState);
- setContentView(R.layout.activity_main);
- Led[0] = (CheckBox)findViewById(R.id.checkbox_led1);
- Led[1] = (CheckBox)findViewById(R.id.checkbox_led2);
- Led[2] = (CheckBox)findViewById(R.id.checkbox_led3);
- Led[3] = (CheckBox)findViewById(R.id.checkbox_led4);
- iLedService = ILedService.Stub.asInterface(ServiceManager.getService("led"));
- try {
- iLedService.LedOpen();
- }catch(RemoteException e){
- e.printStackTrace();
- }
- }
- private void SendCmd(View view)
- {
- for(int i =1; i<5; i++)
- {
- if(Led[i].isChecked()) {
- try {
- iLedService.LedOn(i);
- }catch (RemoteException e){
- e.printStackTrace();
- }
- }
- else {
- try {
- iLedService.LedOff(i);
- }catch (RemoteException e){
- e.printStackTrace();
- }
- }
- }
- }
- }
http://blog.csdn.net/wukunting/article/details/5788196
首先拷贝out/target/common/obj/JAVA_LIBRARIES/framework_intermediates/classes.jar到工程下
然后AndroidStudio中File->Project Structure点击其中的'+'->选择Import .JAR/.AAR Package->选择classes.jar->Finish
继续在Project Structure下选择app->Dependencies->选择'+'->Module Dependency->选择'classes'即可。
这时候整个源码都好了,但是下载速度会很慢,改善基于frameworks设计的app下载和运行速度的方案:
1.修改build.gradle(Module:app)
- apply plugin: 'com.android.application'
- android {
- compileSdkVersion 23
- buildToolsVersion "23.0.2"
- defaultConfig {
- applicationId "com.led.hal.example.callon.callonhalled"
- minSdkVersion 21
- targetSdkVersion 23
- versionCode 1
- versionName "1.0"
- multiDexEnabled true
- }
- dexOptions {
- javaMaxHeapSize "4g"
- }
- buildTypes {
- release {
- minifyEnabled false
- proguardFiles getDefaultProguardFile('proguard-android.txt'), 'proguard-rules.pro'
- }
- }
- }
- dependencies {
- compile fileTree(dir: 'libs', include: ['*.jar'])
- testCompile 'junit:junit:4.12'
- compile 'com.android.support:appcompat-v7:23.2.0'
- compile project(':classes')
- compile 'com.android.support:multidex:1.0.0'
- }
在application下增加
android:name="android.support.multidex.MultiDexApplication"
最后下载运行吧!