Spring Boot 应用篇二
目录
- Spring Boot表单数据校验
- 检验规则
- 异常处理与单元测试
- Spring Boot中异常处理方式
- Spring Boot整合Junit单元测试
- Spring Boot热部署
- 使用Spring Loader进行项目的热部署
- Spring Loader热部署方式一:以maven插件的方式
- Spring Loader缺陷:
- Spring Loader热部署方式二:在项目中直接使用jar包的方式
- 注意:这一种方式不会出现端口抢占的情况
- DevTools工具
- Spring Boot缓存技术
- Spring Boot整合Ehcache
- Spring Boot整合Spring Data Redis
- Spring Boot定时任务
- Scheduled定时任务器
- Cron表达式
- Spring Boot整合Quartz
- Quartz 的使用思路
- 整合步骤
Spring Boot表单数据校验
Spring Boot中使用了Hibernate-validate校验框架来完成数据校验的。(但是不需要我们导入这个jar包,Spring Boot中的web启动器中已经包含了此包)
检验规则
常用的校验规则如下
- @NotBlank:判断字符串是否为null或者是空串(去掉两边空格)
- @NotEmpty:判断字符串是否为null或者是空串(不会去掉两边空格,也即是如果你输入的是一段空串,校验会通过)
- @Length:判断字符的长度(最大或最小)[校验数字会抛异常的哦]
- @Min:判断数值最小值
- @Max:判断数值最大值
- @Email:判断邮箱是否合法
@GetMapping("save")
public Object addUser(@Valid UserVO user, BindingResult bindingResult) throws Exception {
    if (bindingResult.hasErrors()) {
        List<ObjectError> allErrors = bindingResult.getAllErrors();
        StringBuilder builder = new StringBuilder();
        for (ObjectError allError : allErrors) {
            builder.append(allError.getDefaultMessage());
        }
        throw new Exception(builder.toString());
    }
//        这里已经说明校验通过了
    String addUser = userService.addUser(user);
    return addUser;
}
异常处理与单元测试
- Spring Boot中异常处理方式
- Spring Boot整合Junit单元测试
Spring Boot中异常处理方式
Spring Boot中对于异常处理提供了五种处理方式
其实这五种,只需要了解即可,真要使用的话都是选择最后一种,而且有的公司部门前后分离,为了简化开发,可能会和前台商量一种规范,甚至都不采用如下这几种。
- 自定义错误页面。SpringBoot 默认的处理异常的机制。
SpringBoot 默认的已经提供了一套处理异常的机制。 一旦程序中出现了异常 SpringBoot 会像/error 的 url 发送请求。在 springBoot 中提供了一个 叫 BasicExceptionController 来处理/error 请求,然后跳转到默认显示异常的页面来展示异常 信息。如果我们需要将所有的异常同一跳转到自定义的错误页面 ,需要在src/main/resources/templates目录下创建error.html 页面。注意:名称必须叫error。 - @ExceptionHandler注解处理异常
用法和@Request Mapping注解类似,但是此类注解的方法在哪个Controller中,只对该类中出现的异常有效。 - @ControllerAdvice+@ExceptionHandler 注解处理异常
此种方式弥补了第二种的缺陷,但是可能会有很多的异常处理方法。 - 配置 SimpleMappingExceptionResolver 处理异常
此种方式弥补了第三种的缺陷,可以在全局异常类中添加一个方法完成异常的同一处理。但是不能拿到异常信息。 - 自定义 HandlerExceptionResolver 类处理异常
该方式需要再全局异常处理类中实现HandlerExceptionResolver 接口,弥补了方式四获取不到异常信息的缺陷。
Spring Boot整合Junit单元测试
- 添加Spring Boot整合Junit单元测试的包
<!-- 添加 junit 环境的 jar 包 -->
<dependency>
    <groupId>org.springframework.boot</groupId>
    <artifactId>spring-boot-starter-test</artifactId>
</dependency>
- 在测试类中添加相应注解
@RunWith:启动器。
SpringJUnit4ClassRunner.class:让junit 与 spring 环境进行整合。
@SpringBootTest(classes={App.class}) 。
1,当前类为springBoot 的测试类 @SpringBootTest(classes={App.class}) 。
2,加载SpringBoot 启动类。启动 springBoot。
junit 与 spring 整合@Contextconfiguartion(“classpath:applicationContext.xml”)
@RunWith(SpringJUnit4ClassRunner.class)
@SpringBootTest(classes = {App.class})
public class UserServiceTest {

    @Autowired
    private UserServiceImpl userServiceImpl;

    @Test
    public void testAddUser() {
        this.userServiceImpl.addUser();
    }
}
Spring Boot热部署
热部署:热部署即在项目启动后代码发生改变但是不重新启动容器。
Spring Boot的热部署分为两种
- SpringLoader插件
- DevTools工具(准确的说是重新部署)
使用Spring Loader进行项目的热部署
- 以maven插件的方式
- 在项目中直接使用jar包的方式
Spring Loader热部署方式一:以maven插件的方式
- 在pom配置文件中添加下配置
<build>
    <plugins>
        <plugin>
            <groupId>org.springframework.boot</groupId>
            <artifactId>spring-boot-maven-plugin</artifactId>
            <dependencies>
                <dependency>
                    <groupId>org.springframework</groupId>
                    <artifactId>springloaded</artifactId>
                    <version>1.2.5.RELEASE</version>
                </dependency>
            </dependencies>
        </plugin>
    </plugins>
</build>
- 使用maven的命令来启动项目
spring-boot:run
Spring Loader缺陷:
- 只能对Java代码做热部署处理,但是对页面无能为力。
- Spring Loader以maven插件方式热部署是在系统后台以进程的形式来运行。在Idea或者eclipse中我们停掉的只是项目,所以再次手动运行时会报端口占用错误。需要我们手动打开任务管理器杀死该进程(Java.exe)。
Spring Loader热部署方式二:在项目中直接使用jar包的方式
- 将Spring Loader的jar包放在项目根路径的lib目录下
- 运行时候,常规运行,但是需要添加一些参数
-javaagent:.\lib\springloaded-1.2.5.RELEASE.jar-noverify
注意:这一种方式不会出现端口抢占的情况
DevTools工具
首先说一下Spring Loader与DevTools的区别:
Spring Loader:Spring Loader在部署项目时使用的是热部署的方式。
DevTools:DevTools在部署项目时使用的是重新部署的方式。
- 修改项目的pom文件,添加DevTools的依赖
<!-- DevTools 的坐标 -->
<dependency>
    <groupId>org.springframework.boot</groupId>
    <artifactId>spring-boot-devtools</artifactId>
    <!-- 不传递依赖 -->
    <optional>true</optional>
</dependency>
- 常规运行即可
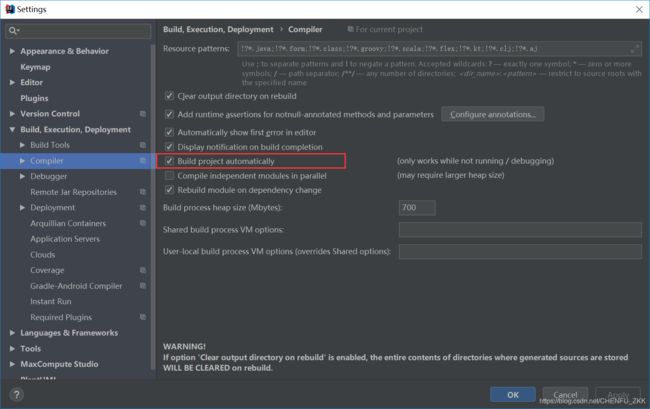
IDEA下不生效的解决方案,勾上下边的这个选项(File-Settings-Compiler-Build Project automatically)

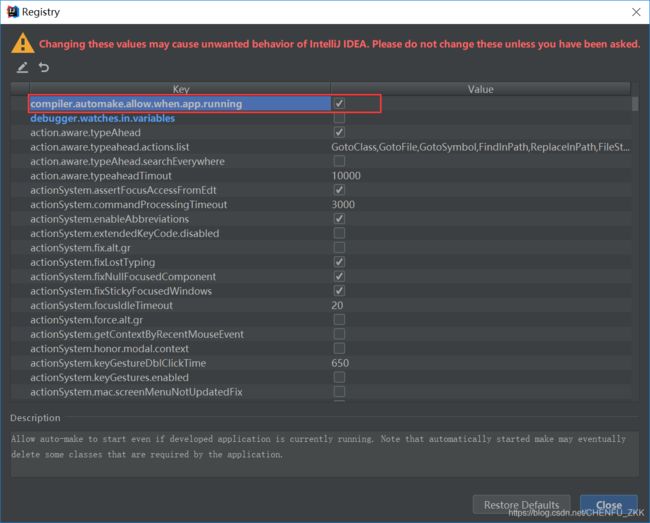
然后按住以下快捷键(ctrl + shift + alt + /)修改Registry。勾上 Compiler autoMake allow when app running

Spring Boot缓存技术
- Spring Boot整合Ehcache
- Spring Boot整合Spring Data Redis
Spring Boot整合Ehcache
- 修改pom文件,添加对缓存支持和Ehcache的jar包
<dependencies>
    <!-- springBoot 的启动器 -->
    <dependency>
        <groupId>org.springframework.boot</groupId>
        <artifactId>spring-boot-starter-web</artifactId>
    </dependency>
    <!-- springBoot 的启动器 -->
    <dependency>
        <groupId>org.springframework.boot</groupId>
        <artifactId>spring-boot-starter-data-jpa</artifactId>
    </dependency>
    <!-- 测试工具的启动器 -->
    <dependency>
        <groupId>org.springframework.boot</groupId>
        <artifactId>spring-boot-starter-test</artifactId>
    </dependency>
    <!-- mysql -->
    <dependency>
        <groupId>mysql</groupId>
        <artifactId>mysql-connector-java</artifactId>
    </dependency>
    <!-- druid 连接池 -->
    <dependency>
        <groupId>com.alibaba</groupId>
        <artifactId>druid</artifactId>
        <version>1.0.9</version>
    </dependency>
    <!-- Spring Boot 缓存支持启动器 -->
    <dependency>
        <groupId>org.springframework.boot</groupId>
        <artifactId>spring-boot-starter-cache</artifactId>
    </dependency>
    <!-- Ehcache 坐标 -->
    <dependency>
        <groupId>net.sf.ehcache</groupId>
        <artifactId>ehcache</artifactId>
    </dependency>
</dependencies>
- 创建Ehcache的配置文件(ehcache.xml,resource目录下)
:xsi="http://www.w3.org/2001/XMLSchema-instance"
         xsi:noNamespaceSchemaLocation="../config/ehcache.xsd">

    >

    <!--defaultCache:echcache 的默认缓存策略 -->


>
- 在Spring Boot的核心配置文件里添加Ehcache配置文件路径
spring.cache.ehcache.cofnig=ehcache.xml
- 在Spring Boot的启动类上开启缓存支持
@EnableCaching
- 在需要添加缓存支持的方法上加上缓存相关的注解
@Cacheable
@CacheEvict
Spring Boot整合Spring Data Redis
Spring Data Redis是Spring Data下的一个模块。作用就是简化对redis的操作。
- 修改pom文件,导入Spring-Data-Redis启动器
<dependencies>
    <!-- springBoot 的启动器 -->
    <dependency>
        <groupId>org.springframework.boot</groupId>
        <artifactId>spring-boot-starter-web</artifactId>
    </dependency>
    <!-- Spring Data Redis 的启动器 -->
    <dependency>
        <groupId>org.springframework.boot</groupId>
        <artifactId>spring-boot-starter-data-redis</artifactId>
    </dependency>
</dependencies>
- 在Spring Boot的核心配置文件配置Redis相关的参数
spring.redis.pool.max-idle=10
spring.redis.pool.min-idle=5
spring.redis.pool.max-total=20
spring.redis.hostName=192.168.70.128
spring.redis.port=6379
- 编写Spring Data Redis的配置类
详细整合可以参考一下两篇博客:
SpringBoot2.x整合Redis || SpringBoot2.x整合Redis-使用Spring缓存注解操作Redis
Spring Boot定时任务
- Scheduled定时任务器
- 整合Quartz定时任务框架
Scheduled定时任务器
Scheduled定时任务器:是Spring3.0以后自带的一个定时任务器。
- 修改pom文件,添加Scheduled的jar包
<dependencies>
    <!-- springBoot 的启动器 -->
    <dependency>
        <groupId>org.springframework.boot</groupId>
        <artifactId>spring-boot-starter-web</artifactId>
    </dependency>
    <!-- 添加 Scheduled 坐标 -->
    <dependency>
        <groupId>org.springframework</groupId>
        <artifactId>spring-context-support</artifactId>
    </dependency>
</dependencies>
- 创建一个专门保存定时任务方法的类,并让Spring去管理,在该类的定时任务方法上加上@Scheduled注解,该注解有一个cron属性(cron表达式,定时任务触发时的时间的一个字符串表达形式)。
- 开启Spring对定时任务的支持,默认是不开启的,在启动类上加入如下注解。
@EnableScheduling
Cron表达式
Cron 表达式是一个字符串,分为 6 或 7 个域,每一个域代表一个含义 Cron 有如下两种语法格式:
(1) Seconds Minutes Hours Day Month Week Year
(2)Seconds Minutes Hours Day Month Week
一、结构
corn从左到右(用空格隔开):秒 分 小时 月份中的日期 月份 星期中的日期 年份
二、各字段的含义
| 位置 | 时间域名 | 允许值 | 允许的特殊字符 |
|---|---|---|---|
| 1 | 秒 | 0-59 | , - * / |
| 2 | 分钟 | 0-59 | , - * / |
| 3 | 小时 | 0-23 | , - * / |
| 4 | 日 | 1-31 | , - * / L W C |
| 5 | 月 | 1-12 | , - * / |
| 6 | 星期 | 1-7 | , - * ? / L C # |
| 7 | 年(可选) | 1970-2099 | , - * / |
Cron 表达式的时间字段除允许设置数值外,还可使用一些特殊的字符,提供列表、范围、通配符等功 能,细说如下:
●星号(*):可用在所有字段中,表示对应时间域的每一个时刻,例如,在分钟字段时,表示“每分钟”;
●问号(?):该字符只在日期和星期字段中使用,它通常指定为“无意义的值”,相当于占位符;
●减号(-):表达一个范围,如在小时字段中使用“10-12”,则表示从 10 到 12 点,即 10,11,12;
●逗号(,):表达一个列表值,如在星期字段中使用“MON,WED,FRI”,则表示星期一,星期三和星期
五;
●斜杠(/):x/y 表达一个等步长序列,x 为起始值,y 为增量步长值。如在分钟字段中使用 0/15,则 表示为 0,15,30和 45 秒,而 5/15 在分钟字段中表示5,20,35,50,你也可以使用/y,它等同于 0/y;
●L:该字符只在日期和星期字段中使用,代表“Last”的意思,但它在两个字段中意思不同。L 在日期 字段中,表示这个月份的最后一天,如一月的 31 号,非闰年二月的 28 号;如果 L 用在星期中,则表示星 期六,等同于 7。但是,如果 L 出现在星期字段里,而且在前面有一个数值 X,则表示“这个月的最后 X 天”, 例如,6L 表示该月的最后星期五;
●W:该字符只能出现在日期字段里,是对前导日期的修饰,表示离该日期最近的工作日。例如 15W 表示离该月 15 号最近的工作日,如果该月 15 号是星期六,则匹配 14 号星期五;如果 15 日是星期日, 则匹配 16 号星期一;如果 15 号是星期二,那结果就是 15 号星期二。但必须注意关联的匹配日期不能够 跨月,如你指定 1W,如果 1 号是星期六,结果匹配的是 3 号星期一,而非上个月最后的那天。W 字符串 只能指定单一日期,而不能指定日期范围;
●LW组合:在日期字段可以组合使用 LW,它的意思是当月的最后一个工作日;
●井号(#):该字符只能在星期字段中使用,表示当月某个工作日。如 6#3 表示当月的第三个星期五(6 表示星期五,#3 表示当前的第三个),而 4#5 表示当月的第五个星期三,假设当月没有第五个星期三, 忽略不触发;
● C:该字符只在日期和星期字段中使用,代表“Calendar”的意思。它的意思是计划所关联的日期, 如果日期没有被关联,则相当于日历中所有日期。例如 5C 在日期字段中就相当于日历 5 日以后的第一天。 1C 在星期字段中相当于星期日后的第一天。 Cron 表达式对特殊字符的大小写不敏感,对代表星期的缩写英文大小写也不敏感
案例:
@Scheduled(cron = "0 0 1 1 1 ?")//每年一月的一号的 1:00:00 执行一次
@Scheduled(cron = "0 0 1 1 1,6 ?") //一月和六月的一号的 1:00:00 执行一次
@Scheduled(cron = "0 0 1 1 1,4,7,10 ?") //每个季度的第一个月的一号的 1:00:00 执行一次
@Scheduled(cron = "0 0 1 1 * ?")//每月一号 1:00:00 执行一次
@Scheduled(cron="0 0 1 * * *") //每天凌晨 1 点执行一次
Spring Boot整合Quartz
Quartz 的使用思路
- job- 任务 - 你要做什么事?
- Trigger- 触发器 - 你什么时候去做?
- Scheduler- 任务调度 - 你什么时候需要去做什么事?
整合步骤
- 修改pom文件,添加Scheduled坐标
<dependencies>
    <!-- springBoot 的启动器 -->
    <dependency>
        <groupId>org.springframework.boot</groupId>
        <artifactId>spring-boot-starter-web</artifactId>
    </dependency>
    <!-- Quartz 坐标 -->
    <dependency>
        <groupId>org.quartz-scheduler</groupId>
        <artifactId>quartz</artifactId>
        <version>2.2.1</version>
        <exclusions>
            <exclusion>
                <artifactId>slf4j-api</artifactId>
                <groupId>org.slf4j</groupId>
            </exclusion>
        </exclusions>
    </dependency>
    <!-- 添加 Scheduled 坐标 -->
    <dependency>
        <groupId>org.springframework</groupId>
        <artifactId>spring-context-support</artifactId>
    </dependency>
    <!-- Sprng tx 坐标 -->
    <dependency>
        <groupId>org.springframework</groupId>
        <artifactId>spring-tx</artifactId>
    </dependency>
</dependencies>
- 编写自定义AdaptableJobFactory类,手动将实例化的任务对象添加到springIOC容器中并且对象注入
AutowireCapableBeanFactory:可以通过此对象将任务对象添加到IOC容器中并完成注入。 - 编写 Quartz 的启动类,类似于编写整合mybatis的配置类
- 修改启动类,在启动类上介入如下注解,表示启动定时任务
@EnableScheduling
最后,放上一个小案例:SpringBoot-center【github】