一、准备工作
1.1 本地运行时环境
•JDK :1.8+
•MySQL :5.6.5+
•Maven :3.6.1
•IDE :IntelliJ IDEA
Apollo的表结构对timestamp使用了多个default声明,所以需要5.6.5以上版本。
从官方仓库 https://github.com/ctripcorp/apollo Fork 出属于自己的仓库 https://github.com/wupeixuan/apollo。
使用 IntelliJ IDEA 从 Fork 出来的仓库拉取代码。拉取完成后,Maven 会下载所需依赖包。
1.2 创建数据库
Apollo 服务端共有两个数据库:
•ApolloPortalDB
•ApolloConfigDB
ApolloPortalDB 只需要在生产环境部署一个即可,而 ApolloConfigDB 需要在每个环境部署一套,如 fat、uat 和 pro 分别部署3套 ApolloConfigDB。
可以根据实际情况选择通过手动导入SQL或是通过Flyway自动导入SQL创建。
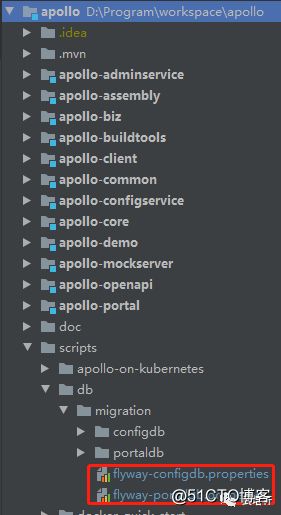
在 Apollo 项目下的 scripts 目录,提供了对应的初始化脚本:
1.2.1 创建 ApolloPortalDB
根据实际情况修改 flyway-portaldb.properties 中的 flyway.user、flyway.password 和 flyway.url 配置。
在 apollo 项目根目录下执行mvn -N -Pportaldb flyway:migrate
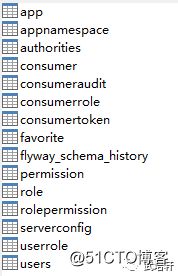
导入成功后,表结构如下:
1.2.2 创建 ApolloConfigDB
根据实际情况修改 flyway-configdb.properties 中的 flyway.user、flyway.password 和 flyway.url 配置。
在 apollo 项目根目录下执行mvn -N -Pconfigdb flyway:migrate
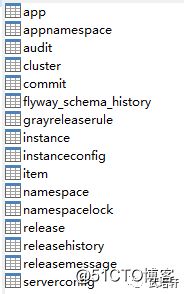
导入成功后,表结构如下:
二、本地启动
2.1 启动 Apollo Config Service 和 Apollo Admin Service
同时启动 apollo-adminservice 和 apollo-configservice 项目,基于 apollo-assembly 项目来启动。
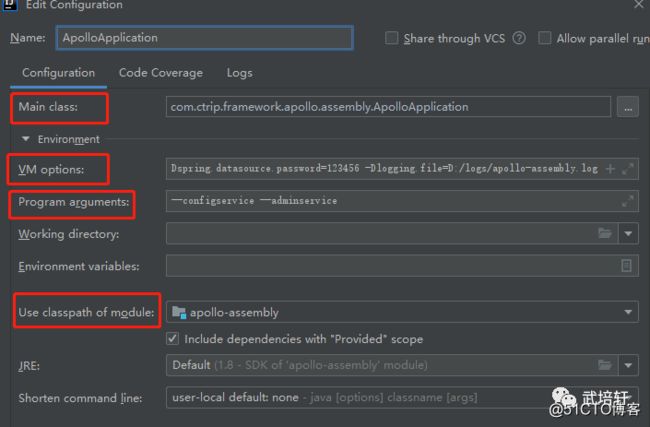
1.配置 IDEA Application
Main class:com.ctrip.framework.apollo.assembly.ApolloApplication

VM options:
-Dapollo_profile=github
-Dspring.datasource.url=jdbc:mysql://localhost:3306/ApolloConfigDB?characterEncoding=utf8
-Dspring.datasource.username=root
-Dspring.datasource.password=123456
-Dlogging.file=D:/logs/apollo-assembly.log

Program arguments:--configservice --adminservice

Use classpath of module:apollo-assembly
•spring.datasource 配置连接 ApolloConfigDB 数据库
•logging.file 配置日志输出文件
1.启动 IDEA Application
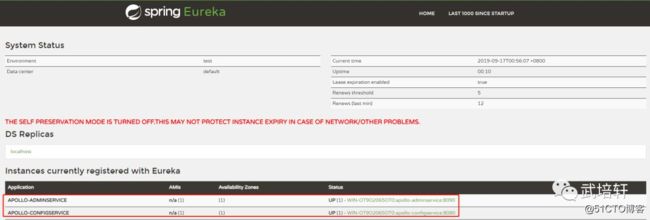
启动完成后,当打开 http://localhost:8080/ 看到 APOLLO-ADMINSERVICE 和 APOLLO-CONFIGSERVICE 注册到 Eureka 中,代表启动成功。
2.2 启动 Apollo-Portal
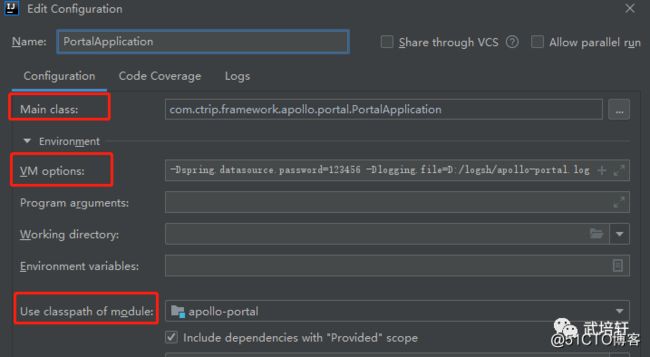
1.配置 IDEA Application
Main class:com.ctrip.framework.apollo.portal.PortalApplication

VM options:
-Dapollo_profile=github,auth
-Ddev_meta=http://localhost:8080/
-Dserver.port=8070
-Dspring.datasource.url=jdbc:mysql://localhost:3306/ApolloPortalDB?characterEncoding=utf8
-Dspring.datasource.username=root
-Dspring.datasource.password=123456
-Dlogging.file=D:/logsh/apollo-portal.log

Use classpath of  module:apollo-portal
内置账号
•username :Apollo
•password :admin
1.启动 IDEA Application
启动完成后,当打开 http://localhost:8070/,出现如下时,表示启动成功。
2.3 Demo 应用接入
为了进行测试,需要创建测试的应用,Appid为 100004458 。如下图所示:
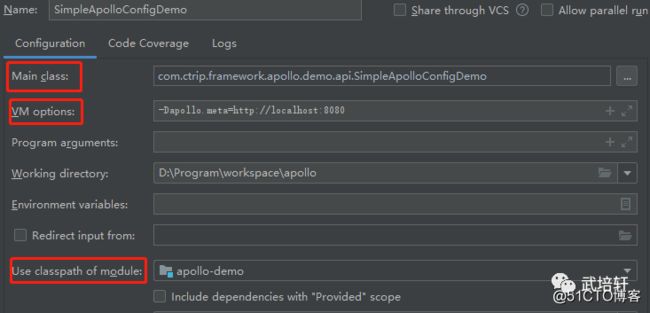
1.配置 IDEA Application
Main class:com.ctrip.framework.apollo.demo.api.SimpleApolloConfigDemo

VM options:
-Denv=dev
-Ddev_meta=http://localhost:8080

Use classpath of module:apollo-demo
1.启动 IDEA Application
成功后,输出日志如下:
Apollo Config Demo. Please input key to get the value. Input quit to exit.输入 timeout ,回车,输出如下:
timeout
> [apollo-demo][main]2019-09-17 01:40:32,775 INFO  [com.ctrip.framework.apollo.demo.api.SimpleApolloConfigDemo] Loading key : timeout with value: 100
客户端日志级别默认是DEBUG,如果需要调整,可以通过修改apollo-demo/src/main/resources/log4j2.xml中的level配置
武培轩
有帮助?在看,转发走一波
喜欢作者
