vue组件库创建、发布、测试
基于vue-cli 3.0工程的组件库,纯干货,不深究理论,作为学习笔记,持续更新
步骤
- 1.创建本地项目
- 2.修改配置
- 3.编写组件、调用
- 4.npm发布
- 5.测试
- 6.上传git、关联github(可选)
1.创建本地项目
- 初始化本地项目
npm install -g @vue/cli
vue create 项目名称
- 调整目录结构
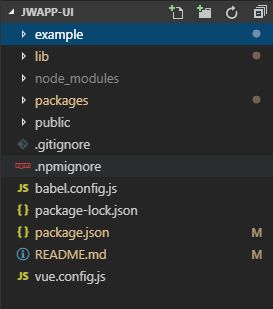
创建完成后,查看一下工程结构,标准的vue工程目录,我们需要对目录进行改造,以方便适应我们的组件库的结构。
--examples // 原 src 目录,改成examples用作示例展示
--packages // 新增packages用于编写存放组件
--lib // 是用来存放生成的打包文件的,这个一会在package.json中进行配置后会出现。
2.修改配置
修改完项目结构后,如果不修改配置,新增的目录是不会被编译的,之前的入口文件等路径也发生了改变,所以我们需要修改配置文件。
cli3.0变得更加简洁,webpack等配置都在vue.config.js中配置。没有这个文件的手动创建一下在项目的根目录。
 pages: {
        index: {
            // entry for the pages 入口文件
            entry: 'example/main.js',
            // the source template html模板文件
            template: 'public/index.html',
            filename: 'index.html',
            title: '首页',
            chunks: ['chunk-vendors', 'chunk-common', 'index']
        }
3.编写组件
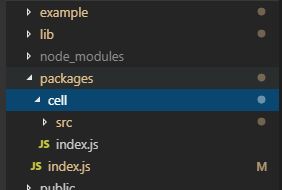
|--packages    			//存放组件的根目录
	|--cell				//cell单元格组件文件夹
		|--src    		 //单元格组件的模板文件夹
			|--cell.vue  //单元格组件
		|--index.js  	//单元格组件配置
	|--index.js  		//组件库配置
cell.vue编写组件内容
<template>
  <a class="jw-cell" :href="href">
   ··· ···
  </a>
</template>
<script>
/**
 * jw-cell
 * @module components/cell
 * @desc 单元格
 * @param url 跳转地址
 */
export default {
  name: "jwcell",
  props: {
    isLink: {
      type: Boolean,
      default: false
    },
    ··· ···
  },
  computed: {
    href() {
      if (this.to && !this.added && this.$router) {
        ··· ···
      }
      return "javascript:;";
    }
  },
  methods: {
    click($event) {
      $event.preventDefault();
      this.$router.push(this.href);
    }
  }
};
</script>

<style scoped lang="scss">
@import "../../../example/assets/rene.scss";

.jw-cell {
  position: relative;
  -webkit-tap-highlight-color: rgba(255, 255, 255, 0);
  -webkit-user-select: none;
  -moz-user-focus: none;
  -moz-user-select: none;
 ··· ···
}
</style>
cell组件的index.js,导出组件
// 导入组件,组件必须声明 name
import cell from './src/cell.vue'
// 为组件提供 install 安装方法,供按需引入
cell.install = function (Vue) {
  Vue.component(cell.name, cell)
}
// 默认导出组件
export default cell
全局index.js,整合所有组件,暴露install安装方法和所有组件
// 导入颜色选择器组件
import cell from './cell'
import './../example/assets/iconfont.css'
// 存储组件列表
const components = [
    cell
]
// 定义 install 方法,接收 Vue 作为参数。如果使用 use 注册插件,则所有的组件都将被注册
const install = function (Vue) {
  // 判断是否安装
  if (install.installed) return
  // 遍历注册全局组件
  components.map(component => Vue.component(component.name, component))
}
// 判断是否是直接引入文件
if (typeof window !== 'undefined' && window.Vue) {
  install(window.Vue)
}
export default {
  // 导出的对象必须具有 install,才能被 Vue.use() 方法安装
  install,
  // 以下是具体的组件列表
  cell
}
在example中调用组件
<template>
  <div class="home">
    <jwcell title="标题文字" icon="icon-shuizhi" isLink arrowIcon="icon-arrow-right-copy-copy"></jwcell>
    <div class="divider"></div>
  </div>
</template>

<script lang="js">
//import jwcell from '/packages/cell/cell.vue'; // @ is an alias to /src

export default {
  name: 'HelloWorld',
  props: {
    msg: String
  },
  components: {

  },
}
4.npm发布
- 在npm上注册账号,创建packages
- 配置package.json
"name": "",
  "version": "0.1.1",
  "description": "",
  //main配置主入口文件
  "main":"lib/jwapp-ui.common.js",
  "author": "",
  "private": false,
  "scripts": {
    "serve": "vue-cli-service serve",
    "build": "vue-cli-service build",
    "lint": "vue-cli-service lint",
    //增加lib命令
    "lib": "vue-cli-service build --target lib --name jwapp-ui --dest lib packages/index.js"
  },
- 执行命令.编译lib
npm run lib
- .npmignore添加忽略目录和文件
examples/
packages/
public/
vue.config.js
babel.config.js
*.map
- 发布
npm login //登陆一下
npm publish //发布
测试安装使用组件
- 安装组件
npm install 组件名
- 在入口文件main.js或其他位置import组件和样式
import jwcell from 'jwapp-ui'
import 'jwapp-ui/lib/jwapp-ui.css'


