【SpringMVC】请求映射+方法入参+处理模型数据+视图解析
文章目录
- 1. HelloWorld
- 2.知识点
- 3.示例
- HTTP 405 的错误提示:消息 JSP 只允许 GET、POST 或 HEAD。Jasper 还允许 OPTIONS 的解决方法
solution:参考 下面只是示例用重定向的方法解决
@RequestMapping(value = "/variable/{id}", method = RequestMethod.PUT)
public String testPUT(@PathVariable("id") Integer id) {
    System.out.println("PUT:"+id);
    return "redirect:/hello";
}
@RequestMapping(value = "/hello")
public String hello() {
    System.out.println("success");
    return SUCCESS;
}- ModeAndView设置的属性jsp页面取不出来 time: ${requestScope.time}
why:jsp的EL表达式允许没打开
solution:<%@ page isELIgnored ="false" %>
1. HelloWorld
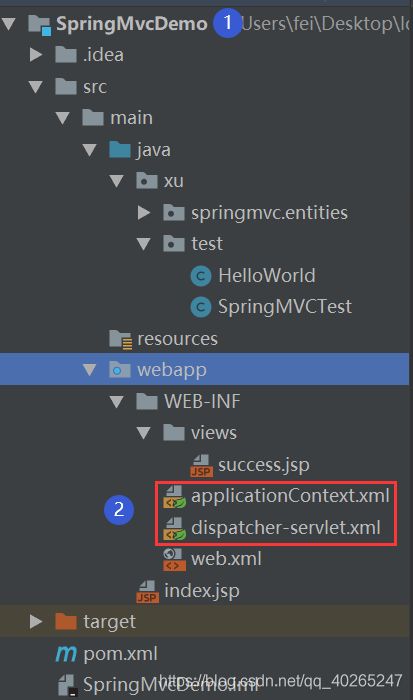
具体参见 上图是目录结构,②是由右击① add framework support自动产生。
pom.xml添加spring外的额外依赖
<dependency>
  <groupId>org.springframework</groupId>
  <artifactId>spring-web</artifactId>
  <version>${spring.version}</version>
</dependency>
<dependency>
  <groupId>org.springframework</groupId>
  <artifactId>spring-webmvc</artifactId>
  <version>${spring.version}</version>
</dependency>
web.xml中 注意:filter listen servlet的配置是需要按照一定顺序依次配置
<servlet>
    <servlet-name>dispatcher</servlet-name>
    <servlet-class>org.springframework.web.servlet.DispatcherServlet</servlet-class>
    <!-- 配置 DispatcherServlet 的一个初始化参数: 配置 SpringMVC 配置文件的位置和名称 -->
    <!--
     实际上也可以不通过 contextConfigLocation 来配置 SpringMVC 的配置文件, 而使用默认的.
     默认的配置文件为: /WEB-INF/<servlet-name>-servlet.xml
    -->
    <!--<init-param>-->
        <!--<param-name>contextConfigLocation</param-name>-->
        <!--<param-value>/WEB-INF/dispatcher-servlet.xml</param-value>-->
    <!--</init-param>-->
    <load-on-startup>1</load-on-startup>
</servlet>
<servlet-mapping>
    <servlet-name>dispatcher</servlet-name>
    <url-pattern>/</url-pattern>
</servlet-mapping>
dispatcher-servlet.xml中的配置
<!-- 配置注解驱动:必须 -->
<!--核实头信息:此处是mvc而不是cache
xmlns:mvc="http://www.springframework.org/schema/mvc"
xsi:schemaLocation="http://www.springframework.org/schema/mvc http://www.springframework.org/schema/mvc/spring-mvc.xsd">
-->
<mvc:annotation-driven/>

<!-- 配置直接转发的页面 -->
<!-- 可以直接相应转发的页面, 而无需再经过 Handler 的方法.  -->
<mvc:view-controller path="/success" view-name="success"/>

<!-- 配置自定扫描的包 -->
<context:component-scan base-package="xu.test"></context:component-scan>

<!-- 配置视图解析器: 如何把 handler 方法返回值解析为实际的物理视图 -->
<bean class="org.springframework.web.servlet.view.InternalResourceViewResolver">
    <property name="prefix" value="/WEB-INF/views/"></property>
    <property name="suffix" value=".jsp"></property>
</bean>
class类
@Controller
public class HelloWorld {
 /**
  * 1. 使用 @RequestMapping 注解来映射请求的 URL
  * 2. 返回值会通过视图解析器解析为实际的物理视图, 对于 InternalResourceViewResolver 视图解析器, 会做如下的解析:
  * 通过 prefix + returnVal + 后缀 这样的方式得到实际的物理视图, 然会做转发操作
  * /WEB-INF/views/success.jsp
  * @return
  */
    @RequestMapping("/hello")
    public String hello() {
        System.out.println("hello");
        return "success";
    }
}index.jsp的body中添加Hello
所以当页面中该链接,DispatcherServlet 截获请求后,就通过控制器上@RequestMapping 提供的映射信息确定请求所对应的处理方法。利用配置的视图解析器,将请求转发给 prefix + returnVal + 后缀
2.知识点
(1) @RequestMapping:常用参数:value、 method
①value即url,可含匹配符? * ** 与占位符{var} 占位符 处理方法入参可通过@PathVariable 映射 URL 绑定的占位符
(2) REST:通过HiddenHttpMethodFilter过滤器,将只支持 GET与 POST的form表单请求转换为标准的http 方法,使得支持 GET、POST、PUT 与 DELETE 请求。
(3) 方法入参标注:@PathVariable 、@RequestParam、@RequestHeader 等
①@RequestParam:绑定请求参数值。value:参数名 required:是否必须。默认为 true, 表示请求参数中必须包含对应的参数,若不存在,将抛出异常
②@RequestHeader:绑定请求报头的属性值
方法入参补充:
① 使用POJO 对象(即没有继承、实现接口的简单java对象)绑定请求参数值。Spring MVC 会按请求参数名和 POJO 属性名进行自动匹• 配,自动为该对象填充属性值。支持级联属性。
②使用 Servlet API 作为入参。支持的类型
* HttpServletRequest
* HttpServletResponse
* HttpSession
* java.security.Principal
* Locale InputStream
* OutputStream
* Reader
* Writer
(4)处理模型数据:最终数据会被放入Request或Session中,以便页面调用
①ModelAndView: 处理方法返回值类型为 ModelAndView 时, 方法体即可通过该对象添加模型数据
②Map 及 Model: 入参为org.springframework.ui.Model、org.springframework.ui. ModelMap 或 java.uti.Map 时,处理方法返回时,Map 中的数据会自动添加到模型中。
③@SessionAttributes: 将模型中的某个属性暂存到HttpSession 中,以便多个请求之间可以共享这个属性
④@ModelAttribute: 方法入参标注该注解后, 入参的对象就会放到数据模型中
(5)视图解析器:
①InternalResourceViewResolver:解析为URL文件。
②BeanNameViewResolver:解析为Bean的名字。逻辑视图名作为Bean id找到对应Bean,注:java类的默认Bean id为类首字母小写。
PS:目前在看handler方法的返回的字符创都是视图名
(5)重定向
3.示例
①②③④⑤⑥×✔✘☞☜√
@SessionAttributes(value={"user"}, types={String.class})
@RequestMapping("/springmvc")
@Controller
public class SpringMVCTest {

   private static final String SUCCESS = "success";

   @RequestMapping("/testRedirect")
   public String testRedirect(){
      System.out.println("testRedirect");
      return "redirect:/index.jsp";
   }
   /*自定义视图
   dispatcher-servlet.xml中配置


实现View的java类
@Component
public class HelloView implements View {
    @Override
    public String getContentType() {
        return "text/html";
    }
    @Override
    public void render(Map map, HttpServletRequest httpServletRequest, HttpServletResponse httpServletResponse) throws Exception {
        httpServletResponse.getWriter().print("helloView,time:" + new Date());
    }
}
*/

   @RequestMapping("/testView")
   public String testView(){
      System.out.println("testView");
      return "helloView";
   }

   @RequestMapping("/testViewAndViewResolver")
   public String testViewAndViewResolver(){
      System.out.println("testViewAndViewResolver");
      return SUCCESS;
   }

   /**
    * 1. 有 @ModelAttribute 标记的方法, 会在每个目标方法执行之前被 SpringMVC 调用!
    * 2. @ModelAttribute 注解也可以来修饰目标方法 POJO 类型的入参, 其 value 属性值有如下的作用:
    * 1). SpringMVC 会使用 value 属性值在 implicitModel 中查找对应的对象, 若存在则会直接传入到目标方法的入参中.
    * 2). SpringMVC 会一 value 为 key, POJO 类型的对象为 value, 存入到 request 中.
    */
   @ModelAttribute
   public void getUser(@RequestParam(value="id",required=false) Integer id,
         Map<String, Object> map){
      System.out.println("modelAttribute method");
      if(id != null){
         //模拟从数据库中获取对象
         User user = new User(1, "Tom", "123456", "[email protected]", 12);
         System.out.println("从数据库中获取一个对象: " + user);

         map.put("user", user);   //map.put("abc", user);
      }
   }

   /**
    * 运行流程:
    * 1. 执行 @ModelAttribute 注解修饰的方法: 从数据库中取出对象, 把对象放入到了 Map 中. 键为: user
    * 2. SpringMVC 从 Map 中取出 User 对象, 并把表单的请求参数赋给该 User 对象的对应属性.
    * 3. SpringMVC 把上述对象传入目标方法的参数.
    *
    * 注意: 在 @ModelAttribute 修饰的方法中, 放入到 Map 时的键需要和目标方法入参类型的第一个字母小写的字符串一致!
    *
    * SpringMVC 确定目标方法 POJO 类型入参的过程
    * 1. 确定一个 key:
    * 1). 若目标方法的 POJO 类型的参数木有使用 @ModelAttribute 作为修饰, 则 key 为 POJO 类名第一个字母的小写
    * 2). 若使用了  @ModelAttribute 来修饰, 则 key 为 @ModelAttribute 注解的 value 属性值.
    * 2. 在 implicitModel 中查找 key 对应的对象, 若存在, 则作为入参传入
    * 1). 若在 @ModelAttribute 标记的方法中在 Map 中保存过, 且 key 和 1 确定的 key 一致, 则会获取到.
    * 3. 若 implicitModel 中不存在 key 对应的对象, 则检查当前的 Handler 是否使用 @SessionAttributes 注解修饰,
    * 若使用了该注解, 且 @SessionAttributes 注解的 value 属性值中包含了 key, 则会从 HttpSession 中来获取 key 所
    * 对应的 value 值, 若存在则直接传入到目标方法的入参中. 若不存在则将抛出异常.
    * 4. 若 Handler 没有标识 @SessionAttributes 注解或 @SessionAttributes 注解的 value 值中不包含 key, 则
    * 会通过反射来创建 POJO 类型的参数, 传入为目标方法的参数
    * 5. SpringMVC 会把 key 和 POJO 类型的对象保存到 implicitModel 中, 进而会保存到 request 中.
    *
    * 源代码分析的流程
    * 1. 调用 @ModelAttribute 注解修饰的方法. 实际上把 @ModelAttribute 方法中 Map 中的数据放在了 implicitModel 中.
    * 2. 解析请求处理器的目标参数, 实际上该目标参数来自于 WebDataBinder 对象的 target 属性
    * 1). 创建 WebDataBinder 对象:
    * ①. 确定 objectName 属性: 若传入的 attrName 属性值为 "", 则 objectName 为类名第一个字母小写.
    * *注意: attrName. 若目标方法的 POJO 属性使用了 @ModelAttribute 来修饰, 则 attrName 值即为 @ModelAttribute
    * 的 value 属性值
    *
    * ②. 确定 target 属性:
    *     > 在 implicitModel 中查找 attrName 对应的属性值. 若存在, ok
    *     > *若不存在: 则验证当前 Handler 是否使用了 @SessionAttributes 进行修饰, 若使用了, 则尝试从 Session 中
    * 获取 attrName 所对应的属性值. 若 session 中没有对应的属性值, 则抛出了异常.
    *     > 若 Handler 没有使用 @SessionAttributes 进行修饰, 或 @SessionAttributes 中没有使用 value 值指定的 key
    * 和 attrName 相匹配, 则通过反射创建了 POJO 对象
    *
    * 2). SpringMVC 把表单的请求参数赋给了 WebDataBinder 的 target 对应的属性.
    * 3). *SpringMVC 会把 WebDataBinder 的 attrName 和 target 给到 implicitModel.
    * 近而传到 request 域对象中.
    * 4). 把 WebDataBinder 的 target 作为参数传递给目标方法的入参.
    */
   @RequestMapping("/testModelAttribute")
   public String testModelAttribute(User user){  //public String testModelAttribute(@ModelAttribute("abc")User user){
   //POJO入参方式,若原本model或session中没有该属性名对应的数据,则会新建一个对象(如果能找到则用它的),然后再匹配填充,放入模型等
      System.out.println("修改: " + user);
      return SUCCESS;
   }

   /**
    * @SessionAttributes 除了可以通过属性名指定需要放到会话中的属性外(实际上使用的是 value 属性值),
    * 还可以通过模型属性的对象类型指定哪些模型属性需要放到会话中(实际上使用的是 types 属性值)
    *
    * 注意: 该注解只能放在类的上面. 而不能修饰放方法.
    */
   @RequestMapping("/testSessionAttributes")
   public String testSessionAttributes(Map<String, Object> map){
      User user = new User("Tom", "123456", "[email protected]", 15);
      map.put("user", user);
      map.put("school", "atguigu");
      return SUCCESS;
   }

   /**
    * 目标方法可以添加 Map 类型(实际上也可以是 Model 类型或 ModelMap 类型)的参数.
    * @param map
    * @return
    */
   @RequestMapping("/testMap")
   public String testMap(Map<String, Object> map){
      System.out.println(map.getClass().getName());
      map.put("names", Arrays.asList("Tom", "Jerry", "Mike"));
      return SUCCESS;
   }

   /**
    * 目标方法的返回值可以是 ModelAndView 类型。
    * 其中可以包含视图和模型信息
    * SpringMVC 会把 ModelAndView 的 model 中数据放入到 request 域对象中.
    * @return
    */
   @RequestMapping("/testModelAndView")
   public ModelAndView testModelAndView(){
      String viewName = SUCCESS;
      ModelAndView modelAndView = new ModelAndView(viewName);

      //添加模型数据到 ModelAndView 中.
      modelAndView.addObject("time", new Date());

      return modelAndView;
   }

   /**
    * 可以使用 Serlvet 原生的 API 作为目标方法的参数 具体支持以下类型
    * @throws IOException
    * pom.xml中添加依赖

	  javax.servlet
	  javax.servlet-api
	  3.1.0

   */
   @RequestMapping("/testServletAPI")
   public void testServletAPI(HttpServletRequest request,
         HttpServletResponse response, Writer out) throws IOException {
      System.out.println("testServletAPI, " + request + ", " + response);
      out.write("hello springmvc");
//    return SUCCESS;
   }

   /**
    * Spring MVC 会按请求参数名和 POJO 属性名进行自动匹配, 自动为该对象填充属性值。支持级联属性。
    * 如:dept.deptId、dept.address.tel 等
    */
   @RequestMapping("/testPojo")
   public String testPojo(User user) {
      System.out.println("testPojo: " + user);
      return SUCCESS;
   }

   /**
    * 了解:
    *
    * @CookieValue: 映射一个 Cookie 值. 属性同 @RequestParam
    */
   @RequestMapping("/testCookieValue")
   public String testCookieValue(@CookieValue("JSESSIONID") String sessionId) {
      System.out.println("testCookieValue: sessionId: " + sessionId);
      return SUCCESS;
   }

   /**
    * 了解: 映射请求头信息 用法同 @RequestParam
    */
   @RequestMapping("/testRequestHeader")
   public String testRequestHeader(
         @RequestHeader(value = "Accept-Language") String al) {
      System.out.println("testRequestHeader, Accept-Language: " + al);
      return SUCCESS;
   }

   /**
    * @RequestParam 来映射请求参数. value 值即请求参数的参数名 required 该参数是否必须. 默认为 true
    *               defaultValue 请求参数的默认值
    */
   @RequestMapping(value = "/testRequestParam")
   public String testRequestParam(
         @RequestParam(value = "username") String un,
         @RequestParam(value = "age", required = false, defaultValue = "0") int age) {
      System.out.println("testRequestParam, username: " + un + ", age: "
            + age);
      return SUCCESS;
   }

   /**
    * Rest 风格的 URL. 以 CRUD 为例: 新增: /order POST 修改: /order/1 PUT update?id=1 获取:
    * /order/1 GET get?id=1 删除: /order/1 DELETE delete?id=1
    * 如何发送 PUT 请求和 DELETE 请求呢 ? 1. 需要在web.xml中配置 HiddenHttpMethodFilter

    hiddenHttpMethodFilter
    org.springframework.web.filter.HiddenHttpMethodFilter


    hiddenHttpMethodFilter
    /*

    * 2. 需要发送 POST 请求
    * 3. 需要在发送 POST 请求时携带一个 name="_method" 的隐藏域, 值为 DELETE 或 PUT
    *
    * 在 SpringMVC 的目标方法中如何得到 id 呢? 使用 @PathVariable 注解
    *
    */
   @RequestMapping(value = "/testRest/{id}", method = RequestMethod.PUT)
   public String testRestPut(@PathVariable Integer id) {
      System.out.println("testRest Put: " + id);
      return SUCCESS;
   }

   @RequestMapping(value = "/testRest/{id}", method = RequestMethod.DELETE)
   public String testRestDelete(@PathVariable Integer id) {
      System.out.println("testRest Delete: " + id);
      return SUCCESS;
   }

   @RequestMapping(value = "/testRest", method = RequestMethod.POST)
   public String testRest() {
      System.out.println("testRest POST");
      return SUCCESS;
   }

   @RequestMapping(value = "/testRest/{id}", method = RequestMethod.GET)
   public String testRest(@PathVariable Integer id) {
      System.out.println("testRest GET: " + id);
      return SUCCESS;
   }

   /**
    * @PathVariable 可以来映射 URL 中的占位符到目标方法的参数中.
    * @param id
    * @return
    */
   @RequestMapping("/testPathVariable/{id}")
   public String testPathVariable(@PathVariable("id") Integer id) {
      System.out.println("testPathVariable: " + id);
      return SUCCESS;
   }

   @RequestMapping("/testAntPath/*/abc")
   public String testAntPath() {
      System.out.println("testAntPath");
      return SUCCESS;
   }

   /**
    * 了解: 可以使用 params 和 headers 来更加精确的映射请求. params 和 headers 支持简单的表达式.
    *
    * @return
    */
   @RequestMapping(value = "testParamsAndHeaders", params = { "username",
         "age!=10" }, headers = { "Accept-Language=en-US,zh;q=0.8" })
   public String testParamsAndHeaders() {
      System.out.println("testParamsAndHeaders");
      return SUCCESS;
   }

   /**
    * 常用: 使用 method 属性来指定请求方式
    */
   @RequestMapping(value = "/testMethod", method = RequestMethod.POST)
   public String testMethod() {
      System.out.println("testMethod");
      return SUCCESS;
   }

   /**
    * 1. @RequestMapping 除了修饰方法, 还可来修饰类 2. 1). 类定义处: 提供初步的请求映射信息。相对于 WEB 应用的根目录
    * 2). 方法处: 提供进一步的细分映射信息。 相对于类定义处的 URL。若类定义处未标注 @RequestMapping,则方法处标记的 URL
    * 相对于 WEB 应用的根目录
    */
   @RequestMapping("/testRequestMapping")
   public String testRequestMapping() {
      System.out.println("testRequestMapping");
      return SUCCESS;
   }

}
index.jsp
<a href="springmvc/testRedirect">Test Redirect</a>

<a href="springmvc/testView">Test View</a>

<a href="springmvc/testViewAndViewResolver">Test ViewAndViewResolver</a>

<!--
   模拟修改操作
   1. 原始数据为: 1, Tom, 123456,[email protected],12
   2. 密码不能被修改.
   3. 表单回显, 模拟操作直接在表单填写对应的属性值
-->
<form action="springmvc/testModelAttribute" method="Post">
   <input type="hidden" name="id" value="1"/>
   username: <input type="text" name="username" value="Tom"/>
   email: <input type="text" name="email" value="[email protected]"/>
   age: <input type="text" name="age" value="12"/>
   <input type="submit" value="Submit"/>
</form>

<a href="springmvc/testSessionAttributes">Test SessionAttributes</a>

<a href="springmvc/testMap">Test Map</a>

<a href="springmvc/testModelAndView">Test ModelAndView</a>

<a href="springmvc/testServletAPI">Test ServletAPI</a>

<form action="springmvc/testPojo" method="post">
   username: <input type="text" name="username"/>
   password: <input type="password" name="password"/>
   email: <input type="text" name="email"/>
   age: <input type="text" name="age"/>
   city: <input type="text" name="address.city"/>
   province: <input type="text" name="address.province"/>
   <input type="submit" value="Submit"/>
</form>

<a href="springmvc/testCookieValue">Test CookieValue</a>

<a href="springmvc/testRequestHeader">Test RequestHeader</a>

<a href="springmvc/testRequestParam?username=atguigu&age=11">Test RequestParam</a>

<form action="springmvc/testRest/1" method="post">
   <input type="hidden" name="_method" value="PUT"/>
   <input type="submit" value="TestRest PUT"/>
</form>

<form action="springmvc/testRest/1" method="post">
   <input type="hidden" name="_method" value="DELETE"/>
   <input type="submit" value="TestRest DELETE"/>
</form>

<form action="springmvc/testRest" method="post">
   <input type="submit" value="TestRest POST"/>
</form>

<a href="springmvc/testRest/1">Test Rest Get</a>

<a href="springmvc/testPathVariable/1">Test PathVariable</a>

<a href="springmvc/testAntPath/mnxyz/abc">Test AntPath</a>

<a href="springmvc/testParamsAndHeaders?username=atguigu&age=10">Test ParamsAndHeaders</a>

<form action="springmvc/testMethod" method="POST">
   <input type="submit" value="submit"/>
</form>

<a href="springmvc/testMethod">Test Method</a>

<a href="springmvc/testRequestMapping">Test RequestMapping</a>
success.jsp的body中添加
<h4>Sucess Page</h4>
time: ${requestScope.time }
<br><br>
names: ${requestScope.names }
<br><br>
request user: ${requestScope.user }
session user: ${sessionScope.user }
<br><br>
request school: ${requestScope.school }
session school: ${sessionScope.school }
<br><br>
abc user: ${requestScope.abc }
<br><br>
mnxyz user: ${requestScope.mnxyz }
<br><br>
<!--国际化
pom.xml中配置jstl依赖:
<dependency>
  <groupId>javax.servlet</groupId>
  <artifactId>jstl</artifactId>
  <version>1.2</version>
</dependency>
<dependency>
  <groupId>taglibs</groupId>
  <artifactId>standard</artifactId>
  <version>1.1.2</version>
</dependency>
dispatcher-servlet.xml中配置国际化资源文件:
<bean id="messageSource" class="org.springframework.context.support.ResourceBundleMessageSource" >
    <property name="basename" value="i18n"></property>
</bean>
该jsp头部需要添加库标签:<%@ taglib prefix="fmt" uri="http://java.sun.com/jsp/jstl/fmt"%>
-->
<fmt:message key="i18n.username"></fmt:message>
<fmt:message key="i18n.password"></fmt:message>
<br><br>
三个资源文件放在resoures:
| 文件名 | 内容 | 语言 |
|---|---|---|
| i18n.properties | i18n.username=Username i18n.password=Password | |
| i18n_en_US.properties | i18n.username=Username i18n.password=Password | 英语 |
| i18n_zh_CN.properties | i18n.username=\u7528\u6237\u540D i18n.password=\u5BC6\u7801 | 中文 |
