SpringBoot最快速使用入门
SpringBoot简介
先来介绍一下Spring
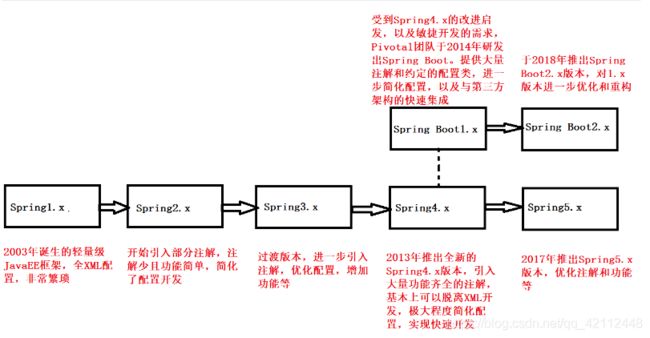
Spring 诞生于2002年, 是个java企业级应用的开源开发框架。Spring主要用来开发Java应用,但是有些扩展是针对构建J2EE平台的web应用。Spring 框架目标是简化Java企业级应用开发,并通过POJO为基础的编程模型促进良好的编程习惯。
缺点:
虽然Spring框架是轻量级的,但它的配置却是重量级的,jsp中要写很多代码、控制器过于灵活,缺少一个公用控制器。
Pivotal团队在原有Spring框架的基础上通过注解的方式进一步简化了Spring框架的使用,并基于Spring框架开发了全新的Spring Boot框架,于2014年4月正式推出了Spring Boot 1.0版本,同时在2018年3月又推出了Spring Boot 2.0版本。
SpringBoot 具有如下优点:
-
快速创建独立运行的Spring项目以及与主流框架集成、
-
使用嵌入式的Servlet容器,应用无需打成WAR包
-
Starters自动依赖与版本控制
-
大量的自动配置,简化开发,也可修改默认值
-
无需配置XML,无代码生成,开箱即用
-
准生产环境的运行时应用监控
Springboot特点
- 创快速创建一个web工程
- 内嵌服务器tomcat,打成jar包即可
- 绝对没有代码生成,也无需 XML 配置
在ideal中搭建springboot工程
pom.xml解读
    4.0.0


        org.springframework.boot
        spring-boot-starter-parent
        2.3.1.RELEASE


    com.yd
    springboot_01
    0.0.1-SNAPSHOT
    springboot_01
    Demo project for Spring Boot


        1.8


            org.springframework.boot
            spring-boot-starter-web


            org.springframework.boot
            spring-boot-starter-test
            test


                    org.junit.vintage
                    junit-vintage-engine


                org.springframework.boot
                spring-boot-maven-plugin
Springboot整合ssm
SpringMvc和Mybatis简介
1.SpringMvc注解介绍
@Controller @Service  @Repository 实例化类--创建对象,存入spring容器中,分别作用于Controller层、service层、mapper层
@Autowired  从spring容器中取出对象
@RequestMapping 映射请求路径,相当于@WebServlet
@ResponseBody  响应数据给客户端,相当于 response.getWriter().write(),常用于异步请求
2.Mybatis简介
MyBatis原本是Apache的一个开源项目iBatis,2010年这个项目由ApacheSoftware Foundation迁移到了Google Code,并且改名为MyBatis,实质上,MyBatis是对iBatis进行的一个完善和升级版本。
MyBatis是一个优秀的持久层框架,是Apache下的顶级项目。它对jdbc的操作数据库的过程进行封装,使开发者只需要关注 SQL 本身,而不需要花费精力去处理例如注册驱动、创建connection、创建statement、手动设置参数、结果集检索等jdbc繁杂的过程代码。
Mybatis通过xml或注解的方式将要执行的各种statement(statement、preparedStatemnt、CallableStatement)配置起来,并通过java对象和statement中的sql进行映射生成最终执行的sql语句,最后由mybatis框架执行sql并将结果映射成java对象并返回。
如果使用 Maven 来构建项目,则需将下面的依赖代码置于 pom.xml 文件中:
  org.mybatis
  mybatis
  x.x.x
SpringBoot支持两种格式的配置文件properties和yml格式.
- 比较两种配置形式,以配置spring数据源为例。
#application.properties
spring.datasource.driver-class-name=com.mysql.jdbc.Driver
spring.datasource.url=jdbc:mysql://localhost:3306/db
spring.datasource.username=root
spring.datasource.password=root
#application.yml
spring:
  datasource:
    driver-class-name: com.mysql.jdbc.Driver
    url: jdbc:mysql://localhost:3306/db
    username: root
    password: root
# mybatis配置
mybatis:
  #输出sql
  configuration:
    log-impl: org.apache.ibatis.logging.stdout.StdOutImpl
YAML文件格式是Spring Boot支持的一种JSON文件格式,相较于传统的Properties配置文件,YAML文件以数据为核心,是一种更为直观且容易被电脑识别的数据序列化格式。
application.yml配置文件的工作原理和application.properties是一样的,只不过yaml格式配置文件看起来更简洁一些。
application.yml文件使用 “key:(空格)value”格式配置属性,使用缩进控制层级关系。
yml文件还支持复杂数据类型,例如数组和集合
#1.数组或单列集合类型
person:
	hobby:
		- play
 		- read
 		- sleep
#或者
person:
	hobby:
 		play,
 		read,
 		sleep
#或者如下方式,推荐使用该方式,[]也可以省略
person:
	hobby: [play,read,sleep]

#2.map集合
person:
	map:
		k1: v1
		k2: v2
#或者使用行内方式
person:
	map: {k1: v1,k2: v2}
工程搭建步骤
1.导入依赖(mybatis,jdbc,mysql)
2.yml中加入数据源配置
3.编写mapper接口和方法
4.编写controller和方法
5.启动类上添加包扫描注解@MapperScan(“com.hp.mapper”)
SpringBoot整合Thymeleaf
Thymeleaf简介
Thymeleaf是适用于Web和独立环境的现代服务器端Java模板引擎,能够处理HTML,XML,JavaScript,CSS甚至纯文本。
Thymeleaf的主要目标是提供一种优雅且高度可维护的模板创建方式。为此,它以自然模板的概念为基础,以不影响模板用作设计原型的方式将其逻辑注入模板文件。这样可以改善设计沟通,并缩小设计团队与开发团队之间的差距。
thymeleaf是一个HTML5模板引擎,可用于Web环境中的应用开发。Thymeleaf提供了一个用于整合Spring MVC的可选模块,在应用开发中,你可以使用Thymeleaf来完全代替JSP或其他模板引擎,如Velocity、FreeMarker等。Thymeleaf的主要目标在于提供一种可被浏览器正确显示的、格式良好的模板创建方式。
整合到Spring boot步骤:
1.pom.xml中添加thymeleaf依赖

2.application.yml配置文件中关闭thymeleaf缓存

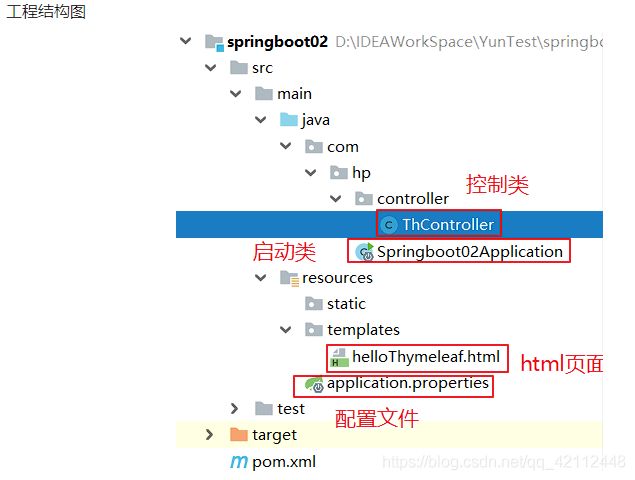
3.编写controller:1.向model中存值,2.跳转到html页面

4.编写html,springboot推荐放在resources->templates包下.
  html标签上加入名称空间 xmlns:th="http://www.thymeleaf.org" ,表示该页面是一个thymeleaf模板页面。
  这样就可以在页面上使用th标签取出model中的值,类似于EL表达式。

5.访问测试
-
添加依赖
<dependency> <groupId>org.springframework.bootgroupId> <artifactId>spring-boot-starter-thymeleafartifactId> dependency> -
关闭thymeleaf缓存
在application.yml
#能让改动的页面及时生效,实现类似热部署效果
spring.thymeleaf.cache=false
Thymeleaf基本语法
-
常用属性
th:*属性 说明 th:each 元素遍历(类似JSP中的c:forEach标签) th:if 条件判断,如果为真 th:unless 条件判断,如果为假 th:value 属性值修改,指定标签属性值 th:href 用于设定链接地址 th:src 用于设定链接地址 th:text 用于指定标签显示的文本内容
使用步骤:
1.页面先引入Thymeleaf模板标签:
2.使用Thymeleaf模板的相关标签动态填充页面内容。
-
标准表达式
种类 表达式语法 说明 变量表达式 ${…} 主要用于获取域对象中的变量值,类似EL表达式 链接URL表达式 @{…} 用于 th:src 和 th:href,th:action属性中 片段表达式 ~{…} 使用th:insert或th:replace属性插入片段
例子:
编写controller
@Controller
public class ThController {

    @GetMapping("/thymeleaf")
    public String HelloThymeleaf(Model model){
        //向model中存值
        model.addAttribute("name","刘备");
        model.addAttribute("age","18");
        //跳转到helloThymeleaf.html
        return "Thymeleaf";
    }
}
Thymeleaf.html页面
    Title


我叫 ,今年 岁了
src示例:
href示例:
th:each示例
对象遍历,功能类似jstl中的
- controller
  @GetMapping("/users")
    public String users(Model model){
         //list集合数据
        List<User> users = new ArrayList<User>();
        users.add(new User(1,"张三","纽约"));
        users.add(new User(2,"李四","上海"));
        users.add(new User(3,"王五","伦敦"));
        model.addAttribute("users",users);

        //Map集合数据
        Map<String,Object> dataMap = new HashMap<String,Object>();
        dataMap.put("No","123");
        dataMap.put("address","深圳");
        model.addAttribute("dataMap",dataMap);

        return "helloThymeleaf";
    }
- html
<table>
          <tr>
            <td>下标td>
            <td>编号td>
            <td>姓名td>
            <td>住址td>
          tr>
          <tr th:each="user:${users}">

            <td th:text="${userStat.index}">td>
            <td th:text="${user.id}">td>
            <td th:text="${user.name}">td>
            <td th:text="${user.address}">td>
          tr>
table>
<hr>
    <div th:each="entry:${dataMap}">
         <span th:text="${entry}">span><br/>
            <br>
         <span th:text="${entry.key}">span>:
         <span th:text="${entry.value}">span>
            <br/>
         ==============================================
    div>
常用的时间格式化:
- controller
model.addAttribute("now",new Date());
- html
<div>
    <span th:text="${#dates.format(now,'yyyy-MM-dd HH:ss:mm')}">span>
div>
其中的#dates是thymeleaf的内置工具对象。
在新建实体类时我们可以引入lombok这样就不需要setter,gettter,tostring方法
使用步骤如下:
1.导入依赖
    org.projectlombok
    lombok
2.IDea中安装lombok插件
3.在实体类上添加@Data注解


