CentOS下离线升级gcc
CentOS下离线升级gcc
- CentOS7离线升级gcc
- 安装`gcc`
- 踩坑过程记录
- 安装`cpp`
- 安装`libmpc`
- 安装mpfr
- 安装`gomp`
- 安装`glibc-devel`
- `gcc`安装小结
- 安装`g++`
- 升级到8.3
- 继续踩坑
- 安装`m4`:
- 安装`gmp`:
- 安装`mpfr`:
- 安装`mpc`:
- `gcc`升级小结
- 第1种姿势——依次安装
- 第2种姿势——建立软链接,一次完成
CentOS7离线升级gcc
最近的工作中,需要将测试服务器上的gcc升级到8.3+,但苦于无法连接外网,因此只能寻求离线安装的方式。在此记录一下安装过程中的收获(以下是在自己虚拟机上的操作)。操作系统版本:
[root@localhost ~]# lsb_release -a
LSB Version:	:core-4.1-amd64:core-4.1-noarch:cxx-4.1-amd64:cxx-4.1-noarch:desktop-4.1-amd64:desktop-4.1-noarch:languages-4.1-amd64:languages-4.1-noarch:printing-4.1-amd64:printing-4.1-noarch
Distributor ID:	CentOS
Description:	CentOS Linux release 7.8.2003 (Core)
Release:	7.8.2003
Codename:	Core
在此记录一下,lsb_release命令需要安装redhat-lsb.x86_64,需要通过yum search lsb来查找安装包:
[root@localhost ~]# yum search lsb
redhat-lsb.x86_64 : Implementation of Linux Standard Base specification
以下操作在无外网连接的情况下进行。
安装
gcc
首先,查看本机的gcc版本:
[root@localhost ~]# gcc -v
-bash: gcc: command not found
以上提示说明本机没有安装gcc。怎么办?坑还是得慢慢踩平的。(本节的第1小节为踩坑过程,第2小节为具体的安装步骤,请移步至第2小节:gcc安装小结)
踩坑过程记录
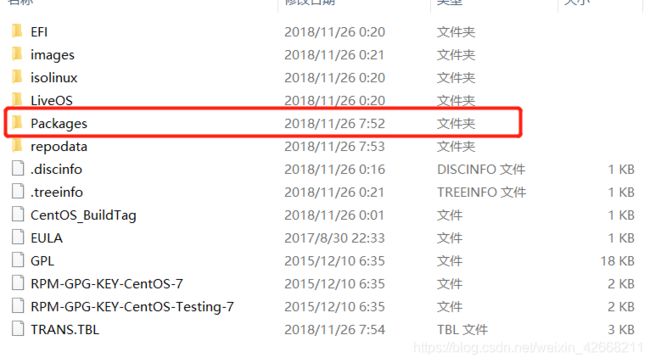
想起了之前下载的CentOS镜像文件:CentOS-7-x86_64-DVD-1810.iso*(下载地址:http://isoredirect.centos.org/centos/7/isos/x86_64/),里面应该能找到gcc的安装包。果然,对该镜像文件进行解压后,在Packages下找到了gcc:


将该文件上传到虚拟机并开始安装:
[root@localhost gcc]# rpm -ivh gcc-4.8.5-36.el7.x86_64.rpm
error: Failed dependencies:
	cpp = 4.8.5-36.el7 is needed by gcc-4.8.5-36.el7.x86_64
	glibc-devel >= 2.2.90-12 is needed by gcc-4.8.5-36.el7.x86_6
	libgomp = 4.8.5-36.el7 is needed by gcc-4.8.5-36.el7.x86_64
	libmpc.so.3()(64bit) is needed by gcc-4.8.5-36.el7.x86_64
	libmpfr.so.4()(64bit) is needed by gcc-4.8.5-36.el7.x86_64
提示缺少相关依赖,这些依赖都能在Packages文件夹下找到。
对应关系如下:
cpp:cpp
libgomp:libgomp
libmpc:libmpc
libmpfr:mpfr
依次安装各依赖:
安装cpp
[root@localhost gcc]# rpm -ivh cpp-4.8.5-36.el7.x86_64.rpm
error: Failed dependencies:
	libmpc.so.3()(64bit) is needed by cpp-4.8.5-36.el7.x86_64
	libmpfr.so.4()(64bit) is needed by cpp-4.8.5-36.el7.x86_64
提示缺少libmpc和libmpfr,只好老老实实地根据提示来继续:
安装libmpc
[root@localhost gcc]# rpm -ivh libmpc-1.0.1-3.el7.x86_64.rpm
error: Failed dependencies:
	libmpfr.so.4()(64bit) is needed by libmpc-1.0.1-3.el7.x86_64
好吧……看来在最后的才是最底层的依赖……
安装mpfr
[root@localhost gcc]# rpm -ivh mpfr-3.1.1-4.el7.x86_64.rpm
Preparing...                          ################################# [100%]
Updating / installing...
   1:mpfr-3.1.1-4.el7                 ################################# [100%]
mpfr安装成功,继续尝试安装mpc:
[root@localhost gcc]# rpm -ivh libmpc-1.0.1-3.el7.x86_64.rpm
Preparing...                          ################################# [100%]
Updating / installing...
   1:libmpc-1.0.1-3.el7               ################################# [100%]
安装cpp:
[root@localhost gcc]# rpm -ivh cpp-4.8.5-36.el7.x86_64.rpm
Preparing...                          ################################# [100%]
Updating / installing...
   1:cpp-4.8.5-36.el7                 ################################# [100%]
安装gomp
[root@localhost gcc]# rpm -ivh libgomp-4.8.5-36.el7.x86_64.rpm
Preparing...                          ################################# [100%]
	package libgomp-4.8.5-39.el7.x86_64 (which is newer than libgomp-4.8.5-36.el7.x86_64) is already installed
	file /usr/lib64/libgomp.so.1.0.0 from install of libgomp-4.8.5-36.el7.x86_64 conflicts with file from package libgomp-4.8.5-39.el7.x86_64
显示安装包冲突了,google搜索了一下,决定将造成冲突的安装包卸载1:
yum remove libgomp
查看卸载结果,发现原来是之前安装的lsb的时候,会把libgomp也给安装了……坑无处不在啊
Dependency Removed:
  gettext.x86_64 0:0.19.8.1-3.el7                 gettext-libs.x86_64 0:0.19.8.1-3.el7                redhat-lsb.x86_64 0:4.1-27.el7.centos.1               redhat-lsb-core.x86_64 0:4.1-27.el7.centos.1
  redhat-lsb-cxx.x86_64 0:4.1-27.el7.centos.1     redhat-lsb-desktop.x86_64 0:4.1-27.el7.centos.1     redhat-lsb-languages.x86_64 0:4.1-27.el7.centos.1     redhat-lsb-printing.x86_64 0:4.1-27.el7.centos.1
再次安装libgomp:
[root@localhost gcc]# rpm -ivh libgomp-4.8.5-36.el7.x86_64.rpm
Preparing...                          ################################# [100%]
Updating / installing...
   1:libgomp-4.8.5-36.el7             ################################# [100%]
安装glibc-devel
[root@localhost rpm]# rpm -ivh glibc-devel-2.17-260.el7.x86_64.rpm
error: Failed dependencies:
	glibc-headers is needed by glibc-devel-2.17-260.el7.x86_64
	glibc-headers = 2.17-260.el7 is needed by glibc-devel-2.17-260.el7.x86_64
需要glibc-headers依赖:
[root@localhost rpm]# rpm -ivh glibc-headers-2.17-260.el7.x86_64.rpm
error: Failed dependencies:
	kernel-headers is needed by glibc-headers-2.17-260.el7.x86_64
	kernel-headers >= 2.2.1 is needed by glibc-headers-2.17-260.el7.x86_64
需要kernel-headers依赖:
[root@localhost rpm]# rpm -ivh kernel-headers-3.10.0-957.el7.x86_64.rpm
Preparing...                          ################################# [100%]
Updating / installing...
   1:kernel-headers-3.10.0-957.el7    ################################# [100%]
综上,glibc-devel及其依赖安装顺序:
kernel-headers
glibc-headers
glibc-devel
以上依赖均安装成功后,再次尝试安装gcc:
[root@localhost gcc]# rpm -ivh gcc-4.8.5-36.el7.x86_64.rpm
Preparing...                          ################################# [100%]
Updating / installing...
   1:gcc-4.8.5-36.el7                 ################################# [100%]
安装完成,查看gcc版本:
[root@localhost gcc]# gcc -v
Using built-in specs.
COLLECT_GCC=gcc
gcc version 4.8.5 20150623 (Red Hat 4.8.5-36) (GCC)
说明安装成功!
gcc安装小结
综上踩坑过程,本机上gcc各依赖包的安装顺序为:
mpfr
libmpc
cpp
libgomp
kernel-headers
glibc-headers
glibc-devel
gcc
但可能因为环境的不同,操作系统会给出不同的错误提示,可能需要安装的依赖也会不同。关键还是要积极地去发现问题。
安装
g++
由于升级的过程中还会用到g++,因此检查一下g++:
[root@localhost gcc]# g++ -v
-bash: g++: command not found
看来又的趟坑了……
参照安装gcc的过程,同样找到g++安装包(gcc-c++):

g++及其依赖包安装顺序如下:
libstdc++-devel
gcc-c++
安装完成后:
[root@localhost gcc]# g++ -v
Using built-in specs.
COLLECT_GCC=g++gcc version 4.8.5 20150623 (Red Hat 4.8.5-36) (GCC)
升级到8.3
以下开始着手将gcc由4.8.5升级到8.3。
继续踩坑
以下仅为踩坑过程记录。具体安装步骤请移步至:gcc升级小结。
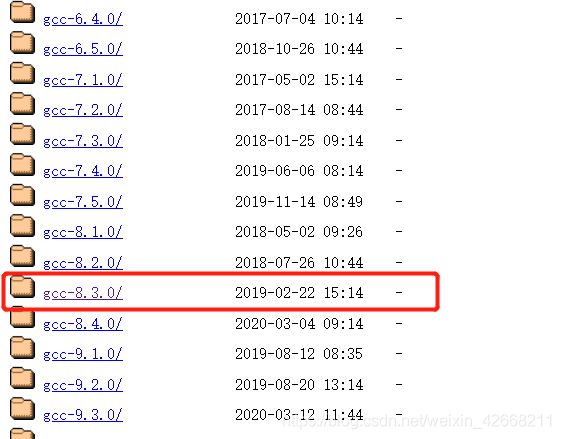
首先是安装包的获取:gcc官网选择合适的镜像下载:

这里选择gcc-8.3.0:

将文件进行解压:tar -zxvf gcc-8.3.0.tar.gz,得到gcc-8.3.0文件夹,再于同级目录新建gcc-build文件夹,作为编译目录,并cd gcc-build进入编译目录。
执行以下命令,开始编译2:
[root@localhost gcc-build]# ../gcc-8.3.0/configure --enable-checking=release --enable-language=c,c++ --disable-multilib
--enable-languages表示你要让你的gcc支持哪些语言,--disable-multilib不生成编译为其他平台可执行代码的交叉编译器。--disable-checking生成的编译器在编译过程中不做额外检查,也可以使用--enable-checking=xxx来增加一些检查2。更多选项参见:https://gcc.gnu.org/install/configure.html,或执行./configure --help查看。
执行结果如下:
configure: error: Building GCC requires GMP 4.2+, MPFR 2.4.0+ and MPC 0.8.0+.
Try the --with-gmp, --with-mpfr and/or --with-mpc options to specify
their locations.  Source code for these libraries can be found at
their respective hosting sites as well as at
ftp://gcc.gnu.org/pub/gcc/infrastructure/.  See also
http://gcc.gnu.org/install/prerequisites.html for additional info.  If
you obtained GMP, MPFR and/or MPC from a vendor distribution package,
make sure that you have installed both the libraries and the header
files.  They may be located in separate packages.
提示编译gcc需要gmp>=4.2,mpfr>=2.4.0,mpc>=0.8.0。
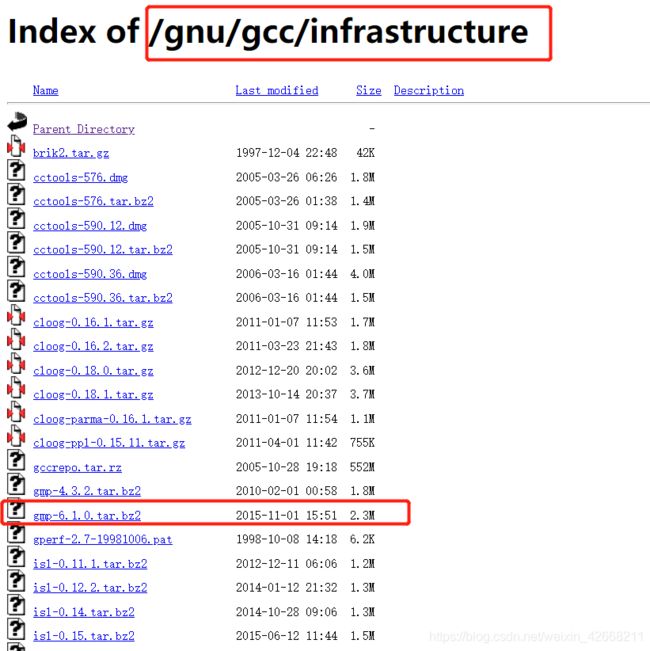
回到刚才下载gcc的网站,进入/gnu/gcc/infrastructure录,即可找到所需依赖:

分别下载mpc、mpfr和gmp。
经过踩坑,确定了上述三个依赖的安装顺序(箭头指向为依赖关系):
m4<-gmp <- mpfr <- mpc(没错,又冒出来个m4)
安装m4:
而gmp又依赖于m4,下载地址:http://ftp.gnu.org/gnu/m4/。
[root@localhost m4-1.4.18]# tar -zxvf m4-1.4.18.tar.gz
[root@localhost m4-1.4.18]# cd m4-1.4.18
[root@localhost m4-1.4.18]# ./configure
[root@localhost m4-1.4.18]# make
[root@localhost m4-1.4.18]# make install
[root@localhost m4-1.4.18]# make clean
安装gmp:
[root@localhost upgrade]# tar -jxvf gmp-6.1.0.tar.bz2
[root@localhost upgrade]# cd gmp-6.1.0
[root@localhost gmp-6.1.0]# ./configure
[root@localhost gmp-6.1.0]# make -j4   # 加快编译速度
[root@localhost gmp-6.1.0]# make install
[root@localhost gmp-6.1.0]# make clean
安装mpfr:
[root@localhost upgrade]# tar -jxvf mpfr-3.1.4.tar.bz2
[root@localhost upgrade]# cd mpfr-3.1.4
[root@localhost mpfr-3.1.4]# ./configure
[root@localhost mpfr-3.1.4]# make -j4
[root@localhost mpfr-3.1.4]# make install
[root@localhost mpfr-3.1.4]# make clean
安装mpc:
[root@localhost upgrade]# tar -zxvf mpc-1.0.3.tar.gz
[root@localhost upgrade]# cd mpc-1.0.3
[root@localhost mpc-1.0.3]# ./configure
[root@localhost mpc-1.0.3]# make -j4
[root@localhost mpc-1.0.3]# make install
[root@localhost mpc-1.0.3]# make clean
至此,最初的错误提示中所列出的依赖均安装完成。继续尝试编译gcc:
[root@localhost gcc-build]# ../gcc-8.3.0/configure --enable-checking=release --enable-language=c,c++ --disable-multilib
结果又出幺蛾子了……提示消息如下:

需要isl>=0.15。那只能老老实实地安装了(在/gnu/gcc/infrastructure下可找到isl):
[root@localhost upgrade]# tar -jxvf isl-0.18.tar.bz2
[root@localhost upgrade]# cd isl-0.18
[root@localhost isl-0.18]# ./configure
[root@localhost isl-0.18]# make -j4
[root@localhost isl-0.18]# make install
[root@localhost isl-0.18]# make clean
再次尝试执行configure:

显示isl的问题已经解决,开始进行编译:
会花费较长的时间,是时候来杯茶压压惊了……
等会儿……茶还没喝两口呢,这幺蛾子又找上门了:

libisl.so.15:cannot open shared object file: No such file or directory
找不到libisl.so.15,难道刚才isl没安装成功?执行命令:
find / -name libisl.so.15
发现该文件位于:/usr/local/include下。由于之前踩过类似的坑,所以尝试把该文件复制到/usr/lib64下,再次对gcc执行make,似乎一切又正常进行了……
编译的时间真的太长了……
gcc升级小结
gcc安装包及其依赖包获取:
gcc:http://mirror.linux-ia64.org/gnu/gcc/releases/
m4:http://ftp.gnu.org/gnu/m4/
gmp+mpfr+mpc+isl:http://mirror.linux-ia64.org/gnu/gcc/infrastructure/
关于gcc的升级,目前发现有两种姿势,不过在开始这两种姿势之前都需要先安装m4:
tar -zxvf m4-1.4.18.tar.gz
cd m4-1.4.18
./configure
make
make install
make clean
第1种姿势——依次安装
即,按照顺序依次安装:gmp、mpfr、mpc、isl、gcc。
gmp:
tar -jxvf gmp-6.1.0.tar.bz2
cd gmp-6.1.0
./configure
make -j4   # 加快编译速度
make install
make clean
说明一下,bz2的文件的解压需要依赖bzip2这个库,可执行:yum search bzip2来查找安装包。离线可参照gcc的离线安装来安装bzip2。
参照gmp的安装命令依次安装mpfr、mpc、isl。
说明:isl安装完成后,需将libisl.so.15复制到/usr/lib64下。
gcc:
tar -zxvf gcc-8.3.0.tar.gz
cd gcc-8.3.0
./configure --enable-checking=release --enable-language=c,c++ --disable-multilib
make -j4
make install
make clean
安装完成后,执行一下命令检查:
gcc -v && g++ -v
结果:
至此,升级成功(若gcc版本仍未发生变化,则需重启生效)。
第2种姿势——建立软链接,一次完成
首先对gcc进行解压并进入目录:
tar -zxvf gcc-8.3.0.tar.gz
cd gcc-8.3.0
在gcc-8.3.0目录下分别对gmp、mpfr、mpc、isl进行解压:
tar -jxvf ../gmp-6.1.0.tar.bz2
tar -jxvf ../mpfr-3.1.4.tar.bz2
tar -zxvf ../mpc-1.0.3.tar.gz
tar -jxvf ../isl-0.18.tar.bz2
至此,上述四个依赖文件均已被解压到gcc-8.3.0目录下。
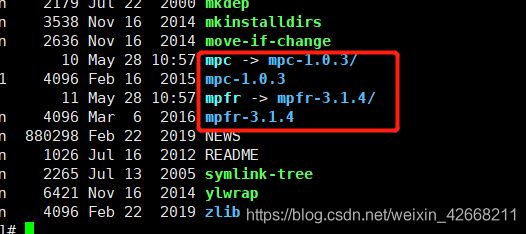
关键一步,建立软链接:
ln -s gmp-6.1.0 gmp
ln -s mpfr-3.1.4 mpfr
ln -s mpc-1.0.3 mpc
ln -s isl-0.18 isl
结果如下图:


然后,便可重复第1种姿势中的方式编译安装gcc:
./configure --enable-checking=release --enable-language=c,c++ --disable-multilib
make -j4
make install
make clean
至此,升级完成。
在这个过程中踩了很多坑,也了解了很多东西。关键还是要善于发现问题的所在。在此记录一下。
不过虽然成功完成升级了,但过程中涉及到的很多东西,连知其然都还没发做到,学习之路才刚开始啊。
参考:
https://blog.csdn.net/beyondlpf/article/details/9818009?utm_medium=distribute.pc_relevant.none-task-blog-BlogCommendFromMachineLearnPai2-1.nonecase&depth_1-utm_source=distribute.pc_relevant.none-task-blog-BlogCommendFromMachineLearnPai2-1.nonecase ↩︎
https://www.cnblogs.com/lizhenghn/p/3550996.html ↩︎ ↩︎

