Android学习笔记の三
Android学习笔记の三
Activity的生命周期
android的任务是放在返回栈中的,也就是说,我们每打开一个Activity,它就会被放在返回栈的栈顶,销毁一个Activity时,这个处于栈顶的Activity就会弹栈。
系统总是会显示栈顶的Activity给用户。
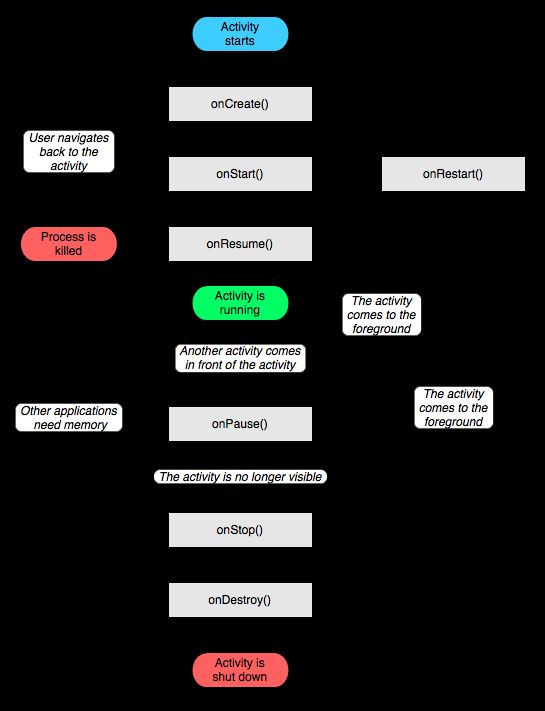
Activity的生存期
- onCteate():在Activity第一次调用被执行,进行初始化操作。
- onStart():Activity由不可见变为可见时调用。
- onResume():Activity准备好和用户交互时调用。
- onPause():系统准备去启动或恢复另一个Activity时调用(通常在这里释放消耗CPU的资源,以及保存关键数据)。
- onStop():Activity**完全不可见**时调用。
- onDestroy():Activity销毁之前调用。
- onRestart():有停止状态变为运行状态前调用。
除onRestart之外,其他6个方法两两对应:
onCreate()和onDestroy()之间是完整生存期
onStart()和onStop()之间是可见生存期
onResume()和onPause()之间是前台生存期
我们来通过程序直观体验一下:
新建一个项目,添加NormalActivity和DialogActivity,它们的布局分别是normal_layout, dialog_layout。
normal_layout.xml:
<LinearLayout xmlns:android="http://schemas.android.com/apk/res/android"
    android:layout_width="match_parent"
    android:layout_height="match_parent"
    android:orientation="vertical" >

    <TextView
        android:layout_width="match_parent"
        android:layout_height="wrap_content"
        android:text="@string/normal" />


LinearLayout>
dialog_layout.xml:
<LinearLayout xmlns:android="http://schemas.android.com/apk/res/android"
    android:layout_width="match_parent"
    android:layout_height="match_parent"
    android:orientation="vertical" >

    <TextView
        android:layout_width="match_parent"
        android:layout_height="wrap_content"
        android:text="@string/dialog" />


LinearLayout>
NormalActivity.java:
public class NormalActivity extends Activity{

    protected void onCreate(Bundle savedInstanceState){
        super.onCreate(savedInstanceState);
        requestWindowFeature(Window.FEATURE_NO_TITLE);
        setContentView(R.layout.normal_layout);
    }
}
DialogActivity.java:
public class DialogActivity extends Activity{

    protected void onCreate(Bundle savedInstanceState){
        super.onCreate(savedInstanceState);
        requestWindowFeature(Window.FEATURE_NO_TITLE);
        setContentView(R.layout.dialog_layout);
    }
}
看到DialogActivity的名字就知道,它不是一般的Activity,而是对话框形式。那么怎么才能把看似普通实际就是很普通的Activity变成对话框呢?看下面。。。
在AndroidManifest.xml中添加:
<activity android:name=".NormalActivity">activity>
<activity android:name=".DialogActivity"
          android:theme="@android:style/Theme.Dialog">
activity>
这样就给DialogActivity设置了对话框主题,这里@android:style/Theme.Dialog是系统内置的主题,当然你也可以定制自己的主题。
在activity_main.xml添加
然后修改MainActivity.java
public class MainActivity extends Activity {

    public static final String TAG = "MainActivity";
    @Override
    protected void onCreate(Bundle savedInstanceState) {
        super.onCreate(savedInstanceState);
        Log.d(TAG, "onCreate");
        requestWindowFeature(Window.FEATURE_NO_TITLE);
        setContentView(R.layout.activity_main);
        Button startNormal = (Button)findViewById(R.id.start_normal);
        Button startDialog = (Button)findViewById(R.id.start_dialog);
        startNormal.setOnClickListener(new OnClickListener(){

            @Override
            public void onClick(View v) {
                // TODO Auto-generated method stub
                Intent intent = new Intent(MainActivity.this, NormalActivity.class);
                startActivity(intent);
            }

        });
        startDialog.setOnClickListener(new OnClickListener(){

            @Override
            public void onClick(View v) {
                // TODO Auto-generated method stub
                Intent intent = new Intent(MainActivity.this, DialogActivity.class);
                startActivity(intent);
            }

        });
    }

    protected void onStart(){
        super.onStart();
        Log.d(TAG, "onStart");
    }

    protected void onResume(){
        super.onResume();
        Log.d(TAG, "onResume");
    }

    protected void onPause(){
        super.onPause();
        Log.d(TAG, "onPause");
    }

    protected void onStop(){
        super.onStop();
        Log.d(TAG, "onStop");
    }

    protected void onDestroy(){
        super.onDestroy();
        Log.d(TAG, "onDestroy");
    }

    protected void onRestart(){
        super.onRestart();
        Log.d(TAG, "onRestart");
    }

}我们点一下Start NormalActivity:


NormalActivity已经完全把MainActivity遮住了,所以执行了onPause和onStop方法,现在我们按返回键

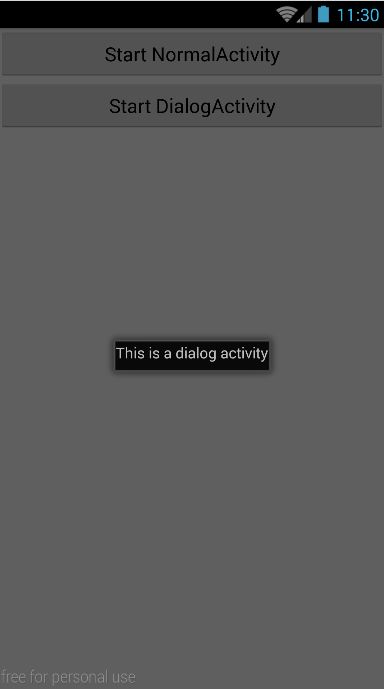
然后再启动Dialog


这里只执行了onPause是因为MainActivity还可见,没有被完全遮住。
最后我们返回到MainActivity在按下返回键

果然onPause,onStop和onDestroy被依次执行了
如果Activity不幸被系统回收,而你需要其中的临时数据
有没有想过onCreate的参数是干啥使的?没错!就是保存临时数据的
记一发模板。
在Activity中添加
protected void onSaveInstanceState(Bundle outState){
        super.onSaveInstanceState(outState);
        String tempData = "Some thing you just typed";
        outState.putString("data_key", tempData);
    }
这样数据就保存下来了,再从onCreate中取出就行啦~
if (savedInstanceState != null){
            String tempData = savedInstanceState.getString("data_key");
            Log.d(TAG, tempData);
}
Activity启动模式
简单介绍一下活动的启动模式。
standard
每当启动一个新活动,就会将它置于栈顶,每次启动都会创建一个新的实例。
也就是说如果你启动3次MyActivity,那么要按3次返回键才能返回。
(Q:怎么启动3次?A:Intent(MyActiity.this, MyActivity.class),随便你启动多少次都行。)
singleTop
启动一个活动时,如果发现它是栈顶就不创建,否则就创建新的实例。
singleTask
在创建一个活动时,会判断栈里边是否有这个活动。如果有,就将这个活动上边的活动统统出栈;没有就创建一个。
singleInstance
给这个活动单设一个栈!
简单介绍完了。那么如何设置启动模式呢?
在AndroidManifest.xml中,在需要设置的活动中添加
android:launchMode=”singleTop”。
standard是默认模式无需设置~


