http://www.jb51.net/article/97434.htm
二、安装Apache httpd
安装httpd以配置Web服务器, HTTP使用80 / TCP
|
1
2
3
4
5
6
7
8
9
10
11
12
13
14
15
16
17
18
19
20
21
22
23
24
25
26
27
28
29
30
31
32
33
34
35
|
[1] 安装 httpd.
[root@linuxprobe ~]
# yum -y install httpd
# 删除默认欢迎页面
[root@linuxprobe ~]
# rm -f /etc/httpd/conf.d/welcome.conf
[2] 配置httpd,将服务器名称替换为您自己的环境
[root@linuxprobe ~]
# vi /etc/httpd/conf/httpd.conf
# line 86: 改变管理员的邮箱地址
ServerAdmin [email protected]
# line 95: 改变域名信息
ServerName www.linuxprobe.org:80
# line 151: none变成All
AllowOverride All
# line 164: 添加只能使用目录名称访问的文件名
DirectoryIndex index.html index.cgi index.php
# add follows to the end
# server's response header(安全性)
ServerTokens Prod
# keepalive is ON
KeepAlive On
[root@linuxprobe ~]
# systemctl start httpd
[root@linuxprobe ~]
# systemctl enable httpd
[3] 如果Firewalld正在运行,请允许HTTP服务。,HTTP使用80 / TCP
[root@linuxprobe ~]
# firewall-cmd --add-service=http --permanent
success
[root@linuxprobe ~]
# firewall-cmd --reload
success
[4] 创建一个HTML测试页,并使用Web浏览器从客户端PC访问它。如果显示以下页面,是正确的
[root@linuxprobe ~]
# vi /var/www/html/index.html
|
三、支持Perl
启用CGI执行并使用Perl脚本
|
1
2
3
4
5
6
7
8
9
10
11
12
13
14
15
16
17
18
19
20
21
22
23
24
25
26
27
28
29
30
|
[1] 安装Perl.
[root@linuxprobe ~]
# yum -y install perl perl-CGI
[2] 默认情况下,在“
/var/www/cgi-bin
”目录下允许CGI。
可以使用Perl Scripts放在目录下。然而,它下面的所有文件都被处理为CGI。
# 下面的设置是CGI的设置
[root@linuxprobe ~]
# grep -n "^ *ScriptAlias" /etc/httpd/conf/httpd.conf
247: ScriptAlias
/cgi-bin/
"/var/www/cgi-bin/"
[3] 如果你想允许在其他目录中的CGI,配置如下。
例如,在“
/var/www/html/cgi-enabled
”中允许。
[root@linuxprobe ~]
# vi /etc/httpd/conf.d/cgi-enabled.conf
# create new
# processes .cgi and .pl as CGI scripts
Options +ExecCGI
AddHandler cgi-script .cgi .pl
<
/Directory
>
[root@linuxprobe ~]
# systemctl restart httpd
[4] 如果SELinux被启用,并且允许CGI在不是像上面[3]的默认目录下,更改规则如下。
[root@linuxprobe ~]
# chcon -R -t httpd_sys_script_exec_t /var/linuxprobe/html/cgi-enabled
[root@linuxprobe ~]
# semanage fcontext -a -t httpd_sys_script_exec_t /var/www/html/cgi-enabled
[5] 创建一个CGI测试页面,并使用Web浏览器从客户端PC访问它。如果显示以下页面,说明配置正确。
[root@linuxprobe ~]
# vi /var/www/html/cgi-enabled/index.cgi
#!/usr/bin/perl
print
"Content-type: text/html\n\n"
;
print
"\n\n"
;
print
"
;
print
"\n\n"
;
[root@linuxprobe ~]
# chmod 705 /var/www/html/cgi-enabled/index.cgi
|
配置httpd以使用PHP脚本
[1] 安装PHP.
|
1
2
3
4
5
|
[root@linuxprobe ~]
# yum -y install php php-mbstring php-pear
[root@linuxprobe ~]
# vi /etc/php.ini
# line 878: 取消注释,设置时区
date
.timezone =
"Asia/Shanghai"
[root@linuxprobe ~]
# systemctl restart httpd
|
[2] 创建一个PHP测试页面,并使用Web浏览器从客户端PC访问它。如果显示以下页面,它是确定。
|
1
2
3
4
5
6
7
8
9
10
|
[root@linuxprobe ~]
# vi /var/www/html/index.php
|
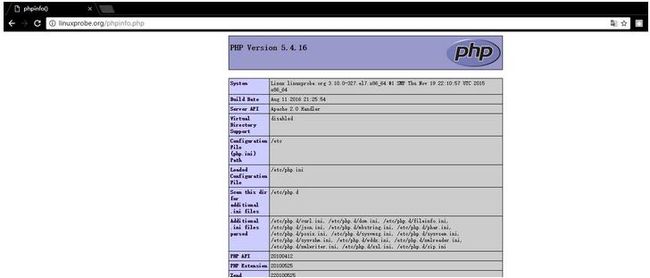
[3] 创建phpinfo测试页,确认是都开启php支持
[root@linuxprobe ~]# echo "" > /var/www/html/phpinfo.php
九、创建SSL证书
创建自己的SSL证书。但是,如果您使用您的服务器作为业务,最好购买和使用来自Verisigh的正式证书等。
|
1
2
3
4
5
6
7
8
9
10
11
12
13
14
15
16
17
18
19
20
21
22
23
24
25
26
27
28
29
30
31
32
33
34
35
36
37
38
39
40
41
42
|
[root@linuxprobe ~]
# cd /etc/pki/tls/cert
cert.pem certs/
[root@linuxprobe ~]
# cd /etc/pki/tls/certs/
[root@linuxprobe certs]
# make server.key
umask
77 ; \
/usr/bin/openssl
genrsa -aes128 2048 > server.key
Generating RSA private key, 2048 bit long modulus
...............................................................+++
....................................................................................................+++
e is 65537 (0x10001)
Enter pass phrase:
Verifying - Enter pass phrase:
[root@linuxprobe certs]
# openssl rsa -in server.key -out server.key
Enter pass phrase
for
server.key:
writing RSA key
[root@linuxprobe certs]
# make server.csr
umask
77 ; \
/usr/bin/openssl
req -utf8 -new -key server.key -out server.csr
You are about to be asked to enter information that will be incorporated
into your certificate request.
What you are about to enter is what is called a Distinguished Name or a DN.
There are quite a few fields but you can leave some blank
For some fields there will be a default value,
If you enter
'.'
, the field will be left blank.
-----
Country Name (2 letter code) [XX]:CN
#国家后缀
State or Province Name (full name) []:Shanghai
#省
Locality Name (eg, city) [Default City]:Shanghai
#市
Organization Name (eg, company) [Default Company Ltd]:LinuxProbe
#公司
Organizational Unit Name (eg, section) []:DevOps
#部门
Common Name (eg, your name or your server's
hostname
) []:linuxprobe.org
#主机名
Email Address []:[email protected]
#邮箱
Please enter the following
'extra'
attributes
to be sent with your certificate request
A challenge password []:
#默认
An optional company name []:
#默认
#
[root@linuxprobe certs]
# openssl x509 -in server.csr -out server.crt -req -signkey server.key -days 3650
Signature ok
subject=
/C
=CN
/ST
=Shanghai
/L
=Shanghai
/O
=LinuxProbe
/OU
=DevOps
/CN
=linuxprobe.org
/emailAddress
[email protected]
Getting Private key
|
十、配置SSL
[1] 配置SSL.
|
1
2
3
4
5
6
7
8
9
10
11
12
13
14
|
[root@linuxprobe ~]
# yum -y install mod_ssl
[root@linuxprobe ~]
# vi /etc/httpd/conf.d/ssl.conf
# line 59: 取消注释
DocumentRoot
"/var/www/html"
# line 60: 取消注释,定义域名
ServerName linuxprobe.org:443
# line 75: 改变SSLProtocol
SSLProtocol -All +TLSv1 +TLSv1.1 +TLSv1.2
# line 100: 改成刚刚创建的server.crt
SSLCertificateFile
/etc/pki/tls/certs/server
.crt
# line 107: 改成刚刚创建的server.key
SSLCertificateKeyFile
/etc/pki/tls/certs/server
.key
[root@www ~]
# systemctl restart httpd
|
[2] 如果Firewalld正在运行,请允许HTTPS服务。 HTTPS使用443 / TCP
|
1
2
3
4
|
[root@www ~]
# firewall-cmd --add-service=https --permanent
success
[root@www ~]
# firewall-cmd --reload
success
|
十一、启用基本身份验证
启用基本身份验证以限制特定网页的访问
[1]例如,在目录[/var/www/html/auth-basic]下设置基本身份验证设置。
|
1
2
3
4
5
6
7
8
9
10
11
12
13
14
15
16
17
18
19
20
21
22
23
24
25
26
27
28
29
|
[root@linuxprobe ~]
# vi /etc/httpd/conf.d/auth_basic.conf
# 创建新配置文件
AuthType Basic
AuthName
"Basic Authentication"
AuthUserFile
/etc/httpd/conf/
.htpasswd
require valid-user
<
/Directory
>
# 添加用户:使用“-c”创建新文件(仅为初始注册添加“-c”选项)
[root@linuxprobe ~]
# htpasswd -c /etc/httpd/conf/.htpasswd wang
New password:
# set password
Re-
type
new password:
# confirm
Adding password
for
user wang
[root@linuxprobe ~]
# systemctl restart httpd
[root@linuxprobe ~]
# mkdir /var/www/html/auth-basic
[root@linuxprobe ~]
# vi /var/www/html/auth-basic/index.html
# create a test page
|